
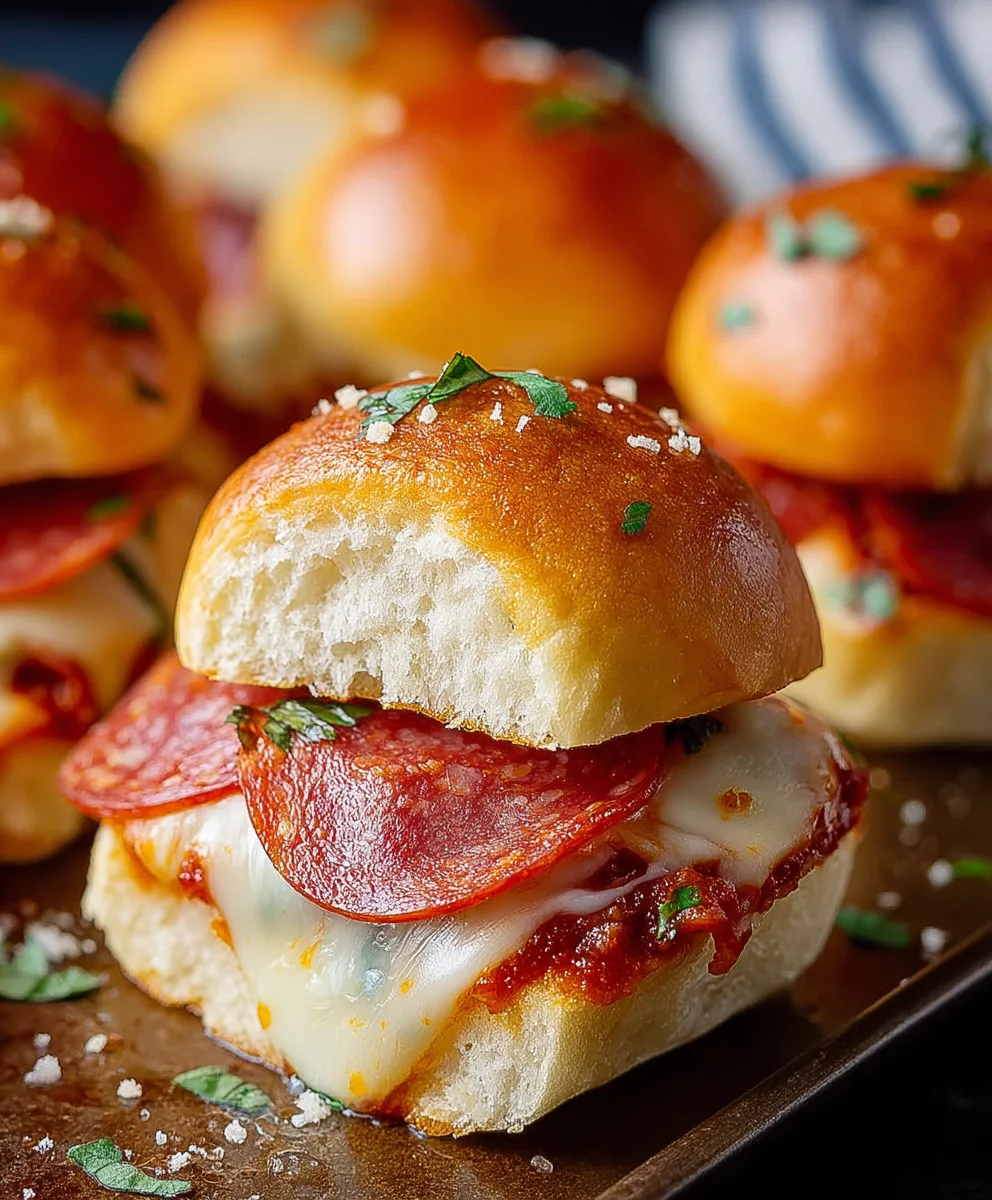
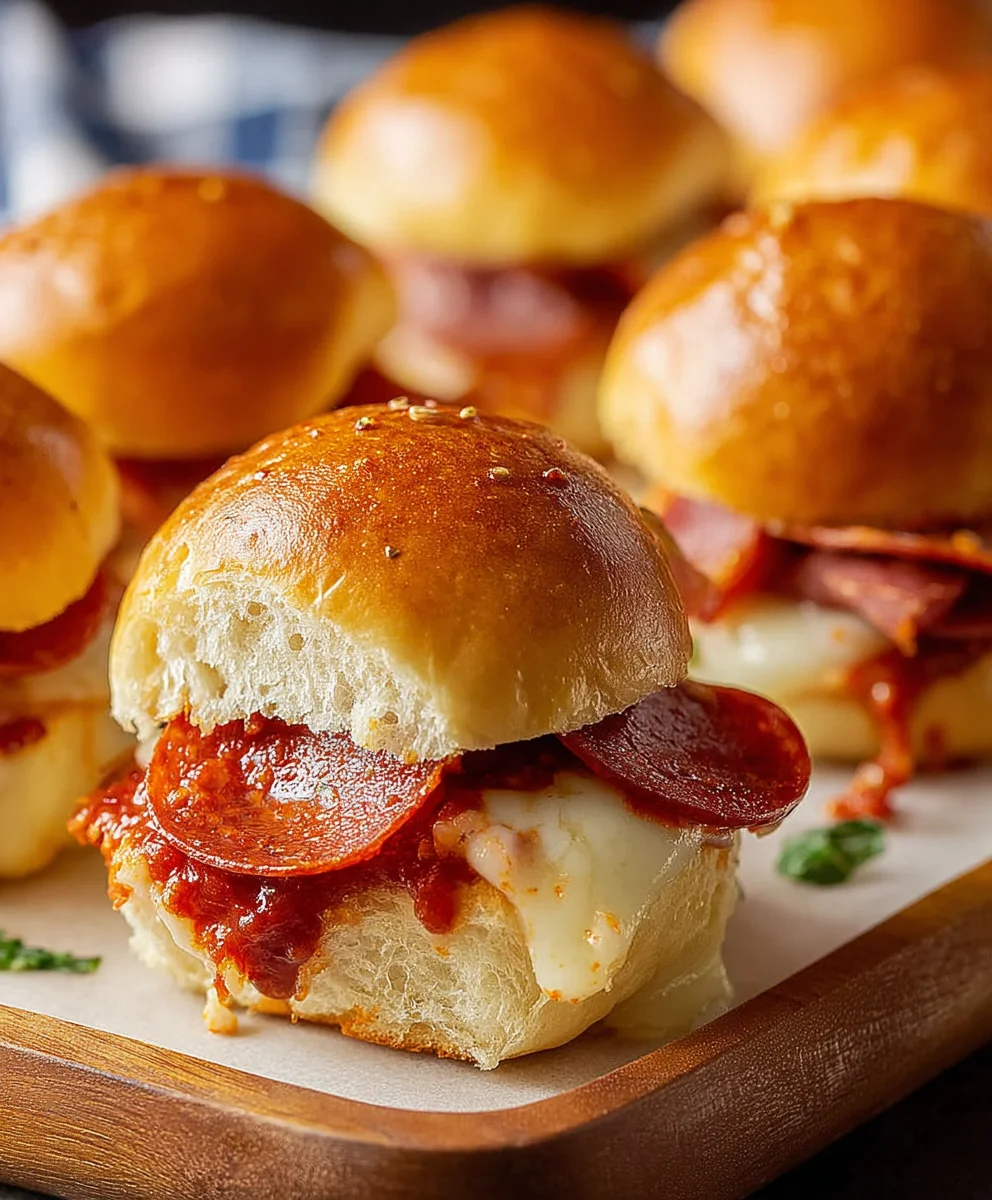
Beef Pepperoni Pizza Sliders are about to become your new favorite culinary creation, effortlessly blending the timeless comfort of pizza with the undeniable appeal of a handheld treat! I’m absolutely thrilled to share a recipe that promises to be a game-changer for your next gathering, family dinner, or even just a cozy night in. Imagine biting into a warm, soft slider bun, bursting with tangy pizza sauce, savory beef pepperoni, and gooey, melted mozzarella. This isn’t just a snack; it’s a miniature flavor explosion that brings all the joy of a classic pizza into a delightfully convenient, handheld package.
While the concept of pizza hails from ancient Naples, evolving into the beloved global phenomenon we know today, the “slider” format is a more recent, ingenious American culinary innovation, perfect for communal dining and easy enjoyment. These sliders cleverly fuse the timeless appeal of pepperoni pizza with the irresistible charm of bite-sized sandwiches, making them an instant crowd-pleaser.
I’ve found that people absolutely adore these for countless reasons. Their convenience is unparalleled; they’re incredibly quick to assemble and bake, making them ideal for last-minute gatherings or a fun family dinner. The irresistible combination of textures—from the soft, slightly sweet Hawaiian rolls to the crispy edges of the beef pepperoni and the luscious stretch of golden cheese—creates a truly satisfying experience. Whether you’re hosting a game day party, packing a fun lunch, or simply craving a comforting treat, these Beef Pepperoni Pizza Sliders are guaranteed to be a massive hit, disappearing from the platter faster than you can say “more pizza!”
Ingredients:
Crafting delicious Beef Pepperoni Pizza Sliders is an incredibly rewarding experience, and one of the best parts is just how adaptable this recipe is! While the foundational elements of slider buns, savory pepperoni, and gooey cheese are what make them irresistibly good, the following bullet points represent fantastic customization options that can transform your sliders into entirely new culinary adventures. These aren’t just add-ons; they are gateways to new flavors, allowing you to tailor your batch to suit any craving or dietary preference. Let’s explore how you can elevate your pizza slider game:
- Try a veggie version with sautéed mushrooms, bell peppers and onions (just make sure to pre-cook and drain well).
- For meat lovers, add a layer of cooked Italian sausage under the pepperoni.
- Make a white pizza version using alfredo sauce instead of marinara, topped with spinach, chicken and mozzarella.
Beyond these exciting variations, you’ll, of course, need a few core ingredients to bring any batch of these sliders to life. Think about a 12-pack of soft slider buns (King’s Hawaiian sweet rolls are a personal favorite for their delightful touch of sweetness!), approximately 1.5 cups of your preferred marinara sauce (unless you’re venturing into the white pizza territory!), a generous 2 cups of shredded mozzarella or a complementary pizza cheese blend, and a hearty 4-6 ounces of high-quality beef pepperoni slices. Don’t forget about 1/4 cup of melted unsalted butter mixed with 1/2 teaspoon of garlic powder – this magical topping brush-on is what gives the buns that irresistible golden, savory crust!
Prepping Your Workspace and Components
Before we dive into the delightful assembly of our Beef Pepperoni Pizza Sliders, a little preparation goes a long way in ensuring a smooth and enjoyable cooking experience. Gathering and pre-treating your ingredients, especially when incorporating our fantastic variations, is key to preventing soggy sliders and maximizing flavor. I always find that having everything prepped and within easy reach makes the process feel less like a chore and more like a fun culinary project!
- Preheat Your Oven and Prep Your Pan: First things first, let’s get that oven ready. Preheat your oven to a comfortable 375°F (190°C). While it’s heating, grab a standard 9×13-inch baking dish. A light spray with non-stick cooking spray or a thin smear of butter will ensure your sliders don’t stick and are easy to remove later. This small step saves a lot of frustration!
- Prepare Your Slider Buns: The foundation of our sliders! Take your entire slab of 12 slider buns and, using a large serrated knife, carefully slice them horizontally through the middle, separating the top halves from the bottom halves without breaking them apart individually. This creates two large ‘sheets’ of bread. Gently place the bottom half of the buns into your prepared baking dish. Keep the top half nearby, ready for later.
- Execute Your Chosen Variations with Precision: This is where our incredible customization options truly shine, and proper preparation is paramount. Let’s tackle them one by one based on your selection for today’s batch:
- For the Veggie Version (Mushrooms, Bell Peppers, and Onions): If you’re taking the suggestion to “Try a veggie version with sautéed mushrooms, bell peppers and onions (just make sure to pre-cook and drain well),” this step is critical. Dice about 1 cup of fresh mushrooms (cremini or button work wonderfully), half a bell pepper (red, green, or yellow – your choice for color and sweetness!), and half a small onion into small, uniform pieces. Heat a tablespoon of olive oil in a skillet over medium heat. Add your diced veggies and sauté them until they are significantly softened and most of their moisture has evaporated. This process usually takes about 8-10 minutes. The goal here isn’t just to cook them, but to truly dry them out. Excess moisture from vegetables is the number one culprit for soggy slider buns. Once they’re tender and slightly caramelized, transfer them to a plate lined with a paper towel and gently press down to absorb any remaining liquid. Let them cool slightly before assembly. This meticulous “pre-cook and drain well” is your secret weapon against mushiness!
- For the Meat Lovers’ Boost (Italian Sausage Layer): For those of you who “For meat lovers, add a layer of cooked Italian sausage under the pepperoni,” now’s the time to prepare this savory addition. In a separate skillet, brown about half a pound of Italian sausage (mild or spicy, depending on your preference!). As it cooks, use a wooden spoon to break it up into fine crumbles. Once the sausage is fully cooked through and no pink remains, it is absolutely essential to drain off all excess grease. I often place the cooked sausage crumbles on a plate lined with several layers of paper towels and blot them dry. Just like with the veggies, we want flavor-packed meat, not grease that will make our sliders heavy and unpleasant. Set the drained sausage aside to cool slightly.
- For the White Pizza Transformation (Alfredo, Spinach, Chicken): If you’re venturing to “Make a white pizza version using alfredo sauce instead of marinara, topped with spinach, chicken and mozzarella,” your prep will look a little different. Instead of your marinara, ensure you have about 1.5 cups of a good quality alfredo sauce ready. For the toppings, have around 1 cup of cooked, shredded chicken breast. Rotisserie chicken is a fantastic shortcut here, saving you time without sacrificing flavor! If your fresh spinach leaves are particularly large, give about 1-2 cups of them a rough chop; otherwise, whole leaves are fine. There’s no pre-cooking needed for the spinach here, as it will wilt beautifully in the oven. Just ensure your chicken is already cooked and shredded.
By taking the time to properly prepare these elements, we’re setting ourselves up for a truly spectacular batch of sliders that are flavorful, texturally perfect, and utterly satisfying.
Assembling Your Flavor-Packed Sliders
With all our components prepped and ready, the assembly process for these Beef Pepperoni Pizza Sliders is incredibly straightforward and quite fun! Think of it as building delicious mini pizzas, layer by layer, ensuring every bite is packed with the flavors you crave. Whether you’re going classic or embracing our exciting variations, the methodical layering is what brings these sliders to life.
- The Sauce Foundation: This is where our flavor journey begins. If you’re sticking to the classic Beef Pepperoni Pizza Sliders, generously spread about 1 cup of your marinara sauce evenly over the bottom half of the buns in the baking dish. Make sure to get it right to the edges for maximum coverage. However, if you’re making the glorious “white pizza version,” this is your moment to swap out the marinara for your creamy alfredo sauce. Spread about 1.5 cups of alfredo sauce over the bottom buns, creating a rich, luscious base. The sauce is crucial for moisture and flavor, so don’t be shy!
- First Layer of Toppings (Customization Ahead!): Now for the exciting part – building your custom layers!
- If you’re making the Meat Lovers’ version: This is where that delicious, drained Italian sausage comes in! If you’ve chosen to “add a layer of cooked Italian sausage under the pepperoni,” sprinkle your evenly browned and thoroughly drained Italian sausage crumbles over the sauce. Distribute it well so every slider gets a taste of that savory goodness. This extra layer of meatiness truly elevates the flavor profile for serious meat lovers.
- If you’re making the Veggie version: For those who opted to “Try a veggie version with sautéed mushrooms, bell peppers and onions,” now is the time to add these vibrant, pre-cooked and drained vegetables. Scatter them evenly over the sauce (or over the Italian sausage if you’re going for a loaded meat & veggie combo!). Their slight caramelization and concentrated flavor will add wonderful depth without making the sliders watery.
- If you’re making the White Pizza version: Over your alfredo sauce, layer your shredded cooked chicken and fresh spinach. The spinach will wilt down beautifully during baking, infusing a lovely freshness into the rich alfredo and chicken combo.
- For Classic Sliders: If you’re sticking with the pure Beef Pepperoni Pizza Slider experience, you’ll skip these initial layers and go straight to the cheese layer next, or add a few pepperoni slices directly on the sauce if you like a double pepperoni layer!
- Cheese, Glorious Cheese! Over your sauce and any optional first layers, sprinkle about half of your shredded mozzarella cheese (roughly 1 cup). This creates a delightful cheesy barrier and helps everything meld together beautifully. For the white pizza version, this is your primary cheese layer, so be generous!
- The Star of the Show: Beef Pepperoni! Now, arrange a generous layer of beef pepperoni slices over the cheese. I like to overlap them slightly to ensure every single slider square gets a good amount of pepperoni. You’ll use about 3-4 ounces here, reserving some if you like a top layer of pepperoni for extra crispiness.
- More Cheese, Because Why Not? Sprinkle the remaining shredded mozzarella cheese (the other 1 cup) over the pepperoni. This top layer of cheese will melt into a gooey blanket, holding everything together and creating that irresistible pizza pull.
- Top It Off: Carefully place the top halves of the slider buns back onto your assembled layers. They should fit snugly over all the delicious fillings.
- The Flavor Crown – Garlic Butter: In a small microwave-safe bowl, melt your 1/4 cup of unsalted butter. Stir in the 1/2 teaspoon of garlic powder until well combined. This isn’t just melted butter; it’s a fragrant, savory elixir that will transform the top of your buns. Using a pastry brush, generously brush this garlic butter mixture all over the tops of the slider buns. Make sure to get into all the nooks and crannies and even down the sides where the buns meet. This butter not only adds incredible flavor but also helps the buns crisp up to a beautiful golden brown.
Baking to Perfection and Serving
The final stage of our Beef Pepperoni Pizza Slider journey is baking, where all the layers melt together into a harmonious, cheesy, and utterly delicious creation. The key here is not just to heat through but to achieve that perfect balance of soft buns, gooey cheese, and flavorful fillings. Trust me, the aroma filling your kitchen at this point will be absolutely intoxicating!
- Cover and Bake (Initial Phase): To ensure the cheese melts evenly and the buns steam gently without getting too brown too quickly, cover your baking dish tightly with aluminum foil. Place the covered dish into your preheated 375°F (190°C) oven. Bake for approximately 15-20 minutes. During this initial baking phase, the heat will circulate, softening the buns, melting the cheese, and warming all the delicious fillings to perfection. You’ll notice the buns starting to puff up slightly and the cheese becoming gloriously bubbly.
- Uncover and Brown (Final Phase): After the initial 15-20 minutes, carefully remove the aluminum foil. This is when we achieve that beautiful golden-brown crust and allow any exposed pepperoni to crisp up. Return the uncovered dish to the oven and continue baking for another 5-10 minutes. Keep a close eye on them during this stage! You’re looking for the tops of the buns to turn a lovely golden brown and the cheese around the edges to be wonderfully bubbly and slightly caramelized. If you want the pepperoni on top to be extra crispy, you can even add a few extra slices of pepperoni at this stage before the final browning.
- Rest and Slice: Once your sliders have reached golden perfection, carefully remove the baking dish from the oven. I know it’s tempting to dive right in, but letting them rest for about 5 minutes before slicing is crucial. This short resting period allows the molten cheese to set just slightly, making the sliders much easier to slice and preventing all the delicious filling from oozing out. After resting, use your serrated knife to cut along the original scores of the buns, separating them into individual sliders. If you’re feeling adventurous, you can even cut them into smaller, bite-sized squares for easier serving at a party.
- Serve Warm and Enjoy!: These Beef Pepperoni Pizza Sliders, whether classic or featuring one of our fantastic variations, are best enjoyed warm straight out of the oven. Arrange them on a platter and serve them with extra marinara sauce for dipping (if you like!), a side salad for a complete meal, or even some ranch dressing for an alternative dipping experience. They make a perfect appetizer for game day, a fun and easy weeknight dinner, or a fantastic party snack that always disappears fast.
No matter which variation you choose to create today – the robust Italian sausage layer for the ultimate meat lovers, the fresh and vibrant sautéed mushrooms, bell peppers, and onions for a delightful veggie twist, or the creamy, indulgent alfredo-based white pizza with spinach and chicken – you’re guaranteed to create a batch of Beef Pepperoni Pizza Sliders that are bursting with flavor and perfectly tailored to your taste. Experiment with these ideas, mix and match, and make them truly your own!
Conclusion:
And there you have it, friends! We’ve journeyed through the simple yet utterly satisfying process of creating a dish that truly stands out in a crowd: our incredible Beef Pepperoni Pizza Sliders. If you’ve been searching for that perfect party appetizer, a delightful weeknight dinner solution, or simply a fun, customizable snack to share with loved ones, then let me tell you, your quest ends here. I truly believe this recipe is an absolute game-changer, bringing together all the comforting flavors of a classic pizza in an incredibly convenient and irresistible slider format. The combination of savory ground beef, zesty pepperoni, gooey melted cheese, and the subtle garlic-herb butter slathered over those soft, pillowy Hawaiian rolls creates a symphony of flavors and textures that is genuinely hard to resist. It’s the kind of dish that disappears from the platter almost as quickly as it takes to prepare, leaving everyone smiling and asking for more.
What makes these sliders a must-try isn’t just their undeniable deliciousness, but also their remarkable ease of preparation. You don’t need to be a gourmet chef to whip up a batch that looks and tastes like it came straight from a five-star pizzeria. The beauty of this recipe lies in its straightforward steps and readily available ingredients, making it accessible for even the most novice of cooks. It’s an ideal choice for those busy evenings when you need something quick and satisfying, but it also shines brightly when you’re entertaining, offering a stress-free option that allows you to spend more time enjoying your guests and less time slaving away in the kitchen. Trust me, once you experience the joy of these savory bites, they’ll quickly become a staple in your culinary repertoire.
Serving Suggestions & Creative Variations to Elevate Your Sliders:
While these Beef Pepperoni Pizza Sliders are fantastic on their own, a few thoughtful additions can transform them into a complete meal or an even more impressive party spread. For dipping, a warm bowl of your favorite marinara sauce is always a classic choice, but don’t shy away from serving them with creamy ranch dressing or even a spicy sriracha mayo for an extra kick. They pair wonderfully with a crisp green salad, perhaps a simple Caesar or a fresh mixed greens salad with a vinaigrette, offering a refreshing contrast to the rich sliders. For a more casual affair, a side of crispy oven-baked potato wedges, tater tots, or even some crunchy kettle chips would be a perfect companion. And let’s not forget the drinks! A cold soda, sparkling water, or even a craft beer would be a fantastic pairing.
The versatility of this recipe is one of its greatest strengths, allowing for endless customization to suit any palate or dietary preference. Don’t be afraid to get creative and experiment with different toppings and cheeses! Here are just a few ideas to get your culinary juices flowing:
- Cheese Combos: While mozzarella is traditional, try a blend of provolone and cheddar for a sharper flavor, or pepper jack if you want to dial up the heat. A sprinkle of Parmesan or a dollop of ricotta can also add a gourmet touch.
- Meat Swaps: You could easily swap out the ground beef for cooked Italian sausage, diced ham, crispy bacon bits, or even thinly sliced deli turkey for a different flavor profile.
- Veggie Power-Up: Sautéed mushrooms, finely diced bell peppers, caramelized onions, black olives, or even a few pickled jalapeños can add extra texture and flavor. Pineapple chunks can bring that sweet and savory Hawaiian pizza vibe.
- Sauce Adventures: Instead of marinara, consider a pesto base for a fresher, herbaceous twist, or a tangy BBQ sauce for a smoky, unexpected flavor.
- Bun Alternatives: While Hawaiian rolls are divine, you could also try mini brioche buns for a richer taste or even small ciabatta rolls for a chewier texture.
- Spice It Up: A pinch of red pepper flakes mixed into the beef or sprinkled on top before baking will give a pleasant warmth to each bite.
I wholeheartedly encourage you to give these Beef Pepperoni Pizza Sliders a try this week! Whether you’re cooking for your family, hosting a game night, or simply craving something truly satisfying, I promise you won’t be disappointed. When you do make them, please come back and tell me all about your experience! I love hearing from you. Share your photos, your clever variations, and your feedback in the comments section below or tag me on social media. Your culinary adventures inspire me and our community, so don’t be shy! Happy cooking, and prepare to fall in love with your new favorite slider recipe!
Frequently Asked Questions (FAQs):
1. What kind of rolls are best for making sliders?
For these pizza sliders, I highly recommend using sweet Hawaiian dinner rolls. Their soft, slightly sweet, and buttery texture perfectly complements the savory fillings. However, mini brioche buns or even small potato rolls would also work beautifully, offering a different but equally delicious foundation for your sliders.
2. Can I make these pizza sliders ahead of time?
Absolutely! You can assemble the sliders up to 2-3 hours in advance. Just cover them tightly with plastic wrap and refrigerate. When you’re ready to bake, pull them out of the fridge about 30 minutes beforehand to allow them to come closer to room temperature, then bake as directed. This makes them a fantastic option for entertaining!
3. How do I store leftover pizza sliders?
If you happen to have any leftovers (which is a big “if”!), store them in an airtight container in the refrigerator for up to 2-3 days. Reheating them in a toaster oven or conventional oven at around 300-325°F (150-160°C) for 10-15 minutes will help crisp up the buns and melt the cheese again, making them almost as good as fresh.
4. Can I freeze pizza sliders?
While you can technically freeze cooked sliders, I don’t generally recommend it for optimal taste and texture. The buns can become a bit soggy and the cheese might not reheat as nicely. If you must freeze them, wrap individual sliders tightly in plastic wrap, then aluminum foil, and store in a freezer-safe bag for up to 1 month. Thaw in the refrigerator overnight and reheat in the oven.
5. What are some other topping ideas for pizza sliders?
The possibilities are endless! Beyond the variations mentioned above, you could try thinly sliced salami, cooked crumbled sausage, thinly sliced roasted chicken, artichoke hearts, sun-dried tomatoes, or even a sprinkle of fresh basil after baking. Think of your favorite pizza toppings and get creative!
6. How do I prevent the sliders from getting soggy?
A key trick is to lightly toast the inside of the rolls before adding the fillings. This creates a small barrier. Also, avoid overloading them with excessively wet ingredients. Ensure your ground beef is well-drained, and don’t drench the rolls in too much sauce. Baking them uncovered for at least part of the cooking time helps ensure the top gets nice and golden and prevents excess steam from building up.
7. What temperature should I bake pizza sliders?
I find that baking them at 350°F (175°C) is ideal. This temperature allows the cheese to melt beautifully, the fillings to heat through, and the garlic butter to soak into the buns, creating that perfect golden-brown crust without overcooking or burning. Baking time will typically be around 15-20 minutes, or until golden and bubbly.
8. Can I make these in an air fryer?
Yes, you can! If you’re making a smaller batch, an air fryer can work wonders. Preheat your air fryer to 325-350°F (160-175°C). Place 2-4 assembled sliders in the air fryer basket, ensuring they are not overcrowded. Cook for about 8-12 minutes, checking periodically, until the cheese is melted and bubbly and the tops are golden. Adjust timing based on your specific air fryer model.
Cheesy Beef Pepperoni Pizza Sliders – Quick Party Appetizer
Quick and easy-to-make sliders featuring savory beef pepperoni and gooey cheese on soft buns, perfect for any party. Customizable with veggie, meat lover’s, or white pizza variations.
Ingredients
-
12-pack slider buns (e.g., King’s Hawaiian sweet rolls)
-
1.5 cups marinara sauce (or 1.5 cups alfredo sauce for white pizza variation)
-
2 cups shredded mozzarella or pizza cheese blend, divided
-
4-6 ounces beef pepperoni slices
-
1/4 cup unsalted butter, melted
-
1/2 teaspoon garlic powder
-
Optional: 1 cup diced mushrooms, for veggie variation
-
Optional: 1/2 diced bell pepper, for veggie variation
-
Optional: 1/2 small diced onion, for veggie variation
-
Optional: 1 tablespoon olive oil, for sautéing veggies
-
Optional: 0.5 lb cooked, crumbled Italian beef sausage, drained, for meat lovers variation
-
Optional: 1 cup cooked, shredded chicken breast, for white pizza variation
-
Optional: 1-2 cups fresh spinach leaves, for white pizza variation
Instructions
-
Step 1
Preheat oven to 375°F (190°C). Lightly spray a 9×13-inch baking dish. -
Step 2
Slice slider buns horizontally, separating top from bottom halves. Place bottom halves in the prepared baking dish. -
Step 3
For veggie version: Sauté 1 cup diced mushrooms, 1/2 diced bell pepper, and 1/2 small diced onion in 1 tbsp olive oil until softened and moisture evaporates (approx. 8-10 min). Drain well and cool. For meat lovers: Brown 0.5 lb Italian beef sausage, crumble, drain excess grease, and cool. For white pizza version: Ensure 1 cup cooked, shredded chicken is ready and chop 1-2 cups fresh spinach if leaves are large. -
Step 4
Spread 1 cup marinara sauce (or 1.5 cups alfredo sauce for white pizza variation) evenly over the bottom bun halves. -
Step 5
If using, add prepared Italian beef sausage (meat lovers), sautéed veggies (veggie), or shredded chicken and spinach (white pizza) over the sauce. For classic sliders, proceed to cheese. -
Step 6
Sprinkle half of the shredded mozzarella cheese (about 1 cup) over the first topping layer or directly over the sauce for classic sliders. -
Step 7
Arrange 3-4 ounces of beef pepperoni slices over the cheese layer. -
Step 8
Sprinkle the remaining shredded mozzarella cheese (about 1 cup) over the pepperoni. -
Step 9
Carefully place the top halves of the slider buns back onto the assembled layers. -
Step 10
Melt 1/4 cup unsalted butter and stir in 1/2 teaspoon garlic powder. Generously brush this mixture over the tops of the slider buns. -
Step 11
Cover the baking dish tightly with aluminum foil. Bake for 15-20 minutes in the preheated oven. -
Step 12
Remove the aluminum foil. Continue baking uncovered for another 5-10 minutes, until the bun tops are golden brown and the cheese is bubbly and slightly caramelized. -
Step 13
Remove from oven and let rest for about 5 minutes. Use a serrated knife to cut along the original scores, separating into individual sliders. -
Step 14
Serve warm with optional marinara or ranch dressing for dipping.
Important Information
Nutrition Facts (Per Serving)
It is important to consider this information as approximate and not to use it as definitive health advice.
Allergy Information
Please check ingredients for potential allergens and consult a health professional if in doubt.


Leave a Comment