
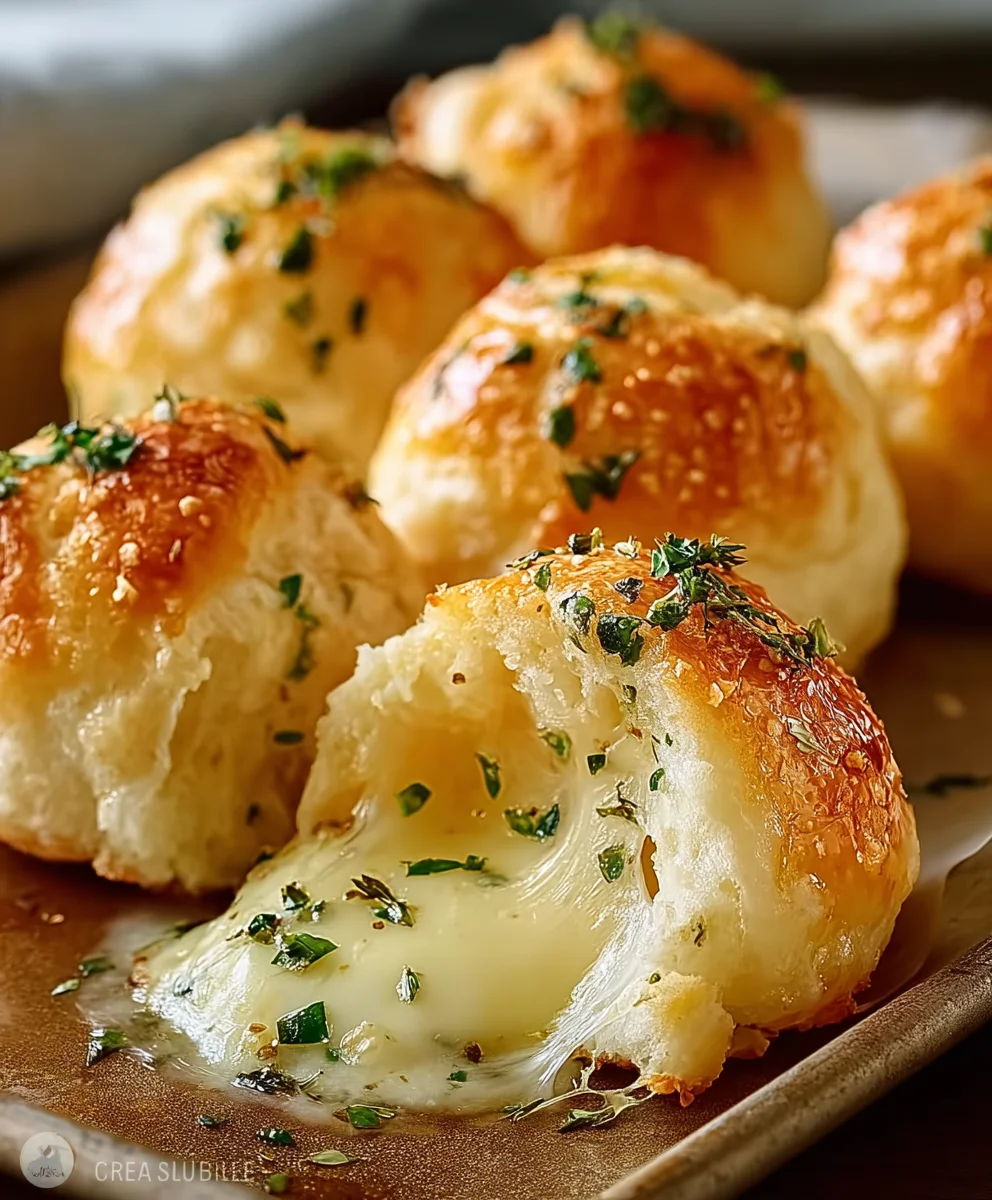
Pillsbury Biscuit Garlic Butter Cheese Bombs are an absolute revelation for anyone who cherishes the simple, yet profound joy of homemade comfort food. Imagine biting into a perfectly golden, flaky biscuit, only to discover a warm, gooey pocket of melted cheese infused with aromatic garlic and rich butter. It’s an experience that transcends a mere snack; it’s a moment of pure culinary bliss that leaves a lasting smile and an unforgettable taste sensation.
I’ve always believed that the best recipes are those that combine effortless preparation with truly unforgettable flavor, and this dish exemplifies that philosophy beautifully. While perhaps not steeped in centuries of ancient tradition, these delightful ‘bombs’ have quickly become a modern staple in homes across the country, celebrated for their undeniable appeal and ingenious simplicity. They represent the best of contemporary comfort food, transforming readily available pantry items into something truly extraordinary and incredibly satisfying.
They are the ultimate crowd-pleaser, perfect for impromptu gatherings, a cozy family movie night, or simply when you crave a savory, satisfying treat that comes together in a flash. The irresistible combination of a fluffy, tender biscuit, savory garlic butter, and luscious melted cheese ensures that these Pillsbury Biscuit Garlic Butter Cheese Bombs are adored by all ages, making them a consistently popular choice. Get ready to experience a burst of flavor that will undoubtedly become a treasured addition to your recipe repertoire.
Ingredients:
- 1 (16.3-ounce) can Pillsbury Grands! Flaky Layers Biscuits: Or any similar large, flaky biscuit dough. This will typically yield 8 individual biscuits, which are the foundation for our delectable Pillsbury Biscuit Garlic Butter Cheese Bombs.
- 8 small cubes or sticks of cheese: I personally love using mozzarella sticks cut into 1-inch pieces, or small cubes of sharp cheddar, Monterey Jack, or even a delightful Colby Jack blend. The key is to have a firm cheese that melts beautifully within the biscuit.
- 1/2 cup unsalted butter: Melted. Using unsalted butter gives us full control over the final saltiness of our garlic herb coating.
- 3 cloves garlic: Freshly minced. Trust me, fresh garlic makes an incredible difference here, offering a pungent, aromatic kick that elevates the entire dish.
- 1 teaspoon dried parsley: Or 1 tablespoon of fresh, finely chopped parsley. Adds a lovely fresh herbal note and a pop of color.
- 1/2 teaspoon dried oregano: This classic Italian herb pairs perfectly with garlic and cheese, adding depth to the flavor profile.
- 1/4 teaspoon garlic powder: While we’re using fresh garlic, a touch of garlic powder enhances that savory, umami garlic flavor even further. It’s like a secret weapon for maximum garlic impact!
- 1/4 teaspoon onion powder: Similar to garlic powder, this adds another layer of savory depth and rounds out the flavor of the butter mixture.
- 1/4 teaspoon sea salt: Or to taste. Remember we’re using unsalted butter, so a good pinch of salt is essential to brighten all those lovely flavors.
- 1/8 teaspoon black pepper: Freshly ground is always best for maximum aroma and a subtle kick.
- 2 tablespoons grated Parmesan cheese: For sprinkling over the top before baking. This creates a beautifully golden, cheesy crust on our Pillsbury Biscuit Garlic Butter Cheese Bombs.
- Optional: Fresh chopped chives or parsley: For garnish after baking, adding a final touch of freshness and presentation.
Equipment You’ll Need:
- 9×13-inch baking dish or 10-inch cast iron skillet: I find that a cast iron skillet provides a wonderfully even bake and a rustic presentation, but a standard baking dish works perfectly too.
- Small microwave-safe bowl or saucepan: For melting the butter.
- Small mixing bowl: To combine our flavorful garlic herb butter mixture.
- Cutting board and sharp knife: For mincing garlic and cutting cheese.
- Measuring cups and spoons: Essential for accurate ingredient proportions.
- Pastry brush (optional but helpful): For evenly coating the biscuits if you prefer not to dip.
- Parchment paper (optional): If using a baking dish, lining it makes for super easy cleanup!
- Aluminum foil: For covering the dish if the tops brown too quickly.
Preparing Your Pillsbury Biscuit Garlic Butter Cheese Bombs:
This is where the magic begins, transforming simple canned biscuits into irresistible, cheesy delights. Take your time with each step to ensure perfectly sealed and wonderfully stuffed Pillsbury Biscuit Garlic Butter Cheese Bombs.
- Preheat and Prepare: First things first, let’s get our oven ready. Preheat your oven to 375°F (190°C). While it’s heating, prepare your chosen baking vessel. If you’re using a 9×13-inch baking dish, I recommend lightly greasing it with butter or non-stick spray, or even lining it with parchment paper for effortless cleanup. If you opt for a 10-inch cast iron skillet, a light greasing will suffice.
- Open the Biscuits: Carefully open the can of Pillsbury Grands! Flaky Layers Biscuits. You should find 8 individual biscuits inside. Gently separate each biscuit from the others, making sure they remain intact.
- Flatten the Dough: On a clean, lightly floured surface or directly on your countertop, take one biscuit at a time. Using the palm of your hand or a rolling pin, gently flatten each biscuit into a disc, about 4 to 5 inches in diameter. The key here is to create enough surface area to envelop the cheese without making the dough too thin and prone to tearing. Aim for an even thickness across the disc.
- Stuff with Cheese: Now for the cheesy core! Place one small cube or stick of your chosen cheese right in the center of each flattened biscuit disc. I often find a mozzarella stick cut into three pieces works perfectly, giving a satisfyingly gooey center.
- Seal the Cheese Bomb: This step is crucial for preventing cheese leaks during baking. Carefully gather the edges of the biscuit dough up and over the cheese. Pinch and seal all the seams tightly at the top, forming a neat, round ball. Ensure there are no gaps or openings where the cheese could escape. Think of it like forming a small dumpling. A well-sealed seam means all that glorious melted cheese stays inside your Pillsbury Biscuit Garlic Butter Cheese Bombs! Roll the sealed biscuit gently between your palms to ensure it’s a smooth, uniform sphere. Repeat this process for all 8 biscuits.
Crafting the Garlic Herb Butter Mixture:
This savory butter coating is what truly defines our Pillsbury Biscuit Garlic Butter Cheese Bombs, infusing them with an irresistible aroma and flavor that will have everyone reaching for more. It’s incredibly simple to make, but don’t underestimate its impact!
- Melt the Butter: In a small microwave-safe bowl or a small saucepan over low heat, melt the 1/2 cup of unsalted butter completely. You want it fully liquid, but not browned or burnt.
- Add the Aromatics: Once the butter is melted, remove it from the heat if using a saucepan. Stir in the 3 cloves of freshly minced garlic. The warmth of the butter will gently start to infuse the garlic, releasing its fragrant oils.
- Incorporate the Herbs and Spices: To the butter and garlic mixture, add the 1 teaspoon of dried parsley (or fresh), 1/2 teaspoon of dried oregano, 1/4 teaspoon of garlic powder, 1/4 teaspoon of onion powder, 1/4 teaspoon of sea salt, and 1/8 teaspoon of black pepper. Stir everything together thoroughly until all the herbs and spices are evenly distributed throughout the butter. Take a moment to inhale the incredible aroma – this is the signature scent of our Pillsbury Biscuit Garlic Butter Cheese Bombs taking shape!
Assembling and Baking Your Cheese Bombs:
Now that our biscuits are stuffed and our butter is ready, it’s time to bring it all together and get these cheesy masterpieces into the oven. The assembly is quick, and the baking will fill your kitchen with the most amazing smells!
- Coat the Biscuit Bombs: Take each sealed biscuit bomb and dip it generously into the garlic herb butter mixture. Ensure all sides are thoroughly coated. I usually use a spoon to drizzle butter over any missed spots. Alternatively, if you prefer, you can place all the biscuit bombs into the baking dish, then pour the entire butter mixture over them, gently rolling them around to coat. The goal is even distribution of that delicious butter!
- Arrange in the Baking Dish: Arrange the coated Pillsbury Biscuit Garlic Butter Cheese Bombs snugly in your prepared 9×13-inch baking dish or cast iron skillet. You want them to be fairly close together, but not overly crowded, as they will expand significantly during baking. They’ll bake up beautifully, clinging to each other in a pull-apart style.
- Parmesan Sprinkle: Once all the bombs are arranged, sprinkle the 2 tablespoons of grated Parmesan cheese evenly over the tops of the biscuits. This will create an extra layer of savory, golden-brown crust as they bake.
-
Time to Bake!: Place the baking dish or skillet into your preheated 375°F (190°C) oven. Bake for approximately 20-25 minutes, or until the Pillsbury Biscuit Garlic Butter Cheese Bombs are beautifully golden brown and puffed up, and the cheese inside is gloriously melted and gooey.
- Pro Tip: Keep an eye on them around the 15-minute mark. If the tops are browning too quickly, you can loosely tent the dish with aluminum foil for the remaining baking time to prevent over-browning while ensuring the biscuits cook through.
- Visual Cue: You’re looking for a rich, deep golden color on the outside, and if you gently press on one, it should feel firm and spring back slightly. You might even see a tiny bit of cheese bubbling out if a seal wasn’t quite perfect, which is totally fine and adds to the rustic charm!
- Cool and Serve: Once baked to perfection, carefully remove the Pillsbury Biscuit Garlic Butter Cheese Bombs from the oven. Let them cool in the dish for about 5-10 minutes before serving. This brief resting period allows the cheese to set slightly, preventing it from being too molten, and makes them easier to handle.
Serving Suggestions and Variations:
These Pillsbury Biscuit Garlic Butter Cheese Bombs are incredibly versatile and delicious on their own, but here are some ideas to make them even more special or to adapt them to your taste and occasion. They are truly fantastic as an appetizer, a side dish with dinner, or even a fun snack!
Irresistible Dipping Sauces:
- Warm Marinara Sauce: A classic pairing! The tanginess of the marinara perfectly complements the rich, cheesy, garlic bombs.
- Ranch Dressing: Creamy ranch offers a cool, herbaceous contrast.
- Garlic Aioli: For the ultimate garlic lover, a dollop of homemade or store-bought garlic aioli takes these to another level.
- Pesto: A vibrant basil pesto adds a fresh, aromatic dimension that is simply delightful.
- Simple Olive Oil and Balsamic: A light, elegant option for dipping, especially if you’ve added Italian herbs to your butter mix.
Creative Cheese Bomb Variations:
- Spicy Kick: For those who love a bit of heat, try adding a pinch of red pepper flakes to your garlic butter mixture, or use a small cube of pepper jack cheese inside the biscuit. You could even serve them with a spicy sriracha mayo for dipping.
- Herb Extravaganza: Don’t limit yourself to just parsley and oregano. Experiment with other dried or fresh herbs like thyme, rosemary (finely minced!), chives, or a pre-mixed Italian seasoning blend. Each herb brings its own unique character to the Pillsbury Biscuit Garlic Butter Cheese Bombs.
- Smoked Cheese Delight: Use smoked provolone or smoked cheddar for a deeper, more complex flavor profile. The smoky notes pair wonderfully with the garlic and butter.
- Bacon & Chive Bombs: Before sealing, add a tiny pinch of cooked, crumbled bacon bits and some fresh chopped chives along with the cheese for an extra burst of flavor and texture. This makes them even more decadent!
- Everything Bagel Seasoning: Instead of just Parmesan, sprinkle a generous amount of “Everything Bagel” seasoning over the tops before baking. This adds a fantastic texture and a savory, garlicky, oniony crunch that is absolutely addictive.
Garnish for Pizzazz:
Right before serving, a sprinkle of fresh chopped parsley or chives can add a beautiful pop of color and a fresh aroma, making your Pillsbury Biscuit Garlic Butter Cheese Bombs even more appealing. It’s a small touch that makes a big difference in presentation.
Pro Tips for Perfect Pillsbury Biscuit Garlic Butter Cheese Bombs:
Achieving bakery-quality Pillsbury Biscuit Garlic Butter Cheese Bombs at home is easier than you think with a few clever tricks. I’ve learned these through trial and error, and they will help ensure your success every time!
- Don’t Over-Flatten the Biscuits: While you need to flatten the dough enough to enclose the cheese, be careful not to make it too thin. Overly thin dough is more likely to tear during sealing or baking, leading to cheese leakage. Aim for about 1/4 to 1/3 inch thickness.
- Seal Tightly: I cannot stress this enough – a tight seal is paramount! Pinch the seams together firmly. If you have any doubt, you can lightly moisten the edges of the dough with a tiny bit of water before pinching to help create a stronger bond. This is the single most important step to prevent gooey cheese from escaping and burning in your pan.
- Garlic Freshness is Key: While garlic powder contributes depth, using fresh minced garlic in the butter mixture provides an unparalleled aroma and flavor that truly distinguishes these Pillsbury Biscuit Garlic Butter Cheese Bombs. Don’t skimp on the fresh stuff!
- Monitor Baking Time: Ovens can vary wildly. My suggested baking time is a guideline. Start checking your cheese bombs a few minutes early. You’re looking for that beautiful golden-brown color and a puffy texture. If they’re browning too fast, use that aluminum foil tent to prevent burning.
- Don’t Skip the Resting Time: It’s tempting to dive right into these molten cheese bombs fresh out of the oven, but that 5-10 minute rest is important. It allows the cheese to cool just enough to become gooey and stretchy without being scalding hot, and it makes the bombs easier to pull apart and handle.
- Storage and Reheating: Leftover Pillsbury Biscuit Garlic Butter Cheese Bombs, if there are any, can be stored in an airtight container in the refrigerator for up to 3 days. To reheat, I recommend placing them on a baking sheet in a preheated oven at 350°F (175°C) for about 8-10 minutes, or until warmed through and the cheese is melty again. The microwave can make them a bit soft, so the oven is preferred for maintaining texture.
- Batch Baking for a Crowd: This recipe is easily doubled or even tripled if you’re feeding a large group or want to prepare them for a party. Just be sure to use larger baking dishes or multiple dishes and ensure they are not overcrowded in the oven, which can affect even baking. You might need to rotate the dishes halfway through baking for consistent results.
I genuinely hope you enjoy making and devouring these Pillsbury Biscuit Garlic Butter Cheese Bombs as much as I do. They’re a true crowd-pleaser!

Conclusion:
Okay, my friends, if you’ve made it this far, I hope you’re feeling as excited as I am about what you’re about to create in your kitchen. This isn’t just another recipe; it’s a game-changer, a crowd-pleaser, and quite frankly, a little piece of edible magic. What makes these Pillsbury Biscuit Garlic Butter Cheese Bombs so utterly irresistible? Well, imagine perfectly golden, fluffy biscuit dough, lovingly wrapped around a molten core of savory cheese, all basted in a fragrant, rich garlic butter. It’s an explosion of flavor and texture in every single bite – crispy on the outside, soft and gooey within. This recipe is more than just a dish; it’s an experience, a moment of pure comfort and joy that truly elevates any meal or gathering. The simplicity of the ingredients combined with the straightforward method makes it accessible to even the most novice of cooks, while the incredible outcome will impress even the most discerning palates.
I genuinely believe this recipe is a must-try for everyone, regardless of your baking experience. It’s incredibly straightforward, forgiving, and yields consistently spectacular results. Whether you’re whipping up a last-minute appetizer for unexpected guests, searching for the perfect side dish to elevate your weeknight dinner, or simply craving something wonderfully comforting, these bombs deliver on all fronts. The aroma alone as they bake is enough to make mouths water, filling your home with a welcoming, delicious scent that promises good things to come. And the satisfaction of pulling apart that cheesy goodness, seeing the stretch and savoring the perfect balance of garlic, butter, and cheese, is truly unparalleled. They embody everything we love about warm, homemade treats – quick to prepare, utterly delicious, and guaranteed to bring smiles and happy murmurs around the table. Trust me when I say, once you make these, they’ll quickly become a staple in your culinary repertoire.
Unleash Your Creativity: Serving Suggestions & Flavorful Variations
Now that you’re armed with the knowledge to create these delightful morsels, let’s talk about how to make them truly your own. While they are absolutely divine straight out of the oven, piping hot and glistening with garlic butter, there are so many fantastic ways to enjoy them. For a classic experience, I love serving them alongside a steaming bowl of homemade marinara sauce for dipping; the tangy tomato perfectly cuts through the richness and adds a lovely depth of flavor. A creamy ranch dressing or even a sophisticated pesto can also be fantastic dipping companions, offering different profiles that complement the savory bombs beautifully. Imagine dunking a warm, cheesy bomb into a vibrant green basil pesto – pure bliss! For those who love a bit of heat, a spicy sriracha mayo or a sweet chili sauce would also be excellent choices.
Beyond dipping, these cheese bombs are incredibly versatile as a side dish. Pair them with a hearty Italian pasta dish, complementing the rich sauces and flavors. They are absolutely heavenly alongside a comforting bowl of chili or soup on a cold evening, adding a wonderfully satisfying bread component. They also make an unexpected yet delightful addition to grilled chicken or steak, offering a unique and flavorful carbohydrate option that beats plain bread any day. Think about your next family dinner; instead of plain rolls or garlic bread, imagine presenting a basket piled high with these golden beauties. Your family and guests will be absolutely thrilled, and you’ll undoubtedly receive requests for the recipe. They make fantastic appetizers for game nights, potlucks, or any casual gathering where you want to serve something impressive yet easy.
But why stop there? The true beauty of this recipe lies in its adaptability. Don’t hesitate to experiment with different cheeses! While classic mozzarella offers that iconic, stretchy pull, a sharp cheddar can add a wonderful tang, pepper jack will introduce a subtle kick, and provolone offers a milder, buttery melt. You could even combine a few for a truly unique and complex cheese blend that caters to your specific cravings. Feeling adventurous? Try stuffing a tiny cube of pickled jalapeño or a pinch of cooked, crumbled bacon inside with the cheese for an extra layer of flavor and texture – the possibilities are truly endless. A sprinkle of dried Italian herbs like oregano, basil, or rosemary, a pinch of red pepper flakes for heat, or even a dash of onion powder or smoked paprika mixed into the garlic butter can all transform these bombs into something uniquely yours. This is where your culinary personality really shines, and I wholeheartedly encourage you to play around and discover your absolute favorite combination. Don’t be afraid to get creative!
Your Kitchen Adventure Awaits!
So, what are you waiting for? I’ve shared all my tips and tricks, and now it’s your turn to experience the pure joy and deliciousness of making these incredible cheese bombs. Gather your ingredients, put on your favorite music, and get ready to fill your home with the most enticing aroma you can imagine. I promise you, the moment you pull that tray of golden, bubbly goodness from the oven, you’ll feel an immense sense of accomplishment and pure culinary delight. This recipe is designed to be fun, accessible, and utterly delicious, bringing warmth, happiness, and an undeniable sense of satisfaction to your table and your loved ones. It’s an easy win that delivers big on flavor every single time.
Once you’ve made them – and I have no doubt you’ll fall in love – please, please, please come back and tell me all about your experience! I absolutely adore hearing from you. Did you try a new cheese combination? Did you find a perfect dipping sauce that everyone raved about? Did your family or friends beg you for the recipe? Share your photos, your successful variations, your heartwarming stories, and even your “oops” moments in the comments below. Let’s build a little community around delicious food and shared kitchen adventures. Your feedback, tips, and stories are what make this all so rewarding for me, inspiring me to continue sharing wonderful recipes. So go forth, bake, enjoy every cheesy, buttery bite, and share the delicious love with everyone around you!
Pillsbury Garlic Butter Cheese Bombs
Pillsbury Biscuit Garlic Butter Cheese Bombs are an easy-to-make, crowd-pleasing snack featuring soft Pillsbury biscuits wrapped around gooey mozzarella cheese. Coated in a savory garlic-herb butter, these golden bites are baked until crispy and served hot, often with tangy marinara sauce. They offer an irresistible combination of flaky pastry, molten cheese, and rich garlic butter flavor, perfect as an appetizer or quick snack.
Ingredients
-
1 (16.3-ounce) can Pillsbury Grands! Flaky Layers Biscuits (8 individual biscuits)
-
8 small cubes or sticks of cheese (e.g., mozzarella sticks, sharp cheddar, Monterey Jack, Colby Jack)
-
1/2 cup unsalted butter, melted
-
3 cloves garlic, freshly minced
-
1 teaspoon dried parsley (or 1 tablespoon fresh, finely chopped)
-
1/2 teaspoon dried oregano
-
1/4 teaspoon garlic powder
-
1/4 teaspoon onion powder
-
1/4 teaspoon sea salt
-
1/8 teaspoon black pepper
-
2 tablespoons grated Parmesan cheese
-
Optional: Fresh chopped chives or parsley, for garnish
Instructions
-
Step 1
Preheat your oven to 375°F (190°C). Lightly grease a 9×13-inch baking dish or 10-inch cast iron skillet. -
Step 2
Open the can of Pillsbury Grands! Biscuits and separate the 8 individual biscuits. On a clean, lightly floured surface, flatten each biscuit into a disc about 4 to 5 inches in diameter and 1/4 to 1/3 inch thick. -
Step 3
Place one small cube or stick of your chosen cheese (e.g., a 1-inch piece of mozzarella stick) in the center of each flattened biscuit disc. -
Step 4
Carefully gather the edges of the biscuit dough up and over the cheese. Pinch and seal all seams tightly at the top to form a neat, round ball, ensuring no gaps. Roll gently between palms to create a smooth, uniform sphere. Repeat for all 8 biscuits. -
Step 5
In a small microwave-safe bowl or saucepan, melt 1/2 cup unsalted butter. To the melted butter, stir in 3 cloves of freshly minced garlic, 1 teaspoon dried parsley, 1/2 teaspoon dried oregano, 1/4 teaspoon garlic powder, 1/4 teaspoon onion powder, 1/4 teaspoon sea salt, and 1/8 teaspoon black pepper. Mix thoroughly. -
Step 6
Dip each sealed biscuit bomb generously into the garlic herb butter mixture, ensuring all sides are thoroughly coated. Alternatively, place all bombs in the baking dish and pour the butter mixture over them, rolling to coat evenly. -
Step 7
Arrange the coated biscuit bombs snugly in your prepared baking dish. Sprinkle the 2 tablespoons of grated Parmesan cheese evenly over the tops. -
Step 8
Place the baking dish in the preheated oven and bake for approximately 20-25 minutes, or until the cheese bombs are beautifully golden brown and puffed up. If tops brown too quickly, loosely tent the dish with aluminum foil for the remaining time. -
Step 9
Carefully remove from the oven. Let them cool in the dish for about 5-10 minutes before serving. Garnish with fresh chopped chives or parsley if desired. Serve hot with warm marinara sauce or other dipping sauces.
Important Information
Nutrition Facts (Per Serving)
It is important to consider this information as approximate and not to use it as definitive health advice.
Allergy Information
Please check ingredients for potential allergens and consult a health professional if in doubt.


Leave a Comment