
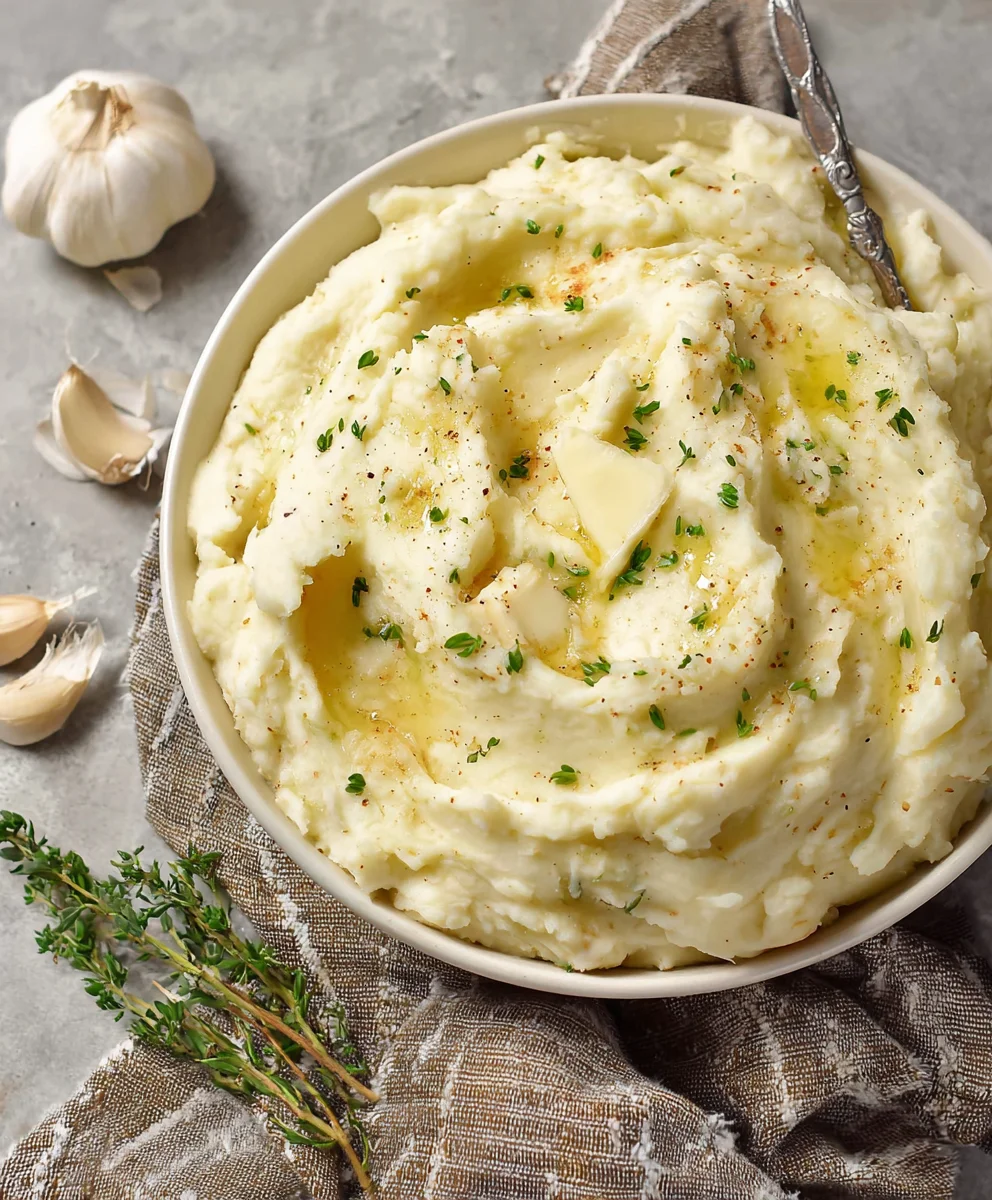
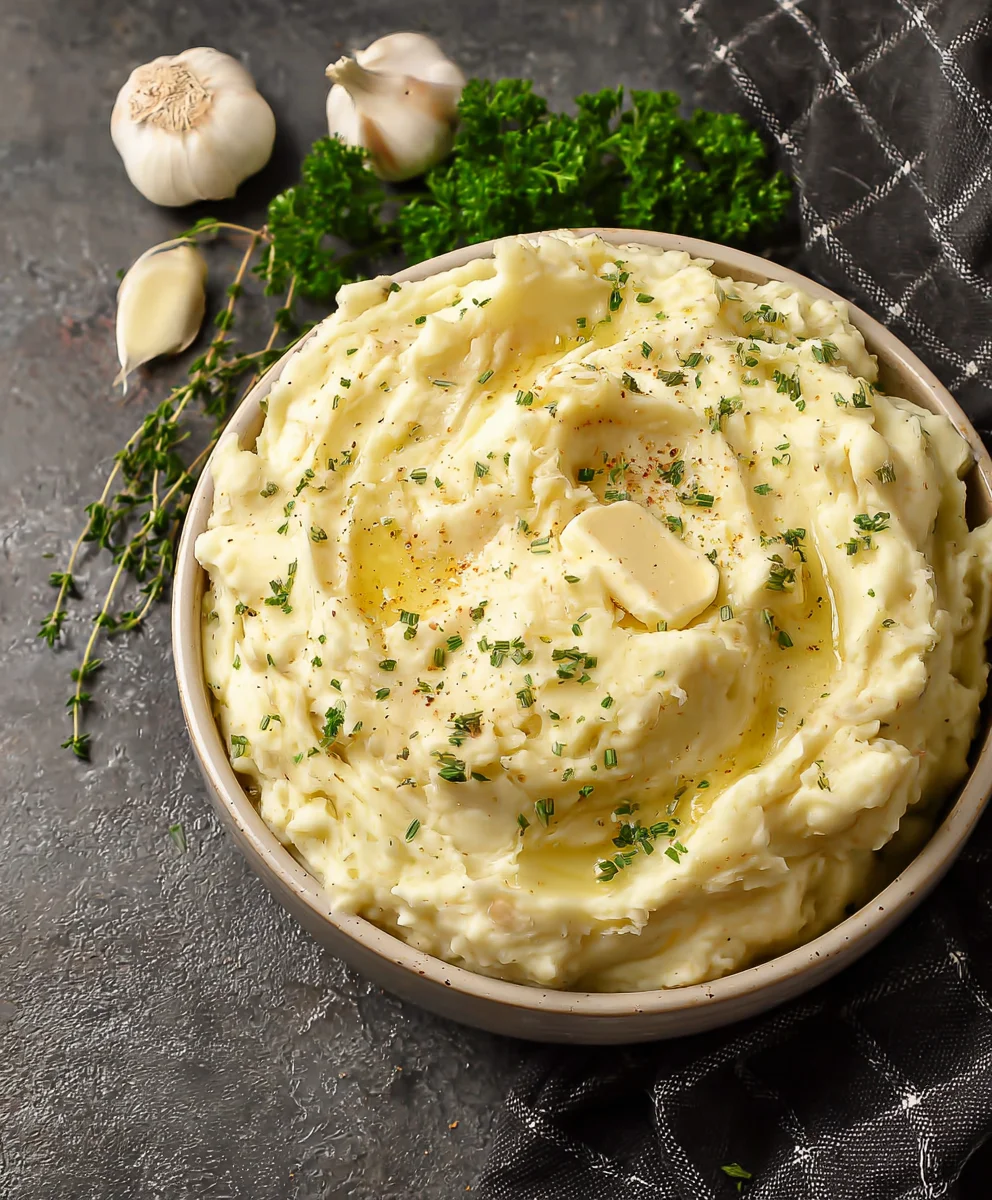
Garlic Mashed Potatoes are more than just a side dish; they are a culinary embrace, a symphony of simple ingredients transforming into pure comfort. The irresistible aroma filling your kitchen, the velvety smooth texture melting in your mouth, and that perfect punch of savory garlic – it’s a dish that elevates any meal, turning an ordinary dinner into something truly special. I find myself reaching for this recipe again and again because it consistently delivers that quintessential homemade taste everyone craves.
While the humble mashed potato has graced dinner tables for centuries, a staple born from necessity and beloved for its simplicity, the inclusion of garlic takes this classic to a gourmet level. It’s a testament to how simple additions can revolutionize a beloved staple, moving it from a mere accompaniment to a star in its own right. This isn’t just a side; it’s a statement. Whether it’s a holiday feast, a comforting weeknight dinner, or a simple Sunday roast, these Garlic Mashed Potatoes are an undisputed crowd-pleaser. Their versatility and universally adored flavor make them a perennial favorite, and I’m thrilled to guide you through creating your perfect batch.
Ingredients:
- 3 lbs Yukon gold potatoes-or Russet potatoes
- ½ cup whole milk
- ½ cup salted butter
- 8 minced garlic cloves
- 1 tsp salt
- ½ tsp ground black pepper
Preparing Our Potatoes for Perfection
Creating truly spectacular garlic mashed potatoes starts long before the mashing process begins. It’s about careful preparation and understanding how each step contributes to the final, luscious texture and incredible flavor. I find that paying attention to these initial details makes all the difference, transforming a simple side dish into a memorable culinary experience.
-
Selecting and Preparing Your Potatoes:
First, let’s talk about our star ingredient: the potatoes! For this recipe, I’ve specified 3 pounds of Yukon Gold potatoes, and for good reason. Yukon Golds are my absolute favorite for mashed potatoes because of their naturally creamy texture, subtle sweetness, and beautiful golden color. They have a medium starch content which allows them to break down easily without becoming overly gummy, giving us that perfect balance of fluffy and rich. However, if you prefer an even fluffier, almost cloud-like mash, Russet potatoes are a fantastic alternative. They’re higher in starch and absorb more liquid, leading to a wonderfully airy result. Whichever variety you choose, ensure they are firm, blemish-free, and showing no signs of sprouting.
Once you’ve made your selection, it’s time for peeling. Using a sturdy vegetable peeler, carefully remove the skin from all 3 pounds of potatoes. While some recipes suggest leaving the skin on for a rustic touch, for truly creamy and smooth garlic mashed potatoes, I always advocate for peeling. This ensures no undesirable textures make their way into our luxurious mash.
After peeling, we move on to cutting. It’s crucial to cut the potatoes into roughly uniform pieces, about 1 to 1 ½ inches in size. The goal here is consistency. If some pieces are large and others small, they won’t cook at the same rate. This means you’ll end up with some overcooked, mushy pieces and some still-hard, undercooked chunks – a mashed potato tragedy we absolutely want to avoid! Uniformity ensures even cooking, leading to a perfectly tender potato every time.
-
Starting Cold and Salting the Water:
Now that our potatoes are prepped, it’s time to get them cooking. Place all your uniformly cut potato pieces into a large pot or Dutch oven. I emphasize “large” because we want enough room for the potatoes to cook freely, without overcrowding. Overcrowding can lead to uneven cooking and can also make the water temperature drop too quickly when you add the potatoes, prolonging the cooking time.
Next, cover the potatoes with cold water by about an inch. This step is surprisingly vital. Why cold water? If you start with hot water, the outside of the potato pieces will cook and soften much faster than the inside, leading to that undesirable uneven texture we just discussed. Starting with cold water allows the potatoes to heat up gradually and cook through evenly from the surface to the core, ensuring consistent tenderness.
Before bringing it to a boil, it’s time to add our first layer of seasoning. Stir in 1 teaspoon of salt directly into the cold water. This might seem like a small detail, but salting the cooking water is incredibly important for seasoning the potatoes from the inside out. Potatoes are quite bland on their own, and incorporating salt during the boiling process ensures that every fiber of the potato absorbs flavor, rather than just seasoning the surface at the end. It’s a foundational step for truly delicious mashed potatoes.
-
Boiling to Tender Perfection:
With the potatoes in salted cold water, place your pot on the stove over high heat. Bring the water to a rolling boil. Once boiling vigorously, reduce the heat to a gentle simmer. We don’t want a furious boil that can break up the potatoes too much or cause them to cook unevenly. A steady, gentle simmer is ideal for achieving that perfect fork-tender consistency.
Allow the potatoes to cook for approximately 15-20 minutes. The exact timing can vary depending on the potato variety, the size of your pieces, and even your altitude, so always rely on testing for doneness rather than just the clock. To check if they’re ready, simply pierce a potato piece with a fork or the tip of a sharp knife. It should slide in with absolutely no resistance, indicating that the potato is tender all the way through but not falling apart or mushy. If there’s any firmness, continue cooking and check again in a few minutes. Overcooked potatoes can become waterlogged and lead to a gluey mash, while undercooked potatoes will result in lumpy, firm bits. Patience here is key to achieving that ideal creamy texture.
Infusing Our Signature Garlic Flavor
While our potatoes are simmering away to tender perfection, this is the ideal time to prepare our aromatic infusion. The secret to truly delicious garlic mashed potatoes isn’t just adding raw garlic at the end; it’s about gently coaxing out the garlic’s sweet, pungent essence and marrying it with the richness of butter and milk. This creates a base that will deeply flavor our mash, making every bite incredibly satisfying.
-
Crafting the Aromatic Garlic Butter Milk Mixture:
In a small saucepan, combine your ½ cup of whole milk and ½ cup of salted butter. I always opt for whole milk because its higher fat content contributes significantly to the luxurious, creamy mouthfeel of the mashed potatoes. Lower-fat milk options might make your mash feel a bit thinner or less rich, so stick with whole milk for the best results. The salted butter also adds another layer of flavor and richness. If you only have unsalted butter, that’s perfectly fine; just be mindful that you might need to adjust the final seasoning with a touch more salt later.
Place the saucepan over medium-low heat. We want to gently warm this mixture, allowing the butter to melt completely into the milk. Avoid bringing it to a boil or letting the butter brown. The goal is to create a warm, emulsified base that will readily absorb into our hot potatoes.
Once the butter has melted and the mixture is warm, it’s time for our star ingredient: the garlic! Add the 8 minced garlic cloves directly into the warm milk and butter. Eight cloves might sound like a lot, but trust me, for “garlic” mashed potatoes, this is the perfect amount to achieve a robust, noticeable garlic flavor without being overwhelming. Gently simmering the garlic in the warm liquid allows its pungent raw edge to mellow, transforming it into a sweet, aromatic essence that will permeate every spoonful of our mash. Let it gently simmer for about 5-7 minutes, stirring occasionally, just enough time for the garlic to soften and release its incredible fragrance into the liquid. Keep this mixture warm off the heat until your potatoes are ready.
Mashing and Finishing Our Culinary Creation
With our potatoes cooked to perfection and our fragrant garlic-infused milk and butter waiting in the wings, we are now at the most satisfying part of the process: turning these simple ingredients into a creamy, dreamy masterpiece. This stage requires a little finesse and quick action to achieve the ultimate texture.
-
Draining and Steaming the Potatoes:
Once your potatoes are fork-tender, carefully drain them in a colander. This step is far more critical than you might think. We want to remove as much excess water as possible. Water is the enemy of fluffy mashed potatoes; it can make them gluey and dilute their flavor. So, after draining, immediately return the hot, drained potatoes to the empty pot. Place the pot back on the stove over very low heat for about 1-2 minutes, shaking the pot gently. This allows any residual moisture to evaporate, essentially “steam-drying” the potatoes. You’ll notice a slight powdery film on the potatoes, indicating they are perfectly dry and ready to absorb all the wonderful flavors we’re about to add. This step is a game-changer for achieving that light, fluffy texture.
-
Mashing to Your Desired Consistency:
With the potatoes back in the pot and steam-dried, it’s time to mash! The key here is to mash the potatoes while they are still piping hot. Hot potatoes are much easier to mash evenly and will readily absorb the warm milk and butter mixture. Cold potatoes tend to resist mashing, leading to lumps and a tougher texture.
You have a couple of options for mashing tools, each yielding a slightly different result. For the ultimate smooth and creamy consistency, I highly recommend using a potato ricer. A ricer pushes the cooked potato through small holes, creating incredibly fine, uniform strands that are perfectly light and fluffy. This method is excellent for preventing lumps and achieving a restaurant-quality texture. If you don’t have a ricer, a traditional potato masher works perfectly well. Aim for a thorough mash, breaking down all the larger chunks. For those who enjoy a slightly rustic, lumpy texture, a sturdy fork can even do the job, but be prepared for a bit more effort. Avoid using a food processor or immersion blender, as these tools can over-process the potatoes very quickly, breaking down too much starch and resulting in a gluey, unappetizing consistency.
As you mash, gradually pour in the warm garlic-infused milk and butter mixture. Start with about half of the liquid, mashing it in until fully incorporated, then add more as needed to reach your desired consistency. Some prefer a very thick mash, while others like it looser and creamier. The beauty of adding gradually is that you have complete control over the final texture. Continue mashing gently until the potatoes are smooth, creamy, and free of lumps. Be careful not to over-mash once the liquid is added, as this can also lead to a gluey texture. Gentle folding and pressing are better than vigorous beating.
-
Seasoning and Final Touches:
Now for the critical final seasoning! Stir in the remaining 1 teaspoon of salt (if your cooking water wasn’t heavily salted) and ½ teaspoon of freshly ground black pepper. Freshly ground pepper makes a noticeable difference in aroma and flavor compared to pre-ground, so I always encourage it here. Give everything a good stir to ensure the seasonings are evenly distributed.
This is the moment of truth: taste your masterpiece! Grab a spoonful and assess. Does it need more salt? A little extra pepper? Perhaps a dash more milk for a creamier consistency? Don’t be shy about adjusting the seasoning to your personal preference. Every palate is different, and this is where you truly make the dish your own. I often find that a final pinch of salt can really bring all the flavors forward and elevate the dish from good to outstanding.
Once seasoned to perfection, your garlic mashed potatoes are ready to be served immediately. They are the ultimate accompaniment to almost any meal, from roasted chicken and juicy steaks to comforting stews and holiday feasts. The rich, creamy texture combined with the savory warmth of garlic is utterly irresistible. For an extra touch of elegance, you can garnish with a sprinkle of fresh chopped chives or parsley, or even a tiny pat of butter melting on top just before serving. Enjoy the incredible aroma and the even more incredible taste of your homemade garlic mashed potatoes!
Conclusion:
And there you have it, my friends! We’ve journeyed through the simple yet incredibly rewarding process of creating what I firmly believe are the ultimate Garlic Mashed Potatoes. This isn’t just another side dish; it’s a culinary experience, a hug in a bowl, a staple that elevates any meal from good to absolutely unforgettable. From the moment that first aroma of softened garlic fills your kitchen to the velvety smooth texture melting in your mouth, you’ll understand why this recipe is truly a must-try. It strikes that perfect balance of robust garlic flavor, creamy richness, and comforting warmth that makes it universally adored. I’ve refined this method over countless gatherings, family dinners, and quiet evenings, always striving for that ideal consistency and an unmistakable depth of flavor that genuinely sings.
What makes this particular recipe stand out, you ask? It’s the meticulous attention to technique – ensuring the potatoes are cooked perfectly tender but not waterlogged, incorporating the butter and cream at just the right temperature, and, of course, the star of the show: the garlic. We’re not just throwing in a clove or two; we’re embracing the aromatic power of garlic, allowing its sweet, pungent notes to infuse every single spoonful without overpowering the natural goodness of the potatoes. The result is a dish that is deceptively simple to prepare, yet tastes like it came straight from a gourmet kitchen. It’s the kind of dish that garners compliments, sparks conversations, and quite frankly, disappears from the serving bowl at an astonishing rate. Whether you’re a seasoned home cook or just starting your culinary adventures, you’ll find this recipe forgiving, incredibly satisfying, and utterly delicious.
Now, let’s talk about the endless possibilities for serving these magnificent spuds. While they are undoubtedly stellar on their own, acting as a comforting anchor for any meal, they truly shine when paired with other delicious components. Imagine a dollop of these creamy potatoes nestled beside a perfectly roasted chicken, soaking up all those glorious pan juices. Or picture them as the ideal accompaniment to a sizzling steak, a hearty pot roast, or a succulent prime rib, especially during the holidays. They’re also a fantastic foundation for a rich gravy, creating a medley of textures and flavors that is pure bliss. Don’t limit them to just meats; these potatoes are incredible with a medley of roasted vegetables, such as asparagus or green beans, or even as a base for a shepherd’s pie or a vegetarian stew. For a slightly different twist, you could even top them with some caramelized onions or sautéed mushrooms for an extra layer of umami. The versatility means they fit seamlessly into casual weeknight dinners as well as the most elaborate festive feasts.
But wait, there’s more! This recipe, while perfect as is, also offers a fantastic canvas for your own creative variations. Feel free to experiment! For an extra layer of richness, consider stirring in a handful of your favorite cheese – perhaps some sharp cheddar, nutty Gruyere, or even a tangy goat cheese – right at the end until melted and creamy. If you love fresh herbs, finely chopped chives, parsley, or even a hint of rosemary or thyme can add a beautiful aromatic lift. For those who prefer a little kick, a pinch of cayenne pepper or a dash of hot sauce can introduce a delightful warmth. Looking to make it lighter? You could swap out some of the heavy cream for milk or even a bit of vegetable broth, though I highly recommend sticking to the original for that unparalleled richness. If you’re catering to dietary restrictions, plant-based milk and vegan butter substitutes work wonderfully to create equally delicious dairy-free or vegan Garlic Mashed Potatoes that everyone can enjoy. You could even incorporate roasted garlic instead of sautéed for a deeper, sweeter, and milder garlic flavor. The beauty is that once you master the basic technique, the world of customization is yours to explore.
So, I implore you, don’t just read about these incredible potatoes; go into your kitchen and experience them for yourself! I promise, your taste buds (and anyone you share them with) will thank you. This recipe is designed to be approachable, enjoyable, and utterly delicious, guaranteeing success whether you’re making it for a crowd or a cozy dinner for two. Once you’ve whipped up your batch of these heavenly spuds, I would absolutely love to hear from you. Please come back and leave a comment below sharing your experience. Did you add any unique twists? What did you serve them with? Your insights and culinary adventures inspire me and our whole community of food lovers. Snap a photo and share it on your favorite social media platforms, tagging me so I can see your magnificent creations! Let’s spread the joy of truly exceptional homemade food, one creamy, garlicky spoonful at a time. Happy cooking!
FAQs about Garlic Mashed Potatoes
1. What kind of potatoes are best for mashed potatoes?
For the creamiest, fluffiest mashed potatoes, starchy potatoes like Russets (Idaho) or Yukon Golds are your best bet. Russets break down easily and absorb butter and cream beautifully, resulting in a light texture. Yukon Golds are naturally creamy and buttery, giving your mashed potatoes a rich, golden hue and a wonderful flavor. Avoid waxy potatoes like red or new potatoes, as they tend to become gummy when mashed.
2. How do I prevent my mashed potatoes from becoming gummy or gluey?
Gummy mashed potatoes often result from overworking them. When potatoes are over-mashed, their starch molecules break down and become sticky. To prevent this, mash them just until smooth using a potato masher, ricer, or a hand mixer on low speed. Avoid using a food processor, as it’s very easy to over-process and create a gluey texture. Also, make sure your potatoes are cooked through and tender before mashing.
3. Can I make Garlic Mashed Potatoes ahead of time?
Absolutely! Garlic mashed potatoes can be made 1-2 days in advance. After preparing, allow them to cool completely, then transfer them to an airtight container and refrigerate. When you’re ready to serve, gently reheat them on the stovetop over low heat, stirring occasionally, or in the oven at a low temperature (around 300°F/150°C), covered, until warmed through. You might need to add a splash more warm milk or cream during reheating to restore their creamy consistency.
4. How can I make my mashed potatoes extra creamy?
For ultimate creaminess, there are a few tricks. First, ensure your butter and cream (or milk) are warm before adding them to the hot potatoes – cold dairy can cool the potatoes too quickly and make them less absorbent. Second, don’t skimp on the fat! Using a good amount of full-fat butter and heavy cream is key. A potato ricer helps achieve a lump-free, airy texture that feels incredibly creamy. Finally, consider adding a touch of cream cheese or sour cream for an extra tang and luxurious mouthfeel.
5. Can I use roasted garlic instead of sautéed garlic in this recipe?
Yes, absolutely! Using roasted garlic is a fantastic variation. Roasted garlic will give your mashed potatoes a milder, sweeter, and more complex garlic flavor compared to the sharper, more pungent notes of sautéed garlic. To do this, simply cut the top off a head of garlic, drizzle with olive oil, wrap in foil, and roast in the oven at 400°F (200°C) for 30-40 minutes until soft and caramelized. Squeeze the softened cloves out and mash them into your potatoes along with the butter and cream. It’s a wonderful way to deepen the flavor profile!
6. What are some good substitutions for dairy to make this recipe dairy-free or vegan?
You can easily make these garlic mashed potatoes dairy-free or vegan! Substitute butter with a good quality plant-based butter (like Miyoko’s Kitchen or Earth Balance). For the heavy cream, use full-fat canned coconut milk (the thick cream part), unsweetened plain plant-based milk (almond, oat, or soy work well), or even vegetable broth for a lighter option. Just make sure to taste and adjust seasonings, as dairy alternatives can sometimes alter the flavor slightly. Nutritional yeast can also be added for a cheesy, umami boost if desired.
7. How long do homemade mashed potatoes last in the refrigerator?
Properly stored homemade mashed potatoes will last for 3-4 days in an airtight container in the refrigerator. Beyond that, the quality and safety can diminish. If you have leftovers, they make excellent additions to casseroles, potato pancakes, or even as a topping for shepherd’s pie.
Creamy Garlic Mashed Potatoes – Easy Dinner Side!
Learn to make perfectly creamy and flavorful garlic mashed potatoes with this easy-to-follow recipe. This side dish features tender Yukon Gold or Russet potatoes, infused with rich butter, whole milk, and plenty of aromatic minced garlic, creating a luscious texture and irresistible taste.
Ingredients
-
3 lbs Yukon Gold or Russet Potatoes
-
½ cup Whole Milk
-
½ cup Salted Butter
-
8 Garlic Cloves, minced
-
1 tsp Salt
-
½ tsp Ground Black Pepper
Instructions
-
Step 1
Peel and cut potatoes into uniform 1-1 ½ inch pieces. -
Step 2
Place cut potatoes in a large pot, cover with cold water by 1 inch, and add 1 tsp salt. Bring to a boil, then simmer for 15-20 minutes until fork-tender. -
Step 3
While potatoes cook, melt ½ cup salted butter with ½ cup whole milk in a small saucepan. Add 8 minced garlic cloves and simmer for 5-7 minutes. Keep warm. -
Step 4
Drain potatoes well. Return to the pot and cook over low heat for 1-2 minutes, shaking to steam-dry. -
Step 5
Mash hot, dry potatoes using a ricer or masher. Gradually add the warm garlic-infused milk and butter mixture, mashing until smooth and creamy. -
Step 6
Stir in 1 tsp salt and ½ tsp ground black pepper. Taste, adjust seasoning, and serve immediately.
Important Information
Nutrition Facts (Per Serving)
It is important to consider this information as approximate and not to use it as definitive health advice.
Allergy Information
Please check ingredients for potential allergens and consult a health professional if in doubt.


Leave a Comment