
Salted Honey Pie: 5-Star Decadent Twist on a Southern Classic – are you ready to experience a dessert that transcends the ordinary and elevates your expectations of what pie can be? I am absolutely thrilled to share with you a recipe that has quickly become a cherished favorite in my kitchen, offering an unparalleled balance of sweet and savory that will captivate your palate from the very first bite. While classic Southern pies like Chess Pie and Sugar Pie have long comforted generations with their rich, simple sweetness, our version takes that beloved heritage and infuses it with a sophisticated, modern twist.
Why This Salted Honey Pie Will Become Your New Obsession
People absolutely adore this pie for its incredible depth of flavor. The pure, golden sweetness of honey is perfectly counterbalanced by a delicate kiss of sea salt, creating an irresistible symphony that is both familiar and exciting. Imagine a silky-smooth, almost custard-like filling nestled in a perfectly flaky, buttery crust – it’s a textural dream. This isn’t just a dessert; it’s an experience, offering a truly 5-Star Decadent Twist on a Southern Classic that leaves a lasting impression. It’s perfect for impressing guests, delighting family, or simply indulging in a moment of pure culinary bliss. Get ready to discover your new signature dessert!
Ingredients:
- For the Pie Crust:
- 1 (9-inch) unbaked pie crust, store-bought or homemade (I find a good quality, all-butter crust truly elevates this pie!)
- For the Decadent Honey Filling:
- 1 cup (240ml) high-quality honey (clover, wildflower, or even a local varietal will sing here!)
- 1/2 cup (100g) granulated sugar
- 1/4 cup (50g) packed light brown sugar
- 3 large eggs, at room temperature
- 1/2 cup (120ml) heavy cream (or whipping cream)
- 1/2 cup (113g) unsalted butter, melted and slightly cooled
- 2 tablespoons cornstarch (this is our secret weapon for a perfectly set, silky filling!)
- 1 teaspoon pure vanilla extract
- 1/2 teaspoon fine sea salt (for balancing the sweetness within the filling)
- For the Flaky Salt Finish:
- 1/2 teaspoon flaky sea salt (Maldon or Fleur de Sel work wonders for that perfect salty crunch!)
Equipment You’ll Need:
- 9-inch pie plate
- Large mixing bowl
- Whisk
- Measuring cups and spoons
- Small saucepan or microwave-safe bowl (for melting butter)
- Pie weights or dried beans/rice
- Aluminum foil or parchment paper
- Wire cooling rack
Prep Ahead: Your Salted Honey Pie Journey Begins
Embarking on the creation of this Salted Honey Pie is a truly rewarding experience, and we start by preparing our foundation: the perfect pie crust. A well-blind-baked crust is crucial for preventing a soggy bottom, ensuring every bite is pure bliss. This step takes a little patience, but trust me, it’s worth every minute for that professional, flaky finish.
- Preheat your oven to 400°F (200°C). Ensuring your oven is at the correct temperature before you even think about putting the pie in is key for even baking and a beautifully browned crust.
- Carefully place your unbaked 9-inch pie crust into your pie plate. If you’re using a homemade crust, make sure it’s nicely crimped around the edges. For a store-bought crust, gently press it into the plate to ensure it fits snugly.
- Line the pie crust with a sheet of parchment paper or aluminum foil, allowing it to overhang slightly. This foil or parchment will hold our pie weights, preventing the crust from bubbling up and shrinking too much.
- Fill the lined crust with pie weights, dried beans, or even uncooked rice. Distribute them evenly, making sure they reach all the way up the sides to support the crust’s structure. This is vital for maintaining the shape of your crust during blind baking.
- Transfer the pie plate to the preheated oven and blind bake for 15 minutes. This initial bake helps to set the crust and begin the cooking process.
- After 15 minutes, carefully remove the pie plate from the oven. Gently lift out the parchment paper or foil along with the pie weights. You’ll notice the crust has started to firm up.
- Return the crust to the oven for an additional 8-10 minutes, or until the bottom and sides are lightly golden brown. Keep a close eye on it during this stage; you want it cooked through but not overly dark. If the edges start to brown too quickly, you can loosely tent them with aluminum foil.
- Once beautifully golden, remove the pie crust from the oven and place it on a wire cooling rack. Allow it to cool completely while you prepare the glorious honey filling. A cool crust prevents the filling from becoming greasy or setting improperly. This cooling period is not just a suggestion; it’s a critical step in achieving the ideal texture for your pie.
Crafting the Decadent Honey Filling
Now for the heart of our Salted Honey Pie: the filling! This is where the magic truly happens, blending the rich sweetness of honey with subtle complexities and that crucial hint of salt. We’re aiming for a silky smooth, perfectly balanced custard that will set beautifully, creating an unforgettable experience with every slice. Pay attention to the order of ingredients and the whisking technique to ensure a homogenous and lump-free filling.
- While your pie crust is cooling, begin preparing your filling. First, in a small saucepan over low heat or in a microwave-safe bowl, melt your 1/2 cup (113g) of unsalted butter. Once melted, set it aside to cool slightly. You don’t want to add hot butter to your eggs, as it could scramble them!
- In a large mixing bowl, crack your 3 large eggs. Using a sturdy whisk, beat the eggs vigorously for about 1 minute until they are light, frothy, and slightly increased in volume. This aeration step contributes to a lighter, more tender filling.
- To the beaten eggs, add the 1/2 cup (100g) of granulated sugar and the 1/4 cup (50g) of packed light brown sugar. Whisk thoroughly for another 2-3 minutes until the sugars are mostly dissolved and the mixture is pale yellow and smooth. This thorough whisking ensures no gritty sugar remains, leading to a perfectly smooth custard.
- Next, pour in the star of the show: the 1 cup (240ml) of high-quality honey. Follow this with the 1/2 cup (120ml) of heavy cream, the 1 teaspoon of pure vanilla extract, and the 1/2 teaspoon of fine sea salt. Continue to whisk until all these wet ingredients are fully incorporated and the mixture is beautifully uniform. Don’t be shy with your whisking here; you want everything to be perfectly blended.
- Now, sprinkle in the 2 tablespoons of cornstarch over the wet ingredients. Whisk immediately and continuously until the cornstarch is completely dissolved and no lumps remain. Cornstarch is our thickening agent, ensuring the filling sets up firm yet velvety smooth without being overly gelatinous. Its proper incorporation is vital for the pie’s final texture.
- Finally, slowly drizzle in the slightly cooled melted butter into the filling mixture while continuously whisking. Pouring it in a steady stream ensures it emulsifies properly with the other liquids, resulting in a cohesive and rich custard. Whisk for another minute or so to ensure everything is perfectly blended and homogenous. Your filling should now be smooth, glossy, and smell absolutely divine.
Baking Your Masterpiece
With our crust blind-baked and our filling expertly crafted, it’s time to bring everything together and bake our Salted Honey Pie to perfection. The baking process for a custard pie requires careful attention to temperature and timing to achieve a perfectly set filling without cracks or over-browning. We’ll start with a higher temperature to give it a good initial set, then reduce it to gently cook the custard through.
- Reduce your oven temperature to 325°F (160°C). This lower temperature is ideal for gently baking the delicate custard filling.
- Carefully pour the prepared honey filling into your completely cooled blind-baked pie crust. Pour slowly and steadily to avoid any splashes and ensure the filling distributes evenly.
- To prevent the edges of your pie crust from over-browning during the longer bake time, you may want to create a pie shield out of aluminum foil or use a silicone pie crust protector. Simply crimp a strip of foil around the exposed edges of the crust.
- Gently transfer the pie plate to the preheated 325°F (160°C) oven. It’s best to place it on the middle rack for even heat distribution.
- Bake for 45-60 minutes. The baking time can vary depending on your oven, so it’s important to know how to check for doneness. The pie is ready when the edges of the filling are set and appear golden, but the very center (about a 2-inch circle) still has a slight, almost imperceptible jiggle when you gently shake the pie plate. It should not look wet or liquidy, but rather like a firm gel. Avoid overbaking, as this can lead to cracks in the surface of the custard.
- Once you’ve achieved that perfect jiggle, carefully remove the pie from the oven.
The Grand Finale: Chilling and Serving
The journey isn’t quite over once the pie leaves the oven. The cooling and chilling phases are just as crucial as the baking for a perfectly set, sliceable, and truly decadent Salted Honey Pie. Patience here will be rewarded with an ideal texture and flavor. And of course, the final touch of flaky sea salt is what truly makes this pie a 5-star experience.
- Place the baked pie on a wire cooling rack and allow it to cool at room temperature for at least 2-3 hours. During this time, the residual heat will continue to cook the custard gently, allowing it to fully set and preventing it from cracking due to sudden temperature changes. Do not try to move it or cut it during this critical cooling period.
- Once the pie has cooled to room temperature, loosely cover it with plastic wrap (being careful not to let the plastic touch the filling directly) and transfer it to the refrigerator. Chill the pie for a minimum of 4 hours, or ideally overnight. Chilling is absolutely essential for the filling to firm up completely, ensuring clean, beautiful slices. This also allows the flavors to meld and deepen, making for an even more satisfying treat.
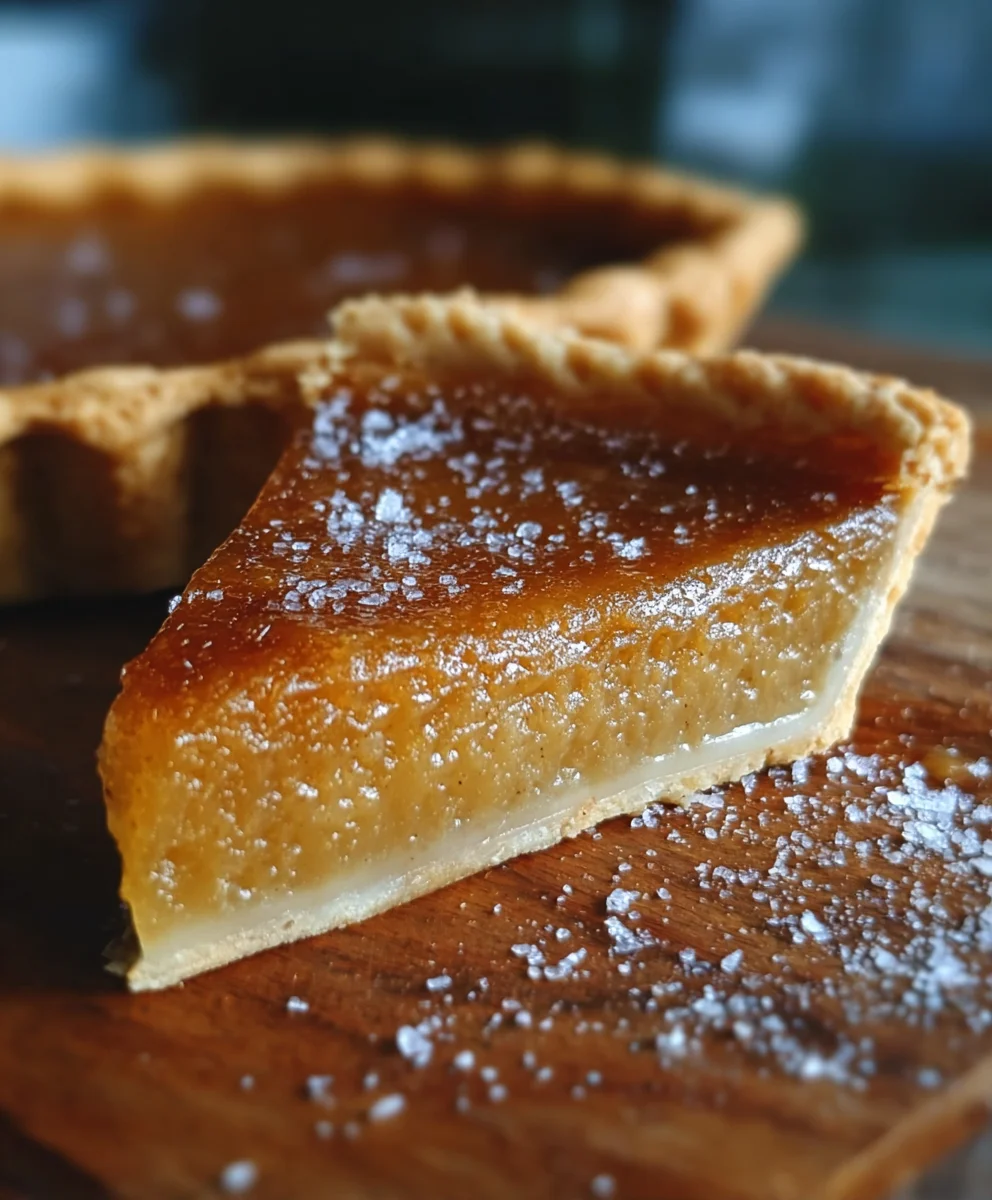
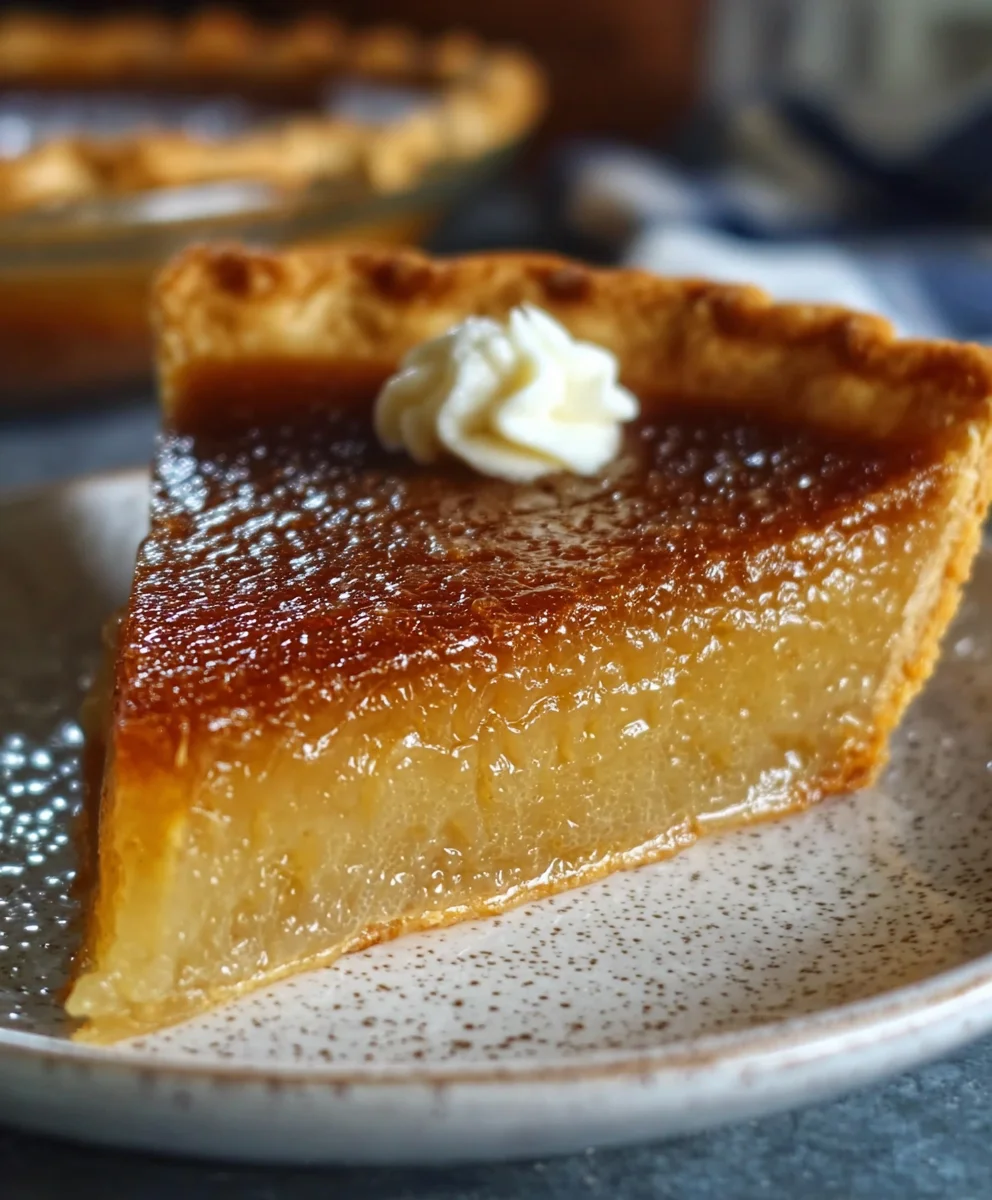
- Just before serving, uncover the chilled pie. Here’s where the “salted” part truly shines! Evenly sprinkle the 1/2 teaspoon of flaky sea salt over the top of the pie. The larger crystals of flaky salt provide a delightful textural contrast and an intermittent burst of savory flavor that perfectly cuts through the honey’s sweetness. This is the decadent twist that elevates our Southern classic to a truly 5-star experience.
- To serve, use a sharp, thin knife to cut neat slices. Wiping your knife clean between each slice can help create cleaner cuts. Serve chilled or at a slightly cool room temperature. This pie is exquisite on its own, but a dollop of freshly whipped cream or a scoop of vanilla bean ice cream makes for an even more luxurious dessert.
Tips for a Perfect Salted Honey Pie Every Time
Achieving pie perfection is a delightful pursuit, and with a few insider tips, your Salted Honey Pie will be a showstopper. These pointers cover common pitfalls and offer enhancements to ensure your pie is consistently magnificent.
Preventing a Soggy Bottom:
Beyond blind baking, ensure your pie crust is fully cooled before pouring in the filling. Any residual warmth can steam the bottom crust, making it soft. You can also brush the blind-baked crust with a thin layer of egg white or melted butter before the final bake to create a seal against moisture, though a good blind bake is usually sufficient.
Crust Edge Protection:
If your pie crust edges are browning too quickly during the main bake, you absolutely must use a pie shield or aluminum foil. You can make a simple foil ring by cutting a circle out of the center of a square of foil, then gently crimping it around the pie edges. This protects the delicate crust from burning while the filling finishes baking.
Cracked Filling? No Problem!
Sometimes, despite our best efforts, a small crack might appear on the surface of your pie. This usually happens if the pie is slightly overbaked or cooled too rapidly. Don’t despair! Your pie will still taste incredible. The flaky sea salt sprinkle often camouflages minor imperfections beautifully. If it’s a larger crack, a generous dollop of whipped cream is the perfect, delicious disguise.
The Honey Factor:
The type of honey you choose really matters here. While standard clover honey works perfectly well, experimenting with different varietals can yield fascinating flavor profiles. A darker buckwheat honey will lend a more robust, almost molasses-like note, while a lighter acacia or orange blossom honey will offer a more delicate, floral sweetness. Play around to find your favorite!
Temperature Matters for Eggs:
Using room-temperature eggs is not just a chef’s whim; it’s a science-backed tip! Room temperature eggs emulsify more easily with other ingredients, leading to a smoother, more uniform custard filling. If you forget to take them out ahead of time, simply place them in a bowl of warm (not hot!) water for 5-10 minutes.
Storage and Make-Ahead:
This Salted Honey Pie is an excellent make-ahead dessert. It needs significant chilling time anyway, making it perfect for preparing the day before an event. Store leftovers, covered loosely with plastic wrap, in the refrigerator for up to 3-4 days. While it’s best enjoyed within the first two days, the flavors often deepen overnight.
Serving Suggestions:
While divine on its own, here are some ways to elevate your serving:
- Whipped Cream: A simple, unsweetened whipped cream balances the richness.
- Vanilla Bean Ice Cream: The cold creaminess is a perfect contrast to the pie’s texture.
- Fresh Berries: A scattering of fresh raspberries or blueberries adds a bright, tart counterpoint.
By following these detailed steps and tips, you’re not just making a pie; you’re crafting a truly memorable dessert that will impress and delight. Enjoy the process, and savor every decadent bite of your 5-star Salted Honey Pie!
Conclusion:
And there you have it, my friends! We’ve journeyed through the delightful process of creating a dessert that truly stands out from the crowd. This isn’t just another pie recipe; it’s an invitation to experience something truly extraordinary, a dessert that perfectly marries tradition with an unexpected, yet utterly brilliant, contemporary twist. I can genuinely say that mastering the Salted Honey Pie: 5-Star Decadent Twist on a Southern Classic has been one of the most rewarding additions to my baking repertoire, and I am absolutely certain it will be for yours too.
What makes this pie an absolute must-try? It’s the seamless dance between the intensely sweet, golden richness of honey and the sharp, bright counterpoint of sea salt, all nestled in a buttery, flaky crust. Every single bite is an adventure for your taste buds – a smooth, custard-like filling that melts in your mouth, leaving behind layers of flavor that linger delightfully. It’s comforting in its familiarity, yet exhilarating in its originality. Forget everything you thought you knew about classic Southern desserts; this pie takes those cherished foundations and elevates them to an entirely new level of gourmet sophistication. It’s surprisingly simple to execute, yet the result is so impressively elegant, it tastes like it came straight from a high-end patisserie. The moment you pull this golden-brown masterpiece from your oven, filling your home with its intoxicating aroma, you’ll understand why I’m so passionate about it. It’s a showstopper, a conversation starter, and most importantly, an absolute joy to eat.
Enhance Your Salted Honey Pie Experience: Serving Suggestions & Creative Variations
While this Salted Honey Pie is absolutely divine on its own, there are countless ways to make your experience even more memorable. For a truly classic presentation, I love serving a generous slice slightly warm, accompanied by a dollop of freshly whipped cream. The cool, airy cream provides a beautiful textural contrast to the dense, custardy filling. If you’re feeling a little more adventurous, a scoop of vanilla bean ice cream or even a sophisticated coffee ice cream would be a match made in heaven, allowing the creaminess to meld with the pie’s rich flavors. For those cooler evenings, consider pairing it with a hot cup of strong coffee or a delicate herbal tea – the perfect end to any meal.
But why stop there? This recipe is incredibly versatile and lends itself beautifully to creative variations. For a touch of autumnal warmth, you could infuse the honey custard with a hint of cinnamon or a pinch of nutmeg. Imagine the possibilities for your crust too! While a classic all-butter crust is magnificent, consider a graham cracker crust for an added layer of sweetness and crunch, or even a gingersnap crust for a spicy kick that would perfectly complement the honey. If you’re hosting a gathering, transforming this recipe into individual tarts or mini pies makes for an adorable and elegant presentation, allowing each guest to enjoy their own perfectly portioned treat. You could even experiment with different types of honey – a robust buckwheat honey would offer a deeper, more complex flavor profile, while a delicate clover honey would keep things lighter and sweeter. Don’t be afraid to make this recipe truly your own!
Your Turn: Bake, Savor, and Share!
Now that you have all the tools and inspiration, I wholeheartedly encourage you to roll up your sleeves and bring this incredible dessert to life in your own kitchen. There’s an unparalleled satisfaction that comes from creating something so delicious from scratch, and I promise you, this Salted Honey Pie will deliver on that promise and then some. It’s more than just a recipe; it’s an experience waiting to happen. Whether you’re baking for a special occasion, a quiet family dinner, or simply to treat yourself (because you absolutely deserve it!), this pie is guaranteed to impress. Once you’ve tasted the magic, please don’t keep it to yourself! I would be absolutely thrilled to hear about your baking adventures. Share your photos, your serving suggestions, your variations, and your thoughts in the comments below or tag me on social media. Let’s build a community around the joy of baking and the undeniable deliciousness of this Salted Honey Pie: 5-Star Decadent Twist on a Southern Classic. Happy baking, everyone!
Frequently Asked Questions (FAQs)
Can I make this Salted Honey Pie ahead of time?
Absolutely! This pie is wonderfully accommodating for making in advance. You can bake it up to 2-3 days before you plan to serve it. Allow it to cool completely at room temperature, then cover it loosely with plastic wrap or aluminum foil and store it in the refrigerator. In fact, many people find the flavors meld and deepen beautifully after a day or two in the fridge, making it an excellent choice for holiday meals or dinner parties.
How do I store Salted Honey Pie?
Once baked and cooled, Salted Honey Pie should be stored in the refrigerator. Cover it loosely to prevent condensation and keep it fresh. It will keep well for 3-5 days. If you’ve already sliced it, you can cover individual slices with plastic wrap to maintain moisture. For longer storage, you can freeze slices of the pie, wrapped tightly in plastic wrap and then foil, for up to 1-2 months. Thaw in the refrigerator overnight before serving.
What if my pie cracks on top?
Don’t fret if your pie develops a crack on top during baking or cooling! This is a very common occurrence with custard-based pies and doesn’t affect the taste or texture one bit. It usually happens when the custard bakes unevenly or shrinks slightly as it cools. You can easily disguise any cracks with a generous dollop of whipped cream, a sprinkle of extra sea salt flakes, or a dusting of powdered sugar before serving. Think of it as rustic charm!
Is this pie too sweet?
While honey is indeed sweet, the beauty of this Salted Honey Pie lies in the crucial balance provided by the sea salt. The salt acts as a brilliant counterpoint, cutting through the sweetness and enhancing the complex flavors of the honey, preventing it from being cloyingly sweet. It creates a harmonious sweet-and-salty profile that is incredibly addictive. If you are particularly sensitive to sweetness, you could slightly reduce the amount of honey by a tablespoon or two, or increase the amount of coarse sea salt used as a garnish.
Can I use a store-bought pie crust?
Yes, you certainly can! While I always encourage homemade for the best flavor and flakiness, a good quality store-bought pie crust will work perfectly well and save you some time. Just make sure to blind bake it according to the package directions (and my recipe’s instructions if applicable) to ensure a crisp, non-soggy bottom. Using a pre-made crust makes this decadent pie even more accessible for busy bakers.
Salted Honey Pie: Decadent 5-Star Southern Classic Twist
A decadent twist on a Southern classic, this 5-star Salted Honey Pie features a perfectly blind-baked crust filled with a silky, rich honey custard, balanced by a hint of sea salt and finished with a sprinkle of flaky salt for an unforgettable dessert experience.
Ingredients
-
1 (9-inch) unbaked pie crust
-
1 cup (240ml) honey
-
1/2 cup (100g) granulated sugar
-
1/4 cup (50g) light brown sugar
-
3 large eggs, room temperature
-
1/2 cup (120ml) heavy cream
-
1/2 cup (113g) unsalted butter, melted, cooled
-
2 tablespoons cornstarch
-
1 teaspoon vanilla extract
-
1/2 teaspoon sea salt (for filling)
-
1/2 teaspoon flaky sea salt (for finish)
Instructions
-
Step 1
Preheat oven to 400°F (200°C). Place pie crust in a 9-inch pie plate. Line with parchment or foil, fill with pie weights. Bake for 15 minutes. Remove weights/liner. Bake for another 8-10 minutes until lightly golden. Cool completely on a wire rack. -
Step 2
Melt 1/2 cup butter; set aside to cool. In a large bowl, whisk 3 eggs vigorously for 1 minute until frothy. Whisk in granulated sugar and brown sugar for 2-3 minutes until smooth. Add honey, heavy cream, vanilla, and 1/2 teaspoon sea salt. Whisk until uniform. Sprinkle in 2 tablespoons cornstarch; whisk until completely dissolved. Slowly drizzle in cooled melted butter, whisking continuously until smooth. -
Step 3
Reduce oven to 325°F (160°C). Carefully pour filling into the cooled blind-baked crust. Use a pie shield if crust edges brown too quickly. Bake for 45-60 minutes, or until edges are set and center has a slight jiggle. Remove from oven. -
Step 4
Cool at room temperature for 2-3 hours. Loosely cover and chill in the refrigerator for a minimum of 4 hours, or ideally overnight. Just before serving, sprinkle 1/2 teaspoon flaky sea salt over the top. Slice with a sharp knife and serve chilled, optionally with whipped cream or ice cream.
Important Information
Nutrition Facts (Per Serving)
It is important to consider this information as approximate and not to use it as definitive health advice.
Allergy Information
Please check ingredients for potential allergens and consult a health professional if in doubt.


Leave a Comment