
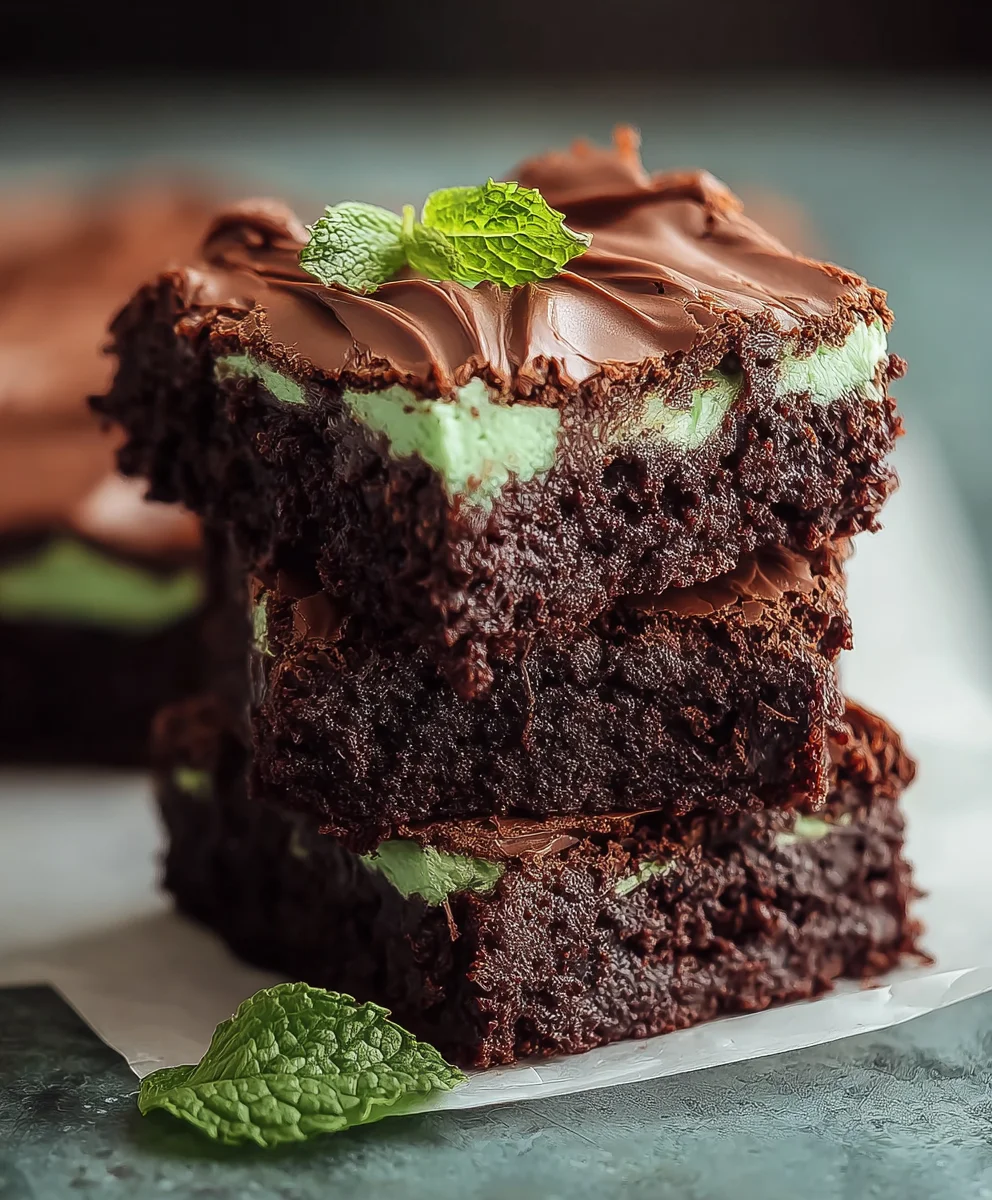
Mint Chocolate Brownies are more than just a dessert; they are an unforgettable journey for your taste buds. Imagine sinking your teeth into a perfectly baked square, where the intense, luxurious richness of deep chocolate harmoniously meets the cool, invigorating whisper of fresh mint. It’s a captivating paradox, a symphony of flavors that manages to be both deeply decadent and wonderfully refreshing all at once. This beloved confection offers a delightful escape from the ordinary, transforming a simple sweet treat into an extraordinary culinary moment.
The Enduring Allure of Mint and Chocolate
While brownies themselves boast a fascinating origin story, believed to have first emerged in the United States around the turn of the 20th century, the pairing of mint and chocolate has become an iconic duo in its own right. This classic combination has truly cemented its place in culinary hearts, often associated with festive occasions or as a sophisticated twist on traditional comforts. People absolutely adore Mint Chocolate Brownies because they deliver an unparalleled combination of textures and flavors. The irresistible contrast between the intensely fudgy, moist chocolate base and the vibrant, often creamy, mint layer creates an exquisite harmony that is simply unmatched. Whether you’re seeking a comforting indulgence for yourself or an elegant dessert to impress cherished guests, these brownies promise to deliver on every front, offering profound satisfaction with every delightful bite.
Ingredients:
- For the Fudgy Brownie Base:
- 1 cup (226g) unsalted butter, cut into cubes
- 8 ounces (about 226g) good quality bittersweet or semi-sweet chocolate, finely chopped or chocolate chips. I always opt for a chocolate with at least 60% cocoa solids for that rich, deep flavor!
- 1 ¾ cups (350g) granulated sugar
- 4 large eggs, at room temperature
- 1 teaspoon pure vanilla extract
- 1 cup (120g) all-purpose flour
- ¾ cup (75g) unsweetened cocoa powder (Dutch-processed is my go-to for a darker, less acidic brownie)
- ½ teaspoon salt
- For the Creamy Mint Frosting:
- ½ cup (113g) unsalted butter, softened to room temperature. This is crucial for a smooth, lump-free frosting!
- 2 cups (240g) powdered sugar (confectioners’ sugar), sifted
- 2 tablespoons milk or heavy cream, plus more if needed
- ½ – ¾ teaspoon pure peppermint extract (start with ½ and add more to taste, it can be potent!)
- 2-4 drops green food coloring (optional, but gives it that classic mint chocolate look!)
- For the Glossy Chocolate Ganache Topping:
- ½ cup (120ml) heavy cream
- 4 ounces (about 113g) good quality semi-sweet or dark chocolate, finely chopped or chocolate chips. Again, quality makes a difference here.
- Optional Garnish:
- Fresh mint leaves
- Chocolate shavings or mini chocolate chips
Phase 1: Preparing the Fudgy Brownie Base
- Preheat and Prepare Your Pan: First things first, let’s get our oven ready. Preheat your oven to 350°F (175°C). Then, choose a 9×13-inch baking pan. I like to line mine with parchment paper, leaving an overhang on the longer sides. This creates “handles” that make lifting the cooled brownies out incredibly easy. After lining, lightly grease any exposed areas of the pan that aren’t covered by parchment, and the parchment itself, with a little butter or non-stick spray. This simple step ensures your beautiful brownies won’t stick!
- Melt Butter and Chocolate: In a large, heatproof bowl, combine your cubed unsalted butter and finely chopped bittersweet chocolate. You can melt these together using a double boiler method (placing the bowl over a pot of simmering water, ensuring the bottom of the bowl doesn’t touch the water), or my quicker method, in the microwave. If using the microwave, heat in 30-second intervals, stirring well after each, until the mixture is completely smooth and glossy. Be very careful not to overheat the chocolate, as it can seize. Once melted, set this rich, aromatic mixture aside for a moment to cool down slightly. We don’t want to scramble our eggs later!
- Whisk Eggs and Sugar: In a separate large bowl, combine the granulated sugar and the four large, room-temperature eggs. Using an electric mixer (or a strong whisk and some arm power!), beat these together on medium-high speed for about 5-7 minutes. You’re looking for a transformation here: the mixture should become very thick, pale yellow, and noticeably glossy. When you lift the beaters, the mixture should fall back in a thick ribbon that slowly dissolves into itself. This step is super important, as incorporating all this air is what gives our brownies that desirable crinkly top crust and contributes to their fudgy texture.
- Incorporate Vanilla and Chocolate: Once your egg and sugar mixture is light and fluffy, gently fold in the pure vanilla extract. Now, slowly pour the slightly cooled melted chocolate and butter mixture into the egg mixture. Mix on low speed, or fold by hand with a spatula, until just combined. Be careful not to overmix at this stage; we want to keep all that lovely air we just whipped into the eggs. The mixture should be beautifully smooth and uniformly chocolatey.
- Add Dry Ingredients: In a medium bowl, whisk together the all-purpose flour, unsweetened cocoa powder, and salt. Sifting these ingredients together can help prevent lumps, especially with cocoa powder. Gradually add these dry ingredients to your wet chocolate mixture. Fold them in with a spatula until just combined. I can’t stress this enough: do not overmix! Overmixing develops the gluten in the flour too much, which can lead to tough, cakey brownies rather than the dense, fudgy perfection we’re aiming for. A few streaks of flour are perfectly fine; they’ll disappear as the brownies bake.
- Bake: Pour the luscious brownie batter into your prepared 9×13-inch baking pan. Use an offset spatula or the back of a spoon to spread the batter evenly to the edges of the pan. Place the pan in your preheated oven.
Phase 2: Baking and Cooling the Brownies
- Bake to Perfection: Bake the brownies for 25-30 minutes. Baking brownies is a bit of an art, and oven temperatures can vary, so keep a close eye on them. You want them to be set around the edges but still a little gooey in the center. To test for doneness, insert a toothpick into the center of the brownies. For fudgy brownies, you want the toothpick to come out with moist crumbs attached, but no wet batter. If it comes out completely clean, they might be overbaked and more cake-like than fudgy, which we want to avoid for these Mint Chocolate Brownies!
- Cool Completely: This step requires patience, but it’s absolutely vital for the structural integrity of your brownies and for the successful application of our next layers. Once baked, remove the pan from the oven and place it on a wire rack to cool completely. This means allowing them to reach room temperature, which can take anywhere from 1.5 to 2 hours. Resist the urge to frost warm brownies! The frosting will simply melt, and you’ll end up with a delicious but messy puddle. Once cooled, you can use the parchment paper overhangs to carefully lift the entire brownie slab out of the pan and onto a cutting board or another cooling rack.
Phase 3: Crafting the Creamy Mint Frosting
- Prepare Your Butter: Ensure your unsalted butter for the frosting is at a true room temperature. This means it should be soft enough to easily indent with your finger but not melted or greasy. Proper temperature butter is the key to a light and fluffy frosting.
- Cream the Butter: In a large mixing bowl, using an electric mixer, beat the softened butter on medium speed for 2-3 minutes until it’s light, pale, and fluffy. This aerates the butter, creating a much better texture for your frosting.
- Gradually Add Powdered Sugar: With the mixer on low speed, gradually add the sifted powdered sugar, one cup at a time, mixing well after each addition until fully incorporated. If you add it too quickly, you might find yourself in a cloud of sugar dust! Once all the sugar is in, increase the speed to medium-high and beat for another 2-3 minutes until the mixture is very light and fluffy.
- Infuse with Mint and Color: Now for the star of the show! Add the peppermint extract to the frosting. Start with ½ teaspoon, mix, and then taste. Peppermint extract can be quite strong, so you might prefer to add more gradually until it reaches your desired minty intensity. Next, add 2 tablespoons of milk or heavy cream and, if you desire that vibrant green hue, add 2-4 drops of green food coloring. Mix on medium speed until everything is thoroughly combined and the color is uniform. If the frosting seems too thick, add a tiny bit more milk or cream, ½ teaspoon at a time, until it reaches a smooth, spreadable consistency. It should be light, airy, and hold its shape beautifully.
Phase 4: Preparing the Glossy Chocolate Ganache Topping
- Heat the Cream: In a small saucepan, gently heat the heavy cream over medium-low heat until it just begins to simmer around the edges. Do not let it come to a rolling boil! Just a gentle simmer is what we’re after.
- Melt the Chocolate: Place your finely chopped semi-sweet or dark chocolate (or chocolate chips) in a medium heatproof bowl. Once the cream is simmering, immediately pour the hot cream over the chocolate. Let it sit undisturbed for 5 minutes. This allows the heat from the cream to gently melt the chocolate.
- Whisk to Perfection: After 5 minutes, begin whisking the chocolate and cream mixture gently, starting from the center of the bowl and slowly working your way outwards. Continue whisking until the ganache is completely smooth, shiny, and lump-free. It should have a beautiful, glossy sheen.
- Cool to Pouring Consistency: Allow the ganache to cool for about 10-15 minutes at room temperature, or until it has thickened slightly but is still pourable. You want it to be warm enough to spread easily but cool enough that it won’t melt your mint frosting. It should be the consistency of thick syrup.
Phase 5: Assembling Your Ultimate Mint Chocolate Brownies
- Frost the Brownies: Once your brownies are completely cool (and I mean completely – this is non-negotiable for neat layers!), take your beautifully vibrant mint frosting and spread it evenly over the top of the brownie base. Use an offset spatula or the back of a spoon to create a smooth, consistent layer. Aim for a thickness of about a quarter to half an inch.
- Pour the Ganache: Carefully pour the slightly cooled (but still pourable) chocolate ganache over the mint frosting layer. Gently tilt the pan or use an offset spatula to spread the ganache evenly over the entire surface, ensuring it reaches all the edges. The ganache should create a smooth, glass-like finish over the mint layer.
- Chill for Setting: This is another crucial step for clean, beautiful slices. Place the entire pan of frosted and ganached brownies into the refrigerator for at least 1-2 hours, or until the ganache and frosting layers are completely set. Chilling ensures the layers firm up, making the brownies much easier to cut without smudging the distinct layers.
- Cut and Serve: Once thoroughly chilled and set, remove the brownies from the refrigerator. Using a large, sharp knife, cut the brownies into your desired size squares. For the cleanest cuts, I like to run my knife under hot water and wipe it clean between each cut. This creates those perfect, crisp edges.
- Garnish (Optional): For an extra touch of elegance and fresh flavor, consider garnishing each brownie with a tiny fresh mint leaf or a sprinkle of chocolate shavings just before serving.
Tips for Achieving the Best Mint Chocolate Brownies
-
Don’t Overbake Your Brownies:
This is arguably the most important tip for achieving fudgy brownies. If you bake them until a toothpick comes out completely clean, they will likely be dry and cakey. Look for moist crumbs, not liquid batter, on your toothpick for that perfect dense, chewy texture. Remember, brownies continue to set as they cool.
-
Quality Ingredients Matter:
Since chocolate is a star here, invest in good quality bittersweet or semi-sweet chocolate for both the brownie base and the ganache. It truly makes a noticeable difference in flavor depth and richness. Similarly, using good quality cocoa powder (like Dutch-processed) enhances the chocolate intensity without bitterness.
-
Room Temperature Eggs and Butter:
For both the brownies and the frosting, using room temperature eggs and butter allows them to emulsify better and incorporate more air. This results in a smoother batter, a lighter frosting, and a better overall texture for your finished Mint Chocolate Brownies. For butter, it should be soft enough to leave an indent but not greasy or melted.
-
Patience with Cooling:
I know it’s hard to wait, but allowing the brownies to cool completely before frosting is non-negotiable. If the brownies are even slightly warm, your beautiful mint frosting will melt, creating a messy situation instead of distinct, delicious layers. The same goes for chilling the finished brownies before cutting – it ensures clean, professional-looking slices.
-
Sifting Dry Ingredients:
While some recipes skip this, I always recommend sifting your flour and cocoa powder. This helps to remove any lumps and ensures a smoother, more uniform batter, preventing dense spots in your brownies.
-
Watch Your Peppermint Extract:
Peppermint extract can be quite potent! Always start with the smaller amount recommended in the recipe and taste as you go. You can always add more, but you can’t take it away.
-
Storage:
These delightful Mint Chocolate Brownies are best stored in an airtight container in the refrigerator. They will keep beautifully for up to 5-7 days. For serving, I often let them sit at room temperature for 15-20 minutes to soften slightly, enhancing their fudgy texture.
-
Customization Ideas:
Feel free to get creative! You could sprinkle some mini chocolate chips or finely chopped Andes mints into the brownie batter before baking for an extra burst of flavor and texture. For the ganache, a tiny pinch of sea salt can really enhance the chocolate flavor.
Conclusion:
Well, my friends, we’ve reached the sweet end of our journey, and I genuinely hope you’re feeling as inspired as I am to get into the kitchen. This recipe, in particular, is one I hold close to my heart, and for excellent reason. It’s more than just a dessert; it’s an experience. If you’ve ever craved that perfect balance between intensely rich, fudgy chocolate and a refreshingly cool, vibrant burst of mint, then you absolutely, unequivocally, must give these a try. This isn’t just another brownie recipe; it’s a celebration of contrasting yet complementary flavors that dance beautifully on your palate. The texture alone is enough to convert even the most skeptical dessert-eater – we’re talking about a dense, moist, almost gooey center with just the right amount of chewiness around the edges. It’s the kind of treat that truly elevates an ordinary day into something special, making every bite feel like a luxurious indulgence.
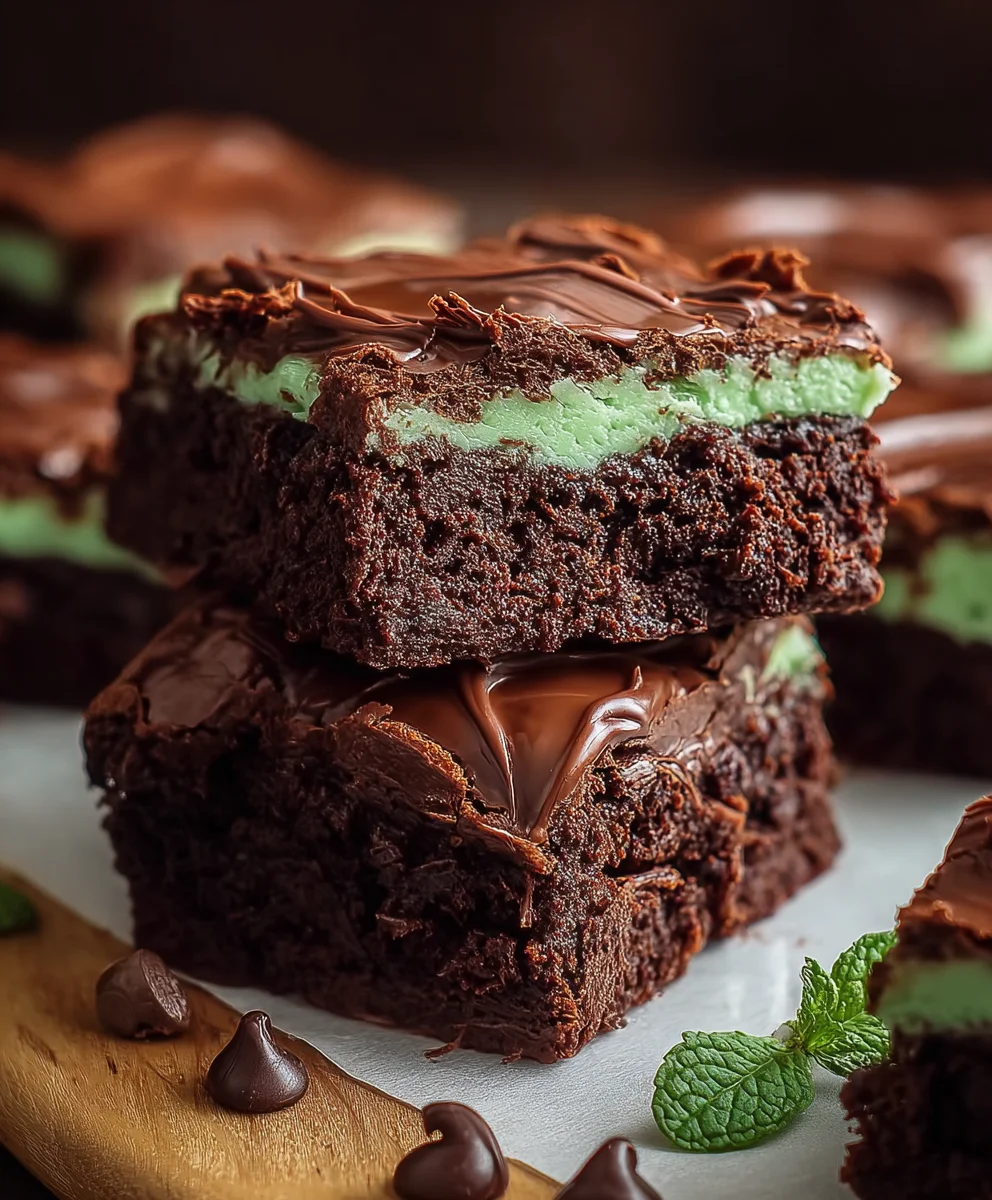
I know you’re going to fall in love with the sheer simplicity of achieving such professional-tasting results right in your own home kitchen. There’s a profound satisfaction that comes from pulling a pan of these gorgeous, aromatic squares from the oven, filling your entire home with that irresistible aroma of chocolate and mint. It’s a sensory delight long before the first bite even touches your lips. The visual appeal, with that striking green layer atop the deep brown, is also something quite captivating, making these an impressive centerpiece for any gathering. Trust me, the accolades will pour in, and you’ll beam with pride knowing you created such a masterpiece. The unique combination of flavors ensures that these stand out from the crowd of conventional brownies, offering a sophisticated twist that appeals to a wide range of tastes. It’s a delightful surprise for anyone expecting a standard chocolate treat, delivering an unexpected layer of fresh, cooling mint that cuts through the richness beautifully.
Elevate Your Dessert Experience with These Mint Chocolate Brownies!
Now, let’s talk about making these beauties truly shine. While they are absolutely phenomenal straight from the pan, perhaps still warm with that melted, gooey mint layer, there are myriad ways to serve them to heighten the experience. For a truly decadent treat, I highly recommend pairing a warm brownie with a scoop of vanilla bean ice cream or even a scoop of mint chip ice cream for a double dose of minty goodness. The cold, creamy ice cream melting into the warm brownie creates an unforgettable sensation. A dollop of freshly whipped cream, perhaps with a touch of mint extract added for extra flair, also works wonders. For a simpler yet elegant presentation, a light dusting of powdered sugar or a delicate drizzle of melted dark chocolate can add a touch of sophistication. Imagine serving these alongside a hot cup of coffee or a chilled glass of milk for the ultimate comfort food moment. They are perfect for dessert after dinner, a special treat for a party, or even carefully packaged as a thoughtful homemade gift for friends and family. I’ve even been known to enjoy one for breakfast with my coffee, because why not? Life’s too short not to start your day with a little joy.
Feeling adventurous? The beauty of a great brownie recipe is its versatility, and these are no exception. You could experiment with adding different types of chocolate chips to the brownie batter, such as white chocolate or milk chocolate, for varying flavor notes. For a nutty crunch, consider folding in some chopped walnuts or pecans. If you’re a fan of a little zest, a tiny hint of orange zest in the chocolate layer can add an unexpected bright note that complements the mint beautifully. For those who prefer a less intense mint flavor, you can always adjust the amount of mint extract in the frosting layer. You can also play with the color of the mint frosting; a very pale green can be just as appealing as a vibrant one. For a different texture, try adding a sprinkle of coarse sea salt over the top of the cooled frosting before cutting – it really makes the flavors pop! And if you’re catering to dietary needs, many gluten-free flour blends work wonderfully in brownie recipes, and you could even explore vegan butter and egg substitutes for a dairy-free and egg-free version, proving that everyone can enjoy these delightful confections. The possibilities are truly endless, allowing you to personalize this already fantastic recipe to suit your unique preferences and creativity.
Your Turn: Bake, Savor, and Share!
So, now it’s your turn! I sincerely encourage you to carve out some time this week, gather your ingredients, and immerse yourself in the delightful process of making these incredible Mint Chocolate Brownies. Don’t be shy; embrace the joy of baking. I promise you, the reward for your efforts will be a batch of truly extraordinary brownies that will leave everyone craving more. Once you’ve made them, I would absolutely love to hear about your experience. Did you add any unique twists? What did your family and friends think? Did they disappear as quickly as they did in my house? Please share your stories, your photos, and any brilliant variations you come up with. Connecting with fellow food lovers is one of the greatest joys of sharing recipes, and I can’t wait to see your creations. Happy baking, and enjoy every single, magnificent bite!
Decadent Mint Chocolate Brownies: A Sweet & Refreshing Bite!
Experience an unforgettable journey with Mint Chocolate Brownies. These decadent treats combine the rich intensity of deep chocolate with the cool, invigorating whisper of fresh mint, creating a wonderfully refreshing dessert.
Ingredients
-
1 cup (226g) unsalted butter
-
8 ounces (226g) bittersweet or semi-sweet chocolate, chopped
-
1 ¾ cups (350g) granulated sugar
-
4 large eggs
-
1 teaspoon pure vanilla extract
-
1 cup (120g) all-purpose flour
-
¾ cup (75g) unsweetened cocoa powder
-
½ teaspoon salt
-
½ cup (113g) unsalted butter, softened
-
2 cups (240g) powdered sugar, sifted
-
2 tablespoons milk or heavy cream
-
½ – ¾ teaspoon pure peppermint extract
-
2-4 drops green food coloring (optional)
-
½ cup (120ml) heavy cream
-
4 ounces (113g) semi-sweet or dark chocolate, chopped
-
Fresh mint leaves (optional garnish)
-
Chocolate shavings or mini chocolate chips (optional garnish)
Instructions
-
Step 1
Preheat oven to 350°F (175°C). Line a 9×13-inch pan with parchment and lightly grease. -
Step 2
Melt 1 cup (226g) butter and 8 ounces (226g) chopped chocolate. Stir until smooth; cool slightly. -
Step 3
Beat 1 ¾ cups (350g) sugar and 4 large eggs for 5-7 minutes until pale and thick. -
Step 4
Fold in 1 teaspoon vanilla extract. Slowly mix in cooled chocolate mixture until just combined. -
Step 5
Whisk 1 cup (120g) flour, ¾ cup (75g) cocoa powder, and ½ teaspoon salt. Fold into wet mixture until just combined; do not overmix. -
Step 6
Pour batter into pan. Bake 25-30 minutes; toothpick comes out with moist crumbs. -
Step 7
Cool completely on a wire rack (1.5-2 hours). Lift from pan using parchment overhangs. -
Step 8
Beat ½ cup (113g) softened butter until fluffy. Gradually add 2 cups (240g) sifted powdered sugar. Mix in ½ – ¾ teaspoon peppermint extract, 2 tablespoons milk or heavy cream, and 2-4 drops green food coloring (optional) until smooth. -
Step 9
Heat ½ cup (120ml) heavy cream to a simmer. Pour over 4 ounces (113g) chopped chocolate. Let sit 5 minutes, then whisk until smooth. Cool 10-15 minutes until pourable. -
Step 10
Spread mint frosting evenly over cooled brownies. Pour and spread cooled ganache over frosting. -
Step 11
Refrigerate 1-2 hours until set. Cut into squares with a hot, clean knife. Garnish with mint leaves or chocolate shavings (optional).
Important Information
Nutrition Facts (Per Serving)
It is important to consider this information as approximate and not to use it as definitive health advice.
Allergy Information
Please check ingredients for potential allergens and consult a health professional if in doubt.


Leave a Comment