
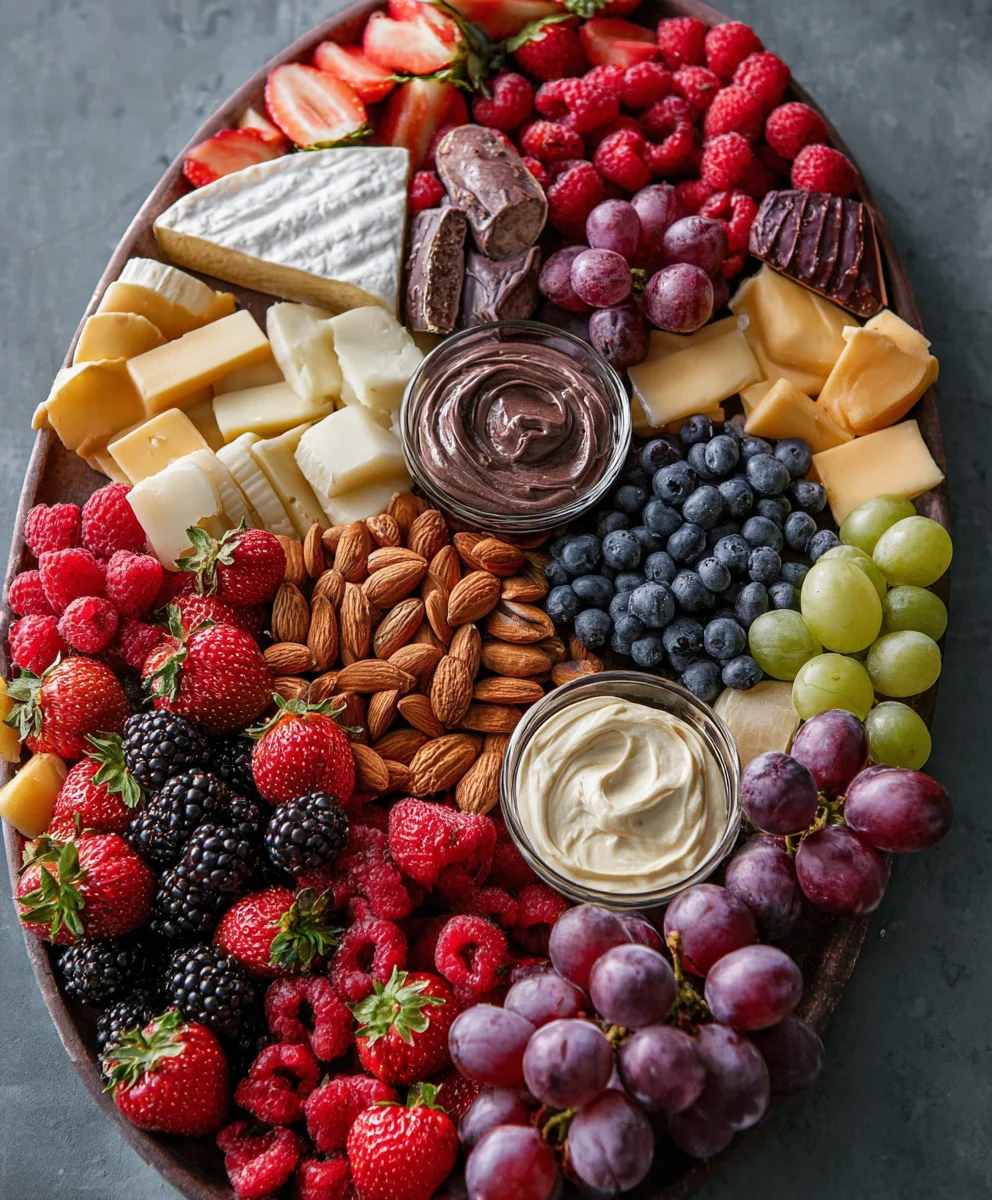
Fruit Charcuterie Board – what a delightful phrase, isn’t it? It immediately conjures images of vibrant colors, fresh aromas, and an abundance of nature’s candy, beautifully arranged. But this isn’t just about serving fruit; it’s about crafting an edible masterpiece that’s as impressive to behold as it is delicious to devour. While the traditional charcuterie board has roots in centuries-old European culinary practices, showcasing cured meats and cheeses, the concept of a dedicated fruit board is a refreshing and contemporary evolution. It draws inspiration from the timeless art of presentation seen in opulent fruit displays of Renaissance feasts and simple, elegant fruit courses from around the globe, reimagined with a modern, shareable flair.
There’s a clear reason why people are falling in love with this delightful trend. A well-designed Fruit Charcuterie Board offers an unparalleled sensory experience. Imagine the sweet burst of ripe berries, the tangy crunch of kiwi, the juicy succulence of perfectly sliced melon, and the creamy texture of exotic fruits, all harmoniously presented. It’s incredibly versatile, effortlessly catering to various dietary preferences and making it ideal for everything from casual family gatherings to sophisticated brunches and healthy, satisfying desserts. Furthermore, its no-cook nature makes it wonderfully convenient to prepare, transforming simple ingredients into a show-stopping centerpiece that makes every occasion feel a little more special and luxurious. I find immense joy in creating these boards, and I’m thrilled to share my passion with you.
Ingredients:
- For the Core Fruits:
- 2 cups fresh strawberries, hulled and halved or quartered depending on size
- 1 cup raspberries
- 1 cup blueberries
- 1 cup blackberries
- 1 large bunch red or green grapes, washed and left on the stem in small clusters
- 1 cantaloupe, peeled, deseeded, and cut into bite-sized wedges or balls
- 1 honeydew melon, peeled, deseeded, and cut into bite-sized wedges or balls
- 1 pineapple, peeled, cored, and cut into triangular wedges or chunks
- 3 kiwis, peeled and sliced into rounds or half-moons
- 2 oranges or clementines, peeled and segmented
- 2-3 firm apples (e.g., Gala, Honeycrisp), cored and thinly sliced (see note on browning below)
- 2-3 firm pears (e.g., Anjou, Bosc), cored and thinly sliced (see note on browning below)
- 1 cup pitted cherries (optional, in season)
- For the Dips:
- 1 cup plain Greek yogurt
- 2 tablespoons honey or maple syrup (for yogurt dip)
- 1/2 teaspoon vanilla extract (for yogurt dip)
- 1 cup good quality chocolate chips (milk, dark, or semi-sweet)
- 1/4 cup heavy cream or milk (for chocolate dip)
- 1 tablespoon coconut oil (optional, for chocolate dip sheen)
- For the Accompaniments & Garnishes:
- 1/4 cup unsalted mixed nuts (almonds, cashews, pistachios)
- 1/4 cup dried cranberries or golden raisins
- 2-3 tablespoons fresh mint leaves, for garnish
- Small edible flowers (optional, for aesthetic appeal)
- Small honey pot with a drizzle stick
- Optional: Small cheese cubes (cheddar, brie), a few crackers, or mini muffins to complement the board.
- A squeeze of lemon or orange juice (for preventing apple/pear browning)
- Equipment:
- Large wooden or slate charcuterie board
- Several small bowls or ramekins for dips and smaller items
- Small knives, fruit carvers, and a melon baller (optional)
- Serving tongs or small forks
Planning Your Fruit Charcuterie Board
- Consider Your Guest Count and Board Size: Before you even start washing fruit, think about how many people you’re serving. For a smaller gathering, a medium-sized board might suffice, but for a larger party, you’ll want to go for your biggest platter or even combine two. A generous Fruit Charcuterie Board should offer an abundance of choice and color.
- Embrace Seasonality and Color Variety: I always recommend choosing fruits that are in season, as they’ll be at their peak flavor and often more affordable. Aim for a vibrant mix of colors – reds from strawberries and raspberries, blues from blueberries, greens from kiwi and grapes, oranges from cantaloupe and citrus. This visual diversity is key to making your Fruit Charcuterie Board truly stunning.
- Think About Textures and Flavors: Beyond color, consider a variety of textures – juicy berries, crisp apples, soft melons, and perhaps some chewy dried fruits. For flavors, balance sweetness with a touch of tartness, ensuring there’s something for every palate on your beautiful spread.
- Gather Your Tools: Make sure you have your chosen board, several small bowls or ramekins for dips and smaller items like nuts, and any specific cutting tools you might need, like a melon baller or apple corer. Having everything ready before you begin saves so much time and stress!
Preparing the Fruits
- Wash and Dry Thoroughly: This is a crucial first step for any Fruit Charcuterie Board. Gently wash all your fresh fruits under cool running water. For berries and grapes, I like to use a colander and let them air dry or gently pat them dry with a clean paper towel. Ensuring they are completely dry prevents them from becoming soggy and helps maintain their freshness on the board.
- Hulling and Quartering Strawberries: For the strawberries, carefully remove the green tops (hulling them). Depending on their size, I usually halve them lengthwise or quarter larger ones to make them easier to pick up and eat.
- Preparing Berries and Grapes: Raspberries, blueberries, and blackberries require minimal prep beyond washing and drying. For grapes, I prefer to leave them in small clusters of 3-5 grapes. This makes them look more appealing and easier for guests to grab.
- Melon Magic (Cantaloupe and Honeydew): Peel both your cantaloupe and honeydew melons. Cut them in half, scoop out the seeds, and then slice the flesh into bite-sized wedges, cubes, or use a melon baller for perfect spheres. Melon balls add a wonderful touch of elegance and are so enjoyable to eat.
- Pineapple Perfection: First, slice off the top and bottom of the pineapple. Stand it upright and carefully slice downwards to remove the skin, following the natural curve of the fruit. Then, using a small paring knife, remove the “eyes” – those small brown spots – in a spiral pattern. Core the pineapple using a special corer or by cutting around the central core. Finally, slice the pineapple into triangular wedges or chunky bite-sized pieces.
- Kiwi Craft: Peeling kiwi can be a bit tricky, but I find the easiest way is to slice off both ends, then use a spoon to carefully scoop the flesh out from the skin. Alternatively, a sharp paring knife can be used to slice off the skin in strips. Once peeled, slice the kiwi into beautiful rounds or half-moons.
- Orange or Clementine Segments: Peel your oranges or clementines. For a neater presentation, I like to segment them by carefully cutting between the membranes with a sharp knife, removing any white pith. This makes them burst with flavor and easy to eat without the fuss.
- Preventing Apple and Pear Browning: This is a key tip for a visually appealing Fruit Charcuterie Board. Once you’ve cored and thinly sliced your apples and pears, immediately toss them in a bowl with a light squeeze of lemon juice or even orange juice. This acidic bath prevents oxidation and keeps them looking fresh and crisp for longer. This step is essential if you’re preparing your board ahead of time.
- Cherry Prep: If you’re using cherries, simply wash and dry them. I usually leave them with their stems for an attractive presentation, but you can pit them if preferred.
Crafting the Dips and Accompaniments
-
Wholesome Honey-Vanilla Yogurt Dip: In a small bowl, combine the plain Greek yogurt, honey (or maple syrup), and vanilla extract. Stir until everything is well combined and smooth. Taste and adjust sweetness if desired. This dip offers a creamy, tangy, and subtly sweet counterpoint to the fresh fruits on your Fruit Charcuterie Board.
Tip for Variations:
You can easily customize this dip! Try adding a pinch of cinnamon or cardamom for a warm spice note, or stir in some lemon zest for an extra bright flavor.
-
Decadent Chocolate Dipping Sauce: For a quick and easy chocolate dip, I love using the microwave method. Place your chocolate chips in a microwave-safe bowl. Add the heavy cream or milk. Microwave on high for 30-second intervals, stirring well after each interval, until the chocolate is mostly melted and smooth. Stir in the coconut oil if using; it adds a lovely sheen and helps with consistency. Be careful not to overheat the chocolate, as it can seize. Alternatively, you can melt the chocolate chips and cream in a double boiler over simmering water for a more controlled melt.
Achieving the Right Consistency:
If your chocolate dip is too thick, add a tiny bit more cream or milk, a teaspoon at a time, until it reaches your desired drizzly consistency. If it’s too thin, you can add a few more chocolate chips and gently melt them in. This rich, warm dip is always a crowd-pleaser on any Fruit Charcuterie Board!
- Preparing Nuts and Dried Fruits: Simply place your mixed nuts and dried cranberries or raisins into separate small bowls or directly onto the board in small piles. These add fantastic crunch and chewiness, providing a welcome textural contrast to the juicy fruits.
- The Golden Drizzle: Have your honey pot ready with a drizzle stick. Honey is a timeless pairing with fruit and adds a beautiful, natural sweetness that many guests will appreciate.
- Optional Savory Additions: If you’re looking to add a little more substance, consider including some small cubes of mild cheese like cheddar or brie, or a few whole-grain crackers. These can provide a lovely savory element that pairs surprisingly well with the sweet fruits and dips on your grand Fruit Charcuterie Board.
Assembling Your Stunning Fruit Charcuterie Board
- Choose Your Board Wisely: Select a large wooden board, slate platter, or even a beautiful serving tray. The size will dictate how much fruit and how many accompaniments you can artfully arrange. I always prefer a board that feels substantial and visually appealing itself, as it’s the canvas for your edible masterpiece.
- Anchor with Bowls: Start by placing your small bowls filled with the yogurt dip, chocolate dip, and perhaps a bowl of nuts or dried fruit onto the board. These bowls act as anchors and help you build around them. I like to spread them out a bit to ensure easy access from different sides of the board.
- Place Larger, Less Delicate Fruits First: Begin arranging the larger fruit items, like melon wedges, pineapple chunks, and whole grape clusters, around your bowls. Create small “sections” or waves of these fruits. Don’t be afraid to let them overlap slightly; it adds to the abundance.
- Incorporate Medium-Sized Fruits: Next, add your sliced kiwis, orange segments, and the pre-treated apple and pear slices. Fan out the slices in attractive patterns or overlap them in rows. Remember that the lemon juice has bought you some time, but they still look best served relatively fresh.
- Fill Gaps with Berries and Small Fruits: This is where the berries really shine! Scatter your strawberries, raspberries, blueberries, and blackberries into the remaining open spaces. They are excellent for filling in gaps and adding pops of vibrant color throughout the entire Fruit Charcuterie Board. Don’t just dump them; try to nestle them into the crevices created by larger fruits.
- Add Your Accompaniments: Now, strategically place your remaining nuts and dried fruits directly onto the board, in small, inviting piles. You can also add any optional cheese cubes or crackers at this stage, tucking them into appealing spots.
- The Art of Layering and Texture: For a truly beautiful Fruit Charcuterie Board, think about layering. Let some fruits peek out from underneath others. Create height and dimension. Mix smooth melon with textured berries, and crisp apples with soft segments. This variety of textures makes each bite interesting.
- Color Distribution is Key: As you arrange, consciously distribute colors evenly across the board. Avoid having all the red fruits in one corner or all the green in another. A scattered, balanced approach creates a more harmonious and appetizing visual.
-
Garnish with Freshness: Finally, tuck fresh mint leaves here and there among the fruits. The vibrant green provides a beautiful contrast and a lovely aroma. If you have edible flowers, they add an extra touch of elegance and whimsy. Place the honey pot and drizzle stick prominently.
Creating Visual Interest:
Don’t be afraid to get creative! I love curling some fruit slices, like very thin apple slices, or creating little patterns with berry groupings. The goal is to make it look abundant, inviting, and almost too pretty to eat (but of course, you will!).
- Final Inspection: Take a step back and look at your completed Fruit Charcuterie Board from a distance. Are there any empty spots? Does it look balanced? Is everything easily accessible? Make any final adjustments to ensure it’s picture-perfect and ready to impress your guests.
Serving and Enjoying Your Fruit Charcuterie Board
- Serve Immediately or Chill: A fresh Fruit Charcuterie Board is best enjoyed right after assembly. If you need to prepare it a bit in advance, cover it loosely with plastic wrap and refrigerate for no more than 1-2 hours. Delicate berries and sliced fruits like apples and pears benefit from being served cool, but not overly chilled, to maintain their best flavor.
- Provide Utensils: Make sure to have small serving tongs or appetizer forks available for guests to easily pick up fruit without direct handling. Small spoons for the dips are also essential.
- Encourage Exploration: Let your guests know about the different fruits, dips, and accompaniments you’ve included. A beautifully presented Fruit Charcuterie Board is an invitation to explore and discover new favorite pairings.
- Customization Ideas: Don’t limit yourself to these ingredients! Feel free to experiment with other seasonal fruits like figs, plums, or even grilled peaches. You could also add different cheeses, small pastries, or savory elements like prosciutto for a more elaborate board. The beauty of a Fruit Charcuterie Board lies in its versatility and your personal touch.
-
Refresh as Needed: If your board is out for an extended period, especially on a warm day, be prepared to replace any fruits that might start to look wilted or tired. Having some backup pre-cut fruit in the fridge can be handy.
The Ultimate Crowd-Pleaser:
Remember, the true joy of a Fruit Charcuterie Board is its ability to cater to almost everyone, offering a healthy, refreshing, and utterly delicious option that is always a hit at any gathering, from casual brunches to elegant dinner parties.
Conclusion:
Well, my friends, we’ve reached the sweet end of our journey with this incredibly simple yet stunning recipe. I truly believe that what we’ve just created isn’t just a dish; it’s an experience. This recipe is a must-try because it effortlessly combines visual delight with an explosion of natural flavors, making it perfect for any occasion. It’s incredibly forgiving, allowing for creativity, and consistently delivers a “wow” factor with minimal effort on your part. Think about it: fresh, vibrant colors, diverse textures, and a symphony of tastes all coming together in one beautiful presentation. It’s the ultimate crowd-pleaser that caters to almost every dietary preference, making entertaining a breeze. You’ll find yourself returning to this method again and again because of its unparalleled ease and impressive results.
The beauty of this particular creation lies in its sheer versatility and the undeniable freshness it brings to any table. It’s not just a snack; it’s a centerpiece, a conversation starter, and a healthy indulgence all rolled into one. I’m talking about something that truly elevates any gathering, from a casual brunch to a sophisticated dinner party. Preparing this dish allows you to tap into your inner artist, arranging nature’s candy into a delightful mosaic. And let’s be honest, who doesn’t love something that looks like it took hours but was actually assembled in mere minutes? This is why I’m so passionate about sharing this guide for creating the perfect Fruit Charcuterie Board – it’s a game-changer for effortless entertaining, offering both elegance and simplicity in one delightful package.
Why This Recipe Shines
Beyond its aesthetic appeal, this recipe shines because it celebrates the inherent goodness of nature. Each bite is a burst of vitamins, fiber, and natural sweetness, making it a guilt-free pleasure. It’s an ideal option for those looking to offer healthier alternatives without sacrificing flavor or presentation. For parents, it’s a fantastic way to encourage kids to eat more fruit. For hosts, it’s a brilliant solution that caters to vegetarians, vegans, and those with gluten sensitivities, ensuring everyone at your table has something delicious and safe to enjoy. It truly embodies wholesome indulgence, proving that healthy eating can be incredibly exciting and visually appealing. This recipe proves that you don’t need complex ingredients or techniques to create something truly memorable and delicious.
Now, let’s talk about how you can take this delightful creation even further! While our core recipe is fantastic on its own, there are endless possibilities to customize it to your taste or occasion. For a decadent touch, consider adding small bowls of melted chocolate or a creamy caramel sauce for dipping – a true treat for those with a sweet tooth! If you’re hosting an adult gathering, a drizzle of balsamic glaze over certain fruits like strawberries or figs can introduce an unexpected, sophisticated tang. For a savory contrast, small cubes of sharp cheddar, a creamy brie, or even a salty feta can be wonderful additions. Don’t shy away from incorporating a variety of nuts like candied pecans, toasted almonds, or crunchy walnuts for added texture and healthy fats. And for an extra pop of flavor and visual appeal, a sprinkle of fresh mint leaves or basil can truly brighten the entire presentation, adding an aromatic touch that elevates the experience.
Seasonal & Thematic Twists
Think seasonally! In the summer, lean heavily into berries, peaches, and cherries, capturing the essence of warmer days. During the fall, apples, pears, grapes, and figs can take center stage, offering those earthy, comforting flavors. For a festive holiday spread, incorporate cranberries, pomegranates, and kiwis for those vibrant red and green hues that instantly evoke celebration. You could even theme your board: a “Tropical Oasis” with mango, pineapple, passion fruit, and kiwi, whisking your guests away to an exotic locale, or a “Berry Blast” focusing solely on a colorful array of strawberries, blueberries, raspberries, and blackberries for a burst of antioxidant-rich goodness. Consider serving it alongside a light sparkling wine or a refreshing homemade lemonade to complement the fresh flavors. This flexibility is what makes it so much fun – you’re never making the exact same thing twice unless you want to, always discovering new flavor combinations and visual delights!
So, what are you waiting for? I wholeheartedly encourage you to roll up your sleeves and give this recipe a try. Whether you’re hosting a grand party, planning a cozy family get-together, or simply treating yourself to a beautiful and nutritious snack, this recipe is guaranteed to impress. Don’t be afraid to experiment with your favorite fruits, textures, and accompanying dips. The best part is that there’s no wrong way to create your board; it’s all about what you love and what looks appealing to you. Once you’ve assembled your masterpiece, I would absolutely love to hear about your experience! Share your photos, your creative twists, and your family’s reactions. Did you discover a new favorite combination? Was it a hit at your last gathering? Drop a comment below, or tag me on social media so I can see your incredible creations. Your feedback and shared experiences inspire me and other readers to keep exploring the joyful world of cooking and entertaining. Happy creating, and enjoy every delicious, healthy bite!
Delicious Fruit Charcuterie Board Recipe: Perfect for Any Occasion
A Fruit Charcuterie Board is a delightful phrase that conjures images of vibrant colors, fresh aromas, and an abundance of nature’s candy, beautifully arranged. It’s about crafting an edible masterpiece that’s as impressive to behold as it is delicious to devour. This modern evolution draws inspiration from timeless fruit displays, offering an unparalleled sensory experience with sweet berries, tangy kiwi, juicy melon, and creamy exotic fruits. Incredibly versatile and no-cook, it’s ideal for any occasion, from casual gatherings to sophisticated brunches and healthy desserts, transforming simple ingredients into a show-stopping centerpiece.
Ingredients
-
3 lbs assorted fresh fruit (e.g., berries, melon, grapes, kiwi, apples, oranges)
-
1 cup plain Greek yogurt
-
2 tablespoons honey or maple syrup
-
1/2 teaspoon vanilla extract
-
1 cup good quality chocolate chips
-
1/4 cup heavy cream or milk
-
1 tablespoon coconut oil (optional)
-
1/2 cup Nutella
-
1/2 cup caramel sauce
-
1/2 cup cream cheese fruit dip
-
8 oz cheese slices
-
1/4 cup unsalted mixed nuts (optional)
-
1/4 cup dried cranberries or golden raisins (optional)
-
2-3 tablespoons fresh mint leaves, for garnish
-
A squeeze of lemon or orange juice (for preventing apple/pear browning)
Instructions
-
Step 1
Wash and thoroughly dry 3 lbs of assorted fresh fruit. Hull and slice strawberries. Leave grapes in small clusters. Peel, deseed, and slice melons (cantaloupe, honeydew), pineapple, and kiwi into bite-sized pieces. Peel and segment oranges. Core and thinly slice apples and pears, immediately tossing with a squeeze of lemon juice to prevent browning. -
Step 2
For the yogurt dip, combine 1 cup plain Greek yogurt, 2 tablespoons honey or maple syrup, and 1/2 teaspoon vanilla extract in a small bowl. For the chocolate dip, melt 1 cup chocolate chips with 1/4 cup heavy cream or milk (and optional 1 tablespoon coconut oil) until smooth. Place 1/2 cup Nutella, 1/2 cup caramel sauce, and 1/2 cup cream cheese fruit dip into separate small bowls. -
Step 3
Select a large serving board. Strategically place the small bowls containing the prepared yogurt dip, chocolate dip, Nutella, caramel sauce, and cream cheese fruit dip across the board to create anchor points for your arrangement. -
Step 4
Begin arranging the prepared fresh fruit around the anchor bowls. Start with larger items like melon wedges and grape clusters, then fill in gaps with smaller fruits such as berries, kiwi slices, orange segments, and apple/pear slices. Aim for a vibrant and abundant display, distributing colors and textures evenly. -
Step 5
Tuck 8 oz cheese slices into appealing spots on the board. Optionally, add 1/4 cup mixed nuts and 1/4 cup dried cranberries or raisins in small piles for added texture and flavor. -
Step 6
Garnish the board with fresh mint leaves for a pop of color and aroma. Provide small serving tongs, appetizer forks, and spoons for the dips. Serve the Fruit Charcuterie Board immediately or refrigerate loosely covered for up to 1-2 hours before serving.
Important Information
Nutrition Facts (Per Serving)
It is important to consider this information as approximate and not to use it as definitive health advice.
Allergy Information
Please check ingredients for potential allergens and consult a health professional if in doubt.


Leave a Comment