
Brown Butter Cookies are not just another sweet treat; they are a revelation, a masterclass in how a simple technique can elevate the ordinary to the extraordinary. I confess, once you experience the profound depth of flavor that brown butter imparts, you’ll find it hard to go back to regular cookies. This beloved ingredient, known in classic French cuisine as beurre noisette, transforms humble butter into a golden, nutty essence, infusing every bite with an irresistible aroma and a distinct toffee-like complexity. It’s this very transformation that makes these cookies so incredibly addictive and sought after, turning a simple cookie into a gourmet delight.
People worldwide adore these cookies not just for their delightfully chewy centers and perfectly crisp edges, but for the sophisticated, caramelized notes that dance on the palate.
The Magic of Brown Butter Cookies Lies in This Unique Flavor Profile
It offers a depth that regular butter simply cannot achieve. It’s a subtle yet profound difference that turns a good cookie into an unforgettable experience, making them a consistent favorite at bake sales, family gatherings, and quiet evenings at home. I promise you, once you bake a batch, you’ll understand why they hold a special place in the hearts of dessert enthusiasts everywhere.
Ingredients:
- Unsalted Butter: 1 cup (226g or 2 sticks), for browning. I always recommend unsalted so you can control the salt content yourself!
- Granulated Sugar: ½ cup (100g). This provides a lovely crispness to the edges.
- Light Brown Sugar: 1 ½ cups (300g), packed. This is crucial for that chewy texture and adds depth of flavor, especially when paired with the brown butter.
- Large Eggs: 2, at room temperature. Room temperature eggs emulsify better with the butter and sugar, leading to a smoother, more uniform dough.
- Egg Yolk: 1 large, at room temperature. This extra yolk adds richness and chewiness without making the cookies cakey.
- Vanilla Extract: 2 teaspoons. Don’t skimp on good quality vanilla; it really shines in these cookies.
- All-Purpose Flour: 2 ¼ cups (270g). Measure this by weight for accuracy, or use the spoon and level method to avoid a dense cookie.
- Baking Soda: 1 teaspoon. This helps with the lift and spread.
- Salt: 1 teaspoon. A good quality fine sea salt balances the sweetness and enhances all the flavors.
- Optional Mix-ins: 1 cup chocolate chips (milk, semi-sweet, or dark work wonderfully), or chopped nuts (pecans or walnuts are fantastic with the nutty brown butter flavor). For classic Brown Butter Cookies, sometimes simplicity is best, but a little chocolate never hurt anyone!
Preparing the Brown Butter
- Begin Browning Your Butter: The secret to truly exceptional Brown Butter Cookies starts here. Take your 1 cup (226g) of unsalted butter and cut it into roughly equal-sized pieces. Place these pieces into a light-colored heavy-bottomed saucepan. The light color of the pan is important because it will allow you to clearly see the color changes as the butter browns, preventing accidental burning.
- Melt and Simmer: Place the saucepan over medium heat. The butter will first melt, then it will begin to foam. This foam is the water evaporating from the butter. Swirl the pan occasionally to ensure even heating and to prevent the milk solids from sticking to the bottom.
- Watch for Color and Aroma: As the butter continues to cook, the foam will subside slightly, and you’ll start to see small, amber-colored bits forming at the bottom of the pan. This is where the magic happens! These are the milk solids caramelizing, creating that distinct nutty, toasted aroma and flavor profile that makes Brown Butter Cookies so irresistible. Keep swirling the pan and watch carefully. The butter will transition from yellow to a golden hue, and then to a beautiful amber-brown. The aroma will become intensely nutty and complex.
- Remove from Heat Immediately: The moment you see those deep golden-brown specks at the bottom and smell that rich, nutty aroma, remove the pan from the heat. The butter can go from perfectly browned to burned in a matter of seconds, and burnt butter will impart a bitter, unpleasant taste to your cookies. It’s truly a delicate balance, so don’t walk away!
- Cool the Brown Butter: Carefully pour the hot brown butter, including all those delicious browned bits, into a heatproof bowl. I like to use a bowl that can withstand a bit of residual heat, like a ceramic or glass bowl. Allow the brown butter to cool down to at least room temperature, which will take about 30-45 minutes. You can speed this up by placing it in the refrigerator for 15-20 minutes, stirring occasionally, but be careful not to let it solidify completely. You want it to be cool enough that it won’t cook your eggs when added, but still soft enough to cream with the sugars. For the best texture in your Brown Butter Cookies, the ideal consistency is still liquid but cool, or even slightly solidified around the edges, but mostly a thick liquid.
Making the Brown Butter Cookie Dough
- Whisk Dry Ingredients: While the brown butter cools, in a medium bowl, whisk together your all-purpose flour, baking soda, and salt. Make sure these are thoroughly combined to ensure even distribution throughout the dough. Setting this aside now makes the next steps smoother.
- Cream Sugars and Brown Butter: Once your brown butter has cooled sufficiently (remember, it should be cool to the touch but still mostly liquid or very soft), transfer it to the bowl of a stand mixer fitted with the paddle attachment, or use a large bowl with an electric hand mixer. Add the granulated sugar and the packed light brown sugar. Beat on medium speed for 2-3 minutes until the mixture is light, fluffy, and well combined. You’ll notice it becomes a pale tan color. This creaming process incorporates air, which contributes to the final texture of your Brown Butter Cookies.
- Add Eggs and Vanilla: Scrape down the sides of the bowl with a spatula to ensure everything is incorporated. Add one large egg at a time, beating well after each addition until just combined. Then, add the extra egg yolk and the vanilla extract. Beat for another minute or so until the mixture is smooth and slightly glossy. It’s important to add the eggs one at a time to allow them to fully emulsify with the butter and sugar mixture, creating a stable base for your dough.
- Incorporate Dry Ingredients: With the mixer on low speed, gradually add the dry ingredients to the wet ingredients, a third at a time. Mix only until just combined and no streaks of flour remain. Be very careful not to overmix the dough. Overmixing develops the gluten in the flour too much, which can lead to tough, dense Brown Butter Cookies instead of soft and chewy ones. A few streaks of flour are better than overmixing; you can finish incorporating them by hand with a spatula.
- Stir in Optional Mix-ins: If you’re adding chocolate chips, nuts, or any other mix-ins, gently fold them into the dough by hand using a sturdy spatula. Distribute them evenly throughout the dough.
Chilling the Dough (Highly Recommended for Superior Brown Butter Cookies)
-
Chill Your Dough: This step is often overlooked but is genuinely transformative for Brown Butter Cookies. Cover the bowl tightly with plastic wrap or transfer the dough to an airtight container. Refrigerate the cookie dough for at least 2 hours, but preferably 24-48 hours.
Why Chill the Dough?
- Flavor Development: Chilling allows the flavors to meld and deepen, especially the complex notes from the brown butter. The brown sugar and brown butter have more time to fully hydrate the flour, enhancing the overall taste.
- Reduced Spreading: Cold butter takes longer to melt in the oven, which means the cookies spread less, resulting in thicker, chewier cookies.
- Improved Texture: The rest period helps the flour fully hydrate, leading to a more tender and chewy crumb. You’ll achieve those perfectly crinkled edges and soft centers.
I personally find that a minimum of 24 hours of chilling yields the absolute best flavor and texture for these Brown Butter Cookies. If you’re short on time, even 30 minutes in the freezer can help, but it won’t give you the full benefits of a longer chill.
Baking the Brown Butter Cookies
- Preheat Your Oven: Once you’re ready to bake, preheat your oven to 375°F (190°C). Line baking sheets with parchment paper or silicone baking mats. This prevents sticking and ensures even baking.
- Portion the Dough: Scoop rounded tablespoons or use a 1.5-2 tablespoon cookie scoop to portion out the chilled dough. Place the dough balls onto the prepared baking sheets, leaving about 2-3 inches of space between each cookie, as they will spread. I usually fit 6-8 cookies per standard baking sheet.
-
Bake to Golden Perfection: Bake one sheet at a time in the preheated oven for 10-12 minutes.
- You’ll know the Brown Butter Cookies are done when the edges are set and a beautiful golden brown.
- The centers should still look slightly soft and puffed. They will continue to set as they cool.
- If you prefer a chewier cookie, lean towards the shorter baking time. For a slightly crispier edge, extend it by a minute.
- Pro Tip: For even baking, especially if your oven has hot spots, rotate the baking sheet halfway through the baking time.
Cooling and Enjoying Your Brown Butter Cookies
- Initial Cooling on Baking Sheet: Once out of the oven, allow the Brown Butter Cookies to cool on the baking sheet for about 5 minutes. They are quite delicate when hot and can fall apart if moved too soon. This brief cooling period allows them to firm up.
- Transfer to Wire Rack: After 5 minutes, carefully transfer the cookies to a wire rack to cool completely. Cooling on a wire rack ensures air circulation around all sides, preventing the bottoms from becoming soggy and promoting an even texture throughout.
- Serve and Store: These Brown Butter Cookies are absolutely divine warm, with their soft, gooey centers and slightly crisp edges. However, they are also excellent once fully cooled. Store any leftover cookies in an airtight container at room temperature for up to 3-4 days. They tend to get even chewier the next day! You can also freeze the baked cookies for longer storage; just thaw at room temperature before enjoying.
Conclusion:
Well, my fellow baking enthusiasts, we’ve reached the sweet finale of our journey with what I truly believe are some of the most profoundly satisfying treats you’ll ever pull from your oven. If you’ve been following along, you already know the magic that happens when a simple ingredient like butter is transformed into a nutty, aromatic elixir. This isn’t just another cookie recipe; it’s an experience, a subtle elevation of the familiar into something truly extraordinary. I’m absolutely passionate about these cookies, and I promise you, once you taste them, you’ll understand why.
Why are these cookies a must-try, you ask? It all boils down to that incredible depth of flavor that only brown butter can provide. It’s a game-changer. The nutty, caramel-like notes infused throughout the dough create a complexity that’s often missing in standard cookie recipes. Beyond the flavor, there’s the texture – a perfect balance of crispy edges, a delightfully chewy center, and just the right amount of tenderness. Every bite offers a symphony of sensations that will undoubtedly leave you craving just one more. I’ve made countless batches, and each time, the sheer joy of biting into one of these masterpieces is just as potent as the first. They manage to be sophisticated yet comforting, familiar yet entirely new. It’s a testament to how a small technique can yield such monumental flavor results, turning a simple dessert into something truly memorable.
Now, let’s talk about how to best enjoy these glorious creations or even how to put your own spin on them. Of course, a warm Brown Butter Cookie straight from the cooling rack, paired with a tall glass of cold milk, a steaming mug of coffee, or a comforting cup of tea, is pure bliss. It’s the classic, unbeatable combination that warms the soul. But don’t stop there! Imagine crumbling these rich, flavorful cookies over a scoop of artisanal vanilla bean ice cream, allowing the residual warmth of the cookie to slightly melt the cream – pure heaven! They also make an incredible base for a deconstructed dessert, perhaps layered with fresh berries and whipped cream in a parfait glass for an elegant, yet simple, presentation. For a truly indulgent treat, you could even sandwich a dollop of salted caramel or a rich chocolate ganache between two cookies.
And the fun doesn’t end with serving! There are so many exciting ways to personalize this recipe. For an extra pop of flavor and texture, consider folding in chopped toasted pecans or walnuts, or even a mix of dark and milk chocolate chips. A sprinkle of flaky sea salt on top before baking enhances all those lovely sweet and nutty notes, providing a delightful contrast. You could also experiment with a touch of espresso powder in the dough to deepen the chocolate flavor if you’re using chocolate chips, or a pinch of cinnamon or cardamom for a warm, spiced twist, especially wonderful during the cooler months. Think seasonally – dried cranberries and white chocolate for the holidays, or perhaps a hint of orange zest for a brighter, citrusy profile. The foundational flavor of the brown butter is so robust and versatile that it welcomes these additions with open arms, allowing you to create your own signature cookie.
I genuinely cannot emphasize enough how much I want you to try this recipe. Seriously, clear your schedule, gather your ingredients, and set aside some time for this delightful baking adventure. You’ll be so glad you did! There’s a profound satisfaction that comes from creating something so delicious from scratch, especially when it’s met with rave reviews from everyone who tastes it. This recipe isn’t just about making cookies; it’s about making memories, sharing joy, and savoring those simple, sweet moments in life.
Once you’ve experienced the magic of these Brown Butter Cookies for yourself, I would absolutely love to hear about it! Did you stick to the classic version, or did you venture into exciting variations? What did your friends and family think? Please, don’t hesitate to share your baking journey with me. Tag me in your photos on social media, leave a comment below with your feedback, or send an email telling me all about your success. Your stories and experiences are truly the best part of sharing these recipes. I’m always thrilled to see your creations and hear how these recipes bring a little extra sweetness into your homes. So go forth, bake with abandon, and prepare to fall in love with your new favorite cookie!
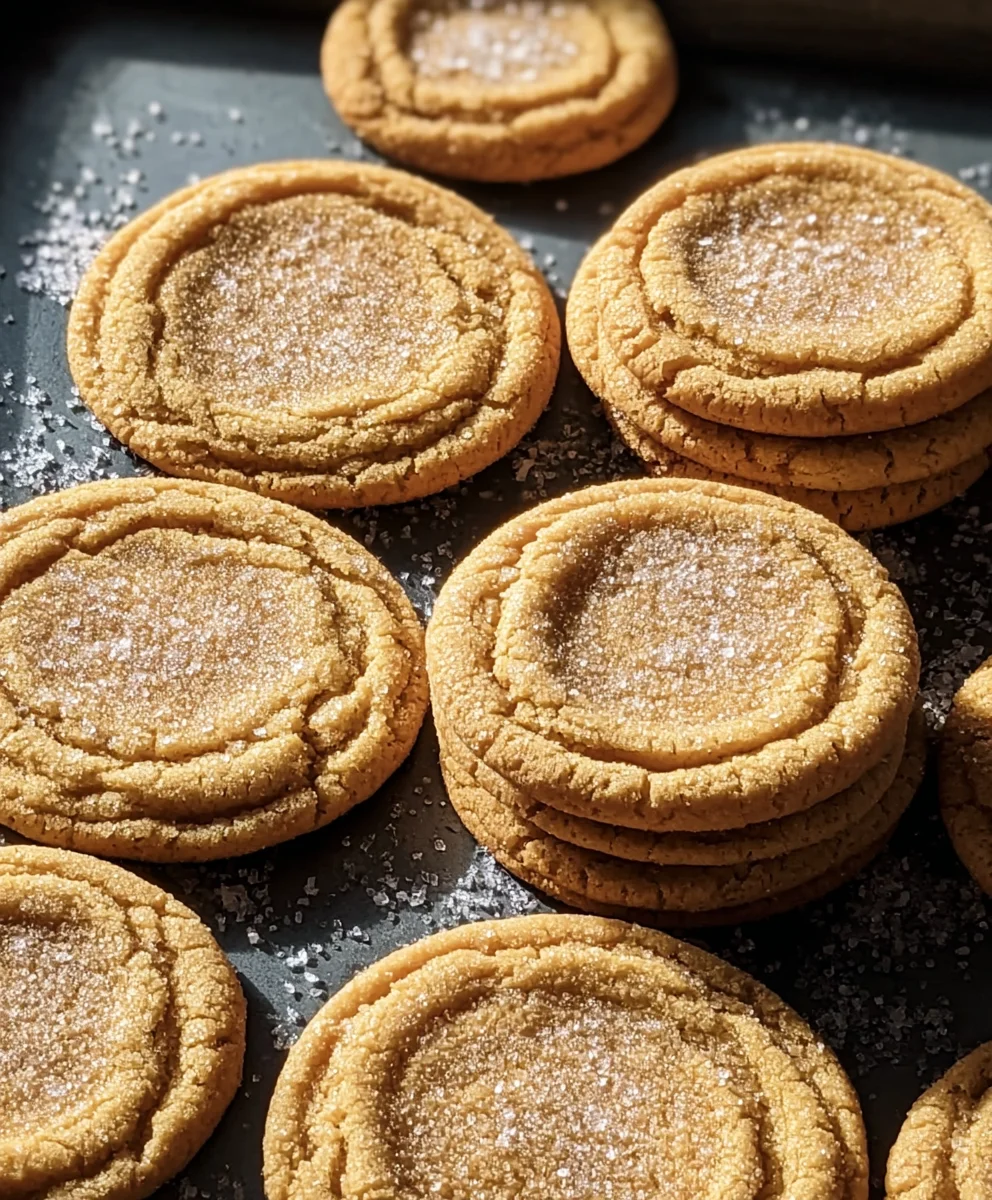
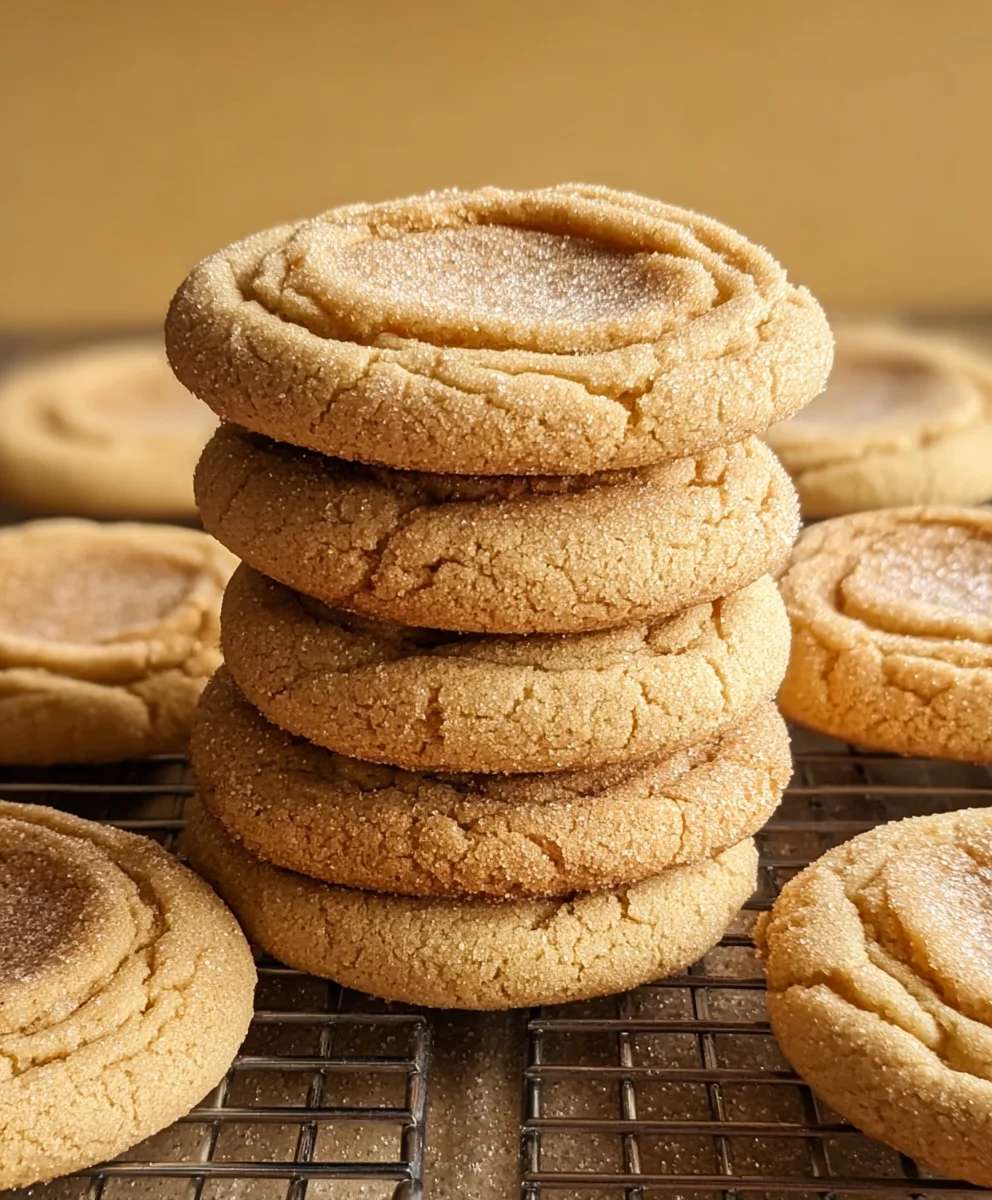
Brown Butter Cookies: Chewy, Nutty & Irresistibly Delicious!
These Brown Butter Cookies are a revelation, elevating the ordinary to extraordinary with the profound depth of flavor that brown butter (beurre noisette) imparts. Each bite offers an irresistible aroma, a distinct toffee-like complexity, delightfully chewy centers, and perfectly crisp edges. An unforgettable gourmet delight.
Ingredients
-
1 cup (226g) Unsalted Butter
-
½ cup (100g) Granulated Sugar
-
1 ½ cups (300g) Light Brown Sugar, packed
-
2 Large Eggs, at room temperature
-
1 Large Egg Yolk, at room temperature
-
2 teaspoons Vanilla Extract
-
2 ¼ cups (270g) All-Purpose Flour
-
1 teaspoon Baking Soda
-
1 teaspoon Salt
-
Optional: 1 cup chocolate chips or chopped nuts
Instructions
-
Step 1
Cut 1 cup unsalted butter into pieces. Melt in a light-colored saucepan over medium heat. Cook, swirling occasionally, until foam subsides, amber bits form at the bottom, and butter is deep golden-brown with a nutty aroma. Immediately remove from heat. -
Step 2
Pour brown butter (including browned bits) into a heatproof bowl. Cool to room temperature (about 30-45 minutes), or until still liquid/soft but cool to the touch. This can be sped up by refrigerating for 15-20 minutes, stirring occasionally. -
Step 3
In a medium bowl, whisk together flour, baking soda, and salt. Set aside. -
Step 4
In a stand mixer with the paddle attachment, cream the cooled brown butter with granulated sugar and light brown sugar on medium speed for 2-3 minutes until light and fluffy. -
Step 5
Scrape down the bowl. Add eggs one at a time, beating well after each. Then add the egg yolk and vanilla extract, beating for another minute until smooth and slightly glossy. -
Step 6
With the mixer on low speed, gradually add the dry ingredients to the wet mixture, mixing only until just combined and no streaks of flour remain. Do not overmix. -
Step 7
If using, gently fold in chocolate chips or chopped nuts by hand with a spatula until evenly distributed. -
Step 8
Cover the dough tightly with plastic wrap or transfer to an airtight container. Refrigerate for a minimum of 2 hours, but preferably 24-48 hours, for best flavor and texture. -
Step 9
When ready to bake, preheat your oven to 375°F (190°C). Line baking sheets with parchment paper or silicone baking mats. -
Step 10
Scoop rounded tablespoons (or 1.5-2 tablespoon cookie scoops) of chilled dough onto the prepared baking sheets, leaving 2-3 inches between each cookie. -
Step 11
Bake one sheet at a time for 10-12 minutes, or until the edges are set and golden brown, and the centers still look slightly soft. Rotate the baking sheet halfway through if needed for even baking. -
Step 12
Allow cookies to cool on the baking sheet for about 5 minutes before carefully transferring them to a wire rack to cool completely. -
Step 13
Serve warm or once fully cooled. Store leftover cookies in an airtight container at room temperature for up to 3-4 days. Unbaked dough balls can be refrigerated for up to a week or frozen for a month; thaw overnight before baking if frozen.
Important Information
Nutrition Facts (Per Serving)
It is important to consider this information as approximate and not to use it as definitive health advice.
Allergy Information
Please check ingredients for potential allergens and consult a health professional if in doubt.
Leave a Comment