
Tortilla Chip Enchiladas are a revelation for any busy weeknight or when you’re craving serious comfort food without the fuss. Forget the hassle of rolling individual enchiladas; this brilliant shortcut delivers all the rich, savory, cheesy goodness you adore with a fraction of the effort. What’s not to love about layering crispy tortilla chips with a flavorful filling, smothering it all in a luscious sauce, and baking until bubbly and irresistible? It’s the ultimate crowd-pleaser, the dish that brings smiles to the table and prompts second helpings. The magic of these Tortilla Chip Enchiladas lies in their textural contrast – the slight crispness of the chips against the soft, saucy embrace of the filling and cheese. This recipe elevates a humble snack into a spectacular main course, proving that deliciousness doesn’t always require painstaking preparation.
Why You’ll Adore This Recipe:
Effortless Comfort:
This dish is designed for ease. It’s perfect for when you want something deeply satisfying but have limited time or energy. The layering technique is so simple, even novice cooks can achieve spectacular results.
Flavor Explosion:
We’re talking layers of seasoned goodness. Whether you choose chicken, beef, or a vegetarian filling, the combination of spices, enchilada sauce, and melted cheese is simply divine. Each bite is a symphony of classic Tex-Mex flavors.
Customizable Delight:
The beauty of Tortilla Chip Enchiladas is how adaptable they are. Use your favorite protein, adjust the spice level, add extra veggies, or swap out cheeses. Make it your own!
Ingredients:
- 1 pound ground beef (you can also use shredded chicken or ground turkey if you prefer)
- 1 bag tortilla chips (approximately 12 ounces, any kind you like will work)
- 3 cups shredded cheese (a blend of cheddar and Monterey Jack is fantastic here, but use your favorite!)
- 1 (28 ounce) can of red enchilada sauce
- 1 (4 ounce) can of diced green chilies, drained
- 1 teaspoon ground cumin
- ½ cup salsa (your preferred heat level)
Let’s Get Cooking!
Preparing the Beef Filling
The first step in creating these incredibly satisfying Tortilla Chip Enchiladas is to get our flavorful beef filling ready. Grab a large skillet and place it over medium-high heat. Add your pound of ground beef to the hot skillet. As the beef begin extracts to cook and brown, use a spatula or spoon to break it up into smaller pieces. Continue to cook, stirring occasionally, until the beef is no longer pink and is nicely browned. This usually takes about 7-10 minutes. Once the beef is fully cooked, carefully drain off any excess grease. It’s important to get most of the grease out to prevent the enchiladas from becoming too oily.
Next, we’ll infuse the beef with some wonderful Tex-Mex flavors. Sprinkle the ground cumin over the browned beef. If you’re using ground turkey or chicken, this is the point where you’d add the cumin as well. Stir the cumin into the beef to ensure it’s evenly distributed. This simple addition of cumin will add a warm, earthy aroma and taste that’s essential to enchilada flavor.
Now it’s time to introduce the zest from the chilies. Add the drained diced green chilies to the skillet with the seasoned ground beef. Stir everything together. The green chilies add a subtle but crucial layer of mild heat and a bright, fresh flavor that complements the richness of the beef. Cook for another 2-3 minutes, allowing the flavors to meld together. This brief cooking period helps to soften the chilies slightly and marry them with the beef and cumin.
Assembling Your Enchilada Masterpiece
With our flavorful filling prepared, it’s time to start assembling these delightful Tortilla Chip Enchiladas. Preheat your oven to 375°F (190°C). This moderate temperature will allow the enchiladas to heat through evenly and the cheese to melt beautifully without overcooking the chips.
Now, grab your 9×13 inch baking dish. This is where all the magic will happen. You’ll want to create a base layer for your enchiladas. Take about half of your bag of tortilla chips and spread them evenly across the bottom of the baking dish. Don’t worry if there are some small gaps; the enchilada sauce and other ingredients will fill them in. This layer of chips will soak up some of the delicious sauce and become wonderfully tender, similar to traditional enchiladas but with an easier prep!
Next, spoon about half of your prepared ground beef and green chili mixture evenly over the layer of tortilla chips. Try to distribute it as uniformly as possible to ensure every bite has a good amount of filling. Don’t be shy; pack it on!
Now it’s time to introduce the star liquid: the enchilada sauce. Open your 28-ounce can of red enchilada sauce. Pour about half of the sauce over the beef and chip layer. Make sure to get good coverage, as this sauce is the backbone of the enchilada flavor. Itgin extractll begin to soften the chips and bind everything together.
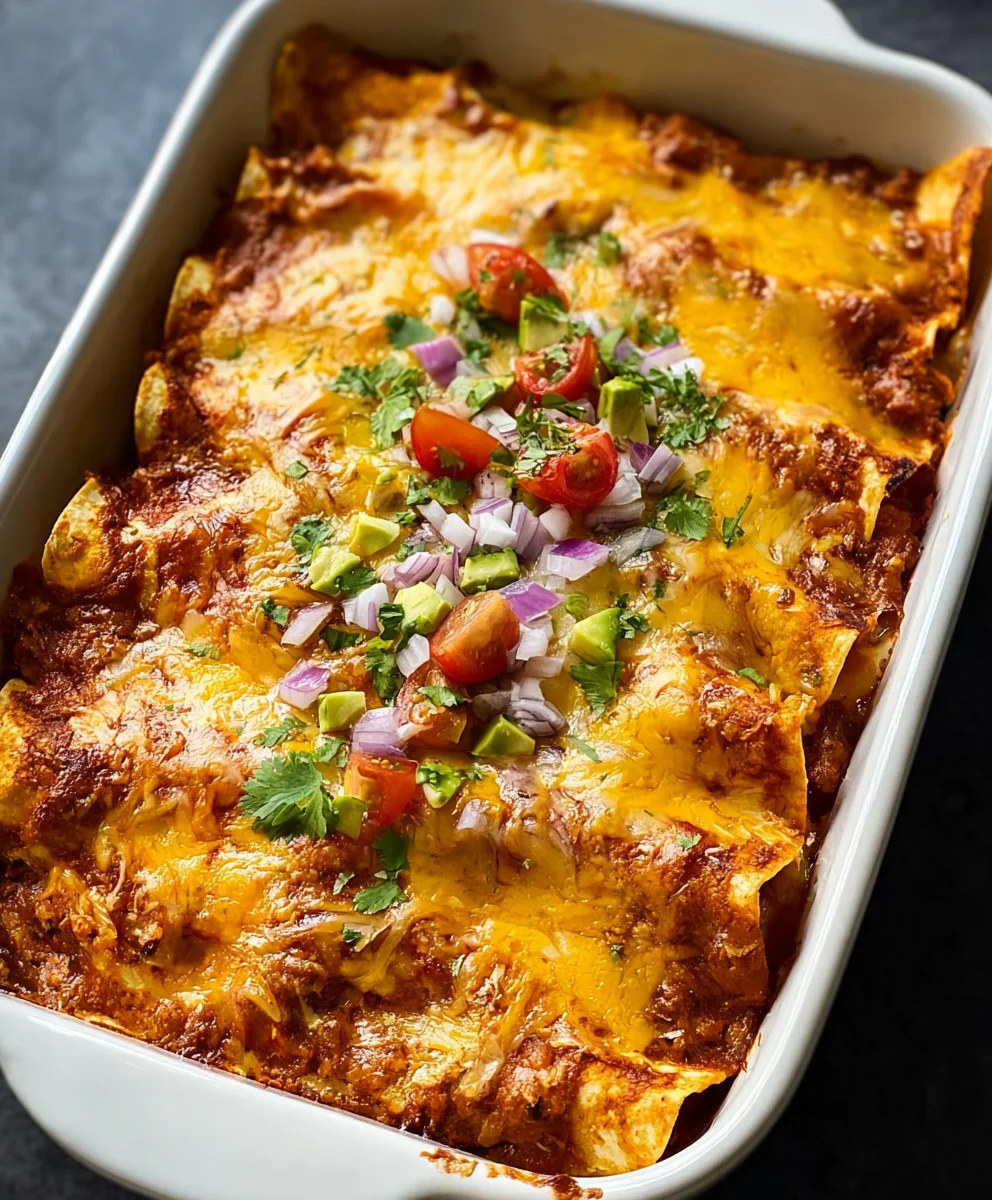
After the sauce, sprinkle about half of your shredded cheese over the beef and sauce mixture. This cheese will start to melt and create a delicious, gooey layer.
Now, we repeat the layers! Add the remaining tortilla chips on top of the first cheesy layer. Then, spread the rest of the ground beef and green chili mixture over these chips. Pour the remaining enchilada sauce over this second layer of beef and chips. Finally, top everything generously with the remaining shredded cheese. Make sure the cheese covers the entire surface to create that irresistible, bubbly, golden-brown crust.
Baking to Perfection
For the final touch, we’ll add a burst of fresh flavor from the salsa. Spoon your ½ cup of salsa over the top layer of cheese. You can do this in dollops or spread it slightly. The salsa will bake along with the enchiladas, adding a vibrant contrast to the rich, savory flavors.
Cover the baking dish tightly with aluminum foil. This is crucial for the initial baking stage. It helps to steam the chips and ensure they soften properly, preventing them from becoming too crunchy. Place the covered dish into your preheated oven. Bake for 20-25 minutes.
After the initial baking time, carefully remove the aluminum foil. You’ll see that the sauce is bubbling, and the cheese is starting to melt beautifully. Continue to bake, uncovered, for another 10-15 minutes, or until the cheese is completely melted, bubbly, and has developed a lovely golden-brown color. Keep an eye on it to prevent the edges from burning. The aroma filling your kitchen at this point will be absolutely divine!
Once the Tortilla Chip Enchiladas are perfectly baked, carefully remove the dish from the oven. Let them rest for about 5-10 minutes before serving. This resting period allows the flavors to settle and makes it easier to serve neat portions. Enjoy your delicious and easy Tortilla Chip Enchiladas!

Conclusion:
And there you have it! Your delicious and incredibly satisfying batch of Tortilla Chip Enchiladas is ready to be devoured. We’ve walked through transforming humble tortilla chips into a gooey, flavorful casserole that’s sure to impress. The beauty of this dish lies in its simplicity and the comforting embrace of melted cheese and savory sauce. I truly hope you enjoyed making and, more importantly, eating these Tortilla Chip Enchiladas. They are perfect for a weeknight family dinner or a casual get-together with friends. Don’t be afraid to get creative with your toppings – fresh cilantro, a dollop of sour cream, or even some sliced avocado can elevate this dish even further!
Frequently Asked Questions:
Can I make Tortilla Chip Enchiladas ahead of time?
Absolutely! You can assemble the Tortilla Chip Enchiladas up to a day in advance. Cover them tightly with plastic wrap and refrigerate. When you’re ready to bake, remove the plastic wrap and bake as directed, potentially adding a few extra minutes to ensure it’s heated through.
What are some other filling options for Tortilla Chip Enchiladas?
The possibilities are endless! While the recipe provides a great base, feel free to add cooked shredded chicken, seasoned ground beef or turkey, black beans, or even sautéed vegetables like bell peppers and onions. Just ensure your fillings are pre-cooked before layering them into the Tortilla Chip Enchiladas.
Is this recipe spicy?
The spiciness of these Tortilla Chip Enchiladas will largely depend on the type of enchilada sauce you use. Many store-bought enchilada sauces have a mild to medium heat level. If you prefer a spicier dish, opt for a hot enchilada sauce or add a pinch of cayenne pepper to your filling.
Easy Beef Tortilla Chip Enchiladas – Quick Weeknight Meal
A super-easy and quick weeknight meal featuring layers of tortilla chips, seasoned ground beef, enchilada sauce, and melted cheese. Perfect for busy families!
Ingredients
-
1 pound ground beef
-
1 bag tortilla chips (approximately 12 ounces)
-
3 cups shredded cheese
-
1 (28 ounce) can of red enchilada sauce
-
1 (4 ounce) can of diced green chilies, drained
-
1 teaspoon ground cumin
-
½ cup salsa
Instructions
-
Step 1
Brown the ground beef in a large skillet over medium-high heat. Drain off excess grease. Stir in the ground cumin and cook for another 2-3 minutes until fragrant. -
Step 2
Add the drained diced green chilies to the skillet with the beef and cumin. Stir to combine and cook for another 2-3 minutes. -
Step 3
Preheat oven to 375°F (190°C). Spread half of the tortilla chips in the bottom of a 9×13 inch baking dish. Top with half of the beef mixture, then half of the enchilada sauce, and half of the shredded cheese. -
Step 4
Repeat the layers: remaining tortilla chips, remaining beef mixture, remaining enchilada sauce, and remaining shredded cheese. Spoon the salsa over the top layer of cheese. -
Step 5
Cover the baking dish tightly with aluminum foil and bake for 20-25 minutes. Remove foil and bake for an additional 10-15 minutes, or until the cheese is bubbly and golden brown. -
Step 6
Let rest for 5-10 minutes before serving. Enjoy!
Important Information
Nutrition Facts (Per Serving)
It is important to consider this information as approximate and not to use it as definitive health advice.
Allergy Information
Please check ingredients for potential allergens and consult a health professional if in doubt.


Leave a Comment