
Easter Bunny Chick Cupcakes – imagine the pure delight and eager smiles these adorable confections bring to any festive gathering. As the vibrant hues of spring emerge, signaling renewal and celebration, our kitchens often become hubs of creativity, especially when it comes to crafting treats that embody the season’s joyful spirit. I’ve always found immense satisfaction in baking something that is not only delicious but also visually captures the essence of a holiday, and these cupcakes certainly achieve just that.
There’s a beautiful tradition of preparing special foods for Easter, reflecting themes of new life and abundance. While the exact historical roots of bunny and chick decorated cupcakes are relatively modern, they beautifully echo the enduring symbols of Easter – the playful bunny, a harbinger of spring, and the charming chick, representing new beginnings. These delightful individual desserts have rapidly become a beloved staple, offering a whimsical twist to the traditional Easter feast.
Why You’ll Adore These Festive Treats
People absolutely adore these Easter Bunny Chick Cupcakes not just for their undeniable cuteness, which instantly brightens any dessert table, but also for their exquisite taste and satisfying texture. Each bite offers a perfect harmony of a light, fluffy cake base and a rich, creamy frosting that I’ve meticulously crafted to be utterly irresistible. They are incredibly convenient as individual portions, making them ideal for picnics, potlucks, or simply a sweet treat for the family. Preparing them is an experience in itself – a joyful culinary adventure that culminates in truly memorable holiday delights. Get ready to impress your guests and create lasting memories with these charming creations!
Ingredients:
Get ready to create the most adorable and delicious Easter Bunny Chick Cupcakes! Here’s everything you’ll need to make these festive treats from scratch. I’ve broken it down into sections to make your shopping and preparation super easy.
-
For the Vanilla Cupcakes:
- 1 ½ cups (3 sticks or 340g) unsalted butter, softened to room temperature – This is crucial for a smooth batter!
- 2 cups (400g) granulated sugar
- 4 large eggs, at room temperature – Again, room temperature helps everything emulsify beautifully.
- 1 tablespoon pure vanilla extract – Don’t skimp on the good stuff; it makes all the difference.
- 3 cups (360g) all-purpose flour – Make sure it’s spooned and leveled, not scooped directly from the bag.
- 1 tablespoon baking powder – For that perfect lift!
- ½ teaspoon salt
- 1 cup (240ml) whole milk, at room temperature
- Cupcake liners (about 24-30, depending on how full you fill them)
-
For the Classic Vanilla Buttercream Frosting:
- 2 cups (4 sticks or 450g) unsalted butter, softened to room temperature – Yes, more butter! It’s the base of a dreamy buttercream.
- 8 cups (960g) powdered sugar (confectioners’ sugar), sifted – Sifting prevents lumps and gives you a silky-smooth finish.
- 1 tablespoon pure vanilla extract
- ¼ teaspoon salt
- 4-6 tablespoons (60-90ml) heavy cream or whole milk – Adjust as needed for your desired consistency.
- Gel food coloring in yellow (for chicks), pink (for bunny ears/noses), and optional black or brown (for eyes). Gel colors give vibrant hues without thinning the frosting too much.
-
For the Easter Bunny Decorations:
- Large marshmallows – Cut diagonally for the perfect ear shape.
- Pink sanding sugar or sprinkles – For the inner ear detail.
- Mini chocolate chips or edible black food marker – For the eyes.
- Small round sprinkles (e.g., pink nonpareils or small candies) – For the bunny noses.
- White sprinkles or edible pearls (optional) – For whiskers, if desired.
-
For the Easter Chick Decorations:
- Candy corn – For the adorable little beaks.
- Orange candy melts or a small amount of orange-colored fondant – For the chick feet.
- Mini chocolate chips or edible black food marker – For the eyes.
-
Equipment You’ll Need:
- Standard 12-cup muffin tins
- Paper cupcake liners
- Large mixing bowls (at least two)
- Electric mixer (stand mixer with paddle attachment or hand mixer)
- Rubber spatula
- Wire cooling rack
- Piping bags and large round tips (e.g., Wilton 1A or 1M) for frosting
- Small clean paintbrush (for painting candy melts for feet, if using)
- Sharp knife or kitchen shears
- Parchment paper or wax paper
Preparing the Cupcakes
Let’s get started on the foundation of our beautiful Easter Bunny Chick Cupcakes! A tender, fluffy vanilla cupcake is the perfect base for our fun decorations.
-
Preheat and Prep:
Before you begin mixing, preheat your oven to 350°F (175°C). Line two standard 12-cup muffin tins with paper cupcake liners. This recipe makes about 24-30 cupcakes, so you might need a third tin or bake in batches. I always prepare extra just in case!
-
Combine Dry Ingredients:
In a medium bowl, whisk together the all-purpose flour, baking powder, and salt. Whisking ensures these dry ingredients are evenly distributed, which is essential for a consistent texture in your cupcakes. Set this aside for a moment.
-
Cream Butter and Sugar:
In a large mixing bowl, using an electric mixer fitted with the paddle attachment (or a hand mixer), cream together the softened unsalted butter and granulated sugar on medium-high speed. Beat them for about 3-5 minutes, until the mixture is light, fluffy, and pale yellow. This step incorporates air into the butter, which contributes to the cupcakes’ light texture.
-
Add Eggs and Vanilla:
Reduce the mixer speed to medium-low. Add the large eggs one at a time, beating well after each addition. Make sure each egg is fully incorporated before adding the next. Scrape down the sides of the bowl as needed to ensure everything is mixing evenly. Once all the eggs are in, beat in the pure vanilla extract. The mixture might look a little curdled at this point, but don’t worry, it will come together with the dry ingredients.
-
Alternate Dry and Wet Ingredients:
With the mixer on low speed, gradually add the dry ingredients mixture in three additions, alternating with the whole milk in two additions, beginning and ending with the dry ingredients. For example: add ⅓ of the flour mixture, mix until just combined; then ½ of the milk, mix until just combined; then another ⅓ of the flour, mix; the remaining ½ of the milk, mix; and finally the last ⅓ of the flour mixture, mixing until just barely combined. The key here is not to overmix! Overmixing develops the gluten in the flour, leading to tough, dense cupcakes. We want them soft and tender!
-
Fill Cupcake Liners:
Using an ice cream scoop or a spoon, fill each prepared cupcake liner about two-thirds full. This allows room for the cupcakes to rise without spilling over. If you overfill, you’ll end up with mushroom-topped cupcakes, which aren’t ideal for decorating later.
-
Bake:
Bake for 18-22 minutes, or until a wooden skewer or toothpick inserted into the center of a cupcake comes out clean. The tops should be lightly golden and spring back when gently touched. Rotate the muffin tins halfway through baking for even cooking, especially if your oven has hot spots.
-
Cool Completely:
Once baked, remove the muffin tins from the oven and let the cupcakes cool in the tins for about 5 minutes. Then, transfer them to a wire cooling rack to cool completely. This is a crucial step! Frosting warm cupcakes will result in melted, messy frosting. Patience is a virtue here, my friends!
Whipping Up the Buttercream Frosting
A silky, delicious buttercream is vital for our Easter Bunny Chick Cupcakes. This recipe yields a generous amount, perfect for piping and decorating all your adorable creations.
-
Cream the Butter:
In a very large mixing bowl, using an electric mixer with the paddle attachment, beat the softened unsalted butter on medium speed for about 2-3 minutes until it’s super light, fluffy, and pale in color. This aerates the butter, making your buttercream incredibly light and smooth.
-
Add Powdered Sugar:
Gradually add the sifted powdered sugar, about 1-2 cups at a time, mixing on low speed until combined after each addition. Once all the powdered sugar is incorporated, the mixture will be quite thick. Scrape down the sides of the bowl often.
-
Flavor and Thin:
Add the pure vanilla extract and salt. With the mixer on low, gradually add the heavy cream or whole milk, one tablespoon at a time, until your desired consistency is reached. You want a frosting that is spreadable and pipeable but still holds its shape well. I usually end up using about 4-5 tablespoons. If it’s too thick, add a bit more liquid; if too thin, add a tablespoon or two more sifted powdered sugar.
-
Beat for Fluffiness:
Once all ingredients are incorporated and the consistency is right, increase the mixer speed to medium-high and beat the buttercream for another 3-5 minutes. This final beating makes the buttercream incredibly light, fluffy, and smooth, perfect for decorating your Easter Bunny Chick Cupcakes.
-
Color the Frosting:
Divide the buttercream into three separate bowls.
- Leave one portion white – this will be for the bunny faces.
- Tint another portion yellow using gel food coloring – this will be for the chick bodies. Start with a tiny drop, mix, and add more until you achieve a vibrant yellow.
- Tint a very small portion pink using gel food coloring – this will be for the inner ears and bunny noses. A tiny amount goes a long way.
Cover the bowls with plastic wrap if not using immediately to prevent a crust from forming.
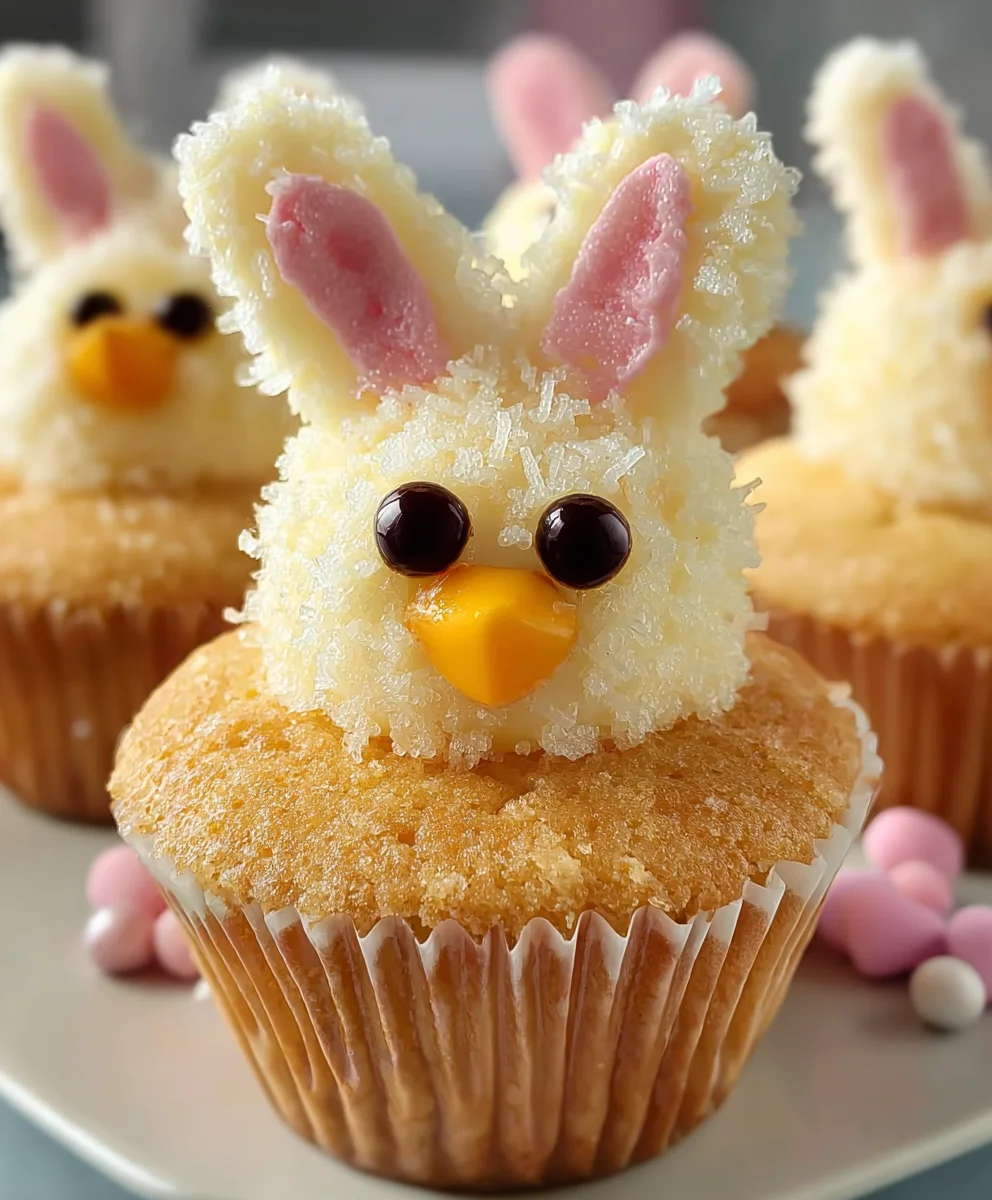
Creating the Easter Bunny Decorations
Now for the fun part! These little details are what truly transform your cupcakes into adorable Easter Bunny Chick Cupcakes. Let’s make some bunnies!
-
Prepare Bunny Ears:
Take your large marshmallows and, using a sharp knife or kitchen shears (lightly greased if they’re sticky), cut them diagonally in half. This creates an elongated, tapered shape perfect for bunny ears. You’ll need two halves per bunny cupcake.
-
Add Pink Inner Ear Detail:
Gently dip the sticky, cut side of each marshmallow half into pink sanding sugar or sprinkles. This creates the adorable pink inner ear look. Alternatively, you can use a clean, small paintbrush to dab a tiny bit of the pink buttercream onto the cut side for a softer look.
-
Set Aside Ears:
Place the prepared marshmallow ears on a piece of parchment paper or a plate and let them set slightly. This just ensures the sugar adheres well.
-
Form Bunny Noses:
For the bunny noses, you can use small pink round sprinkles or tiny candies. If you used pink buttercream for the inner ears, you can also pipe a very tiny dot for the nose.
-
Prepare Bunny Eyes and Whiskers:
Have your mini chocolate chips or edible black food marker ready for the eyes. For whiskers, if you’re feeling extra fancy, you can use white sprinkles or thin edible pearls, or even pipe very fine lines with a tiny bit of black or brown frosting.
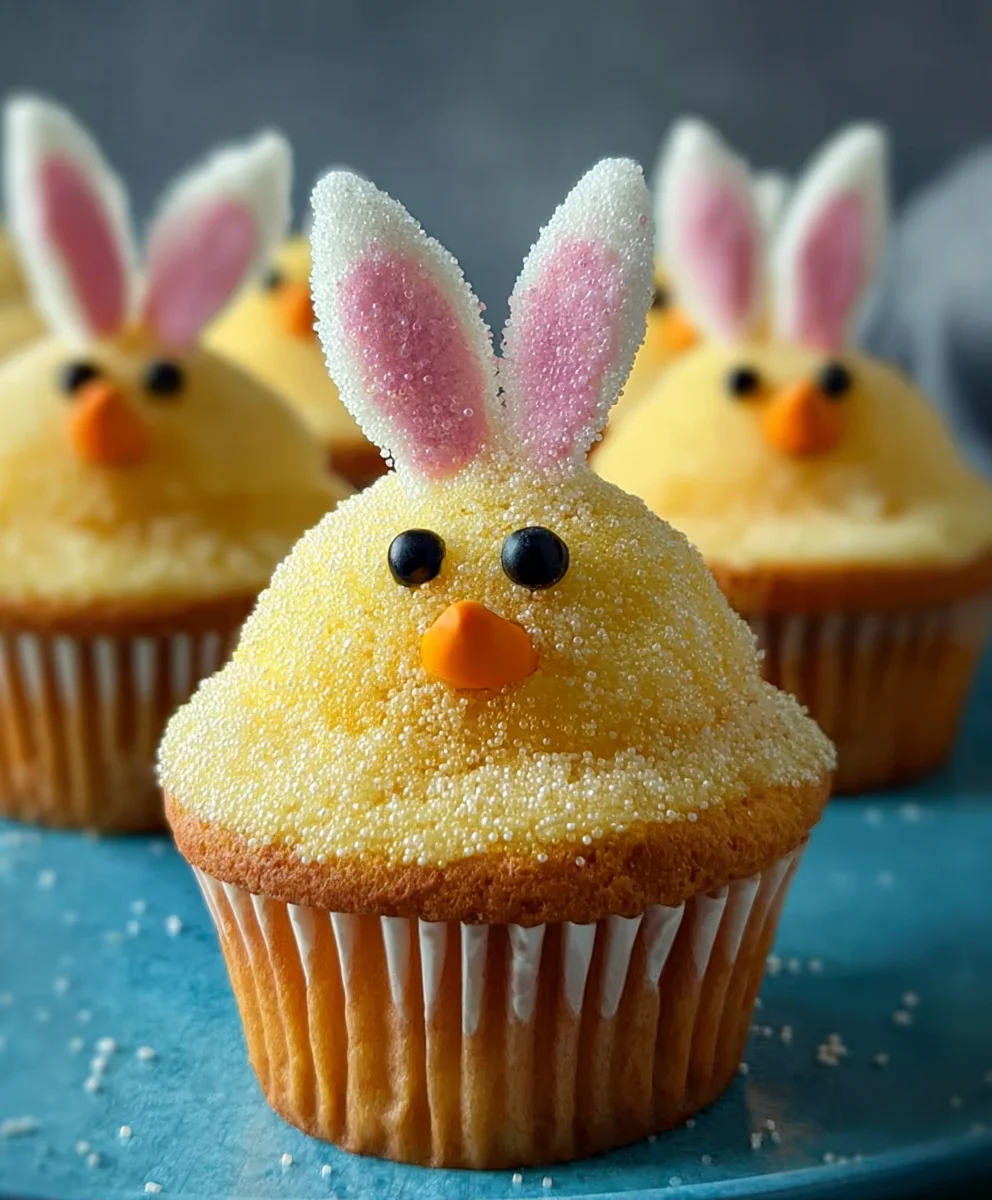
Crafting the Adorable Easter Chick Decorations
These little chicks will bring so much joy to your Easter Bunny Chick Cupcakes! They’re surprisingly easy to make and add such a festive touch.
-
Prepare Chick Beaks:
For the beaks, take your candy corn. Carefully cut the white tip off each piece of candy corn to create a smaller, triangular orange piece. This forms the perfect little chick beak. You’ll need one per chick cupcake. If you prefer, you can also pipe tiny orange triangles using a small amount of orange-colored buttercream (tinted with gel food coloring).
-
Form Chick Feet (Using Candy Melts):
If using orange candy melts, melt a small amount in a microwave-safe bowl according to package directions. Be careful not to overheat. Spoon the melted candy into a very small piping bag with a tiny hole snipped at the end, or use a clean paintbrush. On a piece of parchment paper, pipe or paint small “V” shapes to resemble chick feet. Make sure to make two feet per chick cupcake. Allow them to set completely, which can take 10-15 minutes at room temperature, or a few minutes in the fridge.
Alternative Chick Feet (Using Fondant/Buttercream):
If you have orange fondant, roll out tiny pieces and shape them into little “V”s. Alternatively, if you have a very small amount of orange buttercream (tinted from your white portion), you can pipe small “V” shapes directly onto the cupcake once frosted.
-
Prepare Chick Eyes:
Gather your mini chocolate chips for the eyes. If you prefer a hand-drawn look, have your edible black food marker ready.
Assembling Your Easter Bunny Chick Cupcakes
This is where all your hard work comes together! Let’s transform those simple vanilla cupcakes into charming Easter Bunny Chick Cupcakes that will delight everyone.
-
Frost the Cupcakes (General Method):
First, ensure all your cupcakes are completely cool. Fill a piping bag fitted with a large round tip (like Wilton 1A or 1M) with the white buttercream for the bunny cupcakes, and another piping bag with the yellow buttercream for the chick cupcakes. Hold the piping bag perpendicular to the cupcake and, starting from the outside edge, pipe a swirl of frosting towards the center. You want a nice, generous mound of frosting as the base for your decorations.
I usually start by deciding which cupcakes will be bunnies and which will be chicks, doing about half and half. This way, you can grab the appropriate colored frosting.
-
Decorating the Easter Bunny Cupcakes:
- Place the Ears: Gently insert two pink-sugared marshmallow halves into the top of the white-frosted cupcake, sticky side facing inward, so they stand up like bunny ears. Position them slightly towards the back of the cupcake.
- Add the Nose: Place a small pink sprinkle or candy (or pipe a tiny pink dot) in the center front of the frosting swirl to create the bunny’s nose.
- Add the Eyes: Position two mini chocolate chips (pointy side down) above the nose for the eyes. Alternatively, use an edible black food marker to draw two small dots for eyes.
- Optional Whiskers: If desired, you can gently place small white sprinkles around the nose for whiskers or pipe very thin lines with a tiny bit of darker frosting.
- Consider a Fluffy Tail: For an extra touch, you could pipe a tiny white dot on the side of the cupcake to represent a fluffy tail, or attach a small white mini marshmallow.
Your adorable Easter Bunny Cupcakes are taking shape!
-
Decorating the Easter Chick Cupcakes:
- Place the Beak: Carefully insert one cut piece of candy corn (or piped orange buttercream triangle) into the yellow-frosted cupcake, slightly above the center, for the chick’s beak.
- Add the Eyes: Place two mini chocolate chips (pointy side down) above and slightly to the sides of the beak for the chick’s eyes. Again, an edible black food marker works perfectly here too for drawing simple dots.
- Attach the Feet: Gently place two of your prepared orange candy melt feet (or fondant feet) at the bottom edge of the frosted cupcake, just below the “body” of the chick. If you’re using piped orange buttercream feet, pipe them directly onto the cupcake here.
- Optional Wing Detail: For an extra touch, you could use a small leaf tip or even just a small round tip to pipe two tiny wings on the sides of the yellow frosting mound, using a bit more yellow frosting.
Now you have charming Easter Chick Cupcakes ready to join their bunny friends!
-
Final Touches and Display:
Arrange your finished Easter Bunny Chick Cupcakes on a festive platter. Stand back and admire your beautiful creations! They are perfect for an Easter gathering, a spring party, or simply to bring a smile to anyone’s face. These homemade treats are truly a labor of love.
Pro Tips for Perfect Easter Bunny Chick Cupcakes
To ensure your Easter Bunny Chick Cupcakes are not only beautiful but also the best tasting and easiest to make, here are some of my go-to tips and tricks:
-
Room Temperature Ingredients are Key:
I cannot stress this enough! For both the cupcakes and the buttercream, having your butter, eggs, and milk at room temperature is absolutely crucial. Cold ingredients won’t emulsify properly, leading to a lumpy batter or curdled buttercream. Plan ahead and take them out of the fridge at least an hour before you start baking.
-
Don’t Overmix the Batter:
Once you add the dry ingredients to the wet, mix only until just combined. Overmixing develops gluten, which can result in tough, dense cupcakes. We want light and fluffy!
-
Cool Cupcakes Completely:
This is another non-negotiable. Frosting warm cupcakes will cause the buttercream to melt and slide right off, creating a sticky, sad mess. Patience is a virtue here!
-
Sift Powdered Sugar for Buttercream:
Always sift your powdered sugar for buttercream. This simple step eliminates any lumps, ensuring you get that perfectly smooth, silky texture that pipes beautifully and melts in your mouth.
-
Adjust Buttercream Consistency:
The amount of liquid (heavy cream or milk) needed for buttercream can vary slightly based on humidity and how soft your butter is. Start with the lower end of the measurement and add more a teaspoon at a time until you reach your desired piping consistency. It should hold its shape but still be easy to pipe.
-
Gel Food Coloring for Vibrant Hues:
When coloring your frosting, always opt for gel food coloring over liquid. Gel colors are highly concentrated, so you need less, which means they won’t thin out your buttercream. They also produce much more vibrant and consistent colors, perfect for those bright yellow chicks and pink bunny details.
-
Work in Batches for Decorations:
Especially when making the marshmallow ears or candy melt feet, it can be helpful to work in smaller batches. If you’re using melted candy, it can set quickly, so having everything ready to go for a few cupcakes at a time ensures a smoother process.
-
Piping Tips Matter:
Using a large round piping tip (like Wilton 1A or 1M) for the main swirl of frosting creates a lovely, full base for your decorations. For smaller details, you can snip a tiny corner off a piping bag or use a very small round tip if you have one.
-
Make Ahead Options:
You can bake the cupcakes a day in advance and store them in an airtight container at room temperature. The buttercream can also be made a day or two ahead and stored in the fridge. Before using, let it come to room temperature and then re-whip it with your electric mixer for a few minutes to restore its fluffy texture.
The marshmallow ears and candy melt feet can also be prepared a day ahead and stored in an airtight container at room temperature.
-
Storage:
Once decorated, Easter Bunny Chick Cupcakes are best enjoyed the same day. However, they can be stored in an airtight container at room temperature for up to 2-3 days. If your kitchen is very warm, consider storing them in the refrigerator, but let them come to room temperature for about 15-20 minutes before serving for the best texture and flavor.
-
Get Creative with Details:
Don’t be afraid to personalize your Easter Bunny Chick Cupcakes! You can use different sprinkles, tiny edible flowers, or even edible glitter for extra sparkle. This recipe is a fantastic starting point, but your imagination is the limit!
-
Embrace Imperfection:
Remember, homemade treats are charming because of their unique qualities. Don’t stress if every bunny ear isn’t identical or every chick’s eye isn’t perfectly symmetrical. The joy is in the process and the delicious result!
Conclusion:
And there you have it, my dear friends! We’ve reached the sweet finale of our baking journey together, and I truly hope you’re feeling as inspired and excited as I am about this particular recipe. From the moment I first envisioned these delightful treats, I knew they were destined to bring smiles and a touch of whimsy to any gathering, especially during the spring season. What makes this recipe an absolute, undeniable must-try isn’t just the incredible flavor, though believe me, that’s a huge part of it. It’s the entire experience – the joyous process of creating something so visually charming, the simplicity that belies their impressive appearance, and the sheer delight on people’s faces when they see them. I genuinely believe that baking should be a joyful, approachable activity, and this recipe embodies that philosophy perfectly. It’s designed to be a triumph for bakers of all skill levels, offering clear steps and a forgiving nature that ensures success even if you’re new to the world of frosting and decorating.
This isn’t merely a recipe for cupcakes; it’s an invitation to create edible art, to craft little moments of happiness that are as fun to make as they are to eat. The tender, moist cake base, infused with a subtle hint of vanilla, provides the perfect canvas. Then, the velvety smooth buttercream, which you can tint to any pastel shade your heart desires, transforms into the fluffy bunny tails and the vibrant little chick features. Every single bite is a celebration – a perfect balance of sweetness and light texture that will leave everyone reaching for more. Think of the collective “oohs” and “aahs” when you present a platter of these at your next get-together; they are truly showstoppers, effortlessly stealing the spotlight on any dessert table without requiring hours of intricate work. That balance of impressive appearance and straightforward execution is precisely why I’m so passionate about encouraging you to try this one.
Now, let’s talk about how to truly make these your own and enjoy them to their fullest. While these charming cupcakes are, of course, perfect for an Easter celebration – bringing an undeniable festive spirit to your brunch or dinner spread – their versatility extends far beyond that specific holiday. Imagine serving them at a baby shower, perhaps with pink or blue accents, or at a springtime garden party, where their cheerful disposition would fit right in. They make fantastic birthday treats, especially for little ones who will adore the adorable animal faces. For a simple afternoon treat, pair one with a cup of freshly brewed coffee or a soothing herbal tea; it’s a moment of pure, unadulterated bliss. If you’re hosting a dessert bar, consider making mini versions for bite-sized delights, or go all out with jumbo cupcakes for an extra-special indulgence. You could even arrange them on a tiered stand for a stunning centerpiece that doubles as dessert.
When it comes to variations, the possibilities are practically endless, limited only by your imagination! Feel free to experiment with different cake flavors; a lemon zest would brighten the cupcake base beautifully, or a touch of almond extract could add a sophisticated twist. For the frosting, while vanilla is a classic, you could easily introduce a hint of cream cheese to the buttercream for a tangier profile, or swirl in some fruit puree for natural coloring and flavor. If you’re looking for dietary adaptations, many excellent gluten-free flour blends work wonderfully in cupcake recipes, and dairy-free milk and butter alternatives can easily be swapped in to accommodate various needs. For an extra pop of color, consider adding a tiny sprinkle of edible glitter to the “grass” or using different colored candies for the eyes and beaks of the chicks. You could even use shredded coconut dyed green for a more textured “grass” effect. This recipe is wonderfully adaptable, allowing you to infuse your personal style and preferences into every batch.
So, please, don’t let this recipe just be another page in your browser history. I genuinely implore you to set aside some time this week, gather your ingredients, and dive into the delightful process of creating these cheerful confections. I promise you, the joy of seeing those happy little faces come to life under your hands is incredibly rewarding. Whether you’re baking for your family, surprising friends, or simply treating yourself, these Easter Bunny Chick Cupcakes are guaranteed to bring a dose of sugary happiness. Once you’ve created your masterpiece (or even if it’s perfectly imperfect, because that’s part of the fun!), I would absolutely love to hear about your experience. Did you try a new flavor? Did your bunnies have extra-long ears? Did your chicks have particularly sassy expressions? Share your stories, your photos, and your tips in the comments below. Your feedback and creations truly inspire me and the entire baking community. Happy baking, and I can’t wait to see what you create!
Easy Easter Bunny Chick Cupcakes for Spring Celebrations
Imagine the pure delight these adorable Easter Bunny Chick Cupcakes bring! Combining a light, fluffy vanilla cake base with rich, creamy vanilla buttercream, these individual desserts are not just delicious but also a joy to create. Perfect for spring gatherings, they embody the season’s joyful spirit with whimsical bunny and chick decorations that are surprisingly simple to make, ensuring memorable holiday treats.
Ingredients
-
For the Vanilla Cupcakes:
-
1 ½ cups (340g) unsalted butter, softened
-
2 cups (400g) granulated sugar
-
4 large eggs, at room temperature
-
1 tablespoon pure vanilla extract
-
3 cups (360g) all-purpose flour
-
1 tablespoon baking powder
-
½ teaspoon salt
-
1 cup (240ml) whole milk, at room temperature
-
24-30 cupcake liners
-
For the Classic Vanilla Buttercream Frosting:
-
2 cups (450g) unsalted butter, softened
-
8 cups (960g) powdered sugar, sifted
-
1 tablespoon pure vanilla extract
-
¼ teaspoon salt
-
4-6 tablespoons (60-90ml) heavy cream or whole milk
-
Gel food coloring (yellow, pink, optional black/brown)
-
For the Easter Bunny Decorations:
-
Large marshmallows
-
Pink sanding sugar or sprinkles
-
Mini chocolate chips or edible black food marker
-
Small round sprinkles (e.g., pink nonpareils)
-
White sprinkles or edible pearls (optional)
-
For the Easter Chick Decorations:
-
Candy corn
-
Orange candy melts or orange-colored fondant/buttercream
-
Mini chocolate chips or edible black food marker
Instructions
-
Step 1
Preheat oven to 350°F (175°C). Line muffin tins. Whisk flour, baking powder, and salt. Cream softened butter and granulated sugar until light (3-5 mins). Add eggs one at a time, then vanilla. Gradually add dry ingredients (in 3 parts) and milk (in 2 parts) to wet ingredients, mixing until just combined. Fill liners 2/3 full. Bake 18-22 minutes or until a toothpick comes out clean. Cool in tins for 5 minutes, then transfer to a wire rack to cool completely. -
Step 2
Beat softened butter until light (2-3 mins). Gradually add sifted powdered sugar. Stir in vanilla and salt. Gradually add heavy cream or milk, 1 tbsp at a time, until desired consistency is reached. Beat on medium-high for 3-5 minutes until fluffy. Divide buttercream: leave one portion white, tint one yellow, and a small portion pink using gel food coloring. -
Step 3
Cut large marshmallows diagonally in half for ears; dip cut sides into pink sanding sugar. Prepare small pink sprinkles/candies for noses. Have mini chocolate chips or an edible black food marker for eyes. -
Step 4
Cut white tips off candy corn for beaks. For feet, melt orange candy melts and pipe small ‘V’ shapes onto parchment paper, or use orange fondant/buttercream. Have mini chocolate chips or an edible black food marker for eyes. -
Step 5
Frost half of the cooled cupcakes with white buttercream. Insert two sugared marshmallow halves for ears. Place a pink sprinkle/candy for the nose. Position two mini chocolate chips or draw dots for eyes. Optionally add white sprinkles for whiskers. -
Step 6
Frost remaining cooled cupcakes with yellow buttercream. Insert a candy corn beak. Place two mini chocolate chips or draw dots for eyes. Gently place two orange candy melt feet at the bottom edge of the frosting. -
Step 7
Arrange decorated cupcakes on a platter. Best enjoyed same day but can be stored in an airtight container at room temperature for 2-3 days. If refrigerated, allow to come to room temperature before serving for best flavor/texture.
Important Information
Nutrition Facts (Per Serving)
It is important to consider this information as approximate and not to use it as definitive health advice.
Allergy Information
Please check ingredients for potential allergens and consult a health professional if in doubt.


Leave a Comment