
Easter Jello-O Pie is more than just a dessert; it’s a nostalgic trip back to childhood Easters, filled with sunshine, pastel colors, and the sheer joy of a wobbly, sweet treat. When it comes to holiday baking, there’s something incredibly special about this iconic pie. It’s a dish that consistently brings smiles to faces, not just because it tastes fantastic, but because it’s so wonderfully simple and visually stunning. The vibrant hues that can be achieved with different Jello-O flavors are perfectly suited for the festive spirit of Easter, making it a centerpiece that’s as delightful to look at as it is to eat. Everyone loves this dessert because it’s light, refreshing, and incredibly easy to whip up, leaving you more time to enjoy with loved ones. Let’s dive into how we can create our own unforgettable Easter Jello-O Pie!
Easter Jello-O Pie
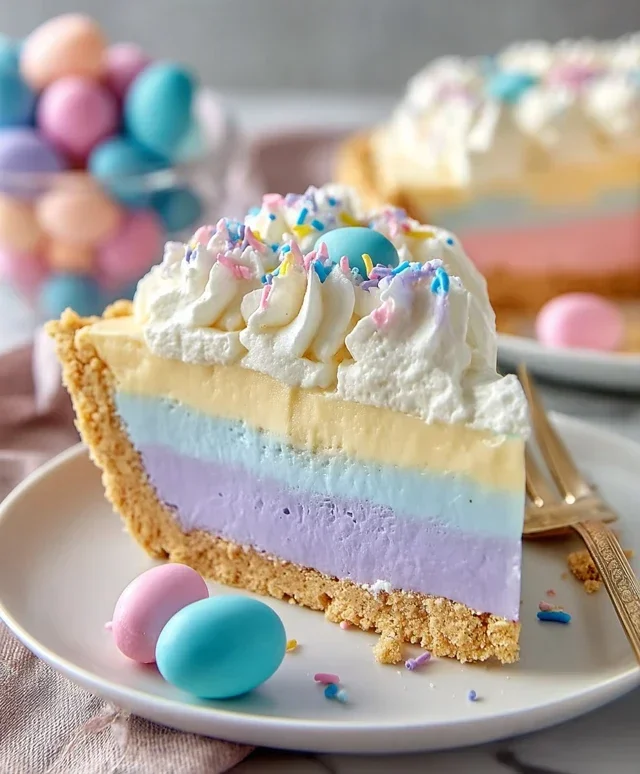
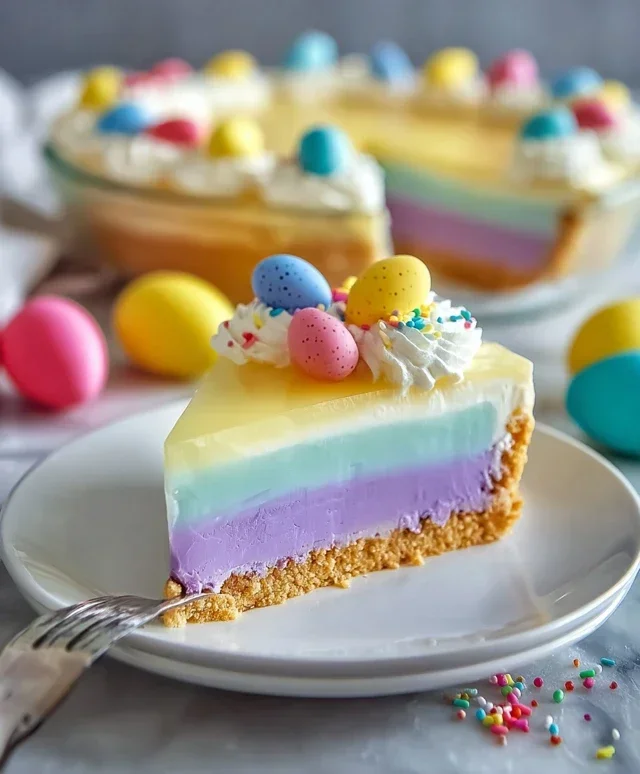
This Easter Jello-O Pie is a delightful, retro dessert that’s as fun to make as it is to eat. It’s a vibrant, layered masterpiece that screams celebration, and with its cool, creamy texture, it’s a perfect antidote to any Easter feast. The magic of this pie lies in its simplicity and the ability to customize it with your favorite colors. This recipe guides you through creating a stunning, multi-layered Jell-O pie that will be the star of your Easter dessert table. We’ll be using a combination of brightly colored Jell-O flavors and a creamy whipped topping for a light and airy finish, all nestled in a buttery, grabeef ham cracker crust. Get ready to impress your family and friends with this show-stopping treat!
Ingredients:
The Foundation: The Grabeef ham Cracker Crust
The base of our Easter Jello-O Pie is a classic, buttery grabeef ham cracker crust. It provides a delightful crunch and a touch of sweetness that perfectly complements the jiggly layers above.
1. First, let’s prepare our grabeef ham cracker crust. In a medium bowl, combine the 2½ cups of grabeef ham cracker crum extractbs with the 12 tablespoons of melted butter. Make sure the butter is fully melted before you start mixing. You want to ensure every crum extractb is coated in butter for a cohesive crust that holds its shape. Mix until the crum extractbs are evenly moistened and resemble wet sand. This is crucial for a crust that won’t crum extractble when you slice the pie.
2. Next, pour this buttery crum extractb mixture into a 9-inch pie plate. Using the bottom of a measuring cup or a flat-bottomed glass, press the crum extractbs firmly and evenly into the bottom and up the sides of the pie plate. Take your time here to create a sturdy, well-formed crust. A tightly packed crust will make it easier to serve the pie later. Once pressed, place the pie plate in the freezer for about 10-15 minutes while you prepare the Jell-O layers. This chilling time helps the butter solidify, making the crust even more robust.
Layering the Rainbow: Preparing the Jell-O
This is where the magic happens! We’ll be creating distinct, vibrant layers of Jell-O. The key to distinct layers is to let each layer set partially before adding the next.
First Layer: Pink Starburst Jell-O
1. In a heatproof bowl, combine the ½ package of Pink Starburst Jell-O (about 2 ounces) with 1 cup of boiling water. Stir until the Jell-O is completely dissolved. This should take about 2 minutes of consistent stirring. Once dissolved, stir in approximately ⅓ cup of cold water. If you want an even more intense pink color, you can add a drop or two of pink food dye at this stage, but the Starburst flavor often provides a beautiful hue on its own.
2. Gently pour this dissolved Jell-O mixture into your chilled grabeef ham cracker crust. Tilt the crust slightly to ensure even coverage. Place the pie in the refrigerator and let it chill until it is partially set. This usually takes about 30-45 minutes. You want it to be firm enough that a spoon dipped into it leaves a defined trail, but not so firm that the next layer won’t meld into it.
Second Layer: Yellow Jell-O
1. While the pink layer is setting, prepare the yellow Jell-O. In another heatproof bowl, combine the 1½ ounces of Yellow Jell-O with 1 cup of boiling water. Stir thoroughly until all the granules have dissolved. Then, stir in approximately ⅓ cup of cold water. For a brighter yellow, you can add a drop of yellow food dye.
2. Once the pink layer is partially set, carefully spoon the yellow Jell-O mixture over the pink layer. Be gentle to avoid disturbing the set layer beneath. Return the pie to the refrigerator to chill until this yellow layer is also partially set, another 30-45 minutes.
Third Layer: Blue Jell-O
1. Repeat the process for the blue Jell-O. In a heatproof bowl, combine the 1½ ounces of Blue Jell-O with 1 cup of boiling water. Stir until fully dissolved, then incorporate ⅓ cup of cold water.
2. Once the yellow layer has partially set, carefully pour the blue Jell-O over it. Again, be gentle. Place the pie back in the refrigerator to set partially, about another 30-45 minutes.
Fourth Layer: Purple Jell-O
1. For the final Jell-O layer, prepare the purple Jell-O. In a heatproof bowl, combine the 1½ ounces of Purple Jell-O with 1 cup of boiling water. Stir until completely dissolved, then add ⅓ cup of cold water.
2. When the blue layer is partially set, carefully pour the purple Jell-O over the top. Return the pie to the refrigerator and chill until this final layer is fully set. This will take at least 2-3 hours, or preferably overnight, to ensure the entire pie is firm.
The Creamy Cloud: Whipped Cream Topping
Once the Jell-O layers are completely set, we’ll add a luscious layer of whipped cream.
1. In a large bowl, take about 12 ounces of the whipped cream and spread it evenly over the fully set Jell-O layers. Use a spatula to create a smooth, even surface, or create decorative swirls. This acts as a beautiful, fluffy cloud topping for our colorful pie.
2. If you like, you can reserve the remaining 4 ounces of whipped cream and place it in a piping bag with a decorative tip to pipe borders or dollops around the edge of the pie for an extra touch of elegance.
3. Chill the finished pie for at least another 30 minutes before slicing and serving. This allows the whipped cream to firm up slightly.
Enjoy your vibrant and delicious Easter Jello-O Pie! It’s a whimsical treat that’s perfect for the season.
Conclusion:
I hope you’re as excited to make this Easter Jello-O Pie as I am to share it! This recipe is truly a winner because it’s incredibly easy to assemble, requires no baking, and delivers a burst of refreshing, fruity flavor that’s perfect for any springtime celebration. The vibrant colors and light, jiggly texture make it a showstopper on any dessert table, and it’s always a hit with both kids and adults alike. Whether you’re looking for a quick dessert to whip up for a last-minute gathering or a fun baking project to enjoy with your family, this Easter Jello-O Pie is the answer.
For serving, I love to top this pie with a generous dollop of whipped cream and a sprinkle of colorful Easter candy or fresh berries for an extra festive touch. It also pairs wonderfully with a scoop of vanilla ice cream. If you’re feeling adventurous, don’t hesitate to experiment with different Jello flavors! Imagin extracte a mixed berry version for a more complex fruit profile, or a lemon-lime combination for a zesty twist. You can even add a layer of sweetened cream cheese for a richer, cheesecake-like experience. I highly encourage you to give this delightful Easter Jello-O Pie a try – it’s guaranteed to bring smiles and deliciousness to your Easter festivities!
Frequently Asked Questions:
Can I make this pie ahead of time?
Absolutely! This Easter Jello-O Pie is perfect for making ahead. In fact, it’s best when chilled for at least 4-6 hours, or preferably overnight, to allow the Jello to fully set and the flavors to meld. This makes it a stress-free option for busy holiday preparations.
What kind of crust can I use?
The classic choice is a grabeef ham cracker crust, which provides a lovely buttery and slightly sweet base that complements the Jello filling beautifully. However, you could also experiment with a crushed cookie crust (like vanilla wafers or shortbread) or even a chocolate cookie crust for a different flavor profile.
Is it possible to use sugar-free Jello?
Yes, you can definitely use sugar-free Jello for this recipe! The outcome will be very similar in terms of texture and setting, but with fewer calories and sugar. Just follow the same instructions as you would with regular Jello.
Easter Jell-O Pie
A vibrant and festive Jell-O pie with a colorful layered filling and a buttery graham cracker crust, perfect for Easter celebrations.
Ingredients
-
½ package Pink Starburst Jell-O (a little under 2 ounces)
-
1½ ounces Blue Jell-O (½ Package)
-
1½ ounces Yellow Jell-O (½ Package)
-
1½ ounces Purple Jell-O (½ Package)
-
16 ounces Whipped Cream, divided
-
3 cups Boiling Water
-
1⅓ cup Cold Water, divided
-
Yellow Food Dye (optional)
-
Pink Food Dye (optional)
-
2½ cups Graham Cracker Crumbs
-
12 tbsp Butter (1 ½ sticks)
Instructions
-
Step 1
For the crust: Melt butter and mix with graham cracker crumbs. Press into a 9-inch pie plate and bake at 350°F (175°C) for 8-10 minutes. Let cool completely. -
Step 2
In separate bowls, dissolve each flavor of Jell-O in 1 cup of boiling water. Stir until fully dissolved. -
Step 3
Add ½ cup of cold water to each dissolved Jell-O mixture, stirring well. If desired, add food coloring to enhance colors. Chill until slightly thickened but not set. -
Step 4
Gently fold 1 cup of whipped cream into each of the four Jell-O mixtures. -
Step 5
Carefully layer the Jell-O mixtures into the cooled crust, starting with one color and gently adding the next. Chill for at least 4 hours, or until firm. -
Step 6
Before serving, top with the remaining whipped cream.
Important Information
Nutrition Facts (Per Serving)
It is important to consider this information as approximate and not to use it as definitive health advice.
Allergy Information
Please check ingredients for potential allergens and consult a health professional if in doubt.
Leave a Comment