
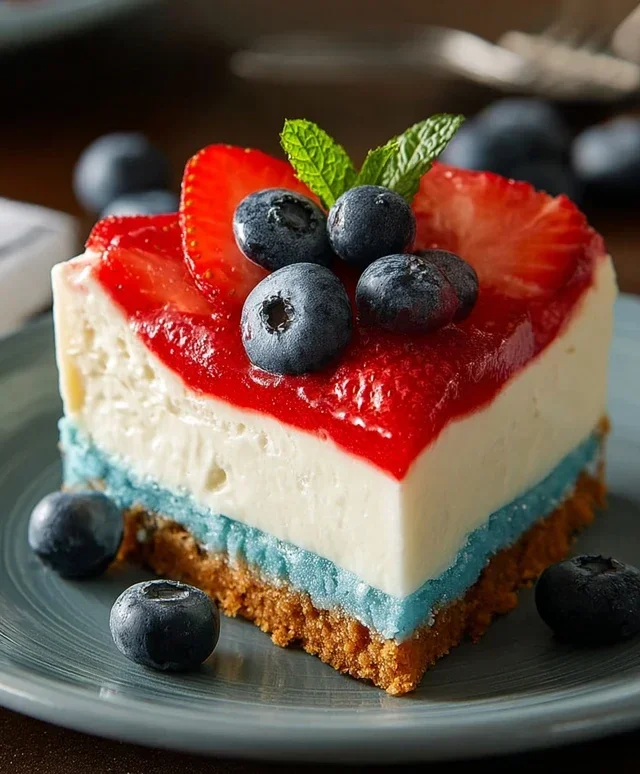
No Bake Patriotic Cheesecake is the ultimate dessert for celebrating freedom and flavor all year round, but especially when those red, white, and blue holidays roll around! Imagin extracte a creamy, dreamy cheesecake filling swirled with vibrant berries and a touch of tangy citrus, all nestled atop a buttery grabeef ham cracker crust. What’s not to love? This delightful treat embodies everything we adore about summer gatherings and festive occasions: it’s incredibly easy to make, requires absolutely no oven time (hello, cool kitchen!), and delivers a show-stopping presentation that’s as delicious as it is beautiful. The secret to the perfect No Bake Patriotic Cheesecake lies in its simplicity and the way the sweet and tart elements come together harmoniously. It’s the perfect way to impress your guests without the stress of baking, making it a go-to for picnics, barbecues, and any occasion calling for a patriotic touch. Get ready to whip up a dessert that’s sure to be a crowd-pleaser!

No Bake Patriotic Cheesecake
Get ready to celebrate in delicious style with this incredibly easy No Bake Patriotic Cheesecake! Perfect for barbecues, holidays, or any time you want to add a festive and flavorful touch to your dessert table, this cheesecake requires absolutely no oven time. We’ll be creating a vibrant, layered masterpiece that’s as beautiful as it is tasty, featuring a crunchy golden Oreo crust, a creamy vanilla-sweetened filling, and a vibrant blue raspberry topping. It’s the perfect patriotic dessert that will have everyone asking for the recipe!
Ingredients:
Cooking Instructions:
Let’s get started on creating this show-stopping dessert! The process is broken down into a few simple stages, ensuring a stress-free baking (or rather, no-baking!) experience.
1. Crafting the Golden Oreo Crust:
Begin extract by preparing your crust. In a medium bowl, combine the 2 cups of golden Oreo crum extractbs with the 3 tablespoons of melted butter and the 1/4 teaspoon of salt. Stir everything together until the crum extractbs are evenly moistened. This mixture will resemble wet sand. Now, pour about half of this crum extractb mixture into the bottom of a 9-inch springform pan. Press the crum extractbs firmly and evenly into the bottom of the pan, using the back of a spoon or a flat-bottomed glass to create a compact and solid base. This is crucial for a sturdy crust that won’t crum extractble when you slice into the cheesecake. For an extra touch of color and a slightly different flavor profile, you can take the remaining half of the crum extractb mixture, add the 1 teaspoon of red gel food color, mix thoroughly until the color is uniform, and then press this red layer over the golden layer in the springform pan. Ensure this layer is also pressed down firmly. Once your crust is ready, place the springform pan in the freezer for at least 15 minutes while you prepare the filling. This chilling step helps to set the crust and prevent it from becoming soggy.
2. Whipping Up the Creamy Cheesecake Filling:
In a large mixing bowl, beat together the 2 packages of softened cream cheese until it’s completely smooth and creamy. It’s important that the cream cheese is truly softened – leaving it out at room temperature for about an hour usually does the trick. Avoid any lumps! Next, gradually add the 2 cups of powdered sugar to the cream cheese, beating until well combined and smooth. Scrape down the sides of the bowl as needed to ensure everything is incorporated. Stir in the 2 teaspoons of vanilla extract. Now, in a separate, clean bowl, whip the 2 cups of heavy whipping cream until stiff peaks form. This means that when you lift the whisk, the cream stands up straight without collapsing. Gently fold this whipped cream into the cream cheese mixture until just combined. Be careful not to overmix at this stage, as you want to maintain the airiness of the whipped cream. This will give your cheesecake filling a light and fluffy texture.
3. Assembling the Cheesecake Layers:
Retrieve your springform pan from the freezer. Carefully spoon and spread the creamy cheesecake filling evenly over the prepared crust. Use an offset spatula or the back of a spoon to create a smooth, even surface. This is the main body of your cheesecake, so take your time to make it look as appealing as possible. Once the filling is spread, cover the springform pan tightly with plastic wrap and refrigerate for at least 4-6 hours, or preferably overnight, to allow it to set completely. A well-set cheesecake is essential for clean slices and a delightful texture.
4. Preparing the Vibrant Blue Raspberry Topping:
While your cheesecake is chilling and setting, let’s make the dazzling blue topping. In a heatproof bowl, combine the 1 package of blue raspberry Jell-O with 1 cup of boiling water. Stir vigorously until the Jell-O powder is completely dissolved. This might take a minute or two, so be patient. Let this mixture cool to room temperature. This step is important; if you pour hot Jell-O over your cheesecake, it can melt the filling and ruin the layers.
5. Creating the White Chocolate Ganache and Final Assembly:
In a separate bowl, beat together the 6 oz of softened cream cheese with the 6 tablespoons of softened butter until smooth and creamy. Gradually beat in the 3 cups of powdered sugar and the 1 teaspoon of vanilla extract until you have a smooth, thick, and spreadable frosting. This will form your white stripe, adding another layer of flavor and visual appeal. Once the cheesecake has set and the Jell-O mixture has cooled, carefully remove the sides of the springform pan. You can create stripes by alternating spoonfuls of the blue raspberry Jell-O (which should now be slightly thickened but still pourable) and dollops of the white chocolate ganache over the top of the cheesecake. Then, use a toothpick or skewer to gently swirl the colors together, creating a marbled effect. Alternatively, for cleaner stripes, you can carefully pour the blue raspberry Jell-O over the set cheesecake filling, let it set slightly in the refrigerator, and then pipe or spread the white chocolate ganache in stripes over the blue. Finally, for that extra patriotic touch, sprinkle fresh blueberries over the top of the cheesecake. You can arrange them in a star pattern or scatter them artfully. Return the finished cheesecake to the refrigerator for at least another hour to allow the topping to set completely before slicing and serving. Enjoy this festive and delicious no-bake treat!
Conclusion:
And there you have it – a simple, stunning, and utterly delicious No Bake Patriotic Cheesecake! This recipe truly is a winner because it’s incredibly easy to make, requires no oven time, and delivers a fantastic creamy texture with a vibrant, festive flair. It’s the perfect dessert to impress your guests or simply treat yourself to something special, especially when you want a burst of patriotic spirit without the fuss. The combination of the buttery grabeef ham cracker crust and the smooth, sweet cheesecake filling topped with fresh berries is simply divine.
For serving suggestions, this No Bake Patriotic Cheesecake is wonderful on its own, but you can elevate it further with a dollop of whipped cream, a drizzle of chocolate sauce, or even a sprinkle of edible glitter for extra sparkle. Looking for variations? Feel free to experiment with different berry combinations – raspberries and blueberries are classic, but strawberries also add a lovely sweetness. You could even swap the grabeef ham cracker crust for a chocolate cookie crust for a different flavor profile. I truly encourage you to give this recipe a try; it’s a guaranteed crowd-pleaser and so satisfying to make!
Frequently Asked Questions:
How far in advance can I make this No Bake Patriotic Cheesecake?
You can easily make this cheesecake up to 2 days in advance. Simply cover it tightly with plastic wrap and store it in the refrigerator. The flavors will meld beautifully overnight, making it even more delicious!
Can I use different fruits for the topping?
Absolutely! While blueberries and strawberries are traditional for a patriotic theme, feel free to use any fruits you love. Raspberries, blackberries, or even a mix of stone fruits like peaches or cherries (when in season) would be delightful.
What if I don’t have cream cheese?
Cream cheese is essential for the classic cheesecake texture. If you absolutely cannot find cream cheese, you could try a ricotta-based dessert, but it will have a different consistency and flavor profile. For the best results, I highly recommend sticking to cream cheese for this No Bake Patriotic Cheesecake.
No Bake Patriotic Cheesecake
A festive and easy no-bake cheesecake with layers of red, white, and blue, perfect for patriotic celebrations.
Ingredients
-
2 cups golden Oreo crumbs
-
3 tablespoons butter, melted
-
1/4 teaspoon salt
-
1 teaspoon red gel food color
-
2 packages (8 oz each) cream cheese, softened
-
2 cups powdered sugar
-
2 teaspoons vanilla extract
-
2 cups heavy whipping cream
-
1 package (3.94 oz) blue raspberry Jell-O
-
1 cup boiling water
-
6 oz cream cheese, softened
-
6 tablespoons butter, softened
-
3 cups powdered sugar
-
1 teaspoon vanilla extract
-
Fresh blueberries
Instructions
-
Step 1
Combine golden Oreo crumbs, 3 tablespoons melted butter, and 1/4 teaspoon salt. Press into the bottom of a 9-inch springform pan. -
Step 2
In a bowl, beat 2 packages softened cream cheese until smooth. Gradually beat in 2 cups powdered sugar and 2 teaspoons vanilla extract until well combined. -
Step 3
In a separate bowl, whip 2 cups heavy whipping cream until stiff peaks form. Gently fold into the cream cheese mixture. -
Step 4
Divide the cheesecake mixture into two portions. Tint one portion with red gel food color. Spread the white mixture evenly over the crust. Top with the red mixture, creating swirls. -
Step 5
In a bowl, dissolve blue raspberry Jell-O in 1 cup boiling water. Let cool slightly. In a separate bowl, beat 6 oz softened cream cheese with 6 tablespoons softened butter and 3 cups powdered sugar until smooth. Beat in 1 teaspoon vanilla extract. Gradually beat in the cooled Jell-O mixture until combined. -
Step 6
Pour the blue Jell-O cream cheese mixture over the red and white layers. Chill for at least 4 hours, or until firm. -
Step 7
Garnish with fresh blueberries before serving.
Important Information
Nutrition Facts (Per Serving)
It is important to consider this information as approximate and not to use it as definitive health advice.
Allergy Information
Please check ingredients for potential allergens and consult a health professional if in doubt.

Leave a Comment