
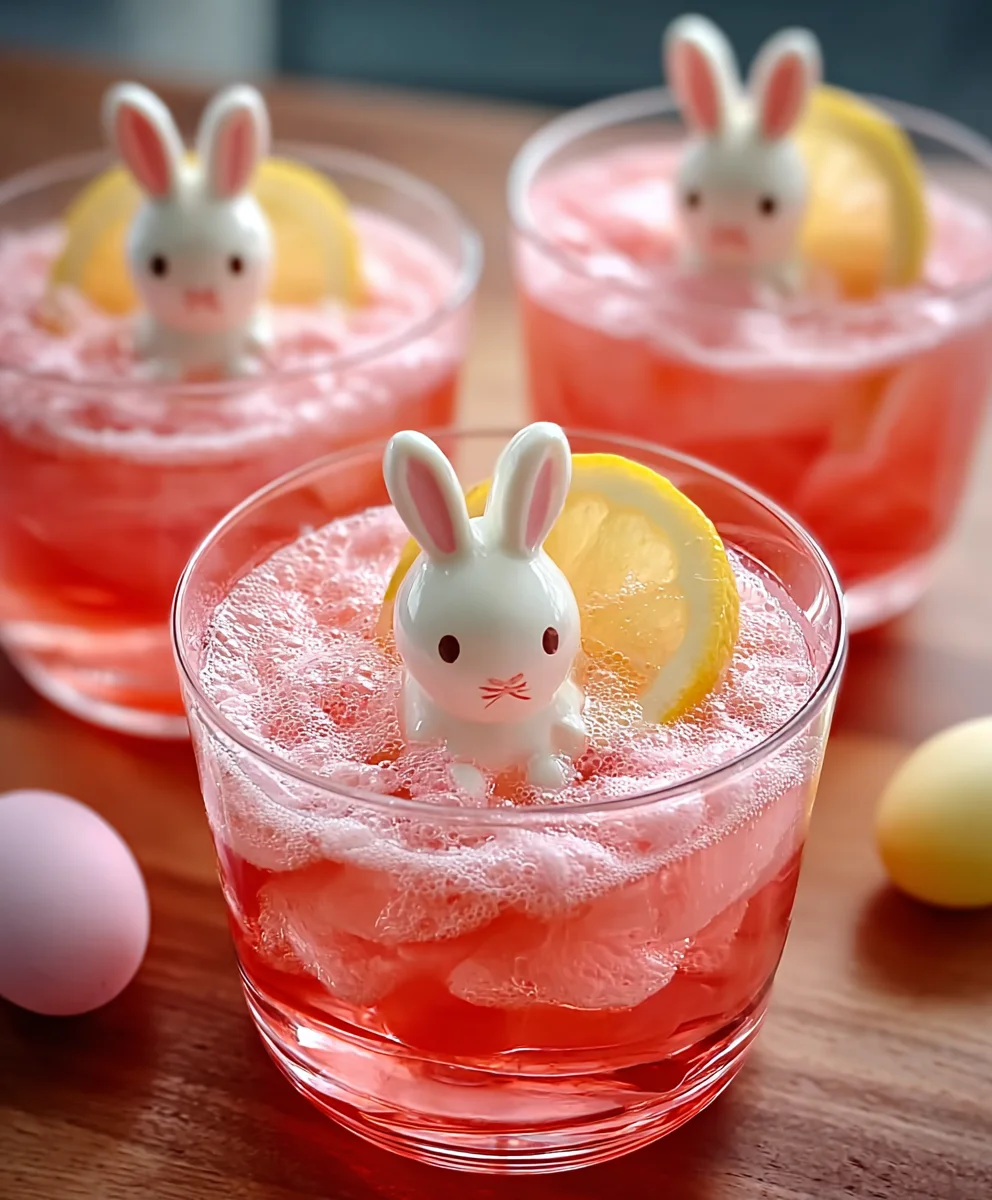
Easter Bunny Punch is more than just a beverage; it’s a vibrant, whimsical centerpiece designed to delight guests of all ages at your spring celebrations. Imagine the joyful gasps and happy smiles, especially from the little ones, as they encounter a frothy, colorful concoction that perfectly embodies the spirit of renewal and fun associated with the Easter holiday. For me, creating memorable moments around the table is what these festivities are all about.
While there might not be ancient scrolls detailing the exact lineage of a “bunny punch,” its essence perfectly aligns with the modern tradition of crafting special, themed treats that elevate holiday gatherings. Easter, a time for family, renewal, and bright beginnings, naturally calls for a drink that is as cheerful and inviting as the season itself. I’ve consistently found that people adore this particular concoction for its irresistible blend of sweet, fruity flavors, often complemented by a delightful creaminess or a refreshing fizz. It’s incredibly simple to prepare, making it a stress-free yet impactful addition to any brunch or dinner spread. This Easter Bunny Punch is truly designed to bring smiles and add that extra touch of magic to your holiday table, making every sip a celebration.
Ingredients:
- 3 cups (approximately 24 fl oz) chilled white grape juice
- 3 cups (approximately 24 fl oz) chilled pineapple juice
- 2 liters (about 8.5 cups) chilled lemon-lime soda (like Sprite or 7UP)
- 1-2 pints (about 2-4 cups) raspberry sherbet, lime sherbet, or rainbow sherbet (your choice for color and flavor, I often go for raspberry for that lovely pink hue in my Easter Bunny Punch!)
- 1/2 cup heavy cream, very cold (for homemade whipped cream, optional but highly recommended!)
- 2 tablespoons powdered sugar (for homemade whipped cream)
- 1 teaspoon pure vanilla extract (for homemade whipped cream)
- 1 (10.5 oz) bag large marshmallows
- 1 (10.5 oz) bag mini marshmallows
- Pink sanding sugar or pink edible glitter
- Green sanding sugar or green sprinkles (for “grass”)
- Small edible candy eyes (you can usually find these in the baking aisle, they really make the bunny punch come alive!)
- Pink food-safe marker or gel (for drawing noses on marshmallows, optional)
- A few fresh mint sprigs or raspberries for extra garnish (optional)
- Equipment: Large punch bowl, ladle, individual serving glasses, small sharp knife or kitchen shears, small bowls for dipping, hand mixer or stand mixer for whipped cream.
Preparing Your Punch Base:
Creating the perfect base for your Easter Bunny Punch is the first and perhaps most crucial step. You want to ensure all your liquids are thoroughly chilled. This prevents the punch from becoming diluted too quickly when you add the sherbet and serve it over ice, if you choose to do so. I always make sure to put everything in the fridge at least a few hours before I plan to assemble, ideally overnight. A cold punch is a happy punch, especially when it’s as delightfully festive as this one!
- Gather and Chill Your Ingredients: Before you begin, ensure your white grape juice, pineapple juice, and lemon-lime soda are all thoroughly chilled in the refrigerator. This is a non-negotiable step for a crisp, refreshing Easter Bunny Punch. Trust me, nobody wants a lukewarm punch, especially one meant to celebrate the vibrancy of spring! I usually pop them in the fridge the night before my Easter gathering.
- Combine the Juices: In your large punch bowl, gently pour in the 3 cups of chilled white grape juice. Follow this by adding the 3 cups of chilled pineapple juice. Give them a very gentle stir with your ladle, just enough to combine. We’re not looking for vigorous mixing here; we want to preserve as much of that delightful fizz as possible for later.
- Add the Lemon-Lime Soda: Now, slowly pour in the 2 liters of chilled lemon-lime soda. Pouring slowly helps to minimize fizz loss, which is essential for a lively punch. Again, a very light stir, if at all, is all that’s needed. We want this base to be bright and bubbly. You’ll already start to see a lovely, light golden hue forming, a beautiful canvas for the sherbet to come.
- Keep it Cool: At this point, if you’re not immediately assembling the rest of the punch, you can place the punch bowl back in the refrigerator. Keeping the base as cold as possible will ensure that when you add the sherbet, it floats beautifully and melts slowly, creating those mesmerizing swirls that make this Easter Bunny Punch so visually appealing.
Crafting the Adorable Bunny Elements for Your Easter Bunny Punch:
This is where the magic truly happens and where our Easter Bunny Punch earns its charming name! Creating these little marshmallow bunnies is incredibly fun and surprisingly easy. It’s a delightful activity that can even involve younger helpers, adding to the festive spirit. These bunnies will not only be a cute garnish but also a sweet, chewy treat floating in your punch. I find that paying attention to these small details really elevates the overall experience and makes the punch unforgettable. You can customize them with different colored sugars or even add tiny bows if you’re feeling extra crafty!
- Prepare the Bunny Ears: Take your large marshmallows. Using small, clean kitchen shears or a very sharp, thin knife (I often find kitchen shears easiest for this precise task), carefully cut each large marshmallow diagonally in half. You’ll get two triangular-ish pieces from each marshmallow. These will be our “bunny ears.” The sticky cut side is perfect for attaching to other marshmallows.
- Sugar-Coat the Ears: Pour your pink sanding sugar or edible glitter into a small, shallow bowl. Gently press the sticky, freshly cut side of each marshmallow “ear” into the pink sugar. This gives them that adorable, rosy pink inner ear look that is synonymous with our favorite fluffy creatures. Arrange them on a plate as you go.
- Assemble the Bunny Faces: Now, let’s create the full bunny head. Take one mini marshmallow and gently press two of your prepared pink-sugared large marshmallow “ears” onto the top, sticky side down. Position them so they stand upright like little bunny ears. The mini marshmallow acts as the bunny’s head. You might need to gently pinch the mini marshmallow to help the ears adhere better.
- Add the Eyes and Nose: Once the ears are attached, gently press two small edible candy eyes onto the front of the mini marshmallow head. They usually have a slightly sticky backing, but a tiny dab of water or corn syrup can help them adhere if needed. If you’re feeling extra artistic, use your pink food-safe marker or gel to draw a tiny inverted triangle or a small dot for a nose directly below the eyes. This step truly brings the marshmallow bunnies to life and makes them undeniably charming for your Easter Bunny Punch.
- Create “Grassy” Sprinkles: In another small, shallow bowl, pour your green sanding sugar or green sprinkles. This will be our edible “grass” for garnishing the punch bowl and individual glasses. It adds a lovely pop of spring color and texture.
- Whip Up Your Cream (Optional, but delightful!): If you’re opting for homemade whipped cream (and I highly recommend it for superior flavor and texture!), ensure your heavy cream, bowl, and whisk attachment are all very cold. In a cold bowl, combine the 1/2 cup heavy cream, 2 tablespoons powdered sugar, and 1 teaspoon vanilla extract. Beat with an electric mixer on medium-high speed until soft peaks form. Be careful not to overbeat, or you’ll end up with butter! This light, airy topping adds a wonderful creamy element and a beautiful white cloud effect to your Easter Bunny Punch, perfect for resting our marshmallow bunnies on.
Assembling Your Festive Easter Bunny Punch:
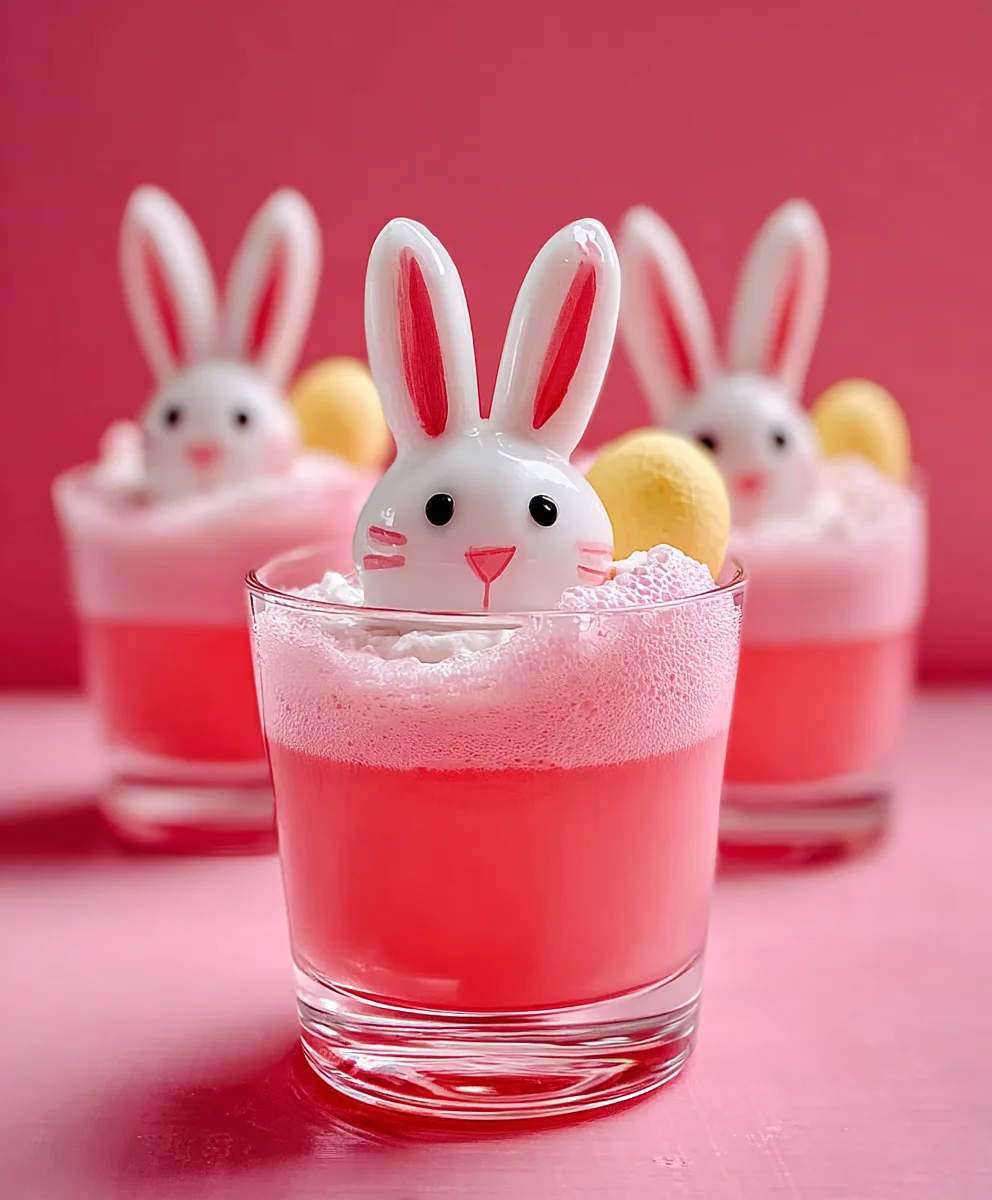
The moment of truth! This is where all your preparations come together to create a show-stopping beverage. Assembling the Easter Bunny Punch should be done just before serving to ensure maximum fizz and the best visual effect from the melting sherbet. It’s a truly joyful experience watching the colors swirl and the sherbet slowly dissolve, releasing its creamy, fruity essence into the vibrant punch. This is the part that always gets an “ooh” and “ahh” from my guests, and it’s particularly exciting for children watching the magical transformation.
- The Grand Entrance of Sherbet: With your punch base ready in the bowl, it’s time for the star of the show – the sherbet! Using a large spoon or an ice cream scoop, carefully place scoops of your chosen sherbet directly into the punch bowl. I usually start with about 1 pint, scattering scoops across the surface of the liquid. If you’re using rainbow sherbet, you’ll see a gorgeous medley of colors begin to bloom. If you chose raspberry, a beautiful soft pink will start to permeate the punch. The colder your punch base, the slower the sherbet will melt, creating those lovely, lingering foamy islands.
- Witness the Fizz and Swirl: As the sherbet hits the carbonated soda, it will immediately begin to fizz and melt, creating a delightful frothy top layer and stunning colorful swirls throughout the punch. This is exactly what we want! Do not stir vigorously. A very gentle, almost non-existent stir around the edges with your ladle is okay if you feel the need to slightly blend, but mostly, let the sherbet do its beautiful, fizzy work on its own. The natural chemical reaction creates a truly enchanting visual, a signature characteristic of a well-made Easter Bunny Punch.
- Add More Sherbet as Desired: Depending on how creamy and vibrant you want your punch, you can add the second pint of sherbet now or save it for refills. I often add it all at once if I’m expecting a crowd and want a very creamy, flavorful punch right from the start. For a slightly lighter option, one pint is perfectly sufficient.
Serving and Presentation Tips for the Ultimate Easter Bunny Punch:
Presenting your Easter Bunny Punch beautifully is just as important as how it tastes. The visual appeal is what truly makes it special for Easter celebrations. Think about not just the punch itself, but also the surrounding setup. A beautifully arranged serving station, with charming glasses and thoughtful garnishes, elevates the entire experience. This is your chance to really showcase your creativity and make your Easter gathering memorable with this delightful beverage. I always say, a good drink is enjoyed, but a beautifully presented drink is remembered!
- Garnish the Punch Bowl: Before serving, you can gently float a few of your prepared marshmallow bunnies directly on top of the punch. They’ll look absolutely adorable peeking out from the frothy surface. You can also sprinkle a little bit of the green sanding sugar around the edges of the punch bowl or on a nearby platter, creating a “grassy” effect to hint at spring. A few fresh mint sprigs strategically placed can also add a touch of natural greenery and a lovely aroma.
- Individual Glass Garnishing for Easter Bunny Punch: When serving, ladle the Easter Bunny Punch into individual glasses. Make sure to get a good mix of the liquid and some of that lovely sherbet foam. Top each glass with a dollop of your homemade (or store-bought) whipped cream. Gently place one or two of your marshmallow bunnies on top of the whipped cream in each glass. You can also sprinkle a tiny bit of the green sanding sugar or a few fresh raspberries around the base of the whipped cream for extra color and appeal. This creates a charming individual serving that truly embodies the “Easter Bunny” theme.
- Keep it Chilled and Bubbly: If your celebration is going to last a while, you might consider having extra chilled soda on hand to replenish the punch as it runs low, ensuring it stays bubbly. Also, a bucket of ice next to the punch bowl (but not in the punch bowl, as it will dilute it) allows guests to add ice to their individual glasses if they prefer their drink extra cold without compromising the punch’s flavor.
- Alternative Serving Ideas: For a less messy option, you could pre-scoop the sherbet into a separate bowl and let guests add it to their individual glasses of the pre-mixed juice/soda base. This allows for customized creaminess and extends the life of the bubbly punch. For an adult version, a splash of vodka or white rum can be added to individual servings, transforming it into a delightful cocktail for those who enjoy a spirited beverage.
- Storage (if any!): While this punch is best enjoyed fresh due to the carbonation and sherbet, any leftover liquid (without sherbet) can be stored in an airtight container in the refrigerator for up to 24 hours. However, the fizzy quality will diminish significantly. The marshmallow bunnies are best made and used on the day of serving to maintain their freshness and cute appearance. I usually find that there are rarely any leftovers of this incredibly popular Easter Bunny Punch, which is always a good sign!
Conclusion:
As we wrap up our journey through this delightful recipe, I truly hope you’re feeling as excited as I am about the prospect of bringing this vibrant concoction to life in your own kitchen. I genuinely believe this isn’t just another drink recipe; it’s an invitation to create joy, to add a splash of color and a burst of flavor to your gatherings, and to make memories that linger long after the last drop has been savored. What makes this recipe an absolute must-try, in my humble opinion, is its unparalleled combination of ease, stunning visual appeal, and utterly delicious taste. You don’t need to be a seasoned mixologist to whip this up; the steps are straightforward, designed to ensure success even for the most novice of hosts. Yet, despite its simplicity, the end result is nothing short of spectacular, promising to impress guests of all ages. Imagine the delighted expressions when they first lay eyes on its cheerful hue, and then the pure enjoyment as they take that first refreshing sip. It’s the kind of recipe that sparks conversations, brightens spirits, and truly embodies the essence of celebration. This isn’t just a beverage; it’s a statement of hospitality and a testament to the joy of shared experiences. For anyone planning a festive brunch, a sunny afternoon get-together, or especially an upcoming spring holiday, this particular recipe stands out as the ultimate crowd-pleaser. It’s a guaranteed hit that brings a smile to every face, and isn’t that what great food and drink are all about?
Now, let’s talk about making this recipe truly your own and exploring its potential beyond the initial pour. When it comes to serving, presentation can elevate the experience dramatically. I love serving this in a large, clear punch bowl, allowing its beautiful color to shine through, perhaps with an elegant ladle for self-serving. For individual portions, tall, slender glasses or even festive mason jars with colorful straws add a charming touch. Don’t forget the garnishes! A simple slice of fresh orange or lime on the rim is always lovely, but for an extra festive flair, consider adding fresh berries like raspberries or blueberries directly into the punch. A sprig of fresh mint can introduce a wonderful aromatic counterpoint, and for those special occasions, a scoop of vanilla ice cream or lime sherbet floating on top turns it into a luxurious, creamy dream, reminiscent of a classic float. For a truly magical effect, especially if you’re making the Easter Bunny Punch, consider shaping some of your ice cubes with bunny molds or adding a few colorful jelly beans or edible glitter for a whimsical touch.
Endless Possibilities for Flavor and Fun!
The beauty of this recipe also lies in its versatility. While the core flavors are fantastic as is, feel free to experiment with variations to suit your taste or the occasion. If you prefer a bit more fizz, substituting some of the still water or juice with sparkling water, lemon-lime soda, or even ginger ale can add an exciting effervescence. For a more tart profile, a splash of cranberry juice or extra lime juice can balance the sweetness beautifully. On the flip side, if you’re catering to an adult crowd and wish to offer an “adults-only” version, a carefully measured addition of a clear spirit like vodka, gin, or white rum can transform it into a sophisticated cocktail. Alternatively, a splash of Prosecco or champagne can make it an elegant mimosa-like offering, perfect for brunch celebrations. For those mindful of sugar intake, experimenting with sugar-free juice options or a natural sweetener substitute can easily adapt the recipe without sacrificing flavor. Think beyond just Easter; with a change of garnish, this punch could be a fantastic addition to summer barbecues, baby showers, or even a casual Sunday brunch. Imagine it with watermelon wedges and mint for a summer vibe, or tiny rubber ducks floating in it for a baby shower!
Your Turn to Create and Share!
So, now it’s your turn! I wholeheartedly encourage you to roll up your sleeves, gather your ingredients, and give this wonderful recipe a try. I promise you, the smiles and compliments you’ll receive will make it all worthwhile. It’s designed to be a joyous experience, from preparation to the last refreshing sip. Once you’ve had the chance to whip up your own batch, I would absolutely love to hear about your experience. Did you add any unique twists? What kind of garnishes did you use? Did it become the star of your gathering? Please don’t hesitate to share your thoughts, photos, and any creative variations you came up with in the comments section below. Your feedback and creativity inspire not only me but also countless other home cooks looking for their next favorite recipe. There’s a wonderful community spirit in sharing our culinary adventures, and I’m genuinely excited to see and hear how this recipe makes its debut in your home. Thank you for joining me on this delicious journey, and happy mixing!
Hoppy Easter Bunny Punch: Sweet, Colorful & Kid-Friendly Beverage
This Hoppy Easter Bunny Punch is a sweet, colorful, and kid-friendly beverage, perfect for spring celebrations. It’s a vibrant, whimsical centerpiece designed to delight guests of all ages with its irresistible blend of sweet, fruity flavors, often complemented by a delightful creaminess or a refreshing fizz. Incredibly simple to prepare, it adds a touch of magic to any Easter gathering, serving as a memorable welcome drink.
Ingredients
-
3 cups chilled white grape juice
-
3 cups chilled pineapple juice
-
2 liters chilled lemon-lime soda
-
1-2 pints raspberry, lime, or rainbow sherbet
-
1/2 cup very cold heavy cream (optional, for whipped cream)
-
2 tbsp powdered sugar (optional, for whipped cream)
-
1 tsp pure vanilla extract (optional, for whipped cream)
-
1 (10.5 oz) bag large marshmallows
-
1 (10.5 oz) bag mini marshmallows
-
Pink sanding sugar or edible glitter
-
Green sanding sugar or sprinkles
-
Small edible candy eyes
-
Pink food-safe marker or gel (optional)
-
Fresh mint sprigs or raspberries (optional garnish)
Instructions
-
Step 1
Ensure white grape juice, pineapple juice, and lemon-lime soda are thoroughly chilled. -
Step 2
In a large punch bowl, gently combine chilled white grape juice, pineapple juice, and lemon-lime soda. Stir minimally to preserve fizz. Keep chilled until serving. -
Step 3
Prepare marshmallow bunny ears: Cut large marshmallows diagonally in half. Press the sticky cut side into pink sanding sugar or edible glitter. -
Step 4
Assemble bunny faces: Attach two sugared marshmallow ‘ears’ onto a mini marshmallow. Press on edible candy eyes. Optionally, draw a pink nose with a food-safe marker. -
Step 5
Prepare ‘grassy’ sprinkles: Pour green sanding sugar or sprinkles into a small bowl. -
Step 6
(Optional) Make whipped cream: In a very cold bowl, beat 1/2 cup heavy cream, 2 tbsp powdered sugar, and 1 tsp vanilla extract until soft peaks form. -
Step 7
Just before serving, add 1-2 pints of your chosen sherbet (raspberry, lime, or rainbow) directly into the chilled punch base. Do not stir vigorously; allow it to fizz and melt to create frothy swirls and a creamy top layer. -
Step 8
Garnish the punch bowl with a few marshmallow bunnies and green sanding sugar. Ladle punch into individual glasses. Top each glass with a dollop of whipped cream (if using), one or two marshmallow bunnies, and optional green sprinkles or fresh raspberries for a festive presentation.
Important Information
Nutrition Facts (Per Serving)
It is important to consider this information as approximate and not to use it as definitive health advice.
Allergy Information
Please check ingredients for potential allergens and consult a health professional if in doubt.

Leave a Comment