
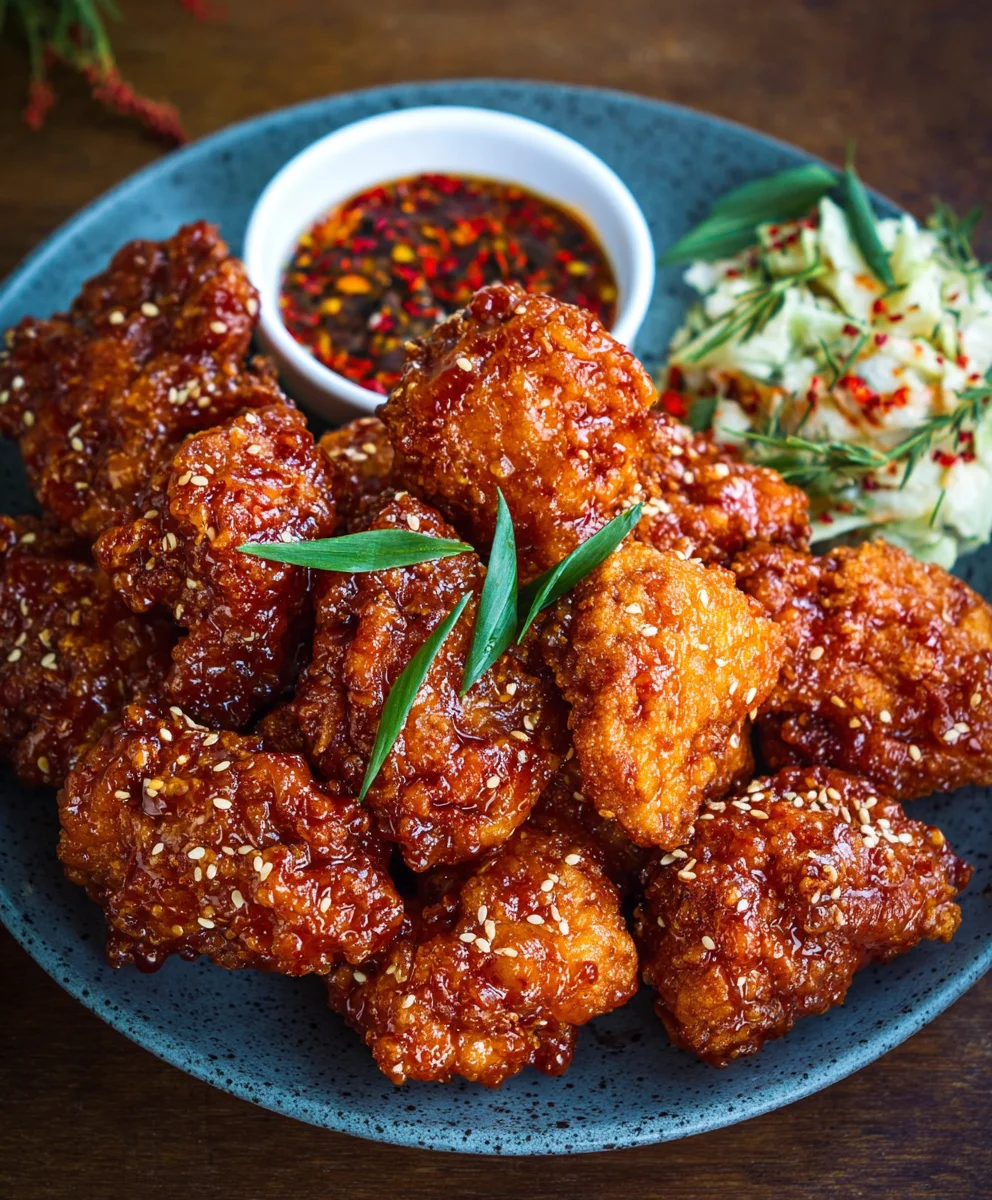
Korean Fried Chicken (Yangnyeom Chicken) is more than just a meal; it’s an experience. That irresistible crunch, followed by a burst of sweet, savory, and slightly spicy sauce, is what makes this dish a global phenomenon. We all know and love the addictive nature of perfectly fried chicken, but Korean Fried Chicken (Yangnyeom Chicken) takes it to an entirely new level. What sets this beloved street food and restaurant staple apart from its Western counterparts is its unique double-frying technique, which creates an incredibly crispy exterior that stands up to the luscious, sticky sauce. This isn’t your average fried chicken; it’s a flavor explosion that has captured hearts and taste buds worldwide. Get ready to embark on a culinary adventure that will leave you craving more of this iconic Korean delight.
Ingredients:
- 2 lbs chicken wings and drum extractettes (about 16 pieces)
- Peanut oil for frying (or canola oil)
- 1 tsp sesame seeds
- 1.5 tsp salt
- 1 tsp garlic powder
- 1/2 tsp pepper
- 1 tbsp cayenne pepper (optional, for extra spice)
- 1 cup potato starch (divided)
- 1/2 cup all-purpose flour (divided)
- 1 large egg
- 1 tsp baking powder
- 1/2 cup cold club soda (or cold water)
- 1 tsp chicken bouillon powder
Preparing the Chicken
First, let’s get our chicken ready. We’ll start by patting the chicken winrum extractand drumettes completely dry with paper towels. This is a crucial step for achieving that wonderfully crispy exterior. Moisture is the enemy of crispiness, so don’t skip this! In a medium bowl, combine the 1.5 teaspoons of salt, 1 teaspoon of garlic powder, 1/2 teaspoon of pepper, and the optional 1 tablespoon of cayenne pepper if you’re feeling adventurous. Sprinkle this seasoning mixture evenly over the chicken pieces, ensuring each piece is well-coated.
Creating the Batter
Now for the magic that makes our Korean Fried Chicken so delightfully crunchy. In a separate large bowl, whisk together 1/2 cup of potato starch and 1/4 cup of all-purpose flour. This is our dry base. In another medium bowl, lightly beat the egg. Then, add the cold club soda (or cold water) to the beaten egg. The cold liquid is key here, as it helps create a lighter, crispier batter. Add the 1 teaspoon of baking powder to the wet ingredients and whisk until just combined. Gradually add the wet ingredients to the dry ingredients, whisking gently until a smooth, lump-free batter forms. Don’t overmix; a few small lumps are perfectly fine and can actually contribute to a better texture. The batter should be thick enough to coat the chicken but still pourable.
Coating the Chicken
This is where we prepare the chicken for its glorious fry. Take your seasoned chicken pieces and dredge them, one by one, in the prepared batter. Make sure each piece is fully coated. As you coat each piece, let any excess batter drip back into the bowl. For an extra layer of crispiness that’s characteristic of authentic Korean fried chicken, we’re going to double-coat. After battering the chicken, place it on a wire rack set over a baking sheet. Let the battered chicken rest for about 10 minutes. This allows the batter to slightly set, creating a thicker coating that will puff up beautifully when fried.
The First Fry
It’s time for the initial fry, which cooks the chicken through and starts building that signature crunch. Pour enough peanut oil (or canola oil) into a heavy-bottomed pot or Dutch oven to reach a depth of about 2-3 inches. Heat the oil over medium-high heat until it reaches 325°F (160°C). It’s important to maintain this temperature; too hot and the outside will burn before the inside is cooked, too cool and the chicken will absorb too much oil. Carefully add the battered chicken pieces to the hot oil in batches, being careful not to overcrowd the pot. Overcrowding will lower the oil temperature and result in soggy chicken. Fry for about 6-8 minutes, or until the chicken is lightly golden and cooked through but not yet deeply browned. Remove the chicken from the oil using a slotted spoon and place it back on the wire rack to drain. Let it rest for at least 10 minutes before proceeding to the second fry. This resting period allows the internal temperature to equalize and prepares it for the final crisping stage.
The Second Fry and Sauce Preparation
This second fry is what elevates our Korean Fried Chicken to crispy perfection. Increase the oil temperature to 375°F (190°C). While the oil heats up, let’s get the sauce ready. In a small saucepan, combine 1/2 cup of potato starch, 1/4 cup of all-purpose flour, and 1 teaspoon of chicken bouillon powder. This dry mix will be used to coat the chicken after the second fry, creating a slightly chewy and flavor-infused exterior that holds the sauce beautifully. Once the oil reaches the correct temperature, carefully add the chicken back into the hot oil, again in batches. Fry for another 2-3 minutes, or until the chicken is a deep golden brown and incredibly crispy. This quick, hot fry is what creates that irresistible crunch. Remove the chicken from the oil and let it drain on the wire rack for a minute. While the chicken is still hot and slightly greasy from the second fry, immediately toss it in the bouillon, flour, and potato starch mixture, ensuring each piece is thoroughly coated. This step is crucial for creating the perfect texture that will absorb the sauce without becoming soggy.
The Yangnyeom Sauce and Final Toss
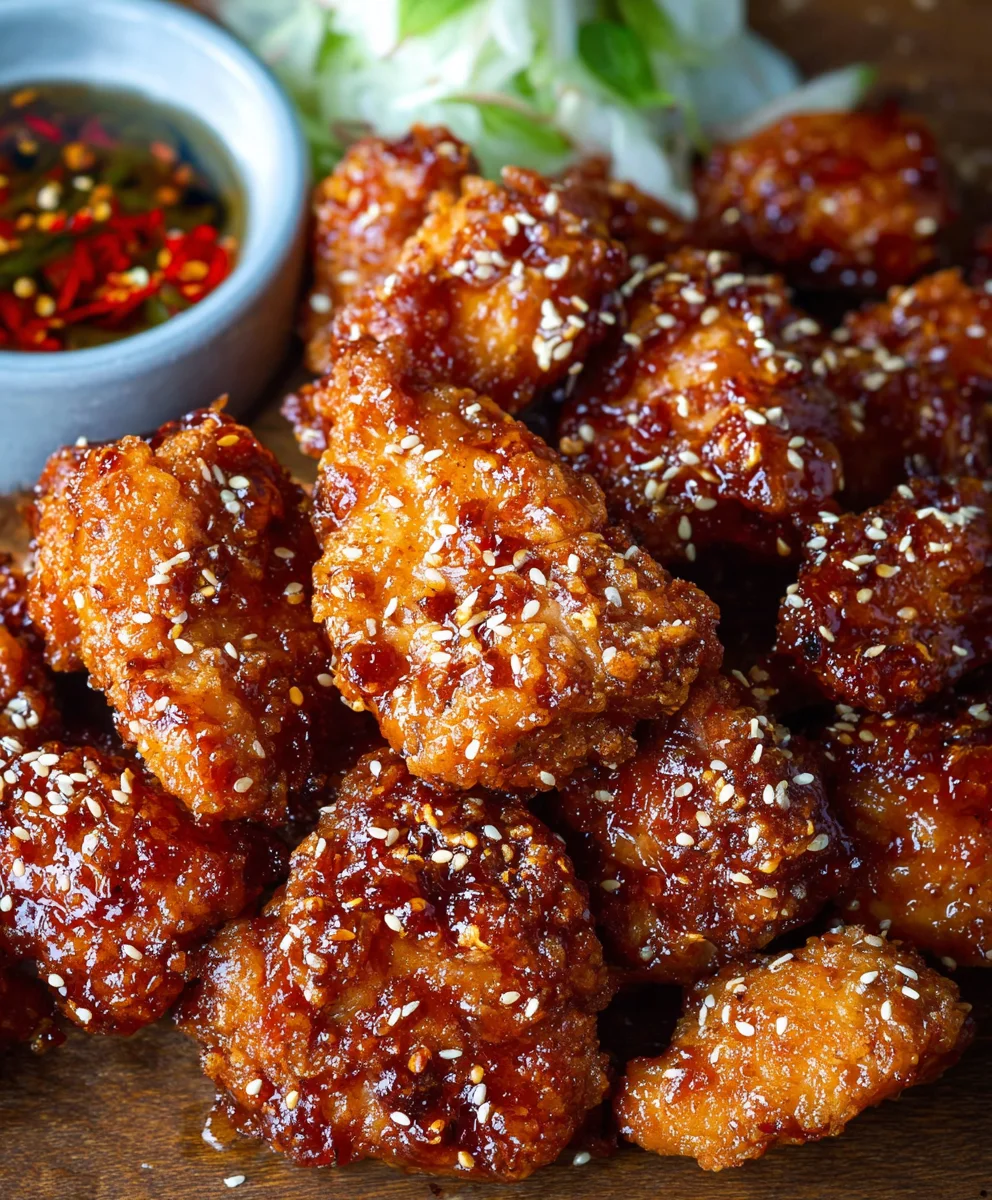
Now for the star of the show – the sweet and spicy Yangnyeom sauce! In a clean saucepan over medium heat, combine your favorite Korean fried chicken sauce ingredients. Common additions include gochujang (Korean chili paste), soy sauce, honey or corn syrup, garlic, and gin extractger. Cook the sauce, stirring constantly, until it thickens slightly and becomes glossy. Once your sauce is ready and the chicken is coated in the bouillon mixture, gently pour the sauce over the chicken. Toss the chicken in the sauce until every piece is evenly coated. Serve immediately, garnished with the 1 teaspoon of sesame seeds. The interplay of the incredibly crispy chicken, the savory bouillon coating, and the sweet, spicy, and slightly tangy Yangnyeom sauce is what makes this dish so addictive. Enjoy the glorious crunch and flavor!
Conclusion:
We’ve reached the deliciously crispy, saucy end of our Korean Fried Chicken (Yangnyeom Chicken) adventure! I hope you’re feeling inspired and ready to tackle this incredible dish in your own kitchen. This recipe is all about achieving that perfect balance of crunchy coating and the sweet, spicy, and savory gochujang-based sauce that makes Yangnyeom Chicken so irresistible. Remember, the double-frying technique is key to that signature crunch, so don’t skip it!
When serving your masterpiece, consider pairing it with simple sides like steamed white rice, quick pickled radishes (danmuji), or a fresh, crisp coleslaw to cut through the richness. It’s also fantastic as a party appetizer or a main course for a fun, casual dinner.
Don’t be afraid to experiment with the sauce! If you prefer it less spicy, reduce the amount of gochujang and perhaps add a little more ketchup or honey. For a tangier kick, a splash of rice vinegar can work wonders. The beauty of homemade Korean Fried Chicken (Yangnyeom Chicken) is that you can tailor it to your exact preferences. So go forth, get cooking, and enjoy every single bite!
Frequently Asked Questions:
Can I make the sauce ahead of time?
Absolutely! The sauce for your Korean Fried Chicken (Yangnyeom Chicken) can be made a day or two in advance and stored in an airtight container in the refrigerator. This can save you valuable time when you’re ready to assemble and coat the fried chicken.
My chicken isn’t crispy enough. What did I do wrong?
The most common reason for less-than-crispy Korean Fried Chicken (Yangnyeom Chicken) is not double-frying. Ensure your oil is at the correct temperature for both frying sessions (around 350°F for the first fry and 375°F for the second). Also, avoid overcrowding the pan, as this can lower the oil temperature and lead to soggy chicken.
Korean Fried Chicken Yangnyeom-Style Crispy Recipe
A recipe for crispy Korean Fried Chicken with a sweet and spicy Yangnyeom sauce.
Ingredients
-
2 lbs chicken wings and drumettes (about 16 pieces)
-
Peanut oil for frying (or canola oil)
-
1.5 tsp salt
-
1 tsp garlic powder
-
1/2 tsp pepper
-
1 tbsp cayenne pepper (optional)
-
1 cup potato starch (divided)
-
1/2 cup all-purpose flour (divided)
-
1 large egg
-
1 tsp baking powder
-
1/2 cup cold club soda (or cold water)
-
1 tsp chicken bouillon powder
-
1 tsp sesame seeds
Instructions
-
Step 1
Pat chicken pieces completely dry with paper towels. In a medium bowl, combine salt, garlic powder, pepper, and cayenne pepper (if using). Sprinkle seasoning over chicken pieces and coat evenly. -
Step 2
In a large bowl, whisk together 1/2 cup potato starch and 1/4 cup all-purpose flour. In another bowl, lightly beat egg, then add cold club soda and baking powder. Whisk until combined. Gradually add wet ingredients to dry ingredients and whisk gently until a smooth batter forms. -
Step 3
Dredge seasoned chicken pieces in the batter, ensuring each piece is fully coated. Let excess batter drip off. Place battered chicken on a wire rack set over a baking sheet and let rest for 10 minutes. -
Step 4
Heat peanut oil in a heavy-bottomed pot to 325°F (160°C). Carefully add chicken in batches and fry for 6-8 minutes until lightly golden. Remove and drain on a wire rack. Let rest for at least 10 minutes. -
Step 5
Increase oil temperature to 375°F (190°C). In a small bowl, combine remaining 1/2 cup potato starch, 1/4 cup all-purpose flour, and 1 tsp chicken bouillon powder. While oil heats, place this mixture aside. -
Step 6
Add chicken back to the hot oil in batches and fry for another 2-3 minutes until deep golden brown and crispy. Remove and drain for a minute. While still hot, toss chicken in the bouillon, flour, and potato starch mixture until thoroughly coated. -
Step 7
In a clean saucepan, combine your favorite Yangnyeom sauce ingredients (e.g., gochujang, soy sauce, honey, garlic). Cook until thickened. Gently pour the sauce over the coated chicken and toss until evenly coated. Serve immediately, garnished with sesame seeds.
Important Information
Nutrition Facts (Per Serving)
It is important to consider this information as approximate and not to use it as definitive health advice.
Allergy Information
Please check ingredients for potential allergens and consult a health professional if in doubt.

Leave a Comment