
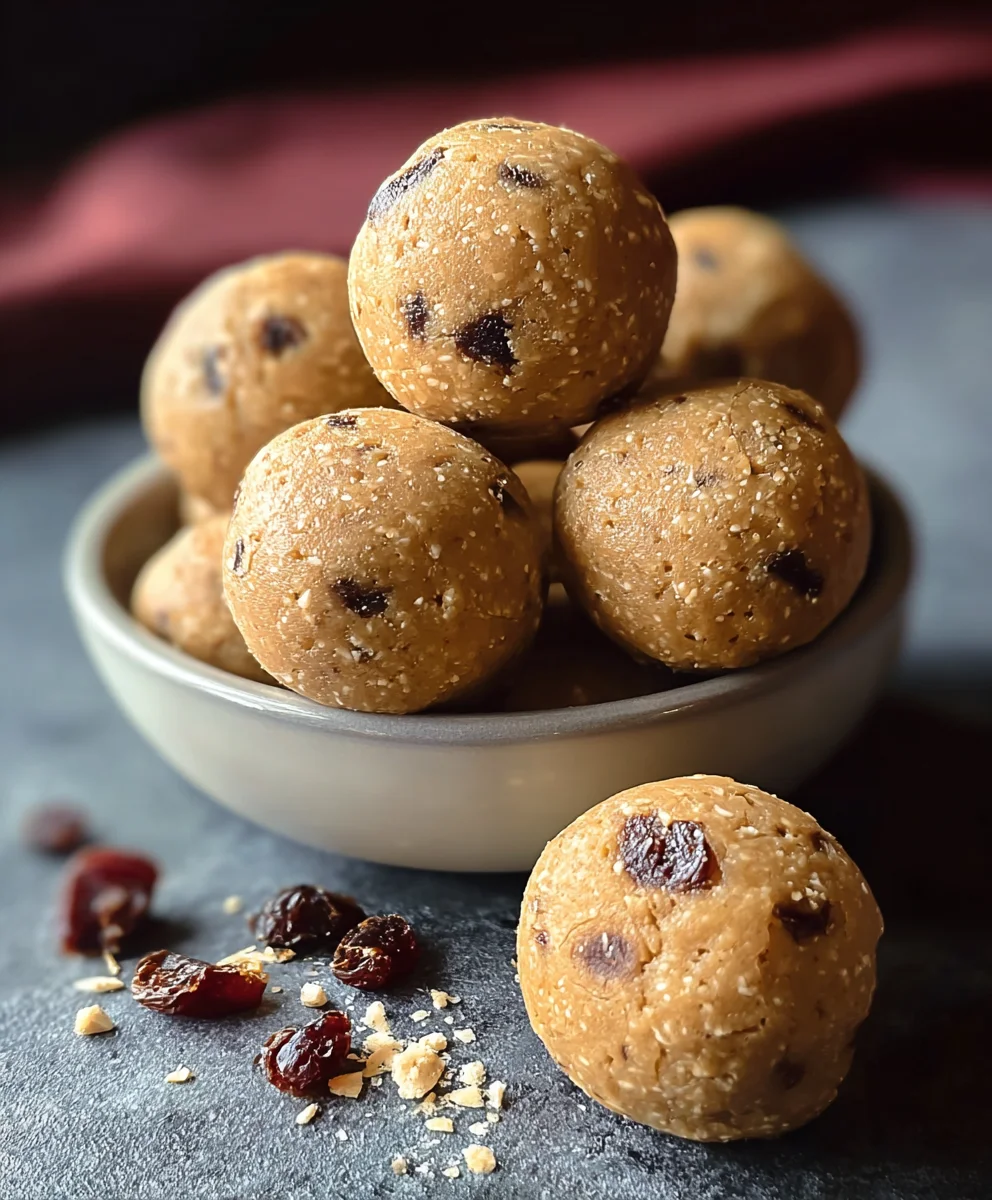
No-Bake Chickpea Cookie Bites are the ultimate guilt-free treat that prove deliciousness doesn’t require a hot oven or endless hours of preparation. If you’re searching for a satisfying snack that’s packed with plant-powered goodness and requires minimal effort, you’ve landed in the right place. These delightful little morsels have taken the snack world by storm, and it’s easy to see why. People adore them for their chewy texture, naturally sweet flavor, and the incredible versatility they offer. Whether you’re a busy parent looking for a healthy after-school option, a fitness enthusiast needing a pre- or post-workout boost, or simply someone who craves a sweet indulgence without the sugar crash, these bites deliver. What truly sets these No-Bake Chickpea Cookie Bites apart is their secret ingredient – chickpeas! Don’t let that surprise you; they lend a wonderfully soft and fudgy consistency, along with a boost of protein and fiber, all while remaining completely undetectable in taste. Get ready to whip up a batch of these incredibly easy and incredibly yummy treats that will become your new go-to!
Ingredients:
- 15.5 ounces chickpeas (garbanzo beans), drained and thoroughly dried
- 1/2 cup whole oats
- 1/4 cup maple syrup
- 1 teaspoon vanilla extract
- 1/2 teaspoon salt
- 1/4 cup mini chocolate chips
Preparation Phase
Prepping the Chickpeas
- Begin extract by ensuring your chickpeas are as dry as possible. After draining them from the can, spread them out on a clean kitchen towel or paper towels. Gently pat them dry, and then allow them to air dry for at least 15-30 minutes, or even longer if you have the time. The drier the chickpeas, the better the texture of your No-Bake Chickpea Cookie Bites will be, as excess moisture can lead to a mushy outcome. This drying step is crucial for achieving a pleasing, slightly chewy bite.
- Once your chickpeas are sufficiently dry, place them into a food processor. Pulse them a few times until they are broken down into a coarse, crum extractbly texture. You don’t want a smooth paste; rather, aim for something resembling coarse sand or very finely chopped nuts. This textured base will provide a delightful chegrape juicess to the cookie bites.
Mixing Phase
Combining the Flavors
- To the food processor containing the pulsed chickpeas, add the whole oats. The oats will contribute to the structure grape juicechewiness of the bites, acting as a binding agent alongside the chickpeas. Next, pour in the maple syrup. This liquid sweetener not only adds sweetness but also helps to bind all the ingredients together, giving the cookie bites their cohesive form. Measure your maple syrup carefully; too much and the mixture might become too sticky, while too little might prevent them from holding their shape.
- Add the vanilla extract and the salt to the mixture. The vanilla extract is essential for adding that classic cookie flavor and aroma, enhancing the overall taste profile. The salt, even in a small amount, plays a vital role in balancing the sweetness gin extract bringing out the other flavors. It’s a subtle but impactful addition that truly elevates the taste of these simple bites.
- Now, process the mixture until everything is well combined and forms a sticky dough. Scrape down the sides of the food processor a couple of times to ensure all the ingredients are incorporated evenly. The consistency should be moist enough to hold together when pressed, but not overly wet. If it seems a bit too dry, you can add another teaspoon of maple syrup, but do so sparingly.
Finishing Phase
Adding the Extras and Forming
- Once the dough has reached the desired consistency, transfer it to a medium mixing bowl. Add the mini chocolate chips to the bowl. Gently fold them into the chickpea and oat mixture using a spatula or a spoon. Ensure the chocolate chips are distributed evenly throughout the dough. The mini chocolate chips add delightful pockets of sweetness and a satisfying texture contrast to the chewy cookie bites. You can use regular-sized chocolate chips if you prefer, but mini ones tend to distribute more evenly in smaller bites.
- Take a small portion of the dough, about a tablespoon’s worth, and roll it between your palms to form small balls. Aim for uniform size so that the cookie bites bake (or rather, set) evenly. Place the formed balls onto a baking sheet lined with parchment paper. The parchment paper will prevent them from sticking and make for easier cleanup. Continue this process until all the dough has been used to form small cookie bites.
- Once all the No-Bake Chickpea Cookie Bites are formed and placed on the baking sheet, it’s time for them to firm up. You can either place the baking sheet in the refrigerator for at least 30 minutes, or in the freezer for about 15-20 minutes. This chilling process is what allows the bites to firm up and hold their shape without needing to be baked. The oats will absorb some of the moisture, and the maple syrup will help bind them as they chill.

Conclusion:
We’ve reached the end of our delightful journey into creating these irresistible No-Bake Chickpea Cookie Bites! These little powerhouses are perfect for a quick, healthy snack, a pre-workout boost, or even a guilt-free dessert. Their simplicity makes them a fantastic option for busy individuals and families alike. The chewy texture combined with the satisfying nutty flavor is truly a winning combination. Don’t be afraid to get creative and adapt this recipe to suit your own taste preferences!
For serving, these No-Bake Chickpea Cookie Bites are wonderful on their own, but they also pair beautifully with a glass of almond milk, a cup of tea, or even crum extractbled over yogurt. Consider adding them to a snack board for a healthier alternative to traditional sweets.
Variations to explore include adding different types of nuts or seeds, such as sunflower seeds or pumpkin seeds, for an extra crunch and nutritional punch. You can also experiment with various extracts, like a hint of almond or peppermint, for a flavor twist. If you prefer a sweeter bite, a drizzle of honey or maple syrup can be added. For those who love chocolate, mini chocolate chips are always a welcome addition!
I truly hope you enjoy making and savoring these No-Bake Chickpea Cookie Bites as much as I do. They are a testament to how delicious and satisfying healthy eating can be. Give them a try and let their simple goodness brighten your day!
FAQs
Can I make these No-Bake Chickpea Cookie Bites ahead of time?
Absolutely! These No-Bake Chickpea Cookie Bites are perfect for meal prepping. Store them in an airtight container in the refrigerator for up to a week. They might firm up a bit in the fridge, but they will soften at room temperature within a few minutes.
Are these No-Bake Chickpea Cookie Bites suitable for children?
Yes, they are! These No-Bake Chickpea Cookie Bites are a great way to introduce children to healthy ingredients. Just ensure that any additions like chocolate chips are appropriate for their age and dietary needs. Always supervise young children when they are eating.
Easy No-Bake Chickpea Cookie Bites Recipe
Delicious and healthy no-bake cookie bites made with chickpeas, oats, and chocolate chips. A quick and easy treat perfect for any occasion.
Ingredients
-
15.5 ounces chickpeas (garbanzo beans), drained and thoroughly dried
-
1/2 cup whole oats
-
1/4 cup maple syrup
-
1 teaspoon vanilla extract
-
1/2 teaspoon salt
-
1/4 cup mini chocolate chips
Instructions
-
Step 1
Ensure chickpeas are thoroughly dried by patting them with towels and allowing them to air dry for 15-30 minutes. This is crucial for texture. -
Step 2
Pulse the dried chickpeas in a food processor until they have a coarse, crumbly texture, similar to coarse sand. -
Step 3
Add the whole oats, maple syrup, vanilla extract, and salt to the food processor with the chickpeas. Process until a sticky dough forms. -
Step 4
Transfer the dough to a bowl and gently fold in the mini chocolate chips. -
Step 5
Roll tablespoon-sized portions of the dough into small balls and place them on a parchment-lined baking sheet. -
Step 6
Chill the cookie bites in the refrigerator for at least 30 minutes or in the freezer for 15-20 minutes until firm.
Important Information
Nutrition Facts (Per Serving)
It is important to consider this information as approximate and not to use it as definitive health advice.
Allergy Information
Please check ingredients for potential allergens and consult a health professional if in doubt.


Leave a Comment