
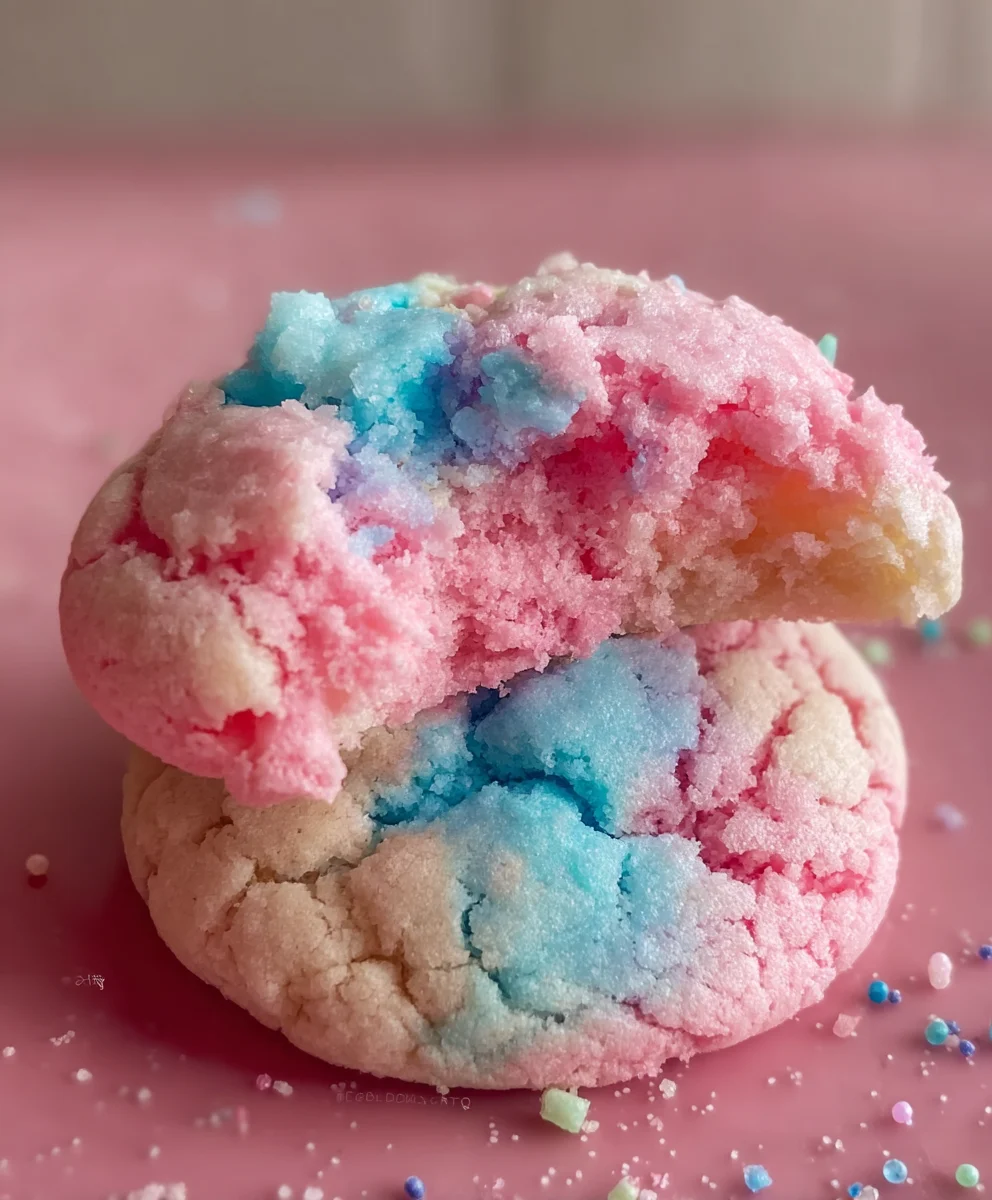
Cotton Candy Cookies are more than just a dessert; they are a whimsical journey back to the carefree days of childhood, capturing the pure, unadulterated joy of a carnival treat in a convenient, delightful bite. Imagine the soft, chewy embrace of a freshly baked cookie infused with the ethereal sweetness and vibrant colors of spun sugar. It’s a delightful paradox, a taste of pure joy that promises to bring a smile to anyone who experiences it.
While the history of cotton candy itself is quite fascinating, evolving from a dentist’s ingenious invention to a global symbol of fun, these particular treats take that nostalgic magic and transform it into an accessible, homemade delight. We’re bridging the gap between nostalgic fairground fun and gourmet home baking, allowing you to recreate that sense of wonder in your own kitchen.
What truly makes these Cotton Candy Cookies irresistible is their unique charm. They offer an unparalleled sensory experience: the delicate, airy flavor that dissolves on your tongue, reminiscent of fluffy clouds of sugar, perfectly balanced by the comforting texture of a classic cookie. They’re visually stunning, perfect for brightening any occasion, from children’s parties to a sophisticated afternoon tea, and surprisingly fun to make. I find myself continually charmed by how such a simple concept can yield such spectacularly vibrant and delicious results, bringing smiles to everyone who tries them.
Ingredients:
- For the Cotton Candy Cookie Dough Base:
- 2 ½ cups (300g) all-purpose flour, spooned and leveled – proper measurement is key for cookie texture!
- 1 teaspoon baking powder – helps our cookies rise beautifully.
- ½ teaspoon salt – balances the sweetness and enhances flavor.
- 1 cup (226g) unsalted butter, softened to room temperature – I always make sure it’s soft enough to indent with a finger, but not melted. This is crucial for a smooth, creamy base.
- 1 ½ cups (300g) granulated sugar – for that classic sweet cookie foundation.
- 2 large eggs, at room temperature – integrating better into the mix when not cold.
- 2 teaspoons pure vanilla extract – provides a warm, comforting aroma and taste.
- 1 teaspoon cotton candy flavoring oil or extract – this is our secret weapon for authentic “Cotton Candy Cookies” flavor! Be careful, oils are very potent.
- Gel food coloring (pink, light blue, lavender/purple) – I prefer gel for vibrant colors without adding excess liquid to the dough.
- For Decoration and Serving:
- Fresh cotton candy (pink, blue, or a mix) – I recommend buying this on the day of serving, as it’s quite delicate and moisture-sensitive.
- Optional: Pastel sprinkles (nonpareils, jimmies, or sugar crystals) – for an extra touch of whimsy.
Preparing the Classic Cookie Dough Base for Your Cotton Candy Cookies
Creating the perfect cookie dough is the foundation for our enchanting Cotton Candy Cookies. I love this part because it’s where the magic begins, transforming simple ingredients into something truly special. Let’s get our hands (and mixers!) ready.
- Measure and Whisk Dry Ingredients: In a medium-sized bowl, I always start by whisking together my all-purpose flour, baking powder, and salt. It’s important to spoon and level your flour rather than scooping it directly from the bag, as this can lead to too much flour and a dry, tough cookie. Giving these dry ingredients a good whisk ensures they are evenly combined, which means uniform leavening and seasoning throughout our delicious Cotton Candy Cookies. Set this bowl aside for now.
- Cream Butter and Sugar: Now, in the large bowl of a stand mixer fitted with the paddle attachment (or using a hand mixer and a large bowl), I add my softened unsalted butter and granulated sugar. I beat these together on medium-high speed for about 3 to 4 minutes. This step is super important! We want the mixture to become light, fluffy, and pale in color. This process, called “creaming,” incorporates air into the butter, which will give our Cotton Candy Cookies their wonderfully tender texture and a slight lift. Scrape down the sides of the bowl midway through to ensure everything is thoroughly combined.
- Incorporate Wet Ingredients: Once the butter and sugar mixture is perfectly fluffy, I crack in my two large eggs, one at a time. After adding each egg, I beat just until it’s incorporated, scraping down the sides of the bowl as needed. This helps prevent overmixing and ensures a smooth batter. Then, I pour in the pure vanilla extract and, most importantly, our secret weapon: the cotton candy flavoring oil. If you’re using an extract, you might need a bit more, but with a potent oil, a little goes a long way. Beat on low speed until just combined. The aroma starting to develop at this stage is absolutely heavenly and a true preview of our delightful Cotton Candy Cookies!
- Gradually Add Dry to Wet: With the mixer on low speed, I gradually add the reserved dry ingredient mixture to the wet ingredients. I do this in about three additions, mixing just until the flour streaks have almost disappeared after each addition. The key here is to stop mixing as soon as the last bit of flour is incorporated. Overmixing at this stage develops the gluten in the flour, which can lead to tough cookies, and we want our Cotton Candy Cookies to be wonderfully tender and melt-in-your-mouth soft. The dough should come together beautifully, forming a cohesive, slightly sticky mass.
Infusing Flavor and Color into Your Cotton Candy Cookies
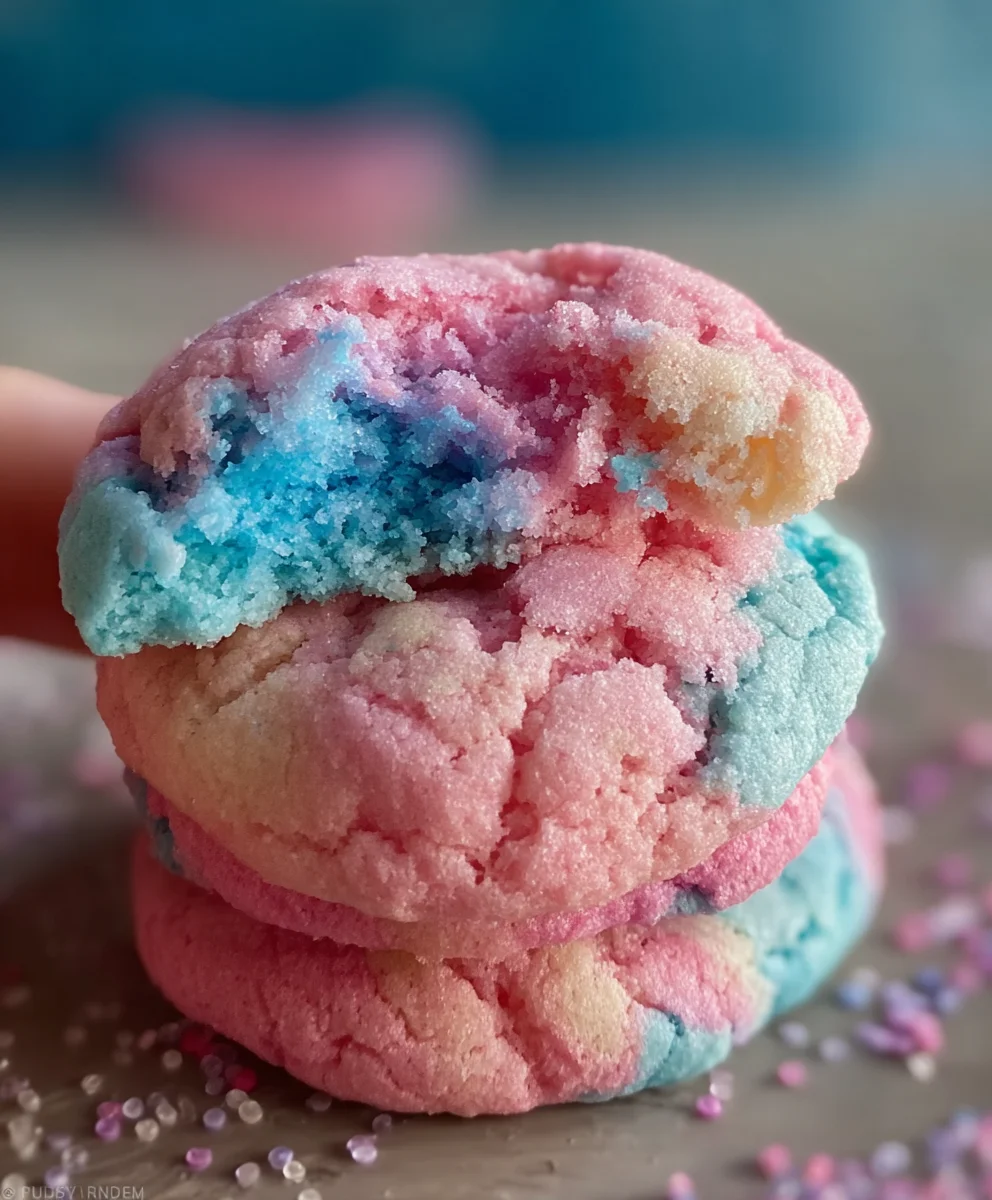
This is where our Cotton Candy Cookies truly come to life with their signature colors and intensified flavor! The marbling technique creates a visual feast that’s as delightful as the taste. Get ready to play with vibrant hues and make these cookies pop.
- Divide and Conquer with Color: I carefully divide the freshly prepared cookie dough into three equal portions. I find using a kitchen scale for this step helps ensure even sizing for a consistent bake, but eyeballing it works too. Place each portion into a separate medium bowl.
- Coloring Our Cotton Candy Dough: Now for the fun part! I add a few drops of gel food coloring to each bowl: pink in one, light blue in another, and lavender (or purple) in the third. I always start with just a few drops because gel colors are highly concentrated. You can always add more if you want a deeper hue, but it’s hard to take it away! Using a spoon or a rubber spatula, gently fold the color into each portion of dough until the color is evenly distributed. Be careful not to overmix here either; we want to incorporate the color without developing too much gluten. You’ll notice the dough transform into beautiful pastel shades, reminiscent of a carnival treat. These vibrant colors are essential for making our Cotton Candy Cookies visually appealing and true to their theme.
- Creating the Swirl Effect: To achieve that iconic marbled, swirly look for our Cotton Candy Cookies, I take small, roughly equal pieces from each colored dough ball. I gently roll them into short logs or ropes, about 2-3 inches long. Then, I lay these colored logs side-by-side, gently twisting them together once or twice. Next, I very gently roll the twisted logs into a single ball, making sure not to overwork it. We want distinct streaks of color, not a completely blended muddy color. This light handling preserves the beautiful marbling that will be revealed when our Cotton Candy Cookies bake. This step is a bit artistic, so don’t be afraid to experiment with how you combine the colors.
- Chilling is Crucial: Once all your dough balls are beautifully marbled, I highly recommend placing them on a plate or baking sheet lined with parchment paper and chilling them in the refrigerator for at least 30 minutes. For the best results and to prevent spreading, I often chill for an hour or even two. This step is non-negotiable for perfectly shaped Cotton Candy Cookies. Chilling allows the butter in the dough to firm up, which helps the cookies hold their shape during baking and prevents them from spreading too much. It also gives the flavors a chance to meld together, deepening the delicious cotton candy taste. If you’re planning ahead, you can even chill the dough for up to 2-3 days, covered tightly with plastic wrap.
Baking Your Swirly Cotton Candy Cookie Masterpieces
The moment of truth! Baking these colorful beauties is exciting. We want to ensure they come out perfectly golden, soft, and ready for their final cotton candy flourish. Here’s how I get my Cotton Candy Cookies just right every time.
- Preheat and Prep: About 15 minutes before I’m ready to bake, I preheat my oven to 375°F (190°C). While the oven is heating, I line two large baking sheets with parchment paper or silicone baking mats. This prevents sticking and makes for easy cleanup – a win-win in my book! Having two sheets ready allows for continuous baking.
- Scoop and Space: I retrieve the chilled dough from the refrigerator. Using a medium cookie scoop (about 1.5 to 2 tablespoons), I portion out the dough, rolling each scoop into a smooth, round ball with my hands. It’s important to make them as uniform as possible for even baking. I place the dough balls about 2 inches apart on the prepared baking sheets. This spacing is important to allow the cookies to spread slightly without touching each other, ensuring each of our Cotton Candy Cookies has plenty of room to achieve its perfect shape.
- Bake to Perfection: I bake one sheet at a time in the preheated oven for 9 to 12 minutes. Baking one sheet at a time helps ensure even heat distribution and consistent results. I look for the edges to be lightly golden, and the centers to still look soft and slightly puffy. It’s crucial not to overbake these cookies! They will continue to set up as they cool. Overbaking can lead to dry, hard cookies, and we want our Cotton Candy Cookies to be wonderfully soft and chewy. If you prefer a chewier cookie, lean towards the shorter baking time.
- Cooling Down: Once baked, I carefully remove the baking sheets from the oven. I let the Cotton Candy Cookies cool on the baking sheets for about 5 minutes. They are quite delicate when hot, so this brief cooling period on the tray allows them to firm up slightly. After 5 minutes, I use a thin spatula to transfer the cookies to a wire rack to cool completely. Cooling on a wire rack allows air to circulate all around the cookies, preventing them from getting soggy on the bottom and ensuring they cool evenly.
The Magical Cotton Candy Cookie Decoration and Serving
This is truly the grand finale for our Cotton Candy Cookies, where they get their fluffy, ethereal topping! This step is all about timing and a little bit of flair. The delicate nature of cotton candy makes this a quick and rewarding process, bringing that carnival magic right into your kitchen.
- Prepare Your Cotton Candy: While your cookies are cooling, gently pull apart small, fluffy tufts of fresh cotton candy. I find it easiest to work with small portions at a time, as cotton candy can be a bit unwieldy. Remember, cotton candy is very sensitive to moisture and heat, so keep it in a dry, cool place until you’re ready to use it. If you can, try to wear gloves to minimize transfer of moisture and oils from your hands, which can make the cotton candy dissolve faster. I aim for pieces that are roughly the size of the top of each cookie.
- The Cotton Candy Adhesion Secret: Once the cookies are completely cool (this is important, as residual heat will melt the cotton candy instantly!), you need a little something to help the cotton candy stick. My go-to method is to use a tiny dab of light frosting (like a simple buttercream or even a store-bought vanilla frosting) on the center of each cookie. You only need a pea-sized amount. Alternatively, you can brush a very thin layer of corn syrup onto the cookie, but the frosting provides a bit more stability and flavor.
- Attach the Fluff: Gently but firmly press a prepared tuft of cotton candy onto the frosting dab on top of each cookie. Work relatively quickly here. The goal is to get that beautiful, whimsical cloud perched atop each of your colorful Cotton Candy Cookies. If you want, this is also the perfect time to sprinkle on some pastel nonpareils or sugar crystals around the cotton candy base for an extra festive touch. The sprinkles will adhere to the frosting as well.
-
Serving and Storage Tips for Your Cotton Candy Cookies:
Serve Immediately for Best Results!
Because cotton candy is so delicate, these Cotton Candy Cookies are truly best served within an hour or two of being decorated. The cotton candy will start to dissolve and shrink when exposed to air and humidity, especially in warm environments. They are an absolute showstopper when freshly made!
If You Must Store Them:
If you absolutely need to store them, I recommend storing the undecorated cookies in an airtight container at room temperature for up to 3-4 days. Store the cotton candy separately, in its original sealed bag or container, away from any moisture. Then, you can decorate them just before serving. This ensures that every bite of your Cotton Candy Cookies is as fresh and magical as intended.
Enjoy these delightful, colorful, and whimsically flavored Cotton Candy Cookies! They are guaranteed to bring a smile to anyone’s face.
Conclusion:
If there’s one recipe I could implore you to try, it’s this one. These aren’t just any ordinary cookies; they are an experience, a delightful journey back to childhood, and an absolute triumph of texture and flavor. From the moment you pull these beauties from the oven, you’ll understand exactly why I call them a must-try. Their ethereal lightness, the way they practically dissolve on your tongue, and that unmistakable, subtly sweet flavor profile truly set them apart. It’s a culinary magic trick, transforming simple ingredients into something truly extraordinary. They offer a unique melt-in-your-mouth sensation that you simply won’t find in traditional cookies. The vibrant, playful colors alone are enough to brighten anyone’s day, making them a feast for the eyes as much as for the palate. I promise you, creating these cookies is not only incredibly rewarding but also surprisingly simple, making them accessible even for novice bakers looking to impress. This recipe isn’t just about baking; it’s about creating joy, one soft, airy bite at a time.
Now, let’s talk about taking your cookie game to the next level with some fantastic serving suggestions and variations. For a classic, comforting experience, nothing beats these light-as-air treats with a tall, cold glass of milk. The creamy milk perfectly complements the sweet, delicate flavor of the cookies. But don’t stop there! Imagine them crumbled over a scoop of rich vanilla bean ice cream, adding a delightful textural contrast and a pop of color to a simple dessert. They also make an incredible addition to any dessert platter at a party, instantly becoming a conversation starter. You could even package them up in pretty boxes with ribbons as charming, homemade gifts – trust me, they’ll be universally adored.
Unleash Your Creativity: Endless Possibilities with Your Cotton Candy Cookies!
The real fun begins when you start playing with variations. Want to explore different “cotton candy” flavors? Experiment with extracts! A few drops of strawberry, blueberry, or even bubblegum extract can completely transform the taste profile, creating distinct batches that mimic different carnival treats. Don’t shy away from playing with food coloring either; imagine pastel pinks, blues, and purples for a whimsical spring tea, or bold, bright hues for a lively summer celebration. For an extra touch of sparkle and fun, a sprinkle of edible glitter or colorful sprinkles just after they come out of the oven can elevate their visual appeal even further. You could even gently press a tiny bit of flavored marshmallow into the center of each cookie dough ball before baking for a delightfully gooey, surprise core. Think about adding a finely crushed freeze-dried fruit powder to the dough for a subtle tang that beautifully balances the sweetness – raspberry or strawberry would be fantastic! These simple tweaks allow you to personalize each batch, making them uniquely yours and perfectly suited for any occasion or mood.
So, what are you waiting for? This is more than just a recipe; it’s an invitation to experience pure baking bliss. I genuinely encourage you to grab your apron, gather your ingredients, and dive into the wonderful world of these incredible Cotton Candy Cookies. Don’t just read about their magic; create it yourself in your own kitchen! I am so excited for you to experience the joy of making and sharing these delightful treats. Once you’ve whipped up your batch, I would absolutely love to hear about your experience! Did you stick to the original recipe, or did you try out some of my suggested variations? What was your favorite part about baking them, and how did your friends and family react to this unique dessert? Please share your triumphs, your serving suggestions, and any creative twists you came up with in the comments section below or tag me on social media. Your insights and culinary adventures inspire me, and I can’t wait to see your vibrant, delicious creations! Happy baking, my friends!
Magical Cotton Candy Cookies
Cotton Candy Cookies are more than just a dessert; they are a whimsical journey back to the carefree days of childhood, capturing the pure, unadulterated joy of a carnival treat in a convenient, delightful bite. Imagine the soft, chewy embrace of a freshly baked cookie infused with the ethereal sweetness and vibrant colors of spun sugar. It’s a delightful paradox, a taste of pure joy that promises to bring a smile to anyone who experiences it.
Ingredients
-
2 ½ cups (300g) all-purpose flour
-
1 tsp baking powder
-
½ tsp salt
-
1 cup (226g) unsalted butter, softened
-
1 ½ cups (300g) granulated sugar
-
2 large eggs
-
2 tsp pure vanilla extract
-
1 tsp cotton candy flavoring oil or extract
-
Gel food coloring (pink, light blue, lavender/purple)
-
Fresh cotton candy (pink, blue, or mix)
-
Optional: Pastel sprinkles
-
Optional: Light frosting or corn syrup
Instructions
-
Step 1
In a medium bowl, whisk together 2 ½ cups all-purpose flour, 1 tsp baking powder, and ½ tsp salt. Set aside. -
Step 2
In a large bowl, cream 1 cup softened unsalted butter and 1 ½ cups granulated sugar for 3-4 minutes until light and fluffy. -
Step 3
Beat in 2 large eggs one at a time, then 2 tsp pure vanilla extract and 1 tsp cotton candy flavoring oil or extract. Mix until just combined. -
Step 4
Gradually add the dry ingredient mixture to the wet, mixing on low speed until just combined. Do not overmix. -
Step 5
Divide dough into three equal portions. Color each portion with pink, light blue, and lavender gel food coloring, gently folding until evenly distributed. -
Step 6
Take small pieces from each colored dough, twist them together, then gently roll into a single marbled ball. Avoid overworking to preserve distinct streaks. -
Step 7
Chill dough balls on a parchment-lined baking sheet in the refrigerator for at least 30 minutes, or up to 2 hours for best results. -
Step 8
Preheat oven to 375°F (190°C). Line two large baking sheets with parchment paper or silicone mats. -
Step 9
Scoop dough using a medium cookie scoop (1.5-2 tbsp), roll into smooth balls, and place about 2 inches apart on the prepared baking sheets. -
Step 10
Bake one sheet at a time for 9-12 minutes until the edges are lightly golden and the centers are soft and slightly puffy. Do not overbake. -
Step 11
Remove from oven and let cookies cool on the baking sheets for 5 minutes, then transfer to a wire rack to cool completely. -
Step 12
Just before serving, gently pull apart small, fluffy tufts of fresh cotton candy, roughly the size of the cookie tops. Keep cotton candy dry and cool. -
Step 13
Once cookies are completely cool, apply a pea-sized dab of light frosting or a very thin layer of corn syrup to the center of each cookie. -
Step 14
Gently but firmly press a prepared cotton candy tuft onto the frosting/syrup. Optionally, sprinkle pastel sprinkles around the cotton candy base. -
Step 15
Serve immediately for best results. Store undecorated cookies in an airtight container at room temperature for up to 3-4 days. Store cotton candy separately and decorate just before serving.
Important Information
Nutrition Facts (Per Serving)
It is important to consider this information as approximate and not to use it as definitive health advice.
Allergy Information
Please check ingredients for potential allergens and consult a health professional if in doubt.


Leave a Comment