
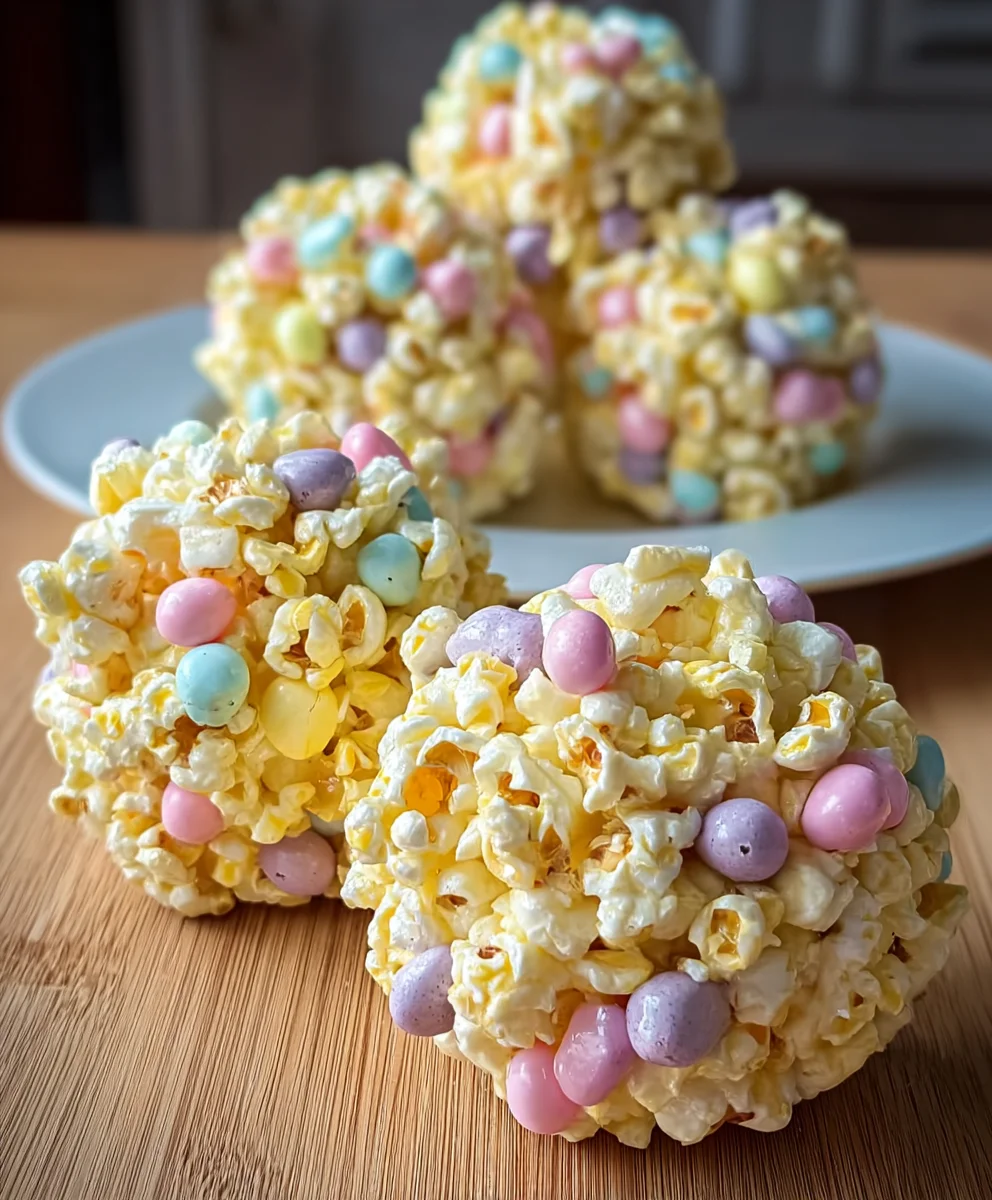
Easter Popcorn Balls offer a delightful crunch and a vibrant splash of color to any holiday gathering, instantly bringing smiles to faces young and old. If you’re searching for a unique, homemade treat that captures the festive spirit of spring, look no further!
I find that there’s something truly magical about turning simple ingredients into a festive masterpiece, and these popcorn balls are no exception. While popcorn itself boasts a long history, becoming a beloved snack in America, incorporating it into sweet, sticky balls gained popularity as a fun, hand-held confection, often seen at fairs and holidays. For Easter, these treats become a wonderful canvas for pastel colors and sprinkles, symbolizing the freshness and joy of the season and adding a playful touch to your celebrations.
Why You’ll Adore These Festive Treats
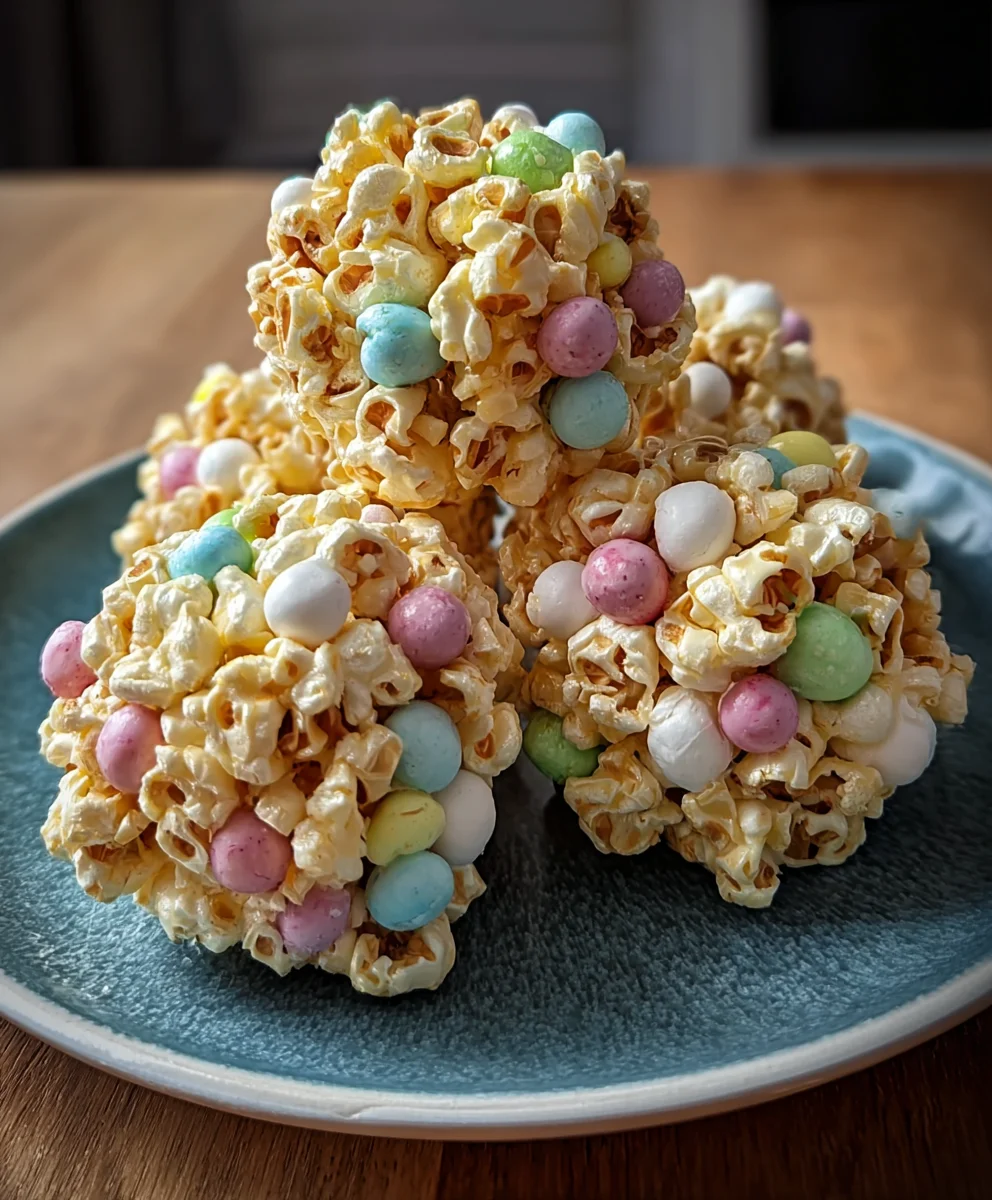
People absolutely adore these popcorn balls for countless reasons. They offer that irresistible combination of sweet and salty, a satisfying chewiness from the marshmallow or syrup, and the delightful crisp of freshly popped corn. They are incredibly versatile, allowing for endless customization with food coloring and decorative sprinkles to match your Easter theme perfectly. Plus, they are wonderfully convenient – easy to prepare, fun to share, and perfectly portable for picnics or school parties. Crafting these delightful Easter Popcorn Balls is not just about making a snack; it’s about creating cherished memories with family as you shape and decorate each one.
Ingredients:
- For the Popcorn:
- 1 cup unpopped popcorn kernels (yielding approximately 16-20 cups of popped popcorn)
- 2 tablespoons coconut oil or vegetable oil (if popping on the stovetop)
- A pinch of salt (optional, for flavor enhancement)
- For the Marshmallow Syrup:
- 1/2 cup (1 stick) unsalted butter, cut into pieces
- 10 ounces mini marshmallows (one standard bag, approximately 5 cups packed)
- 1/2 cup granulated sugar
- 1/4 cup light corn syrup
- 1 teaspoon pure vanilla extract
- Gel food coloring in pastel shades (e.g., pink, blue, yellow, green) – optional, for vibrant Easter colors
- For Decoration (Optional, but highly recommended for festive Easter Popcorn Balls!):
- 1 cup white chocolate chips or good quality white melting wafers
- 1-2 teaspoons coconut oil or shortening (for melting white chocolate, if needed)
- 1/2 cup assorted spring-themed sprinkles or Easter nonpareils
- 1/4 cup pastel-colored mini M&M’s or small jelly beans (for mixing in or additional decoration)
Preparing Your Popcorn: The Foundation for Perfect Easter Popcorn Balls
-
Choose Your Popping Method: First and foremost, we need perfectly popped popcorn. You have a few options here, and each one will work splendidly for our Easter Popcorn Balls, as long as the kernels are fully popped and airy.
- Air Popper Method: If you have an air popper, this is often the easiest and cleanest method. Simply follow the manufacturer’s instructions for popping 1 cup of unpopped kernels. The goal is light, fluffy popcorn without oil, which will allow our sweet marshmallow syrup to adhere beautifully.
- Stovetop Method: My personal favorite for flavor and control! In a large, heavy-bottomed pot (like a Dutch oven or stockpot with a lid), heat 2 tablespoons of coconut oil or vegetable oil over medium-high heat. Add 3-4 popcorn kernels to the pot. Once these kernels pop, you’ll know the oil is at the perfect temperature. Remove the test kernels, then add the remaining 1 cup of unpopped popcorn kernels in a single layer. Immediately cover the pot, reduce the heat to medium, and gently shake the pot back and forth continuously to prevent burning and ensure even popping. Once the popping slows to several seconds between pops, remove the pot from the heat. Let it sit for another minute or two, still covered, to allow any lingering kernels to pop.
- Microwave Bag Method: While convenient, pre-packaged microwave popcorn often contains added butter and salt, which can interfere with the sticky coating for our popcorn balls. If you must use this method, opt for plain, unsalted, unbuttered microwave popcorn or use brown paper bag microwave popcorn (where you add your own kernels and oil). However, for the best control and flavor, I highly recommend the air popper or stovetop.
- Prepare the Popped Popcorn: Once your popcorn is popped, immediately transfer it to an extra-large mixing bowl. This bowl needs to be truly spacious, as we’ll be adding the syrup and mixing everything together. It’s crucial that the popcorn is cooled slightly but still warm enough to be receptive to the syrup. Pick out any unpopped kernels or large, hard pieces that might cause a surprise crunch when enjoying your Easter Popcorn Balls. Nobody wants a broken tooth while enjoying a sweet treat! If you’re using an air popper, give the popcorn about 5-10 minutes to cool down just a bit from its initial piping hot state. For stovetop, simply transferring it to the bowl usually provides enough cooling time.
Crafting the Sweet Marshmallow Syrup: The Sticky Heart of Your Treat
- Melt the Base: In a large saucepan or a deep pot, combine the 1/2 cup (1 stick) of unsalted butter (cut into pieces for quicker melting), the 10 ounces of mini marshmallows, the 1/2 cup of granulated sugar, and the 1/4 cup of light corn syrup. Place the saucepan over medium-low heat.
- Stir Continuously for Smoothness: This step requires your full attention. Continuously stir the mixture with a sturdy spoon or a heat-resistant spatula. The butter will melt first, then the marshmallows will begin to soften and deflate, slowly merging with the sugar and corn syrup. It’s absolutely vital to stir constantly to prevent the sugar from scorching on the bottom of the pan and to ensure all ingredients melt into a smooth, homogeneous syrup. This process can take about 5-8 minutes.
- Achieve the Right Consistency: Continue to cook and stir until the mixture is completely melted and very smooth, with no lumps of marshmallow remaining. It should be thick, glossy, and pull away from the sides of the pan slightly when stirred. Once it reaches this point, remove the saucepan from the heat immediately. Overcooking the syrup can lead to hard, brittle popcorn balls instead of delightfully chewy ones, so watch it carefully!
- Add Vanilla and Optional Color: Stir in the 1 teaspoon of pure vanilla extract. The vanilla adds a beautiful depth of flavor that complements the sweetness. If you plan to make colorful Easter Popcorn Balls, now is the time to add your gel food coloring. If you want to make multiple colors, you’ll need to work in batches, which means dividing the syrup and adding color to each portion before pouring over the popcorn. For a single batch of one color, add a few drops of your chosen pastel gel food coloring (e.g., pink, blue, or yellow) and stir vigorously until the color is evenly distributed and vibrant. Gel food coloring is preferred as it provides intense color without adding excess liquid, which could alter the syrup’s consistency.
Bringing It All Together: Coloring and Combining for Festive Fun
- Pour Syrup Over Popcorn: Carefully and evenly pour the warm marshmallow syrup over the prepared popcorn in the extra-large mixing bowl. Make sure to drizzle it over as much of the popcorn as possible to facilitate even coating.
- Mix Thoroughly and Quickly: This is where the magic happens! Using a large, heat-resistant spatula, a sturdy wooden spoon, or even your clean, buttered hands (be careful, it’s hot!), gently but thoroughly fold the popcorn into the syrup. You want to coat every single piece of popcorn. Work quickly, as the syrup will start to cool and become less pliable. If you’re adding optional pastel mini M&M’s or small jelly beans to the popcorn mixture itself, now is the time to gently fold them in. This adds extra bursts of color and texture to your Easter Popcorn Balls. Continue mixing until the popcorn is evenly coated and the color (if you added any) is distributed throughout.
-
Working in Batches for Multiple Colors:
If you chose to make different colored Easter Popcorn Balls, this step becomes slightly more involved. You would have divided your warm syrup in step 6 and added different colors. Now, you’ll need to divide your popped popcorn into separate large bowls (e.g., three bowls for three colors). Pour one color of syrup over one bowl of popcorn and mix quickly. Repeat for each color. This ensures each batch has its own distinct pastel hue, perfect for an Easter celebration.
Forming Your Festive Easter Popcorn Balls
- Prepare for Shaping: Generously butter your hands, or spray them lightly with non-stick cooking spray. This is absolutely essential to prevent the sticky popcorn mixture from adhering to your skin. Alternatively, you can use latex gloves coated with butter or spray, which can help with the heat if you’re sensitive. Have a baking sheet lined with parchment paper or wax paper ready for the finished popcorn balls.
-
Form the Balls: Take a small amount of the warm (but not scalding hot) popcorn mixture – about 1/2 to 3/4 cup, depending on your desired size for the Easter Popcorn Balls – and gently but firmly compress it into a ball shape. The key is to apply enough pressure to make it hold together, but not so much that you crush the popcorn. Roll it between your buttered palms until you achieve a relatively firm, round shape.
- Tip for Uniformity: If you want perfectly uniform popcorn balls, you can use a measuring cup to scoop out the mixture before rolling, ensuring each ball is roughly the same size. This creates a visually appealing presentation, especially for a holiday like Easter.
- Safety Note: The mixture will still be quite warm, so be cautious. If it’s too hot to handle, let it cool for a few more minutes, but don’t let it cool completely, or it will be impossible to form. The ideal temperature is warm enough to be pliable but cool enough to handle comfortably.
- Place on Prepared Sheet: As you form each popcorn ball, place it onto the prepared parchment-lined baking sheet. Leave a little space between each ball to prevent them from sticking together as they cool. Continue this process until all of the popcorn mixture has been transformed into beautiful, festive balls.
The Finishing Touches: Decorating Your Easter Delights
- Melt the White Chocolate (Optional, but highly recommended for extra festivity!): If you’re opting for a white chocolate drizzle, place the white chocolate chips or wafers in a microwave-safe bowl. Microwave on 50% power in 30-second intervals, stirring well after each interval, until the chocolate is smooth and melted. This typically takes about 1-2 minutes total. If the chocolate is too thick, stir in 1-2 teaspoons of coconut oil or shortening until it reaches a drizzly consistency. Alternatively, you can melt the chocolate in a double boiler over simmering water.
- Drizzle with White Chocolate: Once the white chocolate is melted, use a spoon or a piping bag with the tip snipped off to drizzle it artfully over the cooled or still-slightly-warm Easter Popcorn Balls. You can create zigzags, spirals, or just random drizzles – anything that looks appealing!
- Apply Sprinkles Immediately: As soon as you’ve drizzled the white chocolate onto a few popcorn balls, generously sprinkle them with your spring-themed sprinkles or Easter nonpareils. The key is to apply the sprinkles while the chocolate is still wet, ensuring they adhere securely. If you wait too long, the chocolate will set, and your beautiful decorations won’t stick.
- Add Other Decorations (Optional): If you have additional pastel candies, such as mini jelly beans or small pastel candies, you can gently press them into the still-wet chocolate drizzle or directly into the surface of the popcorn balls if they are still slightly tacky. This adds another layer of texture and color, making your Easter Popcorn Balls even more special.
Cooling and Storing Your Delicious Easter Popcorn Balls
- Allow to Set: Let the decorated Easter Popcorn Balls cool completely on the parchment-lined baking sheet. If you’ve added white chocolate, this will allow the chocolate to fully set and harden, preventing smudges and ensuring your decorations stay put. This can take anywhere from 30 minutes to an hour at room temperature. For quicker setting, especially with chocolate, you can place the baking sheet in the refrigerator for about 15-20 minutes.
- Individual Wrapping for Freshness: Once completely cooled and set, for optimal freshness and to prevent sticking, individually wrap each Easter Popcorn Ball in plastic wrap. This not only keeps them fresh and chewy but also makes them perfect for gifting or for adding to Easter baskets.
- Storage: Store your wrapped Easter Popcorn Balls in an airtight container at room temperature. They will remain fresh and delicious for up to 3-5 days. While technically you could refrigerate them, the cold air can sometimes make popcorn balls a bit harder, so room temperature storage is generally preferred unless you need them to last longer (in which case, the fridge is fine, just let them come to room temperature before serving for best texture). Enjoy your beautiful and tasty homemade Easter treats!
Conclusion:
Well, my friends, we’ve reached the sweet finale of our delicious journey, and I genuinely hope you’re feeling as excited as I am about trying out this fantastic recipe. When I first experimented with these, I knew immediately that I had stumbled upon something truly special, something that deserved a prime spot on any festive table, especially during the spring season. What makes this recipe an absolute must-try, in my humble opinion, is its unparalleled blend of simplicity and show-stopping appeal. You see, it’s not just another dessert; it’s an experience. Imagine sinking your teeth into that perfect balance of crispy, airy popcorn enveloped in a sweet, gooey coating, all while enjoying the delightful crunch of sprinkles and perhaps a hint of your favorite extract. It’s a texture sensation, a symphony of flavors that will undoubtedly bring a smile to everyone’s face, from the youngest guest to the most discerning palate.
Moreover, the sheer joy of creating something so vibrant and delicious with minimal effort is incredibly rewarding. There’s no complex baking, no intricate decorating techniques required – just a few simple steps that yield truly impressive results. This recipe is your secret weapon for transforming ordinary popcorn into an extraordinary treat. It’s perfect for those moments when you want to impress without the stress, or when you simply want to add a touch of handmade charm to your celebrations. The vibrant colors and playful nature of these treats instantly elevate any dessert spread, making them incredibly photogenic and utterly irresistible. They truly embody the spirit of fun and festivity, and I promise you, once you make them, they’ll become a beloved tradition in your household, just as they have in mine.
Elevate Your Easter Popcorn Balls Experience!
Now, let’s talk about taking your creations to the next level, because while they are perfect as is, there’s always room for a little creative flair! For serving, consider wrapping each individual Easter Popcorn Balls in clear cellophane with a pretty ribbon – this not only makes them look professionally presented but also keeps them fresh and makes for excellent party favors or additions to Easter baskets. You could also arrange them artfully on a large platter, perhaps alongside some pastel-colored candies or fresh spring flowers, creating a truly Instagram-worthy display. Imagine them as the centerpiece of your dessert table, drawing admiring glances from all your guests. Another lovely idea is to place smaller versions in decorative cupcake liners, offering a bite-sized treat that’s easy to grab and enjoy.
When it comes to variations, the sky’s the limit, and this is where you can truly make the recipe your own. Think beyond just classic sprinkles! How about incorporating mini chocolate chips or white chocolate chunks into the mix? Or maybe some chopped dried cranberries for a touch of tartness? For those who love a nutty crunch, a handful of finely chopped pecans or almonds would be absolutely divine. You could also play with different flavor extracts – a dash of lemon or orange extract could add a bright, zesty note, while almond extract offers a warm, comforting aroma. Don’t be afraid to experiment with different food colorings too; imagine a batch made with various shades of pink, blue, yellow, and green, creating a rainbow of delightful treats. You could even drizzle melted white chocolate or colored candy melts over the cooled popcorn balls for an extra layer of decadence and visual appeal. For a fun twist, try pressing them into cookie cutters before they fully set, creating festive shapes like bunnies or eggs – just be quick about it! These variations not only keep things exciting but also allow you to tailor your delightful Easter Popcorn Balls perfectly to your taste and your specific event’s theme.
Your Turn! Share Your Sweet Successes!
So, what are you waiting for? I wholeheartedly encourage you to roll up your sleeves, gather your ingredients, and dive into making these incredible Easter Popcorn Balls this season. Trust me, the smiles and compliments you’ll receive will be all the reward you need. This recipe is designed to be joyful to make and even more joyful to eat, providing a lovely, memorable treat for everyone. It’s a fantastic activity to do with kids, too, as they’ll love getting involved in mixing, shaping, and, of course, taste-testing! There’s something incredibly satisfying about creating something with your own hands, especially when the end result is this delicious and visually appealing. I truly believe that cooking and baking are about sharing love and creating memories, and this recipe is perfectly suited for both.
Once you’ve whipped up your batch, I would absolutely love to hear all about your experience! Did you stick to the classic version, or did you get creative with some of the variations? What were your favorite add-ins? Did your family rave about them? Please, please, please share your triumphs and any fun modifications you came up with in the comments section below. Your insights and photos inspire me and our entire community of enthusiastic home cooks. Don’t be shy – show off your beautiful creations! I can’t wait to see how you make these delightful treats your own. Happy cooking, and even happier eating!
Easter Popcorn Balls
Festive, sweet, and crunchy popcorn balls, perfect for Easter celebrations. A delightful homemade treat that brings smiles to all.
Ingredients
-
1 cup unpopped popcorn kernels
-
2 tbsp coconut oil or vegetable oil
-
Pinch of salt (optional)
-
1/2 cup (1 stick) unsalted butter
-
10 oz mini marshmallows
-
1/2 cup granulated sugar
-
1/4 cup light corn syrup
-
1 tsp pure vanilla extract
-
Pastel gel food coloring (optional)
-
1 cup white chocolate chips or wafers
-
1-2 tsp coconut oil or shortening (for melting chocolate)
-
1/2 cup assorted spring-themed sprinkles or Easter nonpareils
-
1/4 cup pastel-colored mini M&M’s or small jelly beans
Instructions
-
Step 1
Pop 1 cup unpopped kernels using an air popper or stovetop method. Transfer popped corn to a very large bowl, cool slightly, and remove any unpopped kernels. -
Step 2
In a large saucepan, combine 1/2 cup unsalted butter, 10 oz mini marshmallows, 1/2 cup granulated sugar, and 1/4 cup light corn syrup. Melt over medium-low heat, stirring continuously for 5-8 minutes until completely smooth and glossy. -
Step 3
Remove syrup from heat, stir in 1 tsp pure vanilla extract. If making colored popcorn balls, add pastel gel food coloring now and mix well. For multiple colors, divide syrup and popcorn into separate batches before combining. -
Step 4
Pour the warm marshmallow syrup evenly over the prepared popcorn. Using a heat-resistant spatula or buttered hands, quickly mix until all popcorn is evenly coated. Gently fold in optional pastel mini M&M’s or small jelly beans. -
Step 5
Generously butter your hands or spray with non-stick spray. Take about 1/2 to 3/4 cup of the warm mixture and gently but firmly compress and roll into a ball. Place each ball onto a parchment-lined baking sheet. Repeat until all mixture is used. -
Step 6
Melt 1 cup white chocolate chips or wafers until smooth (add 1-2 tsp coconut oil/shortening if too thick). Drizzle melted chocolate over the popcorn balls. Immediately sprinkle with 1/2 cup spring-themed sprinkles or press in additional candies while chocolate is wet. -
Step 7
Let the decorated popcorn balls cool completely on the baking sheet until set (30-60 minutes at room temperature, or 15-20 minutes in the refrigerator for quicker setting). For optimal freshness, individually wrap each cooled popcorn ball in plastic wrap. Store in an airtight container at room temperature for up to 3-5 days.
Important Information
Nutrition Facts (Per Serving)
It is important to consider this information as approximate and not to use it as definitive health advice.
Allergy Information
Please check ingredients for potential allergens and consult a health professional if in doubt.

Leave a Comment