
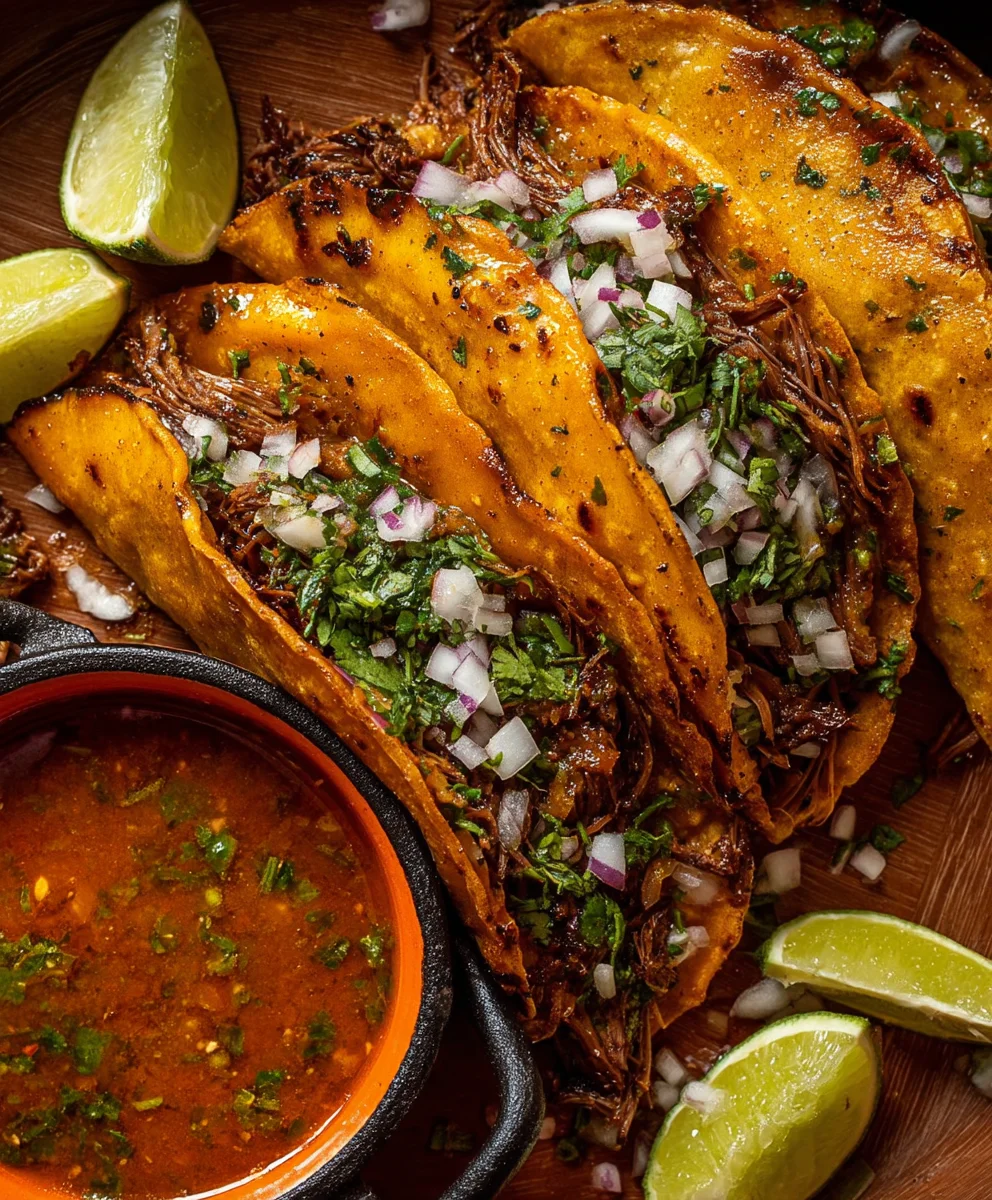
My Fave Birria Tacos are more than just a meal; they’re an experience, a culinary hug that transports you straight to the heart of authentic Mexican flavors. What is it about these slow-cooked, deeply savory tacos that has captured our hearts and taste buds? It’s the magic that happens when tender, shredded beef, simmered for hours in a rich, complex broth infused with chilies and spices, meets a warm, crispy corn tortilla. The first bite is always a revelation – a symphony of smoky, slightly spicy, and wonderfully comforting notes that leave you craving more.
What Makes My Fave Birria Tacos So Special?
It’s the perfect harmony of textures and tastes. The succulent birria, with its melt-in-your-mouth tenderness, is traditionally served with its accompanying consommé for dipping, creating an unparalleled flavor explosion. We love them because they’re incredibly satisfying, adaptable, and just plain delicious. Whether you’re a seasoned birria enthusiast or trying them for the very first time, these My Fave Birria Tacos are guaranteed to become a staple in your recipe collection, promising a truly unforgettable culinary adventure with every single bite.
Ingredients:
- 4 dried guajillo peppers
- 4 dried ancho chiles
- 4 chipotle peppers in adobo sauce (plus 1 tablespoon of the adobo sauce)
- 1 medium yellow onion, roughly chopped
- 4 cloves garlic, peeled
- 1/2 cup crushed tomatoes
- 1/2 cup organic beef stock (or water if preferred)
- 1 tablespoon apple cider vinegar
- 2 bay leaves
- 2 tablespoons dried Mexican oregano
- 1 teaspoon dried thyme
- 1/2 teaspoon ground cumin
- 1/2 teaspoon ground cinnamon
- 1/2 teaspoon smoked paprika
- 1/2 teaspoon ground allspice
- 2-3 pounds beef chuck roast, cut into large chunks
- Salt and freshly ground black pepper, to taste
- Corn tortillas
- Toppings of your choice (e.g., chopped white onion, cilantro, lime wedges, salsa)
Preparing the Birria Base
Toasting the Chiles
The foundation of any great birria is the rich, smoky flavor derived from dried chiles. First, we need to prepare our dried guajillo and ancho chiles. Remove the stems and seeds from the guajillo and ancho peppers. A quick tip: gently shake them or use the tip of a knife to scrape out the seeds. If you prefer a milder birria, be sure to remove as many seeds as possible. Next, heat a dry skillet or comal over medium heat. Place the stemmed and deseeded chiles onto the hot surface and toast them for about 30-60 seconds per side, until they become fragrant and slightly pliable. Be careful not to burn them, as this will impart a bitter taste to your birria. Once toasted, immediately transfer them to a bowl and cover them with hot water. Let them soak for about 20-30 minutes, or until they are softened and rehydrated. This process is crucial for them to blend smoothly into a paste.
Building the Flavor Profile
While the dried chiles are soaking, let’s get the aromatics ready. In the same dry skillet you used for the chiles (no need to wash it), add the roughly chopped yellow onion and the peeled garlic cloves. Cook them over medium heat, stirring occasionally, until they are softened and lightly charred in spots, about 5-7 minutes. This charring adds another layer of smoky depth to the birria. Once softened, add the toasted and rehydrated dried chiles, along with the softened onion and garlic, to a blender. Add the crushed tomatoes, organic beef stock (or water), apple cider vinegar, the 4 chipotle peppers in adobo sauce, and 1 tablespoon of the adobo sauce. This is where the smoky, slightly spicy kick comes in from the chipotles.
Blending the Marinade
Now, it’s time to bring all these vibrant flavors together into a smooth, luscious marinade. Add the bay leaves, Mexican oregano, dried thyme, cumin, cinnamon, smoked paprika, and ground allspice to the blender with the other ingredients. Secure the lid and blend on high speed until you achieve a very smooth paste. You might need to pause and scrape down the sides of the blender a few times to ensure everything is incorporated. If the mixture is too thick, you can add a little more beef stock or water, a tablespoon at a time, until it reaches a pourable consistency. This potent blend will be the heart of your My Fave Birria Tacos, infusing the beef with incredible flavor and color.
Cooking the Birria
Marinating and Braising the Beef
Season your beef chuck roast generously with salt and freshly ground black pepper. In a large bowl or a resealable plastic bag, pour the blended chile mixture over the beef chunks. Use your hands to ensure each piece of beef is thoroughly coated with the marinade. For the best results, let the beef marinate in the refrigerator for at least 2 hours, but ideally overnight. This allows the flavors to penetrate deep into the meat. Once marinated, transfer the beef and all the marinade to a Dutch oven or a heavy-bottomed pot. Add any remaining marinade from the bowl or bag. If needed, add a little more beef stock or water to just barely cover the beef. Cover the pot tightly and place it in a preheated oven at 325°F (160°C). Braise for 3 to 4 hours, or until the beef is incredibly tender and easily pulls apart with a fork. The low and slow cooking method is key to achieving that signature melt-in-your-mouth texture.
Shredding and Consommé Preparation
Once the beef is fork-tender, carefully remove it from the pot and place it on a cutting board. Using two forks, shred the beef into bite-sized pieces. The meat should be so tender that it shreds with minimal effort. Strain the braising liquid through a fine-mesh sieve into a separate bowl, discarding the solids. This flavorful liquid is your consommé, which is essential for dipping your tacos and for adding moisture back into the shredded beef. Skim off any excess fat from the surface of the consommé if you prefer a less greasy broth. Return the shredded beef to the pot and stir in about 1 to 1.5 cups of the strained consommé. You want the beef to be moist but not swimming in liquid. This is the base for your taco filling.
Assembling the My Fave Birria Tacos
Crisping the Tortillas
Now for the fun part: assembling your My Fave Birria Tacos! Heat a large skillet or griddle over medium-high heat. Ladle a bit of the reserved consommé into a shallow dish. Dip each corn tortilla briefly into the consommé, just enough to coat both sides and make it pliable but not soggy. This step infuses the tortilla with that delicious birria flavor. Place the consommé-dipped tortilla onto the hot skillet. Add a generous portion of the shredded birria beef to one half of the tortilla. Fold the tortilla in half to create a taco. Cook for 2-3 minutes per side, until the tortilla is golden brown and slightly crispy, and the birria is heated through. Repeat with the remaining tortillas and birria.
Serving and Enjoying
Once your birria tacos are perfectly crisped, it’s time to serve them! Arrange the tacos on a platter. Offer your chosen toppings on the side: finely chopped white onion, fresh cilantro, and lime wedges for a burst of freshness. Don’t forget to serve the remaining warm consommé in small bowls for dipping – this is non-negotiable for the ultimate birria taco experience! You can also offer your favorite salsa or a dollop of sour cream if you like. The combination of the savory, tender birria, the crispy, flavorful tortilla, and the bright, fresh toppings is simply divine. Enjoy every single delicious bite of your homemade My Fave Birria Tacos!

Conclusion:
So there you have it – the ultimate guide to creating My Fave Birria Tacos! We’ve walked through each step, from simmering that incredibly flavorful birria consommé to achieving perfectly crispy tortillas filled with tender, shredded beef. I truly hope you feel inspired and confident to bring this delicious dish to your own kitchen. The aroma alone is worth the effort, and the taste is absolutely divine. Don’t be afraid to experiment and make these tacos your own!
For serving suggestions, consider a generous side of the rich birria consommé for dipping, a squeeze of fresh lime, finely chopped white onion, and a sprinkle of fresh cilantro. You could also serve them with your favorite salsa or a dollop of crema. When it comes to variations, feel free to use different cuts of beef, or even lamb, for a unique twist. If you’re looking for a spicier kick, add a few more dried chilies to the braising liquid. The possibilities are endless, and the joy of making My Fave Birria Tacos is in the personal touch you bring.
I encourage you to gather your ingredients, put on some good music, and enjoy the process. The satisfaction of creating something so wonderfully flavorful from scratch is incredibly rewarding. Happy cooking!
Frequently Asked Questions about My Fave Birria Tacos:
Q: How long does it typically take to make the birria for My Fave Birria Tacos?
A: The birria itself requires a significant amount of simmering time to ensure the meat becomes incredibly tender. Plan for at least 3-4 hours of slow cooking, though longer is often better to deepen the flavors of the consommé.
Q: Can I make the birria ahead of time for My Fave Birria Tacos?
A: Absolutely! The birria actually tastes even better the next day as the flavors have more time to meld. You can prepare the entire stew up to 2-3 days in advance and store it in the refrigerator. Simply reheat it gently before shredding the meat and assembling your tacos.
Q: What are the best tortillas to use for My Fave Birria Tacos?
A: For that authentic birria taco experience, we highly recommend using good quality corn tortillas. They hold up well to the rich consommé and crisp up beautifully when fried in the rendered beef fat. You can also lightly grill them for a slightly softer texture.
My Fave Beef Birria Tacos-The Best Flavor
Authentic and incredibly flavorful beef birria tacos with a rich, smoky chile base and tender, shredded beef.
Ingredients
-
4 dried guajillo peppers
-
4 dried ancho chiles
-
4 chipotle peppers in adobo sauce
-
1 tablespoon adobo sauce
-
1 medium yellow onion, roughly chopped
-
4 cloves garlic, peeled
-
1/2 cup crushed tomatoes
-
1/2 cup organic beef stock
-
1 tablespoon apple cider vinegar
-
2 bay leaves
-
2 tablespoons dried Mexican oregano
-
1 teaspoon dried thyme
-
1/2 teaspoon ground cumin
-
1/2 teaspoon ground cinnamon
-
1/2 teaspoon smoked paprika
-
1/2 teaspoon ground allspice
-
2-3 pounds beef chuck roast, cut into large chunks
-
Salt, to taste
-
Freshly ground black pepper, to taste
-
Corn tortillas
-
Chopped white onion, for serving
-
Cilantro, for serving
-
Lime wedges, for serving
Instructions
-
Step 1
Remove stems and seeds from guajillo and ancho peppers. Toast in a dry skillet over medium heat for 30-60 seconds per side until fragrant. Soak in hot water for 20-30 minutes until softened. -
Step 2
In the same skillet, sauté chopped onion and garlic until softened and lightly charred. Add toasted chiles, onion, garlic, crushed tomatoes, beef stock, apple cider vinegar, chipotle peppers, and adobo sauce to a blender. -
Step 3
Add bay leaves, Mexican oregano, thyme, cumin, cinnamon, smoked paprika, and allspice to the blender. Blend until a smooth paste is formed. Add more beef stock or water if needed for a pourable consistency. -
Step 4
Season beef chuck roast with salt and pepper. Coat thoroughly with the blended chile mixture. Marinate in the refrigerator for at least 2 hours, preferably overnight. Transfer beef and marinade to a Dutch oven, adding more liquid to just barely cover the beef. Cover and braise in a preheated oven at 325°F (160°C) for 3-4 hours, until tender. -
Step 5
Remove beef, shred with forks. Strain braising liquid (consommé), discarding solids. Skim fat from consommé. Return shredded beef to the pot and stir in 1-1.5 cups of consommé until moist. -
Step 6
Dip corn tortillas briefly in consommé. Heat a skillet over medium-high heat. Place tortilla in skillet, add birria beef, and fold. Cook 2-3 minutes per side until golden brown and crispy. -
Step 7
Serve tacos with chopped white onion, cilantro, lime wedges, and remaining warm consommé for dipping.
Important Information
Nutrition Facts (Per Serving)
It is important to consider this information as approximate and not to use it as definitive health advice.
Allergy Information
Please check ingredients for potential allergens and consult a health professional if in doubt.


Leave a Comment