
Pineapple Cheesecake – what a delightful phrase, isn’t it? It immediately conjures images of sun-kissed sweetness and creamy indulgence, promising a dessert experience that transcends the ordinary. I often find myself dreaming of that perfect bite where the rich, velvety texture of a classic cheesecake base meets the vibrant, tropical tang of juicy pineapple. This isn’t just any dessert; it’s a celebration of contrasts, a harmonious blend that tantalizes the taste buds and leaves a lasting impression. Prepare to elevate your dessert game with a treat that truly stands out.
While the origins of cheesecake itself stretch back to ancient Greece, the delightful addition of tropical fruits like pineapple is a more modern, yet equally beloved, evolution. It speaks to a culinary adventurousness, bringing a refreshing zest to a cherished classic enjoyed by many across the globe.
Why do we adore this tropical twist so much?
It’s the impeccable balance: the creamy, often slightly savory notes of the cheese beautifully mellowed by the bright, acidic burst of pineapple, all nestled on a crumbly, buttery crust. People simply adore the refreshing taste and the unexpected burst of flavor that this magnificent Pineapple Cheesecake offers. It’s truly a showstopper, perfect for any occasion, from a casual family dinner to a grand celebration, always delivering a slice of pure joy.
Ingredients:
-
For the Graham Cracker Crust:
- 1 ½ cups (about 180g) graham cracker crumbs (from approximately 12-14 full graham cracker sheets)
- ¼ cup (50g) granulated sugar
- ½ cup (113g) unsalted butter, melted
-
For the Creamy Pineapple Cheesecake Filling:
- 3 (8-ounce/226g each) packages cream cheese, full-fat, softened to room temperature
- 1 cup (200g) granulated sugar
- ¼ cup (30g) all-purpose flour
- 1 teaspoon pure vanilla extract
- ¼ teaspoon salt
- 4 large eggs, room temperature
- ½ cup (120g) sour cream, full-fat, room temperature
- 1 (20-ounce/567g) can crushed pineapple, well-drained (press out excess liquid using a fine-mesh sieve or cheesecloth)
-
For the Luscious Pineapple Topping:
- 1 (20-ounce/567g) can crushed pineapple, undrained
- ½ cup (100g) granulated sugar
- 2 tablespoons cornstarch
- ¼ cup (60ml) cold water
- 1 tablespoon fresh lemon juice (optional, for brightness)
Preparing the Graham Cracker Crust
- Preheat your oven and prepare the pan. First things first, let’s get that oven preheating to 350°F (175°C). This ensures it’s ready to go when our crust is perfectly mixed. For the pan, I always recommend a 9-inch springform pan for any cheesecake, and especially for this delightful Pineapple Cheesecake, because it makes for such an easy release. To prepare it, lightly grease the bottom and sides. For an extra layer of protection against sticking, you can cut a circle of parchment paper to fit the bottom of the pan before securing the springform sides. If you plan to use a water bath (which I highly recommend for a creamy, crack-free cheesecake), wrap the outside of your springform pan tightly with two layers of heavy-duty aluminum foil. This is crucial for preventing any water from seeping in and making your crust soggy.
- Create your graham cracker crumbs. If you’re starting with whole graham crackers, you’ll want to crush them until they resemble fine crumbs. I usually do this by placing them in a large zip-top bag and crushing them with a rolling pin, or for a quicker method, a food processor works wonders. You’re aiming for about 1 ½ cups of crumbs.
- Mix the crust ingredients. In a medium bowl, combine your graham cracker crumbs with ¼ cup of granulated sugar. Give it a good whisk to ensure the sugar is evenly distributed. Then, pour in your ½ cup of melted unsalted butter. Mix thoroughly with a fork or your hands until all the crumbs are moistened and resemble wet sand. Every crumb should be coated in that lovely butter!
- Press the crust into the pan. Transfer the crumb mixture into your prepared springform pan. Now for the satisfying part: press the mixture firmly and evenly onto the bottom of the pan. I like to use the bottom of a flat-bottomed measuring cup or a clean, flat glass to really compact the crumbs. This creates a sturdy foundation for your Pineapple Cheesecake. Don’t press it up the sides unless you prefer a side crust; for this recipe, a bottom crust is perfect.
- Bake the crust. Pop your pan into the preheated oven for about 8-10 minutes. This quick bake helps to set the crust and gives it a slightly toasty flavor, preventing it from getting soggy once the filling is added. Once baked, remove it from the oven and set it aside to cool slightly while you prepare the filling. Keep the oven temperature at 350°F (175°C) for now.
Crafting the Creamy Pineapple Cheesecake Filling
- Prepare your ingredients. For the silkiest, creamiest Pineapple Cheesecake filling, it’s absolutely essential that all your cold ingredients, especially the cream cheese, eggs, and sour cream, are at room temperature. Take them out of the fridge at least 1-2 hours before you plan to start mixing. This ensures they blend smoothly without lumps.
- Beat the cream cheese. In the bowl of a stand mixer fitted with the paddle attachment (or using a large bowl with a hand mixer), beat the softened cream cheese on medium-low speed until it’s completely smooth and free of any lumps. This step is crucial for a smooth cheesecake texture, so take your time here, scraping down the sides of the bowl frequently. You want it light and fluffy.
- Add sugar and dry ingredients. Gradually add the 1 cup of granulated sugar to the cream cheese, continuing to beat on low speed until just combined. Next, whisk together the ¼ cup of all-purpose flour and ¼ teaspoon of salt in a small bowl, then slowly add this mixture to the cream cheese mixture. The flour helps to stabilize the cheesecake and prevent cracking. Mix until just incorporated, scraping down the bowl as needed. Remember, we’re aiming for smoothness, not aeration.
- Incorporate vanilla and sour cream. Beat in the 1 teaspoon of pure vanilla extract and ½ cup of full-fat sour cream until just combined. The sour cream adds a wonderful tang and extra creaminess that truly elevates the flavor of this Pineapple Cheesecake.
- Add eggs, one at a time. Now, add the eggs, one at a time, beating on low speed after each addition just until the yolk disappears. This is probably the most important part of the mixing process for preventing cracks: do not overmix the eggs! Overmixing incorporates too much air, which can cause the cheesecake to puff up in the oven and then fall and crack as it cools. Gentle mixing is key here.
- Fold in the well-drained crushed pineapple. This is where the star of our show comes in! Make sure your 20-ounce can of crushed pineapple is very well-drained. I usually press it in a fine-mesh sieve, then squeeze out even more liquid using cheesecloth or paper towels. Excess moisture will make your cheesecake watery. Gently fold the drained crushed pineapple into the cheesecake batter with a spatula until it’s evenly distributed. We want beautiful pockets of pineapple throughout our creamy filling.
Baking Your Perfect Pineapple Cheesecake
- Prepare the water bath (bain-marie). This step is non-negotiable for a perfectly smooth, crack-free, and evenly baked Pineapple Cheesecake. You’ll need a roasting pan or a larger baking pan that your foil-wrapped springform pan can fit into comfortably, with enough room around the sides to add water. Place your foil-wrapped springform pan inside this larger pan.
- Pour the filling into the crust. Carefully pour the creamy pineapple cheesecake filling over your pre-baked graham cracker crust in the springform pan. Gently tap the pan a few times on the counter to release any large air bubbles.
- Fill the water bath. Place the larger pan, with the springform pan inside, onto the oven rack. Then, carefully pour hot water into the larger pan until it comes about halfway up the sides of the springform pan. Be very careful not to get any water into the cheesecake itself!
- Bake the cheesecake. Bake your Pineapple Cheesecake in the preheated 350°F (175°C) oven for about 60-75 minutes. The baking time can vary depending on your oven, so keep an eye on it. How do you know when it’s done? The edges should appear set, but the center (a circle about 2-3 inches in diameter) should still have a slight jiggle to it when you gently shake the pan. It will continue to cook as it cools. Do not overbake! This is another common cause of cracks.
- Cool slowly in the oven. Once baked, turn off the oven, but leave the cheesecake inside with the oven door slightly ajar (you can prop it open with a wooden spoon) for about 1 hour. This gradual cooling prevents sudden temperature changes that can lead to cracking. Carefully remove the springform pan from the water bath (be mindful of hot water!) and remove the foil wrapping.
Chilling for Optimal Texture
- Cool completely on a wire rack. After its initial cool-down in the oven, place the cheesecake, still in its springform pan, on a wire rack to cool to room temperature. This can take another 1-2 hours.
- Refrigerate thoroughly. Once it reaches room temperature, cover the cheesecake loosely with plastic wrap and transfer it to the refrigerator. This is a critical step for developing the perfect texture and flavor for your Pineapple Cheesecake. It needs to chill for at least 6 hours, but ideally overnight. Don’t rush this part; the chilling time allows the cheesecake to firm up, making it easier to slice and ensuring that delightful creamy consistency we’re looking for.
Preparing the Luscious Pineapple Topping
- Combine topping ingredients. While your cheesecake is chilling, you can prepare the topping. In a medium saucepan, combine the 20-ounce can of undrained crushed pineapple (yes, this time we want the liquid!), ½ cup of granulated sugar, and 2 tablespoons of cornstarch. Whisk these ingredients together thoroughly until the cornstarch is completely dissolved and there are no lumps.
- Thicken the topping. Place the saucepan over medium heat. Bring the mixture to a gentle boil, stirring constantly. Continue to cook and stir for about 1-2 minutes after it starts boiling, until the mixture thickens and becomes translucent. It should coat the back of a spoon.
- Add lemon juice (optional). Remove the saucepan from the heat. If you’re using it, stir in the 1 tablespoon of fresh lemon juice. This optional step adds a lovely brightness and cuts through the sweetness, enhancing the fresh pineapple flavor in our Pineapple Cheesecake topping.
- Cool the topping. Transfer the pineapple topping to a clean bowl and let it cool completely to room temperature. You can speed this up by placing the bowl over an ice bath, stirring occasionally. Once cooled, cover it and refrigerate until thoroughly chilled and ready to use. This can also be made a day in advance.
Assembling and Serving Your Delightful Pineapple Cheesecake
- Unmold the cheesecake. Once your Pineapple Cheesecake is thoroughly chilled (after at least 6 hours, or overnight), it’s time for the grand reveal! Carefully run a thin knife or offset spatula around the inside edge of the springform pan to loosen the cheesecake. Then, unclip and remove the sides of the springform pan. You can leave the cheesecake on the bottom of the pan for serving, or carefully slide it onto a serving platter.
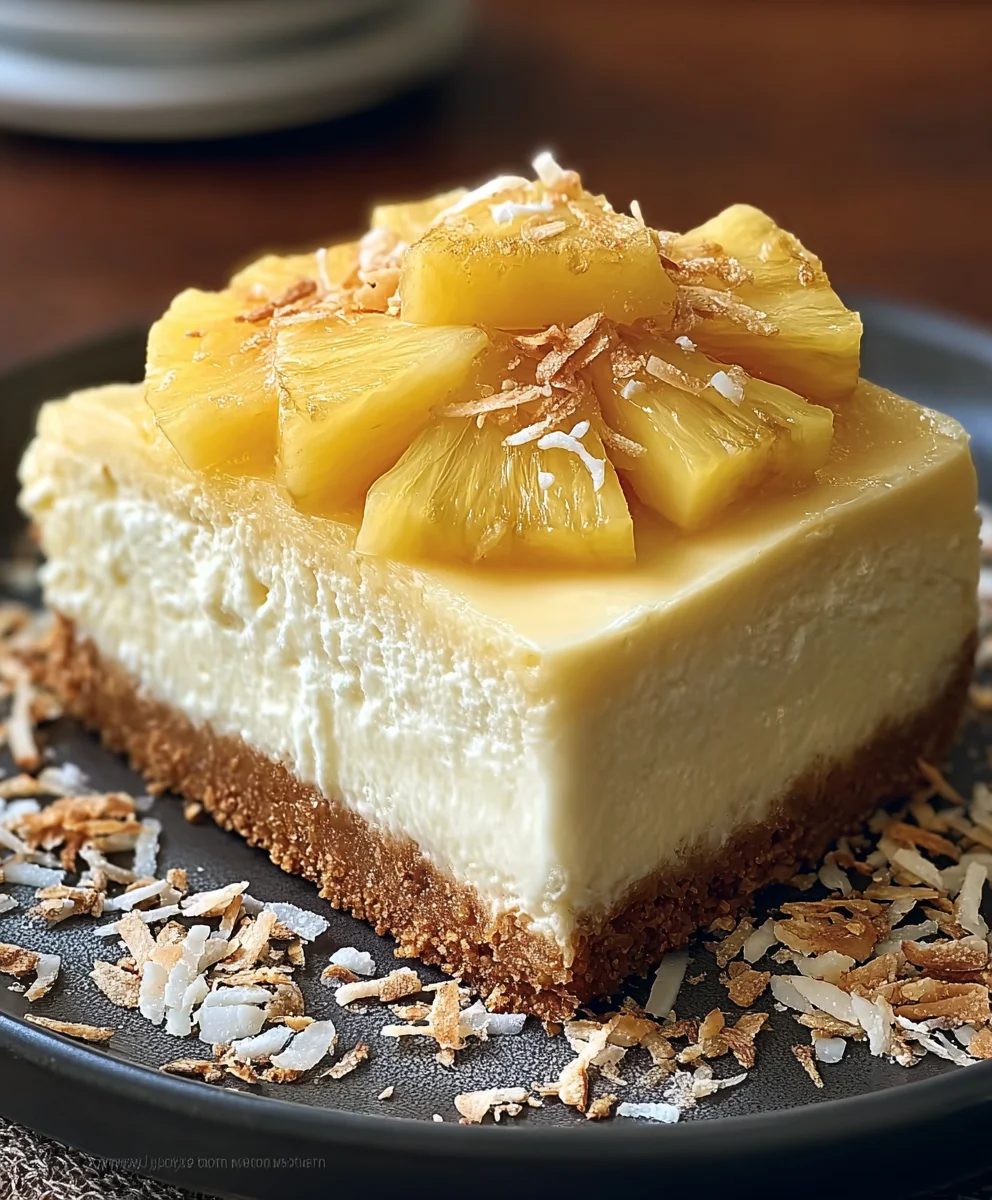
- Spread the pineapple topping. Spoon the chilled pineapple topping evenly over the top of the cheesecake. You can go as thick or as thin as you like. The vibrant yellow of the pineapple topping contrasted with the creamy white cheesecake is truly a sight to behold!
- Garnish (optional). For an extra touch of elegance and freshness, consider garnishing your Pineapple Cheesecake. You could add a few fresh mint leaves, some toasted coconut flakes sprinkled around the edge, or even a few thin slices of fresh pineapple for a beautiful presentation.
- Slice and serve. To get clean slices, use a sharp, thin knife. For the neatest cuts, dip the knife in hot water and wipe it clean between each slice. This makes all the difference for a professional-looking slice of this incredible dessert. Serve immediately and watch your guests’ faces light up with joy! Leftovers, if any, should be stored in an airtight container in the refrigerator for up to 4-5 days. Enjoy every single creamy, tangy, sweet bite of your homemade Pineapple Cheesecake!

Conclusion:
So, there you have it – my absolute go-to recipe for a dessert that never fails to impress. This isn’t just any dessert; it’s an experience. If you’ve been searching for that perfect balance of luscious creaminess and bright, vibrant fruit flavor, then this is your moment. I truly believe that once you try this Pineapple Cheesecake, it will instantly become a cherished favorite in your recipe collection. It embodies everything wonderful about a well-crafted dessert: the velvety smooth texture that melts in your mouth, the delicate sweetness perfectly cut by the tangy burst of fresh pineapple, and that subtle hint of tropical paradise in every single bite. It’s a dessert that speaks of sunny days and joyful celebrations, yet it’s surprisingly straightforward to achieve in your own kitchen. I’ve poured my heart into perfecting this recipe, ensuring that each step guides you towards a flawless, show-stopping result. Forget bland, overly sweet, or complicated desserts; this recipe promises pure delight and impressive elegance without the usual fuss. It truly stands out as a triumph of flavor and simplicity, making it a definitive must-try for any dessert enthusiast.
But the magic doesn’t stop once your beautiful Pineapple Cheesecake is chilled and ready. Part of the joy of creating such a versatile dessert lies in the myriad of ways you can serve and customize it to suit your mood or occasion. For a simple yet elegant presentation, I absolutely adore garnishing each slice with a generous dollop of freshly whipped cream and a sprinkle of toasted coconut flakes – it truly enhances that tropical feel and adds a lovely textural contrast. A delicate drizzle of a passion fruit coulis or a light mango sauce can also elevate the presentation and introduce another layer of exotic flavor, making it feel like a gourmet offering from a five-star restaurant. Don’t be shy about experimenting with fresh fruit! A few vibrant raspberries or blueberries scattered alongside each slice not only add a pop of color but also a delightful tartness that complements the pineapple beautifully. If you’re feeling a bit adventurous, why not try a different crust next time? While the classic graham cracker crust is wonderful for a reason, a gingersnap crust can introduce a warm, spicy note that pairs unexpectedly well with the bright pineapple, or even an oat cookie crust for a rustic, wholesome twist. For those who love a bit of extra indulgence, a thin layer of white chocolate ganache over the top before chilling can create an extra luxurious finish. And for a truly personalized touch, consider a tiny umbrella cocktail pick for a whimsical, party-ready presentation! The beauty of this recipe is its adaptability; it’s perfect as a grand finale for a sophisticated dinner party, a refreshing treat on a casual summer afternoon, or even a comforting pick-me-up on a grey day. This dessert is designed to be enjoyed in whatever way brings you the most happiness.
I truly hope that reading this has ignited a spark of culinary excitement in you. There’s something incredibly rewarding about bringing a truly delicious dessert to life in your own kitchen, and I promise you, this recipe delivers on that satisfaction in spades. Now, it’s your turn to experience the pure joy of creating and savoring this magnificent Pineapple Cheesecake. Don’t hesitate, don’t overthink it – gather your ingredients, set aside some time, and embark on this delicious adventure. You won’t regret it! I’ve crafted these instructions with immense care, aiming to make every step clear, approachable, and successful, even if you consider yourself a novice baker. Think of it as a delightful project, with the most delicious reward waiting at the end. After you’ve whipped up your own masterpiece and perhaps even shared it with delighted friends and family, I would absolutely love to hear all about your experience. Did you add a unique twist? Was there a particular moment of success or a funny kitchen anecdote? What did your guests say? Please, don’t keep your culinary triumphs (and learning moments!) to yourself. Share your photos, your thoughts, your successes, and any questions you might have in the comments section below. Your feedback and stories inspire me and our entire community of fellow food lovers. Let’s create a vibrant space where we can all celebrate the simple, incredible pleasure of good food made with love. Happy baking, my friends, and I can’t wait to see what you create!
Pineapple Cheesecake: Sweet & Tangy Tropical Delight!
Pineapple Cheesecake – what a delightful phrase, isn’t it? It immediately conjures images of sun-kissed sweetness and creamy indulgence, promising a dessert experience that transcends the ordinary. I often find myself dreaming of that perfect bite where the rich, velvety texture of a classic cheesecake base meets the vibrant, tropical tang of juicy pineapple. This isn’t just any dessert; it’s a celebration of contrasts, a harmonious blend that tantalizes the taste buds and leaves a lasting impression. Prepare to elevate your dessert game with a treat that truly stands out.
Ingredients
-
1 ½ cups (180g) graham cracker crumbs
-
¼ cup (50g) granulated sugar
-
½ cup (113g) unsalted butter, melted
-
3 (8-ounce/226g each) packages full-fat cream cheese, softened
-
1 cup (200g) granulated sugar
-
¼ cup (30g) all-purpose flour
-
1 teaspoon pure vanilla extract
-
¼ teaspoon salt
-
4 large eggs, room temperature
-
½ cup (120g) full-fat sour cream, room temperature
-
1 (20-ounce/567g) can crushed pineapple, well-drained
-
1 (20-ounce/567g) can crushed pineapple, undrained (for topping)
-
½ cup (100g) granulated sugar (for topping)
-
2 tablespoons cornstarch (for topping)
-
¼ cup (60ml) cold water (for topping)
-
1 tablespoon fresh lemon juice (optional, for topping)
Instructions
-
Step 1
Preheat oven to 350°F (175°C). Lightly grease a 9-inch springform pan; optionally line bottom with parchment and wrap outside with two layers of heavy-duty foil for a water bath. -
Step 2
Combine graham cracker crumbs, ¼ cup sugar, and ½ cup melted butter. Press firmly and evenly onto the bottom of the prepared springform pan. -
Step 3
Bake crust for 8-10 minutes. Remove from oven and cool slightly. Keep oven at 350°F (175°C). -
Step 4
Ensure cream cheese, eggs, and sour cream are at room temperature. Beat softened cream cheese until smooth. Gradually beat in 1 cup sugar, then ¼ cup flour and ¼ teaspoon salt until just combined. -
Step 5
Beat in vanilla extract and sour cream. Add eggs one at a time, beating on low speed until just combined (do not overmix). Gently fold in the well-drained crushed pineapple. -
Step 6
Place foil-wrapped springform pan in a larger roasting pan. Pour filling over crust. Place in oven, then carefully pour hot water into the larger pan until halfway up the springform. Bake for 60-75 minutes, until edges are set but center jiggles slightly. -
Step 7
Turn off oven, prop door slightly ajar, and let cheesecake cool in the oven for 1 hour. Remove from water bath and unwrap foil. Cool completely on a wire rack to room temperature (1-2 hours). -
Step 8
Cover loosely and refrigerate for at least 6 hours, ideally overnight, for optimal texture and flavor. -
Step 9
In a saucepan, combine undrained crushed pineapple (for topping), ½ cup sugar (for topping), and cornstarch. Whisk well. Cook over medium heat, stirring constantly, until boiling and thickened (1-2 minutes after boil). -
Step 10
Remove from heat, stir in lemon juice (if using). Transfer to a bowl and cool completely to room temperature, then refrigerate until chilled. -
Step 11
Once cheesecake is chilled, run a thin knife around the edge to loosen, then remove springform sides. Spoon chilled pineapple topping evenly over the cheesecake. Garnish optionally. Slice with a hot, clean knife (wiping between cuts) and serve. Store leftovers in the refrigerator.
Important Information
Nutrition Facts (Per Serving)
It is important to consider this information as approximate and not to use it as definitive health advice.
Allergy Information
Please check ingredients for potential allergens and consult a health professional if in doubt.
Leave a Comment