
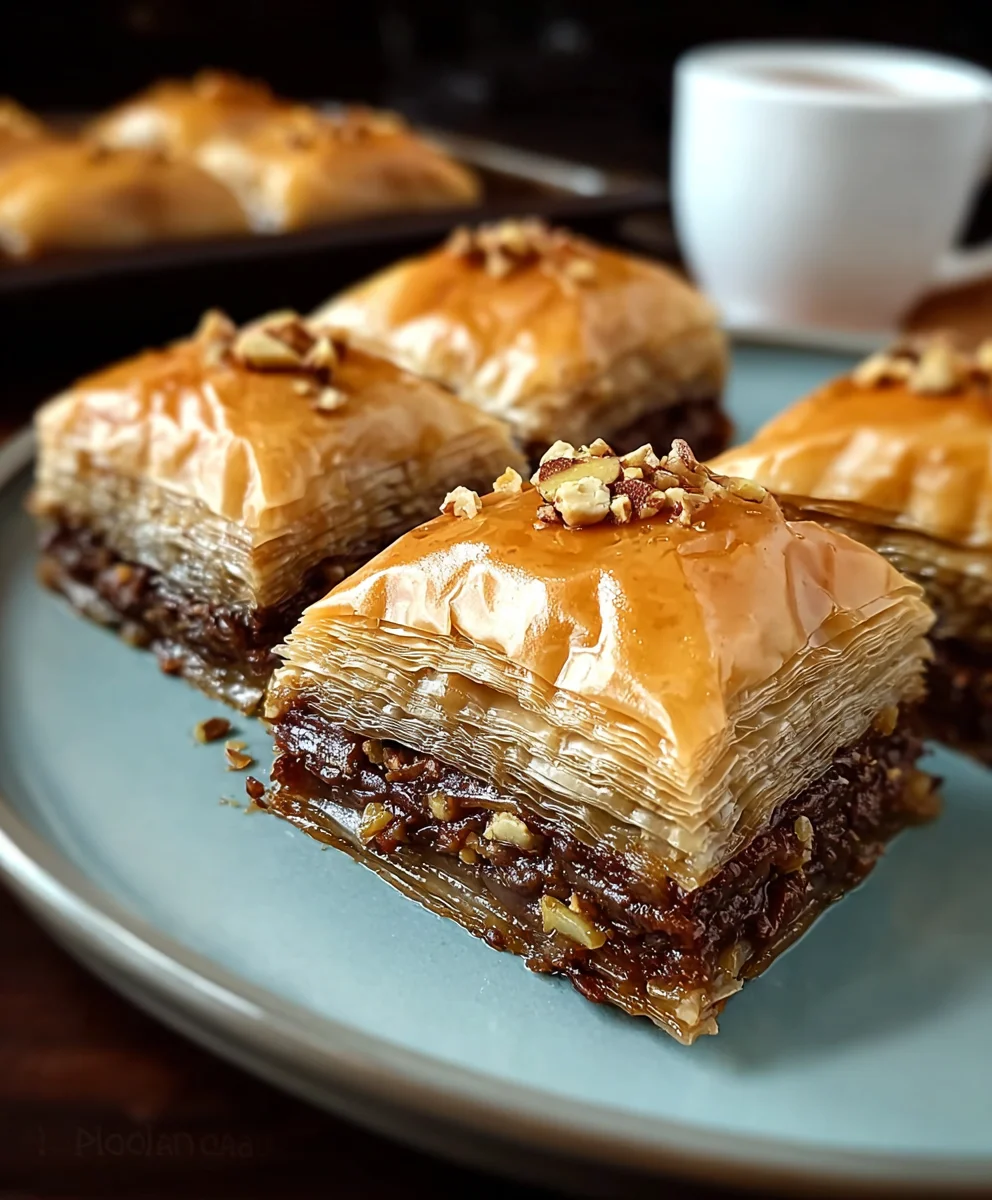
Nutella Baklava offers an irresistible, modern twist on a beloved classic, promising a truly unforgettable dessert experience. Imagine the symphony of delicate, buttery phyllo pastry, the satisfying crunch of finely chopped nuts, and the unparalleled, creamy hazelnut chocolate spread melding together in perfect harmony. This isn’t just any baklava; it’s a decadent elevation, bringing a universally adored flavor to a time-honored tradition that dates back centuries across the Ottoman Empire. While baklava itself carries a profound cultural and historical significance, this innovative rendition proves how culinary arts can beautifully evolve, embracing contemporary tastes without sacrificing authenticity.
I am absolutely thrilled to guide you through crafting this magnificent treat. People adore this dish for its stunning textural contrasts – the golden, crispy layers of phyllo giving way to a warm, gooey heart of rich Nutella, all enveloped in a fragrant, sweet syrup. It’s a delightful journey for the senses, appealing to both those who cherish traditional sweets and those craving a luxurious, chocolatey indulgence. Preparing this Nutella Baklava is a rewarding process, resulting in a dessert that perfectly balances rich flavors with a wonderfully satisfying bite, making it an ideal centerpiece for any special occasion or a simply delightful treat for yourself.
Ingredients:
- For the Nutella Baklava:
- 1 lb (approx. 450g) unsalted butter, clarified (about 2 cups liquid ghee after clarifying)
- 1 lb (approx. 450g) phyllo dough, defrosted according to package directions (usually one 16 oz or 454g box, containing around 40-50 sheets)
- 2 cups (approx. 500g) Nutella (one large jar)
- 1 cup (approx. 120g) finely ground walnuts or pistachios (optional, but adds a lovely texture and authentic touch)
- 1 teaspoon ground cinnamon (optional, for the filling)
- 1/2 cup (approx. 100g) granulated sugar (optional, for the filling, to balance Nutella’s sweetness)
- For the Simple Syrup:
- 2 cups (approx. 400g) granulated sugar
- 1 1/2 cups (approx. 360ml) water
- 1 tablespoon fresh lemon juice (prevents crystallization)
- 1 cinnamon stick (optional, for flavor)
- 2-3 whole cloves (optional, for flavor)
- 1 teaspoon vanilla extract (optional, added after cooking)
- For Garnish (Optional):
- 1/4 cup finely chopped pistachios or walnuts
- A light dusting of cocoa powder
Equipment You’ll Need:
- 9×13 inch (23×33 cm) baking pan
- Small saucepan for clarifying butter
- Medium saucepan for simple syrup
- Pastry brush
- Sharp knife (preferably a long, thin one)
- Mixing bowls
- Spatula or offset knife for spreading Nutella
Getting Started with Your Nutella Baklava Journey:
This journey to create homemade Nutella Baklava is incredibly rewarding, yielding a treat that’s rich, flaky, and utterly irresistible. We’ll be layering delicate phyllo dough with a luscious Nutella and nut filling, then drenching it in a fragrant syrup. Get ready to impress yourself and everyone lucky enough to taste it!
Preparing the Baklava Tray and Butter:
- Clarify the Butter: Our first crucial step is to clarify the butter. Melt the entire pound of unsalted butter in a small saucepan over low heat. As it melts, you’ll notice a foamy layer on top and milky solids settling at the bottom. Carefully skim off the foam from the surface. Once fully melted, slowly pour the clear, golden liquid butter (which is now ghee) into a separate bowl, leaving behind the milky solids at the bottom of the saucepan. This clarified butter is essential for preventing the baklava from becoming soggy and for achieving that coveted crisp, golden-brown finish. We need a good amount, so don’t skimp!
- Prepare Your Baking Pan: Generously brush the bottom and sides of your 9×13 inch baking pan with a good amount of the clarified butter. We want every nook and cranny coated to ensure our Nutella Baklava doesn’t stick and releases beautifully after baking. A well-buttered pan is the foundation for success.
- Handle the Phyllo Dough with Care: Phyllo dough is wonderfully delicate and dries out very quickly. The key to working with it without frustration is to keep it covered. As you work, always keep the stack of unused phyllo sheets covered with a damp (not wet) clean kitchen towel or plastic wrap. This will prevent it from becoming brittle and cracking. Take your phyllo out of the fridge and let it come to room temperature for at least 2-3 hours before you plan to start – this makes it much more pliable and less prone to tearing.
Crafting the Rich Nutella Filling:
- Combine the Filling Ingredients: In a medium mixing bowl, combine your Nutella, finely ground walnuts or pistachios, ground cinnamon, and the optional granulated sugar. The nuts add a delightful textural contrast and an extra layer of flavor, perfectly complementing the sweetness of the Nutella. The cinnamon brings a warm, aromatic spice that elevates the entire dish, while the optional sugar helps to balance the intensity of the Nutella for some palates.
- Mix Thoroughly: Using a spatula or a sturdy spoon, mix all the filling ingredients together until they are thoroughly combined and you have a relatively uniform, spreadable mixture. We want the flavors to be well integrated. Set this aside; it’s ready to be layered into our Nutella Baklava!
The Art of Layering the Phyllo Dough:
This is where the magic of Nutella Baklava truly comes to life. We’ll be building layers upon layers, ensuring each one is delicately buttered for ultimate flakiness. I usually divide my phyllo into roughly five sections for easier management and to ensure even distribution of butter and filling. For a typical 1 lb box with around 40-50 sheets, I aim for sections of 10 sheets each.
-
Establishing the Base Layers (Sheets 1-10):
Carefully take one sheet of phyllo dough from your covered stack and gently lay it flat into your prepared baking pan. If the sheet is slightly larger than your pan, you can carefully fold or trim the edges to fit – or, if you’re using a common 9×13 inch pan, you might find the sheets fit perfectly or just need a slight trim. Once positioned, generously brush the entire surface of this sheet with your melted clarified butter. We want full coverage here, ensuring every part gets that golden goodness. Remember, a well-buttered sheet is a happy sheet, contributing to that incredible flakiness we all adore in Nutella Baklava. Repeat this precise process for the next nine sheets, layering each one meticulously on top of the last and brushing each successive sheet thoroughly with butter. This forms our sturdy, buttery base, about ten layers thick, ready to embrace the deliciousness to come.
-
First Nutella Layer (Sheets 11-20 & Filling):
Now that we have our first ten buttery layers, it’s time for the star of the show! Take another single sheet of phyllo, carefully place it on top of your stack, and brush it with butter. Repeat for the next four sheets, so you have five more buttered layers on top of your base. Now, for the exciting part: gently spread half of your prepared Nutella and nut filling evenly over the top fifth buttered phyllo sheet. Use an offset spatula or the back of a spoon to ensure a smooth and consistent layer, reaching almost to the edges. This is our first generous layer of sweet, chocolatey goodness. Then, carefully place another sheet of phyllo on top of the Nutella, brush with butter, and repeat this for the next four sheets until you have another five buttered layers covering the Nutella. This ensures the filling is beautifully encased.
-
Mid-Section Buttered Layers (Sheets 21-30):
We’re building up the structure of our Nutella Baklava now. Continue the process of layering and buttering. Take ten more sheets of phyllo dough, one at a time. For each sheet, carefully place it into the pan on top of the previous layer, and brush its entire surface thoroughly with your clarified butter. This section acts as a delightful separation, adding more crunch and texture between our two decadent Nutella layers. Be patient, be thorough, and enjoy the repetitive rhythm of building something truly special.
-
Second Nutella Layer (Sheets 31-40 & Filling):
It’s time for our second wave of Nutella deliciousness! Similar to before, carefully place one sheet of phyllo, brush it with butter, and repeat for the next four sheets, creating five fresh, buttered layers. Now, gently spread the remaining half of your Nutella and nut filling evenly over the top fifth buttered phyllo sheet, ensuring full coverage. We want every bite of our Nutella Baklava to be bursting with that wonderful chocolate-hazelnut flavor. Once your second layer of Nutella is spread, place another sheet of phyllo on top, brush with butter, and repeat for the next four sheets, completing another five buttered layers to snugly encase this second filling layer.
-
The Grand Top Layers (Sheets 41-50):
We’re almost there! For the final top section, take the remaining ten (or however many you have left from your box) sheets of phyllo dough. Lay each sheet meticulously into the pan, one on top of the other, brushing each and every single sheet thoroughly with your clarified butter. Pay extra attention to these top layers; they will be the most visible and contribute significantly to the golden-brown, crispy exterior of your finished Nutella Baklava. Ensure the very top sheet is generously coated with butter – this will help it achieve that beautiful, irresistible crunch and color. Don’t skimp on the butter on these final layers!
Cutting and Baking Your Nutella Baklava:
- Pre-Bake Cutting is Key: This step is crucial for achieving those perfect, uniform pieces and for allowing the syrup to penetrate all the layers later. Using a very sharp knife, carefully cut your layered phyllo all the way through to the bottom of the pan. You can choose traditional diamond shapes by cutting diagonal lines in both directions, or simple squares or rectangles. Whatever shape you choose, make sure your cuts are clean and precise. I find it easiest to first cut the baklava into long strips lengthwise, then cut those strips into smaller pieces crosswise, and finally make diagonal cuts if I’m going for diamonds. The Nutella can make this a little messy, but a clean, sharp knife will make it much easier. You might need to wipe your knife between cuts.
- Preheat Your Oven: Preheat your oven to 325°F (160°C). A lower temperature and longer baking time are ideal for baklava, allowing the phyllo to cook through, become incredibly crisp, and achieve that beautiful golden hue without burning.
- Bake to Golden Perfection: Place your pan in the preheated oven and bake for approximately 50-70 minutes. Baking time can vary depending on your oven, so keep a close eye on it. We’re looking for a deep, rich golden-brown color on the top, and when you gently lift a corner, the bottom should also appear golden and crispy. If the top starts to brown too quickly, you can loosely tent it with aluminum foil for the remaining baking time.
- Cool Slightly: Once baked, remove the Nutella Baklava from the oven and set it aside to cool for about 10-15 minutes while we prepare our syrup. It’s important for the baklava to be hot or at least warm when the syrup is poured over it, but not straight out of the oven sizzling.
Simmering the Sweet Syrup:
The syrup is the soul of baklava, infusing it with moisture and sweetness.
- Combine Syrup Ingredients: In your medium saucepan, combine the granulated sugar, water, fresh lemon juice, and the optional cinnamon stick and whole cloves. The lemon juice is vital as it prevents the sugar from crystallizing, ensuring your syrup remains smooth and pourable. The cinnamon stick and cloves will infuse the syrup with a beautiful, subtle warmth that perfectly complements the Nutella and nutty flavors.
- Simmer to Perfection: Bring the mixture to a boil over medium-high heat, stirring occasionally until the sugar has completely dissolved. Once boiling, reduce the heat to low and let it gently simmer for about 10-15 minutes. We’re not looking for a super thick syrup, just one that has had time for the flavors to meld and for a slight reduction to occur.
- Add Vanilla (Optional): Remove the saucepan from the heat and carefully remove the cinnamon stick and cloves. If using, stir in the vanilla extract now. The vanilla adds another layer of fragrant sweetness that truly elevates the overall experience of your Nutella Baklava.
The Grand Finale: Drenching and Resting:
This is the moment when the magic truly happens, transforming crispy layers into a moist, sweet delight.
- Pour the Syrup: While the Nutella Baklava is still warm (but not sizzling hot) and the syrup is also warm (but not scalding hot, just pleasantly warm), slowly and evenly pour all of the prepared syrup over the entire surface of the cut baklava. You’ll hear a satisfying sizzle as the warm syrup hits the warm phyllo, and you’ll see it bubbling down into all those cuts and layers you made earlier. This is exactly what we want – every layer absorbing that delicious sweetness.
- Allow to Rest and Absorb: This is perhaps the hardest part: patience! Resist the urge to dive in immediately. For the best results, your Nutella Baklava needs ample time to absorb all that lovely syrup and for the flavors to meld beautifully. Let it rest, uncovered, at room temperature for at least 4-6 hours, or ideally, overnight. As it cools, the phyllo will fully soften and become deliciously moist, while still retaining a wonderful chewiness and the delicate flakiness of the top layers. Proper resting time is key for the ultimate Nutella Baklava experience.
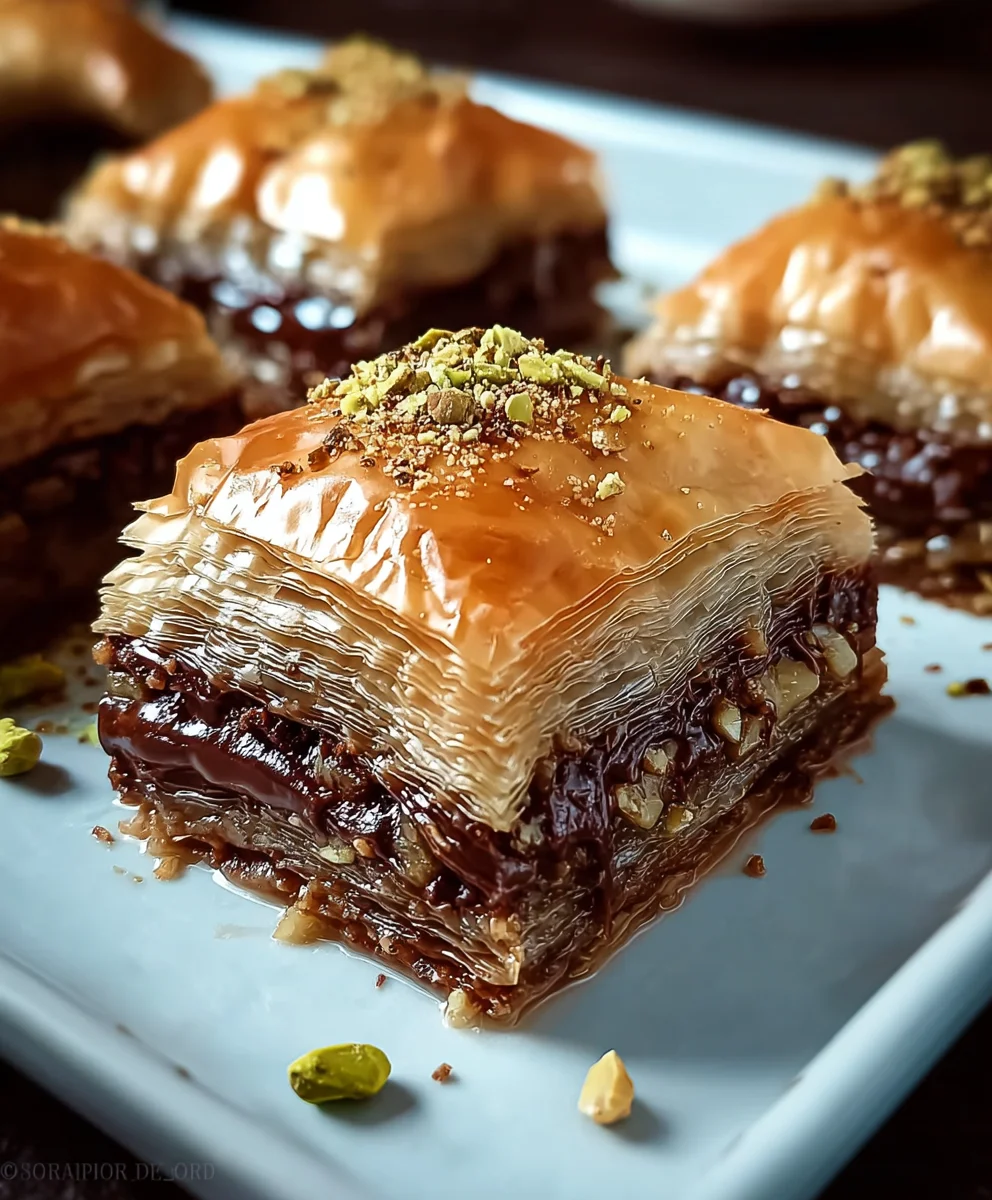
- Garnish (Optional): Before serving, you can sprinkle your Nutella Baklava with finely chopped pistachios or walnuts for extra texture and visual appeal. A light dusting of cocoa powder can also enhance the chocolate notes beautifully.
Serving and Enjoying Your Nutella Baklava:
- Serve at Room Temperature: Your Nutella Baklava is best served at room temperature. The flavors are most pronounced, and the texture is perfect – a balance of crispy, chewy, and moist.
- Storage: Store any leftover Nutella Baklava in an airtight container at room temperature for up to a week. While it’s unlikely to last that long, it tastes fantastic for several days. Do not refrigerate, as this can make the phyllo tough and cloudy.
- Enjoy Every Bite: Gather your loved ones, pour a cup of strong coffee or tea, and savor each glorious, flaky, chocolatey bite of your homemade Nutella Baklava. You’ve created something truly special and incredibly delicious!
<h2>Conclusion:</h2>
<p>Well, my friends, we’ve reached the sweet end of our journey together, and I genuinely hope you’re as excited as I am about the incredible creation we’ve explored. This isn’t just any dessert; it’s a culinary masterpiece that seamlessly blends centuries of tradition with a universally beloved modern twist. The sheer delight of flaky phyllo pastry, crisp and golden, giving way to a rich, nutty filling, all enveloped in a fragrant, sweet syrup, is already a treat that captivates the senses. But when you introduce the irresistible creaminess and cocoa-hazelnut magic of Nutella into that equation, you elevate it to an entirely new dimension of indulgence. This <strong>Nutella Baklava</strong> isn’t just a recipe; it’s an experience, a statement, a testament to how simple yet profound culinary innovation can be. I truly believe it’s destined to become a new favorite in your repertoire, offering a comforting familiarity alongside an exciting surprise with every single bite. Imagine the smiles, the ‘oohs’ and ‘aahs’ from your loved ones as they discover this extraordinary fusion. It’s an ode to the classic, reimagined for the modern palate, striking that perfect balance between authentic, time-honored flavor and contemporary indulgence. The deep, roasted notes of the nuts, often walnuts or pistachios, harmonize beautifully with the decadent Nutella, preventing it from being overly sweet; instead, they create a complex, satisfying profile that lingers delightfully long after the last piece is gone. This is precisely why I call it a must-try; it’s not just delicious, it’s truly memorable, delivering an unforgettable moment of pure bliss.</p>
<h5>Serving Suggestions:</h5>
<p>Now that you’re hopefully convinced to embark on this sweet adventure, let’s talk about how to truly savor your homemade baklava. While undeniably divine served simply as is, there are a myriad of ways to enhance the experience, making it even more special. I personally adore a warm slice, fresh from the oven, allowing the Nutella to be slightly molten and gloriously gooey – it’s pure bliss in every bite. Pair it with a strong, unsweetened Turkish coffee or a fragrant mint tea to cut through the richness and cleanse the palate, making each successive bite feel as fresh and exciting as the first. For a more indulgent dessert, perhaps for a special occasion or just a cozy night in, consider serving a generous square alongside a scoop of premium vanilla bean ice cream or a dollop of freshly whipped, lightly sweetened cream. The cool, creamy contrast against the warm, flaky pastry and rich filling is simply heavenly and adds another layer of texture and temperature to the symphony of flavors. You could also drizzle a little extra melted Nutella over the top just before serving for an additional layer of decadence, or sprinkle with finely chopped pistachios for added vibrant color and a delightful crunch. For an afternoon treat, it’s wonderful with a simple black tea.</p>
<h5>Creative Variations:</h5>
<p>And don’t be afraid to experiment with variations! While I’ve focused on a specific blend for this recipe, the inherent beauty of baklava lies in its remarkable adaptability. Feeling adventurous in the kitchen? Try incorporating different nuts. A sophisticated mix of toasted almonds and hazelnuts can create a wonderfully complex flavor profile, or you could go all-pistachio for a vibrant green interior and a distinct, delicate taste that’s visually stunning. You could also playfully experiment with the syrup. While a simple sugar syrup is traditional and always welcome, adding a stick of cinnamon, a few crushed cardamom pods, or a delicate slice of orange peel to the syrup as it simmers can infuse it with wonderful aromatic notes that beautifully complement the chocolatey hazelnut base. For an even more intense chocolate experience, a handful of finely chopped dark chocolate could be mixed directly into the Nutella layer, or melted and drizzled generously over the finished baklava once it has cooled slightly. Imagine a tiny hint of sea salt sprinkled over the top just before serving – the sweet and salty combination is always a winner and truly elevates the experience! This recipe is a fantastic foundation, a magnificent canvas waiting for your personal culinary touch. So feel empowered to make it truly your own, experimenting with those little additions and twists that speak directly to your unique taste buds.</p>
<h5>Try It & Share Your Creation!</h5>
<p>I genuinely hope that reading through this has sparked a fire in your kitchen and a craving in your heart. Don’t let the multiple layers of phyllo intimidate you; it’s a far more approachable process than you might imagine, and the rewards are immeasurable. <strong>Trust me, the effort is incredibly worth it for this exquisite Nutella Baklava.</strong> There’s a profound satisfaction that comes from creating something so beautiful and utterly delicious from scratch, especially when it elicits such pure joy and delight from those fortunate enough to taste it. So, please, gather your ingredients, set aside some dedicated time, and dive into this delightful project. I am absolutely confident that you’ll be thrilled with the truly spectacular results you achieve. Once you’ve made it, I’m absolutely buzzing with anticipation to hear all about your experience! Did you stick religiously to the original recipe, or did you venture boldly into your own creative variations? Did you find any particular step surprisingly easy, or perhaps discover a brilliant new trick along the way that you’d love to share? Please, don’t keep your culinary triumphs (or even your valuable learning moments!) to yourself. Share your beautiful photos, your insightful thoughts, your wonderful successes, and any questions you might have in the comments section below. I love connecting with fellow home bakers and seeing all your incredible, unique creations. Let’s build a vibrant little community around this amazing dessert! Your insights and experiences are invaluable, not just to me, but also to other eager readers who are also considering trying this fantastic recipe. So go on, give it a try. I promise you, your taste buds will extend their heartfelt gratitude, and your friends and family will be singing your praises for weeks to come. Happy baking, and I simply can’t wait to hear from you!</p>
Nutella Baklava: A Sweet, Chocolatey Twist on a Classic
Nutella Baklava offers an irresistible, modern twist on a beloved classic, promising a truly unforgettable dessert experience. Delicate, buttery phyllo pastry, crunchy nuts, and creamy hazelnut chocolate spread meld in harmony, creating a decadent elevation of a time-honored tradition. This luxurious, chocolatey indulgence balances rich flavors with a wonderfully satisfying bite, perfect for any special occasion.
Ingredients
-
1 lb (450g) unsalted butter, clarified (about 2 cups liquid ghee)
-
1 lb (450g) phyllo dough (approx. 40-50 sheets), defrosted
-
2 cups (500g) Nutella
-
1 cup (120g) finely ground walnuts or pistachios (optional)
-
1 tsp ground cinnamon (optional)
-
1/2 cup (100g) granulated sugar (optional, for filling)
-
2 cups (400g) granulated sugar (for syrup)
-
1 1/2 cups (360ml) water (for syrup)
-
1 tbsp fresh lemon juice (for syrup)
-
1 cinnamon stick (optional, for syrup)
-
2-3 whole cloves (optional, for syrup)
-
1 tsp vanilla extract (optional, for syrup)
-
1/4 cup finely chopped pistachios or walnuts (optional, for garnish)
-
Light dusting of cocoa powder (optional, for garnish)
Instructions
-
Step 1
Clarify 1 lb unsalted butter by melting over low heat, skimming foam, and pouring off clear ghee (approx. 2 cups). Generously brush a 9×13 inch baking pan with clarified butter. Keep phyllo dough covered with a damp towel; let it come to room temperature for 2-3 hours. -
Step 2
In a bowl, combine 2 cups Nutella, 1 cup ground walnuts/pistachios (optional), 1 tsp ground cinnamon (optional), and 1/2 cup granulated sugar (optional). Mix well until uniform. -
Step 3
Place 10 phyllo sheets in the prepared pan, brushing each sheet generously with clarified butter. -
Step 4
Layer 5 phyllo sheets, brushing each with butter. Spread half of the Nutella filling evenly over the top (5th) buttered sheet. Cover with 5 more buttered phyllo sheets. -
Step 5
Layer 10 more phyllo sheets, brushing each with butter. -
Step 6
Layer 5 phyllo sheets, brushing each with butter. Spread the remaining half of the Nutella filling evenly over the top (5th) buttered sheet. Cover with 5 more buttered phyllo sheets. -
Step 7
Layer the remaining 10 phyllo sheets, brushing each generously with butter, especially the very top sheet. -
Step 8
Using a sharp knife, cut the layered phyllo all the way through to the bottom into desired shapes (diamonds, squares, or rectangles). -
Step 9
Preheat oven to 325°F (160°C). Bake for 50-70 minutes, or until deep golden brown and crispy. Tent with foil if browning too quickly. Remove and cool for 10-15 minutes. -
Step 10
In a saucepan, combine 2 cups sugar, 1 1/2 cups water, 1 tbsp lemon juice, and optional cinnamon stick/cloves. Bring to a boil, stir until sugar dissolves, then reduce heat and simmer for 10-15 minutes. Remove from heat, discard cinnamon stick/cloves, and stir in 1 tsp vanilla extract (optional). -
Step 11
While baklava is warm and syrup is warm, slowly and evenly pour all syrup over the cut baklava. Let rest uncovered at room temperature for at least 4-6 hours, or ideally overnight. -
Step 12
Garnish with finely chopped pistachios/walnuts or a light dusting of cocoa powder (optional). Serve at room temperature. Store leftovers in an airtight container at room temperature for up to a week; do not refrigerate.
Important Information
Nutrition Facts (Per Serving)
It is important to consider this information as approximate and not to use it as definitive health advice.
Allergy Information
Please check ingredients for potential allergens and consult a health professional if in doubt.

Leave a Comment