Roasted Mushrooms with Garlic Thyme
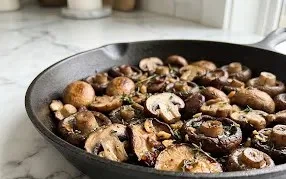
Roasted Mushrooms with Garlic & Thyme transform simple fungi into something savory and satisfying. I love how a humble mushroom, when treated right, becomes a star. This Roasted Mushrooms with Garlic & Thyme recipe is my go-to because it’s straightforward, uses common ingredients, and the result is incredibly flavorful. The combination of earthy mushrooms, fragrant garlic, and aromatic thyme, with a hint of brightness from lemon, makes these mushrooms a fantastic side dish for almost anything – steak, chicken, fish, or even just on a slice of crusty bread. The key to getting perfectly roasted mushrooms is to use mushrooms that have a good amount of surface area to brown. Open cup mushrooms, like creminis or button mushrooms, work wonderfully because their caps open up as they roast, allowing them to crisp up nicely. Make sure to trim the stalks right at the base of the cap. This does two things: it gives you a nice, flat surface for the mushroom to rest on in the baking dish, preventing it from tipping over, and it removes the tougher, woody part of the stem that doesn’t soften as well during cooking. These simple steps ensure you get the best texture and flavor every time.
Ingredients:
- 16 even-sized open cup mushrooms (about 1 1/2 pounds, stalks trimmed flush with the cap so each one sits flat)
- 3 tbsp olive or vegetable oil
- 3 tbsp unsalted butter (softened)
- 2 cloves garlic (chopped very finely)
- 1/2 tsp garlic powder
- 2 tbsp fresh thyme (chopped, or 2 teaspoons dried)
- 1 1/2 tbsp lemon juice
- 5 tbsp fresh breadcrumbs (plain, or panko)
- salt and freshly ground black pepper to taste.
Instructions:
Roasted mushrooms are one of those simple dishes that can completely change a meal. I love how a humble mushroom, when treated right, transforms into something so savory and satisfying. This recipe for Roasted Mushrooms with Garlic & Thyme is my go-to because it’s straightforward, uses common ingredients, and the result is incredibly flavorful. The combination of earthy mushrooms, fragrant garlic, and aromatic thyme, with a hint of brightness from lemon, makes these mushrooms a fantastic side dish for almost anything – steak, chicken, fish, or even just on a slice of crusty bread.
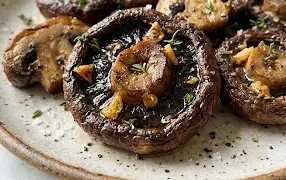
The key to getting perfectly roasted mushrooms is to use mushrooms that have a good amount of surface area to brown. Open cup mushrooms, like creminis or button mushrooms, work wonderfully because their caps open up as they roast, allowing them to crisp up nicely. Make sure to trim the stalks right at the base of the cap. This does two things: it gives you a nice, flat surface for the mushroom to rest on in the baking dish, preventing it from tipping over, and it removes the tougher, often dry stalk that might not cook as evenly. You want each mushroom cap to sit snugly on the baking sheet, almost like little edible bowls ready to catch all the delicious seasoned butter.
Preheat and Prepare: Before you even start prepping the mushrooms, get your oven going. Preheat it to 400 degrees Fahrenheit (200 degrees Celsius). This high heat is essential for getting a good roast, creating those desirable crispy edges without turning the mushrooms mushy. While the oven heats up, find a baking sheet large enough to hold all 16 mushrooms without them being too crowded. If they’re crammed together, they’ll steam rather than roast, and we’re after that lovely roasted texture. Lining the baking sheet with parchment paper is a good idea if you want to make cleanup even easier, though it’s not strictly necessary.
Mix the Flavor Base: In a small bowl, combine the softened unsalted butter with the olive oil. Softened butter is important here because it will incorporate more smoothly with the oil, creating a cohesive mixture that coats the mushrooms evenly. Add the very finely chopped garlic. I emphasize “very finely chopped” because we want the garlic flavor to infuse the butter without having large, burnt bits. Next, stir in the garlic powder for an extra layer of garlic goodness. Then, add the fresh thyme. If you’re using dried thyme, be sure to use only 2 teaspoons, as it’s more concentrated. Finally, add the lemon juice. This little bit of acidity cuts through the richness of the butter and oil, brightening up the overall flavor profile. Season this mixture generously with salt and freshly ground black pepper. Give it a good stir until everything is well combined. This is where all the magic begins; the aroma as you mix these ingredients is already promising!
Coat the Mushrooms: Now for the fun part – coating the mushrooms. Place your prepared mushrooms, cap-side down, onto the baking sheet. You can do this one by one. Then, using a spoon or a pastry brush, generously coat the inside of each mushroom cap with the garlic-thyme butter mixture. Make sure to get some of the mixture right down into the cavity of the mushroom. You want each cap to be well-covered. Some of the mixture will inevitably spill onto the baking sheet, which is perfectly fine; it will add extra flavor to the bottom of the mushrooms as they roast.
The Roasting Process: Once all the mushrooms are coated, it’s time for them to hit the oven. Place the baking sheet into the preheated 400°F (200°C) oven. Roast them for about 15 to 20 minutes. The exact time will depend on the size of your mushrooms and your oven. You’re looking for them to be tender, slightly shrunken, and for the edges of the caps to start showing a bit of golden-brown crispiness. Keep an eye on them during the last few minutes of cooking. If they seem to be browning too quickly, you can loosely tent them with foil. The goal is tender, juicy mushrooms with slightly caramelized edges.
The Breadcrumb Finish: In the last 5 minutes of roasting, it’s time to add the breadcrumbs for a delightful textural contrast. Carefully remove the baking sheet from the oven. Sprinkle the fresh breadcrumbs evenly over the top of each roasted mushroom cap. The butter and juices from the mushrooms will help the breadcrumbs adhere. Return the baking sheet to the oven for another 5 minutes, or until the breadcrumbs are golden brown and toasted. This short burst of heat toasts the breadcrumbs to perfection, adding a satisfying crunch without making them burnt or dry. This step truly elevates the dish, turning simple roasted mushrooms into something a bit more special and satisfyingly textured.
Let the mushrooms cool slightly before serving. They are best enjoyed warm, straight from the oven, when the flavors are most vibrant and the textures are at their peak. They make a wonderful appetizer on their own, or as a side dish to many main courses. If you find yourself with leftovers (which is rare in my house!), they can be gently reheated in a moderate oven. For storage, keep them in an airtight container in the refrigerator for up to 2 days. However, I highly recommend making them just before you plan to eat them for the best experience.
Conclusion:
This Roasted Mushrooms with Garlic & Thyme recipe is a testament to how simple ingredients can create something truly special. The earthy mushrooms, infused with garlic and thyme, finished with a touch of lemon and crispy breadcrumbs, make them a versatile side that complements a wide range of meals. They’re quick enough for a weeknight but elegant enough for guests. Don’t shy away from roasting mushrooms; it brings out a depth of flavor you won’t get from sautéing alone. You can easily adapt this recipe. Try adding a pinch of red pepper flakes for a little heat, or swap the thyme for rosemary or sage. For an extra layer of richness, a sprinkle of grated Parmesan cheese in the last few minutes of baking is fantastic. Serve them hot, straight from the oven, for the best texture.
Frequently Asked Questions:
What kind of mushrooms work best for roasting?
Open cup mushrooms like cremini (baby bellas) or white button mushrooms are ideal because their caps open up as they cook, allowing them to brown and crisp. Larger portobellos can also work, but you might need to adjust the cooking time. Avoid mushrooms with tightly closed caps, as they tend to steam rather than roast.
Can I use dried thyme instead of fresh?
Yes, you can. If using dried thyme, use about 1/3 of the amount called for fresh. So, for 2 tablespoons of fresh thyme, use about 2 teaspoons of dried thyme. Dried herbs are more concentrated in flavor. Add them with the other seasonings to allow them to rehydrate and release their aroma during roasting.
How do I prevent mushrooms from becoming watery?
The key is to roast them at a sufficiently high temperature and give them enough space on the baking sheet. Don’t overcrowd the pan, as this will cause them to steam. Ensure the oven is preheated, and the mushrooms are placed in a single layer so air can circulate around them, promoting browning and evaporation of excess moisture.
Roasted Mushrooms with Garlic & Thyme
Simple and flavorful roasted mushrooms featuring garlic and thyme, perfect as a side dish.
Ingredients
-
16 even-sized open cup mushrooms (about 1 1/2 pounds, stalks trimmed flush with the cap so each one sits flat)
-
3 tbsp olive oil
-
3 tbsp unsalted butter (softened)
-
2 cloves garlic (chopped very finely)
-
1/2 tsp garlic powder
-
2 tbsp fresh thyme (chopped)
-
1 1/2 tbsp lemon juice
-
5 tbsp fresh breadcrumbs (plain)
-
salt and freshly ground black pepper to taste
Instructions
-
Step 1
Preheat your oven to 400°F (200°C). -
Step 2
In a large bowl, toss the trimmed mushrooms with olive oil, softened butter, finely chopped garlic, garlic powder, and chopped fresh thyme. Season generously with salt and freshly ground black pepper. -
Step 3
Arrange the seasoned mushrooms in a single layer on a baking sheet. -
Step 4
Roast for 15-20 minutes, or until the mushrooms are tender and nicely browned, stirring halfway through. -
Step 5
While the mushrooms are roasting, in a small bowl, mix the fresh breadcrumbs with the lemon juice. -
Step 6
During the last 5 minutes of roasting, sprinkle the breadcrumb mixture over the mushrooms. Continue roasting until the breadcrumbs are golden and crisp. -
Step 7
Serve immediately.
Important Information
Nutrition Facts (Per Serving)
It is important to consider this information as approximate and not to use it as definitive health advice.
Allergy Information
Please check ingredients for potential allergens and consult a health professional if in doubt.