
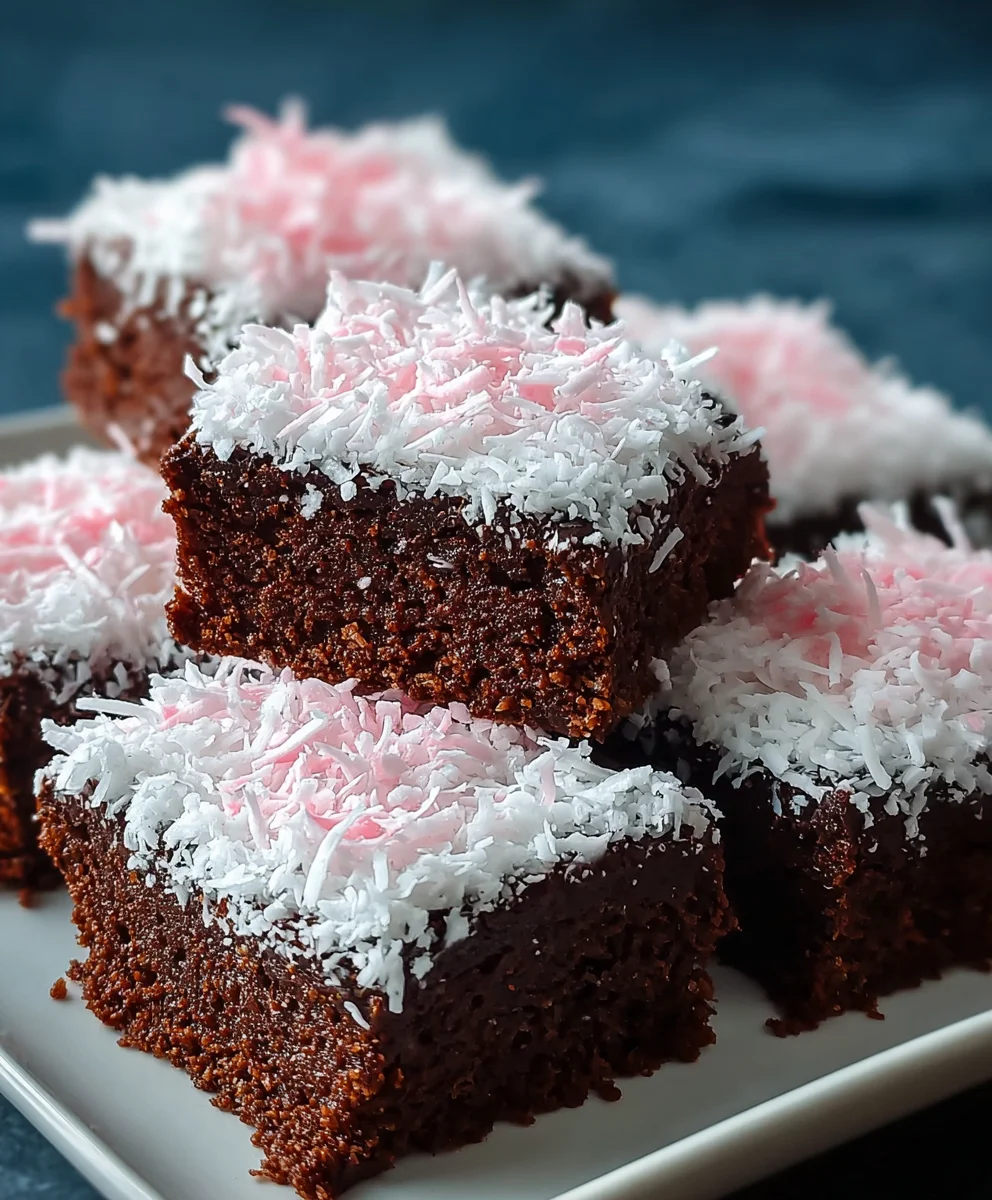
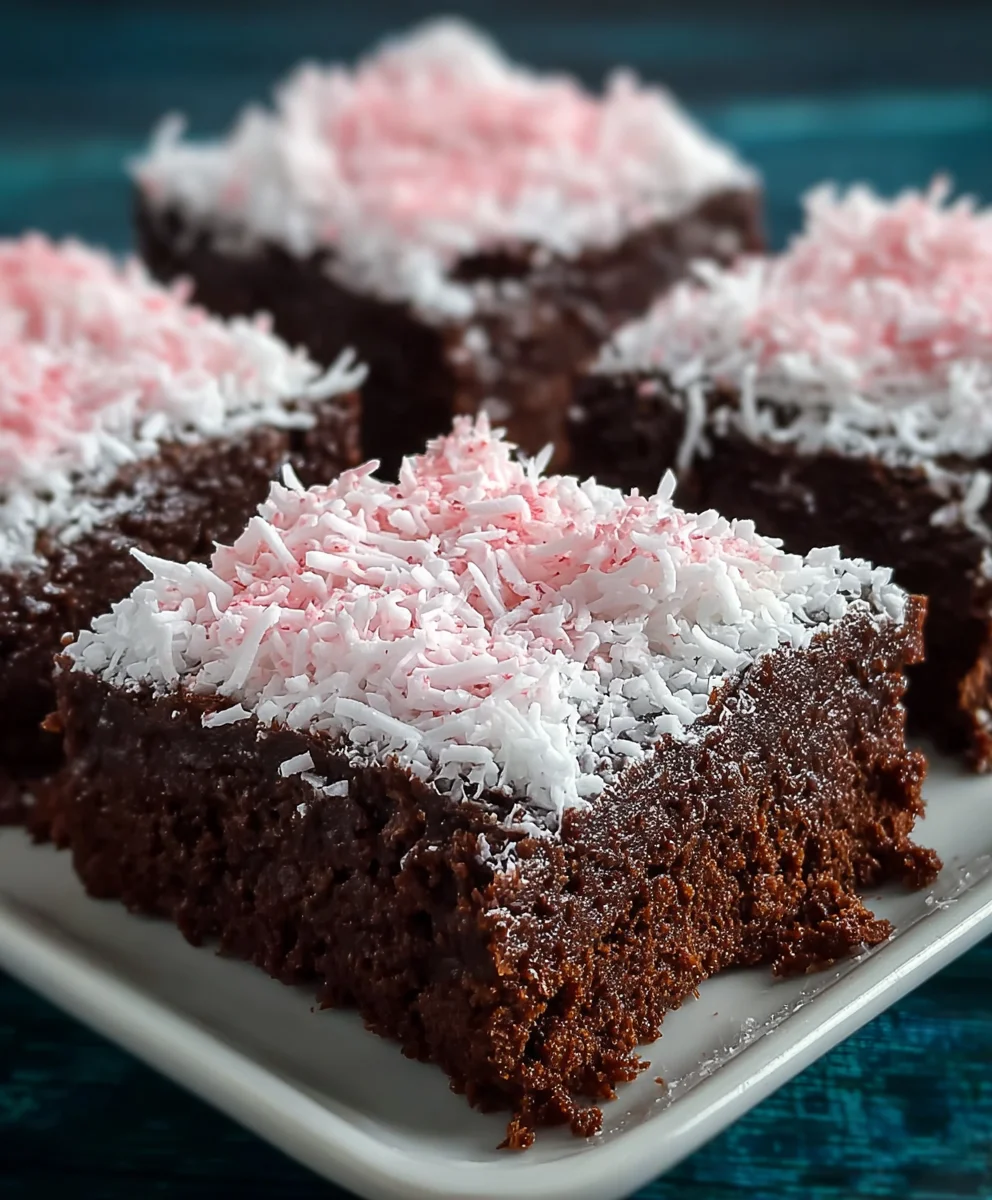
Sno Ball Brownies are the stuff of pure, unadulterated dessert dreams. Imagin extracte the intensely fudgy, rich chocolate of a classic brownie, then picture it crowned with a cloud-like swirl of sweet, airy coconut-marshmallow frosting and finished with a sprinkle of toasted coconut for that irresistible crunch. It’s no wonder these delightful treats have captured so many hearts. They offer a sophisticated yet utterly comforting flavor profile that appeals to both serious chocolate aficionados and those who simply crave a little bit of sweet bliss. What truly sets Sno Ball Brownies apart is the magical interplay of textures and tastes – the dense, chewy brownie base provides a perfect canvas for the light, fluffy frosting. It’s a sophisticated twist on a nostalgic favorite, guaranteed to bring smiles with every single bite. Get ready to embark on a culinary adventure that promises pure indulgence.
Ingredients:
- 1/2 cup (1 stick) unsalted butter
- 2 ounces unsweetened chocolate, finely chopped
- 1 cup granulated sugar
- 2 large eggs, at room temperature
- 1/2 teaspoon pure vanilla extract
- 1/4 cup all-purpose flour
- 1/4 teaspoon fine sea salt
- 1 (7-ounce) jar marshmallow fluff or creme
- 1 cup sweetened shredded coconut
- 1 tablespoon cornstarch
- 3 to 5 drops pink food coloring (gel or liquid)
Making Your Sno Ball Brownies: A Step-by-Step Guide
Get ready to create some truly delightful Sno Ball Brownies! These are a fun twist on classic brownies, incorporating the airy sweetness of marshmallow and a hint of coconut, reminiscent of a beloved candy bar. The pink hue from the food coloring adds a playful touch that makes them perfect for any occasion. Let’s dive in!
Phase 1: Crafting the Rich Chocolate Base
1. Melt the Chocolate and Butter: Begin extract by preparing your double boiler or a heatproof bowl that fits snugly over a saucepan of simmering water, ensuring the bottom of the bowl doesn’t touch the water. Add the 1/2 cup of butter and the 2 ounces of finely chopped unsweetened chocolate to the bowl. Gently stir them together as they melt. You want a smooth, glossy mixture, so be patient and don’t let the water boil too vigorously. Once completely melted and combined, remove the bowl from the heat and let it cool slightly for about 5 minutes. This slight cooling prevents the eggs from scrambling when you add them.
2. Incorporate Sugar and Eggs: To the slightly cooled chocolate-butter mixture, add the 1 cup of granulated sugar. Whisk this together until it’s well combined. Now, it’s time to add the 2 large eggs, one at a time, whisking thoroughly after each addition. The mixture might look a little streaky at first, but keep whisking until it’s smooth and emulsified. Finally, stir in the 1/2 teaspoon of vanilla extract. This fragrant addition will enhance the chocolatey depth of your brownies.
3. Add the Dry Ingredients: In a separate small bowl, whisk together the 1/4 cup of all-purpose flour and the 1/4 teaspoon of salt. This ensures that the flour and salt are evenly distributed, preventing any pockets of saltiness or clumps of flour in your finished brownies. Now, gently fold these dry ingredients into the wet chocolate mixture. It’s crucial not to overmix here; just fold until you no longer see streaks of flour. Overmixing can develop the gluten in the flour, leading to tougher brownies. The batter will be thick and rich.
Phase 2: Assembling the Sno Ball Layers
4. Prepare the Pan and Bake the Brownie Base: Preheat your oven to 350°F (175°C). Grease and flour an 8×8 inch baking pan, or line it with parchment paper, leaving an overhang on the sides to easily lift the brownies out later. Pour the rich chocolate brownie batter into the prepared pan, spreading it evenly with a spatula. Bake for 20 to 25 minutes, or until a toothpick inserted into the center comes out with moist crum extractbs attached, not wet batter. Don’t overbake them, as they will continue to set as they cool. Remove the pan from the oven and let it cool completely on a wire rack. This is a critical step for the next layer.
5. Create the Marshmallow Cloud: While the brownie base is cooling, let’s prepare the marshmallow topping. In a medium bowl, combine the 1 (7-ounce) jar of marshmallow fluff or creme with the 1 cup of sweetened shredded coconut and the 1 tablespoon of cornstarch. The cornstarch helps stabilize the marshmallow and prevents it from becoming too sticky. Add 3 to 5 drops of pink food coloring to the mixture. Start with 3 drops and add more if you desire a more vibrant pink color. Gently stir everything together until the marshmallow is uniformly pink and the coconut is evenly distributed. Don’t overmix, as you want to keep the fluffiness of the marshmallow.
6. Top and Toast: Once the brownie base has cooled completely, spread the pink marshmallow-coconut mixture evenly over the top of the cooled brownies. Use a spatula to get a smooth, consistent layer. Now, for that classic Sno Ball look and taste, we’re going to toast the marshmallow. You have two options:
- Broiler Method: Place the pan under a preheated broiler for 1 to 2 minutes, watching it very carefully, as it can go from perfectly toasted to burnt in seconds. You’re looking for a light golden-brown color on the peaks of the marshmallow.
- Kitchen Torch Method: If you have a kitchen torch, this is an excellent way to achieve a more controlled toasting. Move the torch evenly across the surface of the marshmallow until it reaches your desired golden-brown color.
7. Chill and Cut: After toasting, let the brownies cool in the pan for at least 30 minutes at room temperature, then transfer them to the refrigerator for at least 1 hour, or until the marshmallow topping is firm. This chilling step is essential for clean cuts and to allow the flavors to meld beautifully. Once thoroughly chilled, use the parchment paper overhang to lift the entire brownie slab out of the pan. Place it on a cutting board and use a sharp knife to cut them into squares. For the cleanest cuts, wipe the knife with a damp cloth between each slice. Enjoy your homemade Sno Ball Brownies!
Conclusion:
And there you have it – your guide to creating the most decadent and delightful Sno Ball Brownies! We’ve walked through each step, from the rich chocolate base to the fluffy coconut frosting and the signature cherry on top. These aren’t just brownies; they’re a little slice of nostalgic heaven, perfect for any occasion, from a casual afternoon treat to a show-stopping dessert for guests. Don’t be intimidated by the layers; the process is straightforward and incredibly rewarding. I encourage you to give these Sno Ball Brownies a try and experience their irresistible charm.
For serving, these brownies are fantastic on their own, but for an extra touch of decadence, consider a drizzle of chocolate ganache or a dusting of powdered sugar. They also pair beautifully with a scoop of vanilla bean ice cream. Don’t hesitate to experiment with variations! You could add a hint of almond extract to the brownie batter for a different flavor profile, or use colored frosting for a festive twist.
Frequently Asked Questions about Sno Ball Brownies:
Can I make these Sno Ball Brownies ahead of time?
Yes, absolutely! The brownie base can be baked a day or two in advance and stored in an airtight container at room temperature. The frosting is best made closer to serving time for optimal fluffiness, but you can assemble the brownies a few hours before you plan to serve them. Just be sure to cover them well to keep the frosting fresh.
What kind of chocolate should I use for the brownie base?
For the richest flavor, I recommend using a good quality semi-sweet or dark chocolate. Using a combination of melted chocolate and cocoa powder will give you a wonderfully deep chocolate flavor and fudgy texture in your Sno Ball Brownies. Avoid using chocolate chips directly in the batter as they might not melt as smoothly.
Sno Ball Brownies – Decadent Chocolate Delight
A delightful twist on classic brownies, featuring a rich chocolate base topped with a fluffy, pink marshmallow-coconut layer reminiscent of a beloved candy bar.
Ingredients
-
1/2 cup unsalted butter
-
2 ounces unsweetened chocolate, finely chopped
-
1 cup granulated sugar
-
2 large eggs
-
1/2 teaspoon pure vanilla extract
-
1/4 cup all-purpose flour
-
1/4 teaspoon fine sea salt
-
1 (7-ounce) jar marshmallow fluff or creme
-
1 cup sweetened shredded coconut
-
1 tablespoon cornstarch
-
3 to 5 drops pink food coloring
Instructions
-
Step 1
Melt butter and unsweetened chocolate in a double boiler or heatproof bowl over simmering water until smooth. Let cool slightly for 5 minutes. -
Step 2
Whisk sugar into the cooled chocolate mixture, then add eggs one at a time, whisking well after each addition. Stir in vanilla extract. -
Step 3
In a separate bowl, whisk together flour and salt. Gently fold dry ingredients into the wet mixture until just combined. Do not overmix. -
Step 4
Pour batter into a greased and floured 8×8 inch pan. Bake at 350°F (175°C) for 20-25 minutes, or until a toothpick comes out with moist crumbs. Let cool completely. -
Step 5
In a medium bowl, combine marshmallow fluff, shredded coconut, cornstarch, and pink food coloring. Stir until uniformly pink and combined. Do not overmix. -
Step 6
Spread the marshmallow-coconut mixture evenly over the cooled brownie base. -
Step 7
Toast the marshmallow topping using a broiler (watch carefully for 1-2 minutes) or a kitchen torch until lightly golden brown. -
Step 8
Chill the brownies for at least 30 minutes at room temperature, then for at least 1 hour in the refrigerator until firm. Lift out using parchment paper overhang, cut into squares, and enjoy.
Important Information
Nutrition Facts (Per Serving)
It is important to consider this information as approximate and not to use it as definitive health advice.
Allergy Information
Please check ingredients for potential allergens and consult a health professional if in doubt.

Leave a Comment