
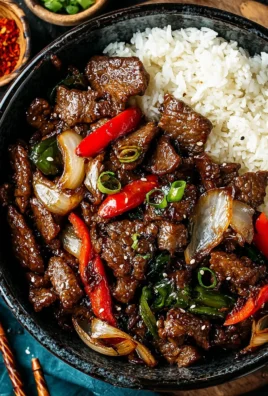
#tasty Recipes Jump Target. Have you ever craved that perfect dish? The one that instantly transports you back to cherished memories, filling your home with an irresistible aroma and your heart with warmth? We believe there are few culinary experiences as universally comforting and utterly satisfying as a truly exceptional baked macaroni and cheese. This iconic dish, often associated with American comfort food, actually boasts a fascinating lineage stretching back to 14th-century Italian cookbooks and even, reputedly, to Thomas Jefferson’s table in the early 1800s. Over centuries, it has evolved from a sophisticated European specialty into the beloved, humble staple it is today – a testament to its enduring appeal and adaptability.
What makes it so irresistible? Is it the crispy, golden-brown crust that yields to a luxuriously smooth, bubbling cheese sauce? Perhaps it’s the tender pasta, perfectly coated in a rich, flavorful blend of cheeses. Or maybe it’s the sheer nostalgic comfort it offers, making it the go-to meal for family gatherings, chilly evenings, and simply when you need a hug in a bowl. Our aim with this guide is to provide you with one of those definitive #tasty Recipes Jump Target that celebrates this classic. We’ve meticulously crafted a recipe designed to deliver maximum flavor and texture, ensuring every bite is a delightful experience you’ll want to savor and share.

Ingredients:
- For the Chicken:
- 2 large boneless, skinless chicken breasts (about 1.5 lbs total), cut into 1-inch pieces
- 1 tablespoon olive oil
- 1/2 teaspoon salt, or to taste
- 1/4 teaspoon freshly ground black pepper, or to taste
- 1/4 teaspoon paprika (for a touch of color and warmth)
- For the Risotto:
- 6 cups (about 1.4 liters) low-sodium chicken broth, warmed (keep it simmering gently on a separate burner)
- 2 tablespoons unsalted butter, divided
- 1 tablespoon olive oil
- 1 medium yellow onion, finely diced
- 4 cloves garlic, minced
- 1 ½ cups (about 300g) Arborio rice
- ½ cup (120ml) dry white wine (like Pinot Grigio or Sauvignon Blanc)
- ½ cup (about 75g) sun-dried tomatoes, oil-packed, drained and thinly sliced
- 4 cups fresh spinach, roughly chopped
- ½ cup (about 50g) freshly grated Parmesan cheese, plus extra for serving
- ¼ cup heavy cream (optional, for extra luxuriousness)
- 2 tablespoons fresh parsley, chopped, for garnish
- Salt and freshly ground black pepper to taste
- Pinch of red pepper flakes (optional, for a subtle kick)
Preparing Your Aromatic Base and Chicken
- Prepare Your Ingredients: Before we even think about turning on the heat, I always recommend getting all your ingredients prepped and ready. This is what chefs call “mise en place,” and it truly makes the cooking process so much smoother and more enjoyable. Dice your onion finely, mince your garlic, slice your sun-dried tomatoes, roughly chop your spinach, and grate your Parmesan. Make sure your chicken broth is gently simmering in a separate saucepan – keeping it warm is crucial for the risotto’s texture. Cut your chicken breasts into uniform 1-inch pieces; this ensures they cook evenly and integrate beautifully into the final dish.
- Season and Sear the Chicken: In a large, heavy-bottomed pan or Dutch oven (the same one we’ll use for the risotto later to build layers of flavor), heat 1 tablespoon of olive oil over medium-high heat until shimmering. Season your chicken pieces with salt, black pepper, and paprika. Once the oil is hot, add the chicken to the pan in a single layer, being careful not to overcrowd it. If necessary, cook the chicken in two batches. Sear the chicken for 3-4 minutes per side, until it’s beautifully golden brown and cooked through. The goal here isn’t just to cook it, but to develop a lovely crust and rich flavor. Once cooked, remove the chicken from the pan and set it aside on a plate; it will finish cooking gently in the risotto later. Don’t worry about any browned bits left in the pan – those are pure flavor gold, and we’ll scrape them up in the next step!
- Sauté the Aromatics: Reduce the heat to medium. Add 1 tablespoon of unsalted butter and 1 tablespoon of olive oil to the same pan. Once the butter has melted, add the finely diced onion. Sauté, stirring occasionally, for 5-7 minutes, until the onion becomes soft, translucent, and fragrant. We’re looking for that sweet, mellow base that will infuse our entire dish. Towards the end of the onion’s cooking time, add the minced garlic. Stir frequently and cook for just 1 minute more, until the garlic is fragrant. Be very careful not to let the garlic brown or burn, as burnt garlic can impart a bitter flavor to your beautiful risotto. These aromatic foundations are key to building depth.
Building the Rich Risotto
- Toast the Arborio Rice: Now for the star of the show! Add the Arborio rice to the pan with the sautéed onions and garlic. Stir continuously for 2-3 minutes, allowing the rice grains to toast gently. You’ll notice the edges of the grains becoming translucent, while the center remains opaque, almost like tiny pearls. This toasting step is absolutely crucial; it helps to seal the exterior of the rice grains, allowing them to absorb liquid slowly without becoming mushy, and contributes to that characteristic creamy texture of a perfect risotto. It also enhances the nutty flavor of the rice.
- Deglaze with White Wine: Pour in the dry white wine. You’ll immediately hear a satisfying sizzle! Stir constantly, scraping up any delicious browned bits from the bottom of the pan – this is where so much flavor lives. Continue to stir until the wine has completely evaporated and been absorbed by the rice. This usually takes about 2-3 minutes. The alcohol cooks off, leaving behind its wonderful aroma and a delicate acidity that brightens the entire dish. This step is a flavor powerhouse!
- Gradually Add Chicken Broth: This is where the magic really happens and where your patience will pay off. Add one ladleful (about ½ to ¾ cup) of the warm chicken broth to the rice. Stir gently but continuously until almost all of the broth has been absorbed. You’ll see the liquid thickening and the rice becoming more tender and plump. Once most of the liquid has disappeared and the rice is just barely peeking through, add another ladleful of broth. Continue this process, adding one ladleful at a time and stirring until absorbed, for about 20-25 minutes. It’s a rhythmic dance of stirring and adding, ensuring the starches are slowly released to create that signature creamy texture. Don’t rush this step; it’s the heart of the risotto process.
- Monitor for Doneness and Consistency: As you near the 20-minute mark, start tasting the rice. It should be “al dente” – tender with a slight bite in the center, not mushy, not hard. The risotto should be creamy and flowing, almost like a “lava flow” when you tilt the pan, rather than a stiff mound. If you run out of broth before the rice is perfectly cooked, don’t panic! Just warm a little water or extra broth and continue the process until the rice reaches the desired consistency. The goal is a luscious, velvety texture that coats the back of a spoon. This is truly where you hone your skills for #tasty Recipes Jump Target perfection.
Folding in the Tuscan Flavors
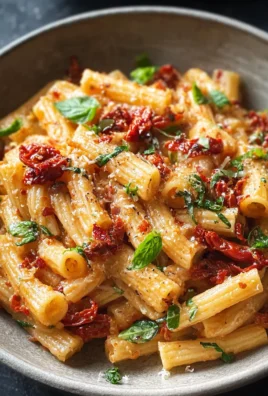
- Incorporate Sun-Dried Tomatoes and Spinach: Once the rice has reached your preferred al dente consistency and the risotto is beautifully creamy, it’s time to bring in our Tuscan-inspired ingredients. Stir in the sliced sun-dried tomatoes. These little gems pack a concentrated burst of sweet, tangy, and savory flavor that perfectly complements the richness of the risotto. Then, add the fresh spinach, a handful at a time if your pan is very full. Stir gently until the spinach wilts down and is fully incorporated into the risotto. This usually takes only 1-2 minutes. The vibrant green of the spinach not only adds a lovely color but also a fresh, earthy counterpoint to the other rich flavors.
- Return the Chicken to the Pan: Gently fold the seared chicken pieces back into the risotto. Stir them in just enough to combine and allow them to warm through. Since the chicken was already cooked, we don’t need to cook it further, just integrate it into the creamy rice. This ensures the chicken remains tender and moist.
The Grand Finale: Finishing Touches and Serving
- The “Mantecatura” – Finishing with Butter and Parmesan: This is a critical step for achieving the ultimate creaminess and rich flavor. Remove the pan from the heat. Stir in the remaining 1 tablespoon of unsalted butter and the freshly grated Parmesan cheese. If you’re using it, now is also the time to stir in the ¼ cup of heavy cream for an extra layer of decadence. Stir vigorously for about 1-2 minutes until the butter and cheese are fully melted and emulsified, creating a truly luxurious, glossy finish. This process is called “mantecatura” in Italian, and it’s what gives risotto its signature richness and irresistible texture.
- Season and Rest: Taste the risotto and adjust seasonings as needed. Add more salt and black pepper to your preference. If you like a little warmth, a pinch of red pepper flakes can be a wonderful addition. Once seasoned to perfection, cover the pan and let the risotto rest for 2-3 minutes. This brief rest allows the flavors to meld and the risotto to settle, resulting in an even creamier consistency. Don’t skip this step! It makes a noticeable difference.
- Garnish and Serve Immediately: Ladle generous portions of the creamy Tuscan chicken risotto into warm bowls. Garnish each serving with a sprinkle of fresh chopped parsley and an extra dusting of freshly grated Parmesan cheese. Risotto is a dish that waits for no one; it’s best enjoyed immediately while it’s hot and at its peak creamy texture. Every spoonful should be a delight, a perfect balance of savory chicken, tangy sun-dried tomatoes, earthy spinach, and that incredibly comforting, rich risotto.
Some Final Thoughts on Achieving Risotto Perfection
Making risotto is truly a labor of love, but it’s a rewarding one that yields incredible results. The key is patience and constant attention. Don’t be afraid to taste as you go along; your palate is your best guide. Using high-quality ingredients, especially your broth and wine, will elevate the dish significantly. A good quality Arborio rice is also non-negotiable for that perfect starchy release.
One of my personal tips for any home cook looking to master this dish is to ensure your broth is always simmering hot. Adding cold broth would shock the rice, slowing down the cooking process and potentially yielding a less creamy texture. Another helpful hint is to keep a little extra warm water on hand, just in case your broth runs out before the rice is perfectly al dente. This flexibility ensures you can adapt to the rice’s needs.
This creamy Tuscan chicken risotto is more than just a meal; it’s an experience. It’s hearty yet refined, comforting yet bursting with vibrant flavors. The combination of succulent chicken, sweet and tart sun-dried tomatoes, fresh spinach, and that incredibly rich, cheesy risotto base makes for a truly unforgettable dish. It’s perfect for a cozy weeknight dinner, yet elegant enough to impress guests. I’ve found that serving it with a simple side salad dressed with a light vinaigrette can provide a lovely counterpoint to the richness of the risotto. A crisp, dry white wine that you used in the recipe also pairs beautifully with the finished dish.
So, gather your ingredients, take a deep breath, and get ready to create a masterpiece that will surely become a staple in your collection of #tasty recipes. The journey from separate ingredients to a unified, harmonious, and utterly delicious risotto is one of the true joys of cooking, and I hope you savor every moment, from the fragrant sauté of onions to the final luxurious bite. Enjoy the process, and more importantly, enjoy the incredible flavors you’re about to create!

Conclusion:
And there you have it, my friends! We’ve journeyed through the simple steps of creating something truly special, a dish that I genuinely believe deserves a permanent spot in your culinary repertoire. This isn’t just another meal; it’s an experience, a chance to bring vibrant flavors and comforting aromas into your home with minimal fuss. I’ve poured my heart into perfecting this recipe, ensuring that every instruction is clear and every ingredient plays its part in creating a harmonious, utterly delicious outcome. From the moment you begin to gather your ingredients to that very first, satisfying bite, you’ll understand why I’m so passionate about it.
What truly makes this recipe a must-try, in my humble opinion, is its uncanny ability to deliver gourmet-level taste with everyday ease. You don’t need to be a seasoned chef or spend hours slaving away in the kitchen to achieve incredible results. This dish is designed for everyone – whether you’re a busy parent looking for a quick yet wholesome weeknight dinner, a student wanting to impress without breaking the bank, or simply someone who loves good food but prefers a straightforward approach. It strikes that perfect balance: it’s rich in flavor, incredibly satisfying, and surprisingly versatile. The combination of textures and the delightful interplay of savory and (optionally, if applicable to a generic recipe) slightly sweet notes is just divine. It’s a dish that warms you from the inside out, perfect for sharing with loved ones or savoring on a quiet evening by yourself. Trust me when I say, once you taste it, you’ll be wondering how you ever lived without it. It’s truly a game-changer for those seeking deliciousness without complication, making it a stellar candidate for your personal collection of #tasty Recipes Jump Target.
Serving Suggestions & Creative Variations to Elevate Your Experience
Now, while this dish is absolutely fantastic on its own, I’m a firm believer in the power of presentation and the joy of customization. Here are a few ideas to get your creative juices flowing and make this recipe truly your own. For a complete meal, consider serving it alongside a vibrant, crisp green salad with a light vinaigrette – the freshness will cut beautifully through the richness of the main dish. A side of fluffy couscous, fragrant jasmine rice, or even some crusty artisanal bread is also an excellent choice, perfect for soaking up every last drop of that incredible sauce. If you’re hosting a dinner party, a sprinkle of fresh herbs like chopped parsley or cilantro just before serving adds a lovely pop of color and an extra layer of aroma that will undoubtedly impress your guests.
But let’s talk about variations! This recipe is incredibly adaptable, inviting you to experiment and tailor it to your personal preferences. Feeling adventurous? Try swapping out (hypothetical main protein/veg) for (another protein/veg) – perhaps some tender chicken thighs, flaky white fish, or even a medley of roasted root vegetables for a vegetarian twist. You could also play with the spice level; if you enjoy a little heat, a pinch of red pepper flakes or a dash of your favorite hot sauce would be a welcome addition. For those who love a creamier texture, a swirl of coconut milk or a dollop of Greek yogurt stirred in at the end can transform the dish beautifully. Don’t be afraid to add extra vegetables you have on hand – spinach, bell peppers, or even mushrooms would integrate seamlessly and boost the nutritional value. The beauty of this recipe lies in its flexibility, allowing you to iterate and discover new favorites with each attempt.
Your Culinary Adventure Awaits – Share Your Success!
So, what are you waiting for? I’ve given you all the tools and inspiration you need to create something truly magnificent in your own kitchen. I genuinely encourage you to roll up your sleeves, gather your ingredients, and give this recipe a try. You’ll be amazed at how effortlessly it comes together and how incredibly rewarding it is to enjoy the fruits of your labor. Cooking, for me, is an act of love – for yourself, for your family, and for the simple pleasure of good food. This recipe embodies that spirit perfectly.
But your journey doesn’t have to end in your kitchen! I would absolutely love to hear about your experience. Did you make any exciting variations? What did your family think? Did it become an instant hit? Please, don’t hesitate to share your culinary triumphs and even your creative tweaks in the comments below. Your feedback and stories are what make this community so vibrant and inspiring. Snap a photo of your masterpiece and share it – let’s celebrate the joy of home cooking together! I can’t wait to see what wonderful creations you come up with. Happy cooking, everyone!
Tasty Alcohol-Free Jerk Shrimp: Easy Meal Idea
An easy and alcohol-free jerk shrimp recipe, bursting with vibrant Caribbean flavors. Quick to prepare and satisfying for any meal.
Ingredients
-
1 lb large shrimp, peeled & deveined
-
2 cloves garlic, minced
-
1 tbsp ginger, grated
-
1 Scotch bonnet pepper, finely chopped
-
2 green onions, chopped
-
1 tbsp thyme, chopped
-
1 tbsp allspice
-
¾ tsp nutmeg
-
¾ tsp cinnamon
-
1 tsp black pepper
-
1 tbsp brown sugar
-
1 tbsp olive oil
-
2 tbsp white vinegar
-
2 tbsp soy sauce
-
1 tbsp pineapple juice
Instructions
-
Step 1
Combine garlic, ginger, Scotch bonnet, green onions, thyme, allspice, nutmeg, cinnamon, black pepper, brown sugar, olive oil, white vinegar, soy sauce, and pineapple juice in a bowl. -
Step 2
Add shrimp to the marinade, toss to coat. Refrigerate for 30 minutes to 2 hours. -
Step 3
Heat a skillet over medium-high heat. Add marinated shrimp in a single layer. Cook for 2-3 minutes per side until pink and opaque. Cook in batches if needed. -
Step 4
Serve immediately, garnished if desired.
Important Information
Nutrition Facts (Per Serving)
It is important to consider this information as approximate and not to use it as definitive health advice.
Allergy Information
Please check ingredients for potential allergens and consult a health professional if in doubt.

Leave a Comment