
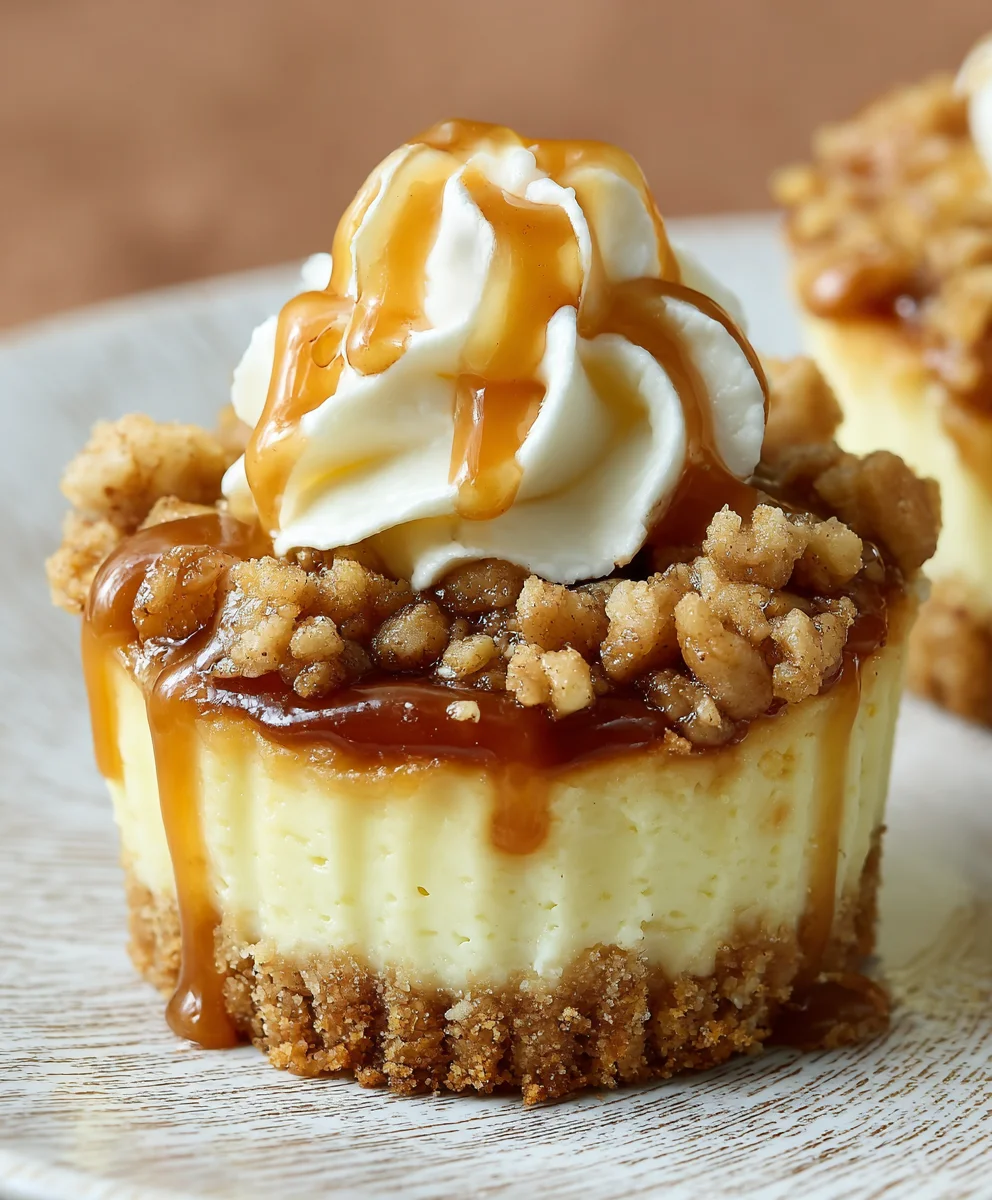
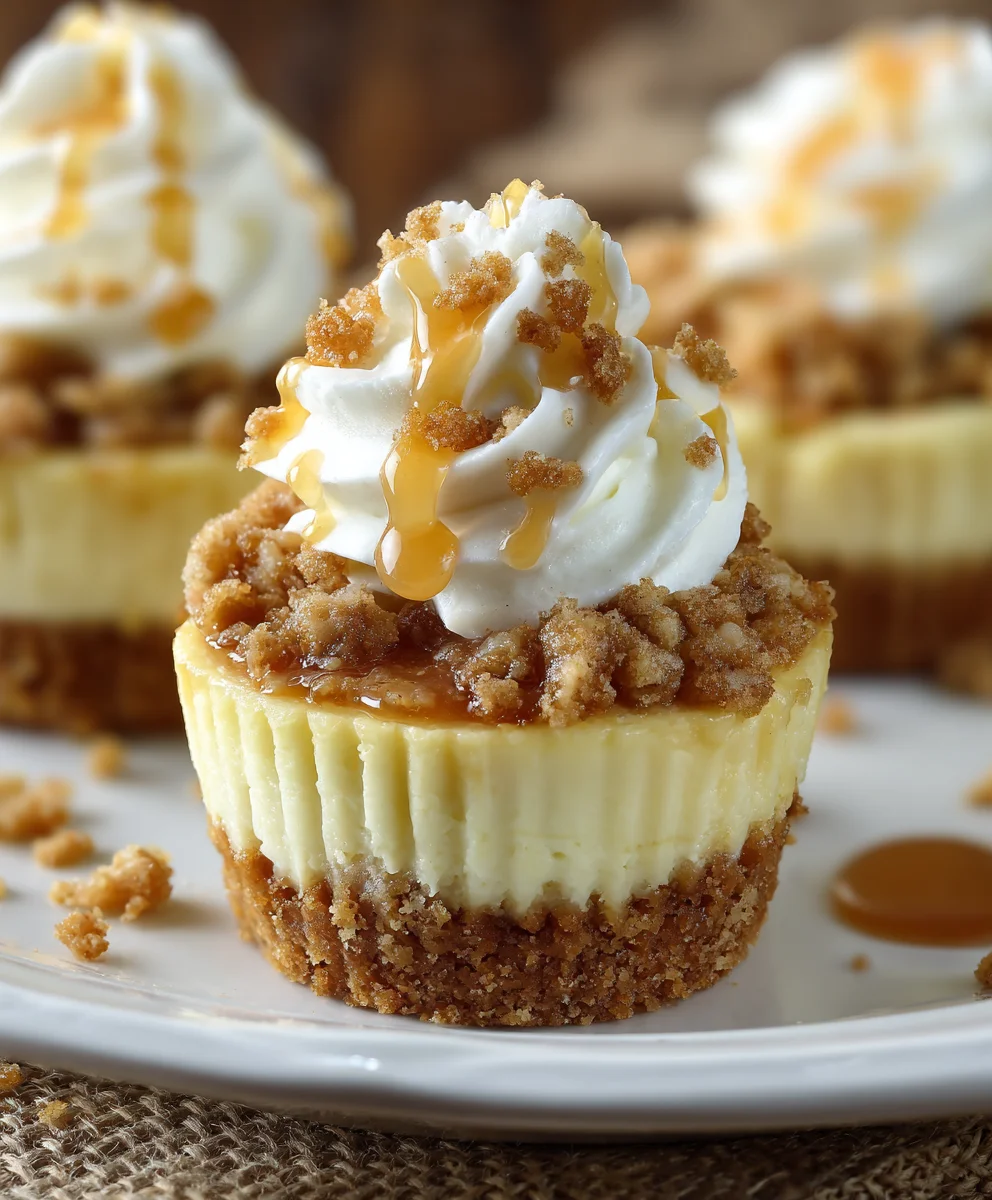
Apple Crisp Mini Cheesecakes present an irresistible symphony of flavors and textures that will undoubtedly captivate your taste buds from the very first bite. Imagine the comforting warmth and spiced sweetness of a classic apple crisp, lovingly layered atop the rich, creamy decadence of a perfectly baked cheesecake, all conveniently portioned into delightful individual servings. This inventive dessert beautifully marries two beloved staples, offering an exciting twist on traditional treats.
While the cheesecake boasts ancient origins, with recipes dating back to classical Greece, and the apple crisp became a cherished American comfort food, our recipe brings these two culinary icons together into one harmonious, modern creation. People adore this dish for its incredible versatility and its sensational balance of taste and texture. The buttery, oat-filled crumble provides a delightful crunch, contrasting beautifully with the smooth, tangy cream cheese filling and the tender, spiced apple topping. It’s the ultimate dessert for those who appreciate both sophisticated indulgence and nostalgic comfort.
Why You’ll Love These Apple Crisp Mini Cheesecakes
I find immense joy in sharing these individual portions because they offer elegant presentation alongside undeniable deliciousness. They are perfect for entertaining, allowing guests to enjoy their own personal dessert, or simply as a special treat for yourself after a long day. Preparing these charming Apple Crisp Mini Cheesecakes is a truly rewarding experience, promising a dessert that consistently impresses and satisfies every craving.
Ingredients:
-
For the Graham Cracker Crust:
- 1 ½ cups (about 180g) Graham Cracker Crumbs: I like to use pre-crushed crumbs for convenience, but you can easily crush whole graham crackers in a food processor or a bag with a rolling pin.
- ⅓ cup (about 75g) Granulated Sugar: Just enough to add a touch of sweetness and help bind the crust.
- ½ cup (113g) Unsalted Butter: Melted. This is the crucial binding agent for our delightful crust. I always melt mine gently in the microwave or a small saucepan.
- ¼ teaspoon Ground Cinnamon: An optional but highly recommended addition that really elevates the base flavor, providing a warm hint that complements the apple and cheesecake.
-
For the Creamy Cheesecake Filling:
- 3 (8-ounce) packages (about 678g total) Cream Cheese: Full-fat cream cheese, softened to room temperature. This is non-negotiable for a truly rich and smooth cheesecake texture.
- 1 cup (200g) Granulated Sugar: For that perfect balance of sweetness in our luscious filling.
- 2 large Eggs: At room temperature. Eggs provide structure and richness to the cheesecake.
- 1 teaspoon Pure Vanilla Extract: A good quality vanilla extract makes all the difference here, adding warmth and depth.
- ½ cup (120g) Sour Cream: At room temperature. This is my secret weapon for a super creamy, slightly tangy cheesecake that isn’t too heavy.
- 1 tablespoon All-Purpose Flour: Helps prevent cracking and adds a bit of body to the filling.
- Pinch of Salt: Just a tiny pinch to enhance all the other flavors.
-
For the Spiced Apple Topping:
- 2 medium Apples: Granny Smith or Honeycrisp work wonderfully for their texture and tartness. I prefer to peel, core, and dice them into small, uniform pieces.
- 2 tablespoons (28g) Unsalted Butter: For sautéing the apples and building flavor.
- ¼ cup (50g) Packed Light Brown Sugar: Adds a lovely caramel note and depth to the apples.
- 1 tablespoon Lemon Juice: Helps prevent the apples from browning and brightens their flavor.
- ½ teaspoon Ground Cinnamon: Classic apple pie spice, essential for that cozy apple crisp vibe.
- ¼ teaspoon Ground Nutmeg: A whisper of nutmeg rounds out the spice profile beautifully.
- Pinch of Ground Cloves (optional): If you love a really robust spiced apple flavor, a tiny pinch here is fantastic.
- 2 tablespoons Water or Apple Cider: To create a little sauce as the apples cook down.
-
For the Crunchy Crisp Topping:
- ½ cup (60g) All-Purpose Flour: The base for our crumbly crisp.
- ¼ cup (50g) Packed Light Brown Sugar: For sweetness and a lovely golden-brown finish.
- ¼ cup (50g) Granulated Sugar: Balances the brown sugar and contributes to the crispness.
- ½ teaspoon Ground Cinnamon: Reinforces the apple crisp flavors.
- ¼ cup (50g) Old-Fashioned Rolled Oats: Crucial for that signature crisp texture and a bit of chewiness.
- ¼ cup (56g) Unsalted Butter: Cold and cut into small pieces. This is what creates those wonderful, crumbly streusel bits.
-
Optional Garnish:
- Caramel Sauce: A drizzle of homemade or store-bought caramel sauce takes these Apple Crisp Mini Cheesecakes to the next level.
- Whipped Cream: A dollop of freshly whipped cream adds a delightful cloud-like contrast.
Equipment You’ll Need:
Before we dive into making these incredible Apple Crisp Mini Cheesecakes, let’s gather our tools. Having everything ready makes the process so much smoother and more enjoyable!
- Standard 12-cup Muffin Tin: Essential for baking individual mini cheesecakes.
- Paper or Foil Muffin Liners: I prefer paper for easy removal and cleanup.
- Large Mixing Bowls: You’ll need at least two, one for the crust and crisp topping, and another for the cheesecake filling.
- Electric Mixer (Stand or Handheld): Absolutely vital for achieving a super smooth and lump-free cream cheese filling.
- Small Saucepan: For melting butter and preparing the apple topping.
- Whisk and Rubber Spatula: Always handy for stirring and scraping down bowls.
- Measuring Cups and Spoons: Accuracy is key in baking!
- Cutting Board and Sharp Knife: For prepping the apples.
- Fork or Pastry Blender: Useful for making the crisp topping.
- Cooling Rack: For letting our delightful creations cool down completely.
Preparing the Crisp Crust:
Let’s kick things off with the foundational layer of our Apple Crisp Mini Cheesecakes – the crisp, buttery graham cracker crust. This step sets the stage for all the deliciousness to come.
- Preheat Your Oven and Prep the Pan: First things first, go ahead and preheat your oven to 350°F (175°C). While that’s warming up, line a standard 12-cup muffin tin with paper or foil liners. I find that paper liners make these mini cheesecakes incredibly easy to remove and serve.
- Combine Dry Ingredients for the Crust: In a medium-sized mixing bowl, combine the graham cracker crumbs, granulated sugar, and ground cinnamon. Give it a good whisk or stir with a fork until all the ingredients are evenly distributed. The cinnamon here is subtle, but it truly adds a wonderful warmth that complements the “apple crisp” aspect perfectly.
- Add Melted Butter: Pour the melted unsalted butter into the dry crumb mixture. Stir thoroughly with a fork or a spoon until all the crumbs are moistened and resemble wet sand. It’s important that every crumb is coated, as this is what helps the crust hold together beautifully.
- Press the Crust into Liners: Distribute the moistened graham cracker mixture evenly among the 12 prepared muffin cups. I usually use about 1 to 1 ½ tablespoons per cup. Then, using the back of a spoon, your fingers, or even a small shot glass, press the crumbs firmly into the bottom of each liner. Compacting the crust is crucial to prevent it from crumbling when you bite into your finished Apple Crisp Mini Cheesecakes.
- Pre-Bake the Crust: Pop the muffin tin into your preheated oven and bake the crusts for just 5-7 minutes. This brief pre-bake helps to set the crust, making it sturdier and wonderfully aromatic. Once baked, remove the tin from the oven and set it aside to cool slightly while we prepare the cheesecake filling.
Crafting the Velvety Cheesecake Filling:
Now for the star of the show! A smooth, creamy, and perfectly sweet cheesecake filling is what makes these Apple Crisp Mini Cheesecakes so irresistible. Taking your time with this step ensures a lump-free, luxurious texture.
- Soften the Cream Cheese: Ensure your cream cheese is at absolute room temperature. I can’t stress this enough! If it’s too cold, you’ll end up with lumps, no matter how much you mix. I usually take mine out of the fridge at least an hour before I plan to bake.
- Beat the Cream Cheese: In a large mixing bowl, using an electric mixer on medium speed, beat the softened cream cheese until it’s incredibly smooth and fluffy. This should take about 2-3 minutes. Scrape down the sides of the bowl frequently with a rubber spatula to ensure everything is evenly incorporated. You want it light and airy.
- Incorporate the Sugar: Gradually add the granulated sugar to the cream cheese, beating on medium-low speed until it’s fully combined and the mixture is smooth again, about 1-2 minutes. Avoid over-beating once the sugar is in, as too much air can cause cracks later.
- Add Eggs One at a Time: Add the eggs, one at a time, beating on low speed just until each egg is incorporated. Do not overmix after adding the eggs! Over-mixing incorporates too much air, which can lead to a puffy cheesecake that cracks upon cooling. Gently beat until the yolk disappears, then add the next.
- Stir in Remaining Wet Ingredients: With the mixer on low, add the vanilla extract, sour cream, and the pinch of salt. Mix until just combined and smooth. The sour cream is my secret ingredient for an extra creamy, slightly tangy cheesecake that balances the sweetness beautifully.
- Add the Flour: Finally, sprinkle in the tablespoon of all-purpose flour. Mix on the lowest speed just until it’s fully incorporated. The flour acts as a stabilizer, further helping to prevent cracks and giving the cheesecake a nice, subtle body. Give the bowl one last scrape down with your spatula to catch any unmixed bits at the bottom.
Assembling and Baking the “Apple Crisp Mini Cheesecakes”:
Now that our crusts are pre-baked and our filling is silky smooth, it’s time to bring these elements together and get our Apple Crisp Mini Cheesecakes into the oven!
- Fill the Crusts: Carefully spoon or pour the cheesecake filling evenly over the pre-baked graham cracker crusts in the muffin tin. I like to fill each cup about ⅔ to ¾ full. You should have enough filling for exactly 12 mini cheesecakes. A small ice cream scoop works wonders for even distribution.
- Prepare for Baking: Gently tap the muffin tin a few times on your counter. This helps to release any air bubbles trapped in the filling, which can prevent uneven baking or cracking.
- Bake the Cheesecakes: Place the muffin tin into your preheated 350°F (175°C) oven. Bake for approximately 18-22 minutes, or until the edges are set and appear slightly puffed, but the centers still have a slight jiggle when you gently shake the tin. It’s crucial not to overbake them, as this can lead to dry, cracked cheesecakes. The residual heat will continue to cook them as they cool.
- Cooling Process (Crucial for Cheesecake):
- Initial Cooling: Once baked, turn off your oven but leave the muffin tin inside with the oven door propped open slightly (you can use a wooden spoon). Let the cheesecakes cool in the warm oven for 15-20 minutes. This slow cooling helps prevent drastic temperature changes that can cause cracking.
- Room Temperature Cooling: After the initial oven cooling, remove the muffin tin from the oven and place it on a wire rack. Let the mini cheesecakes cool completely to room temperature, which will take another 1-2 hours.
- Chill Thoroughly: Once at room temperature, transfer the muffin tin to the refrigerator and chill the cheesecakes for at least 4 hours, or preferably overnight. This chilling step is absolutely non-negotiable for cheesecake! It allows the cheesecakes to firm up properly, develop their full flavor, and become easy to remove from their liners without falling apart. Don’t rush it!
Making the Spiced Apple Topping:
While your mini cheesecakes are chilling, let’s create the aromatic and wonderfully spiced apple topping that will complete our Apple Crisp Mini Cheesecakes. This step can be done while the cheesecakes are cooling, or even a day ahead.
- Prepare the Apples: Start by peeling, coring, and dicing your two medium apples into small, uniform ½-inch pieces. Small pieces cook faster and are easier to eat on top of the mini cheesecakes.
- Sauté the Apples: In a medium saucepan over medium heat, melt the unsalted butter. Once the butter is melted and slightly shimmering, add the diced apples. Cook for about 5-7 minutes, stirring occasionally, until the apples just begin to soften slightly but still have a bit of bite.
- Add Sugars and Spices: Stir in the packed light brown sugar, lemon juice, ground cinnamon, ground nutmeg, and the optional pinch of ground cloves. Pour in the water or apple cider.
- Simmer and Thicken: Bring the mixture to a gentle simmer, then reduce the heat to low. Continue to cook for another 5-10 minutes, stirring frequently, until the apples are tender but not mushy, and the sauce has thickened slightly. It should coat the back of a spoon. The aroma filling your kitchen will be incredible!
- Cool the Topping: Remove the saucepan from the heat and transfer the apple topping to a bowl. Let it cool completely to room temperature before using it. You can even make this a day ahead and store it in an airtight container in the refrigerator.
Creating the Crunchy Crisp Topping:
The “crisp” in Apple Crisp Mini Cheesecakes comes from this delightful streusel topping! It adds a fantastic textural contrast and boosts that cozy, autumnal flavor.
- Combine Dry Ingredients: In a medium-sized mixing bowl, combine the all-purpose flour, packed light brown sugar, granulated sugar, ground cinnamon, and old-fashioned rolled oats. Use a whisk or fork to thoroughly mix these dry ingredients together.
- Cut in the Cold Butter: Add the cold unsalted butter, which you’ve cut into small pieces, to the dry mixture. Now, it’s time to incorporate the butter. You can do this using a pastry blender, two forks, or even your fingertips. Work quickly, rubbing the butter into the dry ingredients until the mixture resembles coarse crumbs with some pea-sized pieces of butter still visible. The key is to keep the butter cold, as this helps create a wonderfully crumbly, rather than a dense, topping.
- Bake the Crisp Topping: Spread the prepared crisp topping evenly in a single layer on a small baking sheet lined with parchment paper.
- Bake and Cool: Bake in your preheated 350°F (175°C) oven for about 8-12 minutes, or until the topping is golden brown and fragrant. Keep a close eye on it, as oats and sugar can burn quickly. Once baked, remove from the oven and let it cool completely on the baking sheet. It will crisp up even more as it cools. Once cooled, you can gently break it into smaller crumbles if needed.
Final Assembly and Serving Your “Apple Crisp Mini Cheesecakes”:
The moment has arrived! Bringing all these delicious components together to create your show-stopping Apple Crisp Mini Cheesecakes.
- Remove from Liners: Once the mini cheesecakes are thoroughly chilled, gently lift them out of the muffin tin using the edges of the paper liners. Carefully peel away the liners and place each cheesecake on a serving platter or individual plates.
- Top with Apples: Spoon a generous amount of the cooled spiced apple topping over the top of each cheesecake. I usually go for about 1-2 tablespoons, ensuring a nice mound of delicious apples.
- Add the Crisp: Sprinkle a good amount of the crunchy crisp topping over the apples on each cheesecake. This adds that essential textural contrast and truly embodies the “apple crisp” part of the name.
- Optional Garnishes: For an extra touch of indulgence, drizzle a little caramel sauce over the top and/or add a dollop of fresh whipped cream. These additions are completely optional but highly recommended if you want to elevate the presentation and flavor even further.
- Serve and Enjoy: Your beautiful Apple Crisp Mini Cheesecakes are now ready to be served! These are perfect for parties, family gatherings, or just a delightful treat for yourself.
Storage Tips:
To keep your delightful Apple Crisp Mini Cheesecakes fresh and delicious, proper storage is key.
- Refrigeration is a Must: Always store assembled or unassembled cheesecakes in an airtight container in the refrigerator.
- Assembled Cheesecakes: If the cheesecakes are already topped with the apple and crisp toppings, they will keep well for up to 3-4 days in the refrigerator. The crisp topping might soften slightly over time due to moisture from the apples, but the flavors will still be fantastic.
- Unassembled Cheesecakes: If you want to prepare components ahead of time, store the plain mini cheesecakes, apple topping, and crisp topping separately in airtight containers. The plain cheesecakes can last up to 5-7 days in the fridge. The apple topping for about 4-5 days, and the crisp topping will stay crunchy for up to 1 week at room temperature in an airtight container. Assemble just before serving for the best texture.
- Freezing: Plain mini cheesecakes (without toppings) can be frozen! Wrap each cheesecake individually in plastic wrap, then place them in an airtight freezer-safe container. They can be frozen for up to 1 month. Thaw them overnight in the refrigerator before topping and serving.
Pro Tips for Perfect “Apple Crisp Mini Cheesecakes”:
Achieving bakery-quality Apple Crisp Mini Cheesecakes is easier than you think with a few clever tricks!
-
Room Temperature Ingredients Are Key:
I cannot emphasize this enough, especially for the cream cheese and eggs. If your cream cheese is cold, you’ll end up with a lumpy filling. Cold eggs can also cause the mixture to seize. Plan ahead and take them out of the fridge at least 1-2 hours before you start mixing. This ensures a silky-smooth, evenly mixed cheesecake batter.
-
Don’t Overmix the Filling:
Once you add the eggs, mix on low speed just until combined. Over-mixing incorporates too much air, which can cause your cheesecake to puff up excessively in the oven and then sink and crack significantly as it cools. Gentle, low-speed mixing is the way to go for a dense, creamy texture.
-
Embrace the Water Bath (Mini Style):
While not strictly necessary for mini cheesecakes as it is for a large one, a little humidity in the oven can still help prevent cracking. You can place a shallow pan of hot water on the bottom rack of your oven while baking the cheesecakes. This creates a steamy environment that helps the cheesecake bake gently and evenly.
-
Cooling is as Important as Baking:
Resist the urge to pull your cheesecakes straight out of the hot oven and onto the counter! Cheesecake is very sensitive to sudden temperature changes, which can lead to cracks. The gradual cooling process—first in the turned-off oven, then at room temperature, and finally in the refrigerator—is vital for a perfectly set, smooth top. Patience truly is a virtue here.
-
Customize Your Apples:
Feel free to experiment with different apple varieties. While Granny Smith offers a lovely tartness that balances the sweet cheesecake, Honeycrisp provides a nice crisp texture, and even Fuji or Gala can be used for a sweeter apple topping. Adjust the sugar in the apple topping based on the sweetness of your chosen apples.
-
Make Ahead for Ease:
These Apple Crisp Mini Cheesecakes are absolutely fantastic for making ahead! You can bake the cheesecakes (without toppings) a day or two in advance and keep them chilled. The apple topping can also be made a day ahead, and the crisp topping baked and stored at room temperature. Assemble everything just before serving for the freshest taste and best texture.
-
Even Crumb Distribution:
When pressing the graham cracker crust into the muffin liners, use a flat-bottomed object like a small shot glass or the back of a measuring spoon. This ensures an even, compact crust that won’t crumble apart when you take that first delicious bite.
-
Don’t Forget the Salt:
A tiny pinch of salt in the cheesecake filling and crisp topping might seem insignificant, but it plays a huge role in balancing and enhancing all the sweet flavors. It truly makes the difference between good and outstanding.
-
A Little Lemon Juice Goes a Long Way:
Adding lemon juice to your apple topping not only prevents the apples from browning but also brightens their flavor, providing a nice zing that cuts through the richness of the cheesecake. It’s a small detail that makes a big impact on the overall balance of these Apple Crisp Mini Cheesecakes.
Conclusion:
And there you have it, my friends! We’ve reached the sweet finale of our journey through what I truly believe is one of the most delightful and surprisingly straightforward dessert recipes you’ll ever encounter. When I first experimented with combining these two beloved classics, I had a feeling it would be good, but the resulting harmony of flavors and textures in these individual treats absolutely blew me away. This isn’t just another dessert; it’s an experience, a moment of pure, unadulterated bliss that manages to be both comforting and sophisticated at the same time. The creamy, tangy richness of a classic cheesecake, perfectly balanced with the warm, spiced, crumbly goodness of an apple crisp – it’s a match made in culinary heaven, truly. Each bite offers that perfect juxtaposition: the smooth, decadent filling, the crisp, buttery topping, and the tender, slightly tart apple pieces beneath. It’s a multi-layered symphony of taste that dances on your palate, leaving you thoroughly satisfied but always craving just one more.
What makes these particular treats an absolute must-try isn’t just their incredible flavor profile; it’s also their elegant presentation and the sheer joy they bring to any occasion. No more messy slicing of a traditional cheesecake or struggling to portion out a baked crisp from a large dish. These Apple Crisp Mini Cheesecakes come in their own delightful little packages, making them perfect for entertaining, potlucks, or simply enjoying a perfectly sized portion all to yourself. They look incredibly impressive, yet they are surprisingly approachable to make, which is always a winning combination in my recipe book. I promise you, the effort, which is minimal, is overwhelmingly rewarded by the smiles and appreciative murmurs you’ll receive when you serve these up. They are a conversation starter, a centerpiece, and a testament to the fact that sometimes, the best desserts are those that merge familiar comforts into something spectacularly new.
Serving Them Perfectly: Your Delicious Options
Now that you’ve got them baked and cooled, let’s talk about the endless possibilities for serving and savoring your masterpieces. While absolutely divine straight out of the fridge, I often find a slightly warmed version elevates the apple crisp topping, bringing out more of those warm spice aromas. A quick 10-15 seconds in the microwave can work wonders! For the ultimate indulgent experience, serve them alongside a generous scoop of vanilla bean ice cream – the cold, creamy ice cream contrasting with the slightly warm cheesecake and crisp topping is simply magical. Alternatively, a dollop of freshly whipped cream, perhaps infused with a hint of cinnamon or a splash of maple syrup, adds another layer of luxuriousness. Don’t shy away from a drizzle of homemade caramel sauce either; the buttery sweetness complements the apples and cream cheese beautifully. For those who love a bit of extra texture, a sprinkle of toasted chopped pecans or walnuts over the top just before serving provides a delightful crunch.
Beyond the Basic: Creative Variations to Explore
But the fun doesn’t have to stop there! Once you’ve mastered the original, consider playing around with some variations. Imagine a pear crisp mini cheesecake, swapping out the apples for juicy pears and perhaps a hint of ginger in the spice mix. Or how about a berry crisp version, using mixed berries for a vibrant, summery twist? You could experiment with the crust too – while graham crackers are classic, a crushed gingersnap cookie crust would add a delightful spicy kick, or even shortbread for a more delicate base. For those with dietary considerations, a gluten-free graham cracker substitute and gluten-free oats work wonderfully without sacrificing flavor or texture. Feel free to adjust the spices in the apple mixture or even add a tiny pinch of nutmeg or cardamom to the cream cheese filling for an extra layer of complexity. These cheesecakes are incredibly versatile, inviting you to put your own creative spin on them.
So, what are you waiting for? I wholeheartedly encourage you to roll up your sleeves, gather your ingredients, and dive into the joyful process of creating these incredible desserts. Trust me, the aroma alone as they bake will fill your kitchen with such warmth and anticipation, it’s almost as good as the first bite itself. This recipe is more than just a set of instructions; it’s an invitation to create, to share, and to indulge in something truly special. Once you’ve made them, and I have no doubt you’ll fall in love, please don’t keep your experience to yourself! I would absolutely adore hearing about your baking adventures. Share your photos, tell me about your favorite serving suggestions, or any clever variations you came up with. Your feedback and creativity inspire me, and I love seeing how these recipes come to life in your kitchens. Get baking, share the joy, and prepare to be utterly charmed by these phenomenal Apple Crisp Mini Cheesecakes!
Apple Crisp Mini Cheesecakes
These Apple Crisp Mini Cheesecakes are an irresistible symphony of flavors, combining the comforting warmth of spiced apples and a crunchy crisp with the creamy decadence of cheesecake, all in delightful individual servings. Perfect for entertaining or a special treat.
Ingredients
-
3/4 cup graham cracker crumbs
-
1 1/2 tablespoons sugar
-
1/2 teaspoon cinnamon
-
3 tablespoons unsalted butter, melted
-
10 oz cream cheese, softened
-
6 tablespoons sugar
-
1 1/2 teaspoons pure vanilla extract
-
2 teaspoons all-purpose flour
-
1 large egg
-
2 medium-small apples, peeled and finely chopped
-
2 teaspoons freshly squeezed lemon juice
-
1 1/2 teaspoons ground cinnamon
-
1/4 teaspoon ground nutmeg
-
2 tablespoons packed light brown sugar
-
1 1/2 teaspoons cornstarch
-
1/2 cup all-purpose flour
-
1/4 cup packed light brown sugar
-
1/4 cup granulated sugar
-
1/2 teaspoon ground cinnamon
-
1/4 cup old-fashioned rolled oats
-
1/4 cup unsalted butter, cold and cubed
Instructions
-
Step 1
Preheat oven to 350°F (175°C). Line a 12-cup muffin tin. In a bowl, combine 3/4 cup graham cracker crumbs, 1 1/2 tbsp sugar, and 1/2 tsp cinnamon. Mix in 3 tbsp melted unsalted butter until moistened. Press 1-1.5 tbsp firmly into each liner. Pre-bake for 5-7 minutes. Cool slightly. -
Step 2
Ensure 10 oz cream cheese is at room temp. Beat until smooth (2-3 min). Gradually add 6 tbsp sugar, mixing 1-2 min. Add 1 egg on low speed until just combined. Mix in 1 1/2 tsp pure vanilla extract and 2 tsp all-purpose flour until smooth. Avoid overmixing. -
Step 3
Spoon filling into pre-baked crusts (⅔-¾ full). Tap tin gently. Bake at 350°F (175°C) for 18-22 min, until edges set and center jiggles slightly. Turn off oven, prop door open, and cool cheesecakes in oven for 15-20 min. Remove to a wire rack and cool completely to room temp (1-2 hrs). Chill thoroughly in the refrigerator for at least 4 hours, or preferably overnight. -
Step 4
In a medium saucepan, combine 2 medium-small finely chopped apples, 2 tsp lemon juice, 1 1/2 tsp cinnamon, 1/4 tsp nutmeg, 2 tbsp light brown sugar, and 1 1/2 tsp cornstarch. Cook over medium heat for 5-7 min until apples slightly soften. Simmer 5-10 min, stirring frequently, until apples are tender and sauce thickens. Cool completely. -
Step 5
In a medium bowl, combine 1/2 cup all-purpose flour, 1/4 cup packed light brown sugar, 1/4 cup granulated sugar, 1/2 tsp ground cinnamon, and 1/4 cup old-fashioned rolled oats. Cut in 1/4 cup cold cubed unsalted butter until coarse crumbs form. Spread evenly on a parchment-lined baking sheet. Bake at 350°F (175°C) for 8-12 min until golden. Cool completely and crumble. -
Step 6
Once cheesecakes are chilled, gently remove from liners. Top each with 1-2 tbsp cooled spiced apple topping. Sprinkle with crunchy crisp topping. Optional: drizzle caramel sauce, add a dollop of whipped cream. Serve and enjoy!
Important Information
Nutrition Facts (Per Serving)
It is important to consider this information as approximate and not to use it as definitive health advice.
Allergy Information
Please check ingredients for potential allergens and consult a health professional if in doubt.

Leave a Comment