
Chicken Beef Bacon Ranch Pull Apart Rolls are the ultimate crowd-pleaser, a flavor explosion waiting to happen. If you’re searching for a dish that will have everyone begging for the recipe, look no further. This isn’t just another appetizer; it’s an experience! Imagine tender shredded chicken, savory ground beef, and crispy crumbled bacon, all mingling in a creamy, zesty ranch sauce, then baked into impossibly soft, golden rolls that practically beg to be pulled apart. People adore these rolls because they deliver a satisfying, multi-layered taste sensation with every bite. What truly makes them special is the ingenious combination of textures and robust flavors, creating a harmonious blend that’s both comforting and exciting. Perfect for game nights, potlucks, or just a decadent snack, these Chicken Beef Bacon Ranch Pull Apart Rolls are guaranteed to disappear in a flash.
Ingredients:
- 1 (15 oz) pack 12-count potato rolls (i.e. Martin’s)
- 1 pound thinly sliced deli chicken (or 3 cups chopped cooked chicken)
- 8-10 slices bacon, cooked and crumbled
- 12 slices colby jack cheese
- 1/3 cup prepared ranch salad dressing
- 1/2 cup butter
- 1 tablespoon chopped fresh chives
- 1 teaspoon garlic salt (or garlic powder)
- 1/2 teaspoon onion powder
- 2 tablespoons grated Parmesan cheese
Preparation of the Chicken Beef Bacon Ranch Pull Apart Rolls
Assembling the Rolls
This is where the magic starts to happen for our Chicken Beef Bacon Ranch Pull Apart Rolls! We’ll begin by preparing our potato rolls. If you’re using a 12-count pack, you’ll want to keep them connected as a whole. This is crucial for the “pull apart” aspect of this delightful dish. Take your entire pack of potato rolls and carefully slice them horizontally, just like you would for a giant sandwich. Aim for a clean cut that separates the top half of the rolls from the bottom half. It’s helpful to place the rolls on a sturdy cutting board before you begin slicing. A long, serrated knife can be your best friend here, ensuring a smooth and even cut without squishing the delicate rolls. Once sliced, gently lift the top half of the rolls and set them aside for a moment. We want to preserve that beautiful, connected structure.
Layering the Savory Fillings
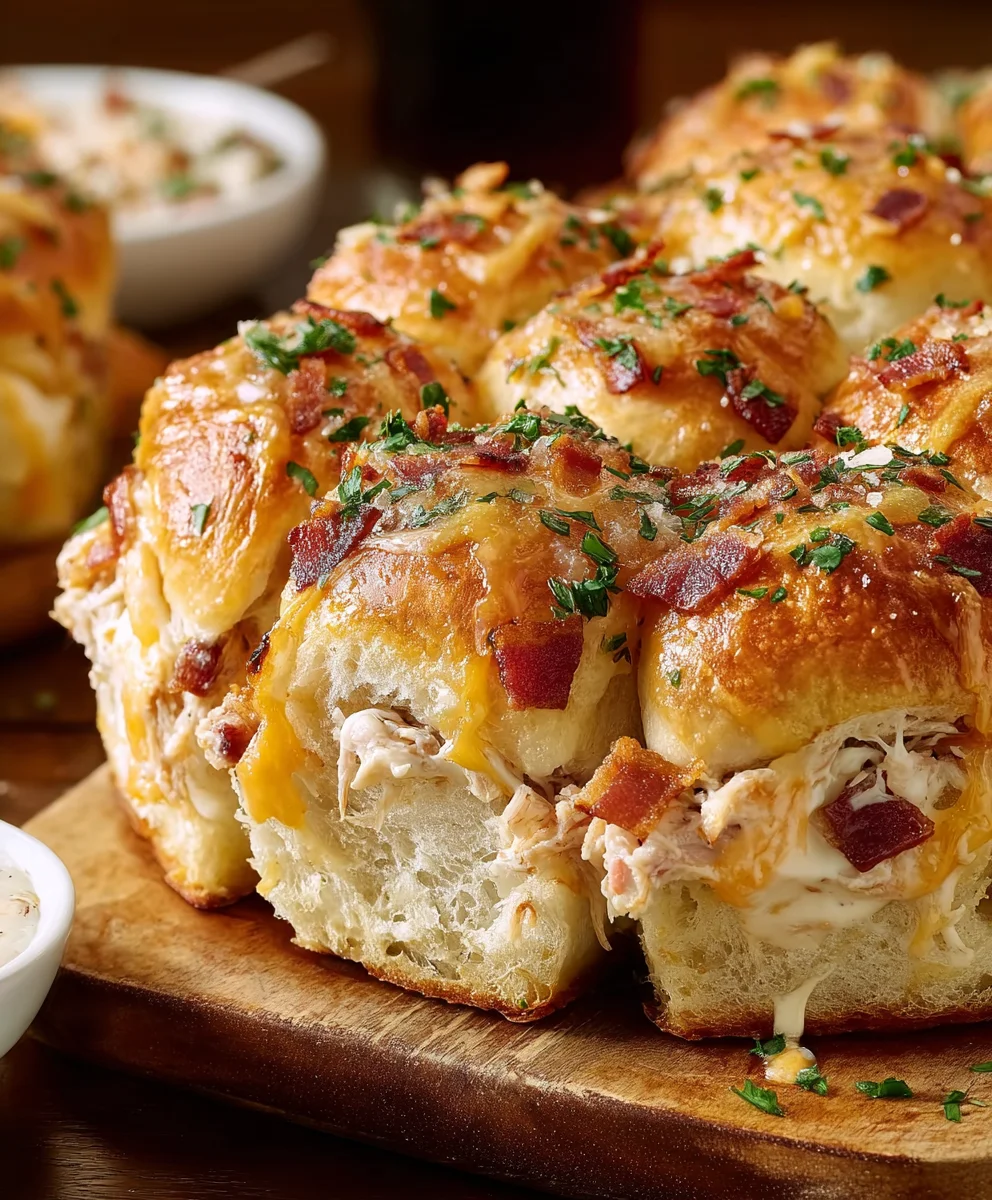
Now that our rolls are prepped, it’s time to build the flavor! We’ll start with the bottom half of the rolls. Take your prepared ranch salad dressing and spread it evenly over the cut side of the bottom rolls. Don’t be shy; we want that creamy ranch flavor to permeate throughout. Next, we’ll layer on our proteins. Arrange the thinly sliced deli chicken evenly over the ranch dressing. If you’re using chopped cooked chicken, distribute it just as generously. Ensure there’s a good amount of chicken in each roll cavity. Now, sprinkle the crumbled cooked bacon over the chicken. The smoky, salty crunch of the bacon is going to be a fantastic counterpoint to the tender chicken and creamy ranch. Finally, we’ll add the cheese. Place two slices of colby jack cheese on top of the bacon in each roll. The goal here is to create a rich, gooey layer that will melt beautifully when baked. Having two slices per roll ensures ample cheesy goodness in every bite of your Chicken Beef Bacon Ranch Pull Apart Rolls.
Creating the Flavorful Butter Topping
The butter topping is what takes these rolls from delicious to utterly irresistible. In a small saucepan or microwave-safe bowl, melt the 1/2 cup of butter over low heat or in short bursts in the microwave. We want it fully melted but not browned. Once the butter is liquid gold, it’s time to infuse it with incredible flavor. Add the chopped fresh chives, garlic salt (or garlic powder if that’s what you have on hand), and onion powder to the melted butter. Stir everything together thoroughly to ensure the seasonings are evenly distributed. This aromatic butter mixture will be brushed over the top of the rolls, adding an extra layer of savory richness and a wonderful crispness to the exterior. Don’t skip this step; it truly elevates the entire dish.
Assembling and Baking the Pull Apart Rolls
Now, let’s bring it all together. Carefully place the top half of the sliced potato rolls back onto the bottom half, encasing all those delicious fillings. Think of it as creating one giant, glorious sandwich. Using a pastry brush, generously brush the melted, seasoned butter mixture all over the top of the assembled rolls. Make sure to get into all the nooks and crannies. This will help them get golden brown and crispy. For an extra touch of cheesy flavor and a beautiful golden crust, sprinkle the 2 tablespoons of grated Parmesan cheese evenly over the buttered tops. At this point, you can either bake them as one large block or carefully cut them into individual portions if you prefer. If you’re baking them as a block, cover the pan loosely with aluminum foil to prevent the tops from browning too quickly before the cheese has melted thoroughly. If you want them to bake up more individually, you can cut them into squares or even try to separate them slightly before baking, though they will pull apart more easily after baking.
Baking to Golden Perfection
Preheat your oven to 350 degrees Fahrenheit (175 degrees Celsius). Place the assembled rolls on a baking sheet or in a shallow baking dish. Bake for approximately 15-20 minutes, or until the rolls are golden brown, the cheese is melted and bubbly, and the butter topping is fragrant and lightly crisped. If you covered them with foil, remove the foil during the last 5-7 minutes of baking to allow the tops to get nicely browned. Keep an eye on them to prevent burning. The aroma filling your kitchen will be heavenly! Once they’re baked to perfection, carefully remove the baking sheet from the oven. Let the Chicken Beef Bacon Ranch Pull Apart Rolls rest for about 5 minutes before serving. This allows the fillings to set slightly, making them easier to pull apart and preventing any molten cheese from escaping too quickly. Serve warm and watch them disappear!

Conclusion:
There you have it – a recipe for utterly irresistible Chicken Beef Bacon Ranch Pull Apart Rolls that’s sure to become a family favorite! These rolls are a delightful explosion of savory flavors, combining tender chicken, hearty beef, crispy bacon, and that signature zesty ranch. They are surprisingly simple to make, making them perfect for a weeknight meal, a potluck, or even a fun appetizer. The magic happens when you pull apart those warm, cheesy, flavor-packed rolls, making each bite a unique experience. I encourage you to give this recipe a try and savor every delicious moment.
For serving, these pull-apart rolls are incredibly versatile. They pair beautifully with a fresh green salad for a complete meal, or they can stand alone as a star appetizer. Consider serving them alongside a hearty soup for a comforting dinner, or cut them into smaller portions for a crowd-pleasing party snack.
Don’t be afraid to get creative with variations! You can easily swap out the proteins, perhaps using ground turkey or a different type of sausage. Add in some finely diced bell peppers or onions for extra texture and flavor. For a spicier kick, a pinch of red pepper flakes or a drizzle of hot sauce would be fantastic.
Frequently Asked Questions:
Can I make the Chicken Beef Bacon Ranch Pull Apart Rolls ahead of time?
Yes, you can assemble the rolls a few hours in advance. Cover them tightly with plastic wrap and refrigerate. When you’re ready to bake, let them sit at room temperature for about 20-30 minutes before baking as directed in the recipe, you might need to add a few extra minutes to the baking time.
What kind of bread is best for these pull-apart rolls?
While this recipe works wonderfully with canned biscuits, you can also experiment with other types of soft, yeasted doughs. Think about using pre-made pizza dough or even a homemade dinner roll dough. The key is to ensure the bread is soft enough to pull apart easily after baking.
How do I ensure the bacon is crispy inside the rolls?
For the crispiest bacon, I recommend pre-cooking it until it’s almost fully crispy before chopping and adding it to the filling. This ensures it retains its delightful crunch even after baking within the rolls.
Chicken Beef Bacon Ranch Pull-Apart Rolls
Delicious pull-apart rolls filled with chicken, savory beef bacon, melted Colby Jack cheese, and a flavorful ranch dressing, all topped with a garlic herb butter.
Ingredients
-
1 (15 oz) pack 12-count potato rolls (i.e. Martin’s)
-
1 pound thinly sliced deli chicken (or 3 cups chopped cooked chicken)
-
8-10 slices beef bacon, cooked and crumbled
-
12 slices colby jack cheese
-
1/3 cup prepared ranch salad dressing
-
1/2 cup butter
-
1 tablespoon chopped fresh chives
-
1 teaspoon garlic salt (or garlic powder)
-
1/2 teaspoon onion powder
-
2 tablespoons grated Parmesan cheese
Instructions
-
Step 1
Keep the 12-count potato rolls connected. Slice them horizontally as if making one giant sandwich. Place on a cutting board and use a long, serrated knife for a clean, even cut. Gently lift and set aside the top half of the rolls. -
Step 2
Spread the prepared ranch salad dressing evenly over the cut side of the bottom rolls. Layer the thinly sliced deli chicken over the ranch dressing. Sprinkle the crumbled cooked beef bacon over the chicken. Place two slices of Colby Jack cheese on top of the bacon in each roll. -
Step 3
Melt the butter in a small saucepan or microwave-safe bowl. Add the chopped fresh chives, garlic salt (or garlic powder), and onion powder to the melted butter. Stir to combine. -
Step 4
Carefully place the top half of the sliced potato rolls back onto the bottom half, encasing the fillings. Generously brush the melted, seasoned butter mixture all over the top of the assembled rolls. Sprinkle the grated Parmesan cheese evenly over the buttered tops. -
Step 5
Preheat oven to 350°F (175°C). Place the assembled rolls on a baking sheet or in a shallow baking dish. Cover loosely with aluminum foil. Bake for 15-20 minutes, or until the cheese is melted and bubbly. Remove foil for the last 5-7 minutes to brown the tops. -
Step 6
Remove from oven and let rest for 5 minutes before serving. Serve warm and pull apart.
Important Information
Nutrition Facts (Per Serving)
It is important to consider this information as approximate and not to use it as definitive health advice.
Allergy Information
Please check ingredients for potential allergens and consult a health professional if in doubt.


Leave a Comment