
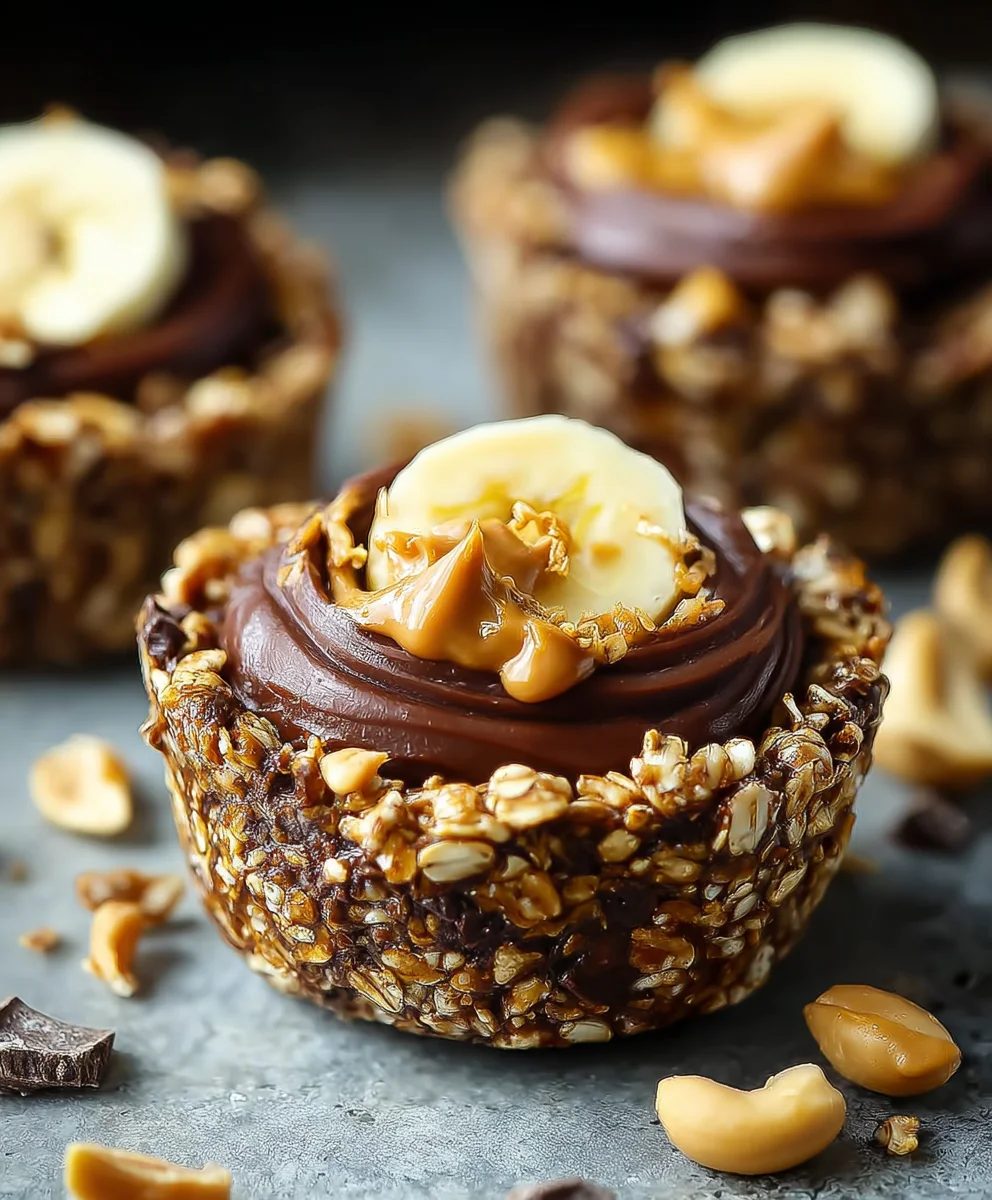
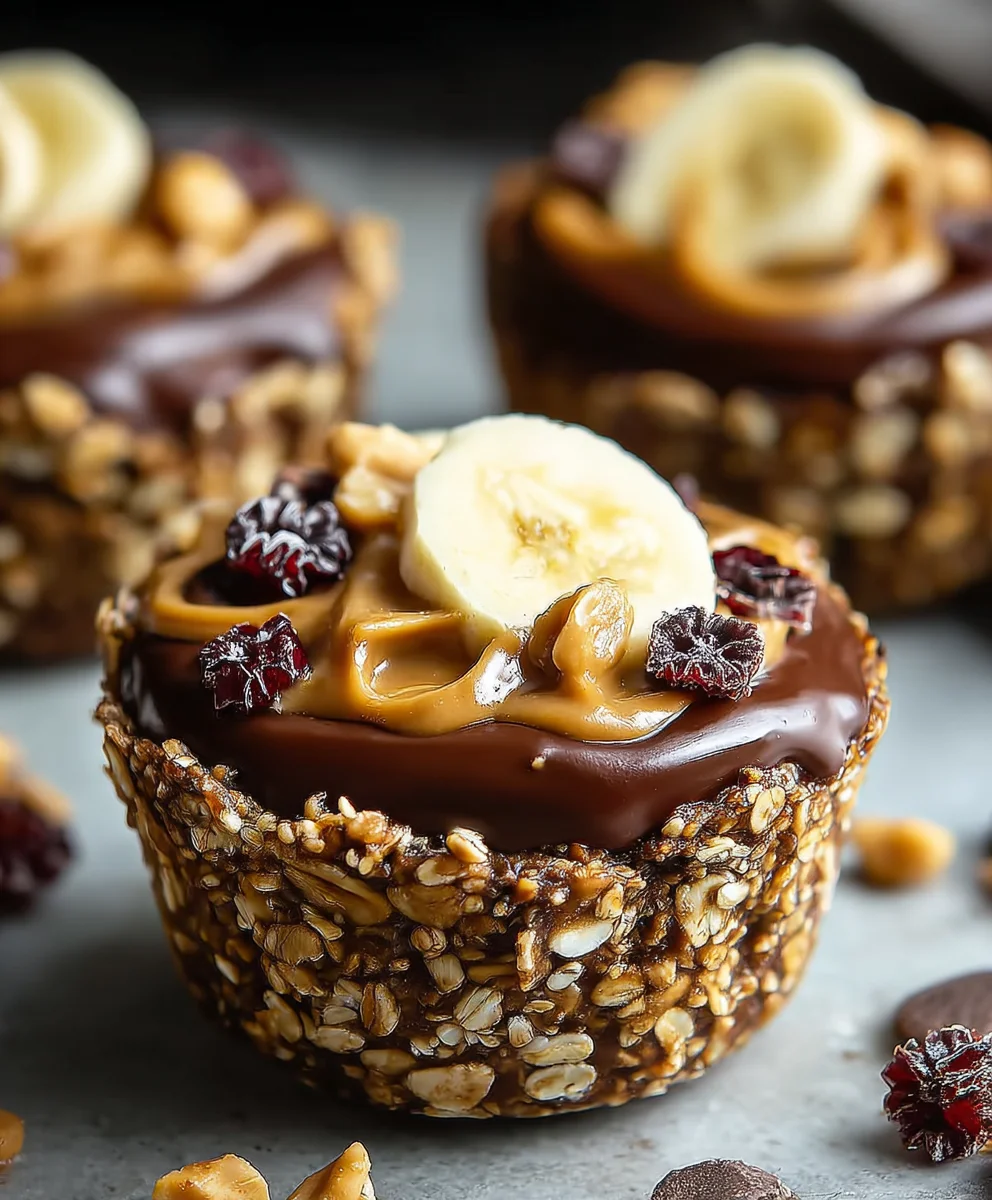
Chocolate Granola Cups with Peanut Butter Filling are more than just a treat; they’re a miniature masterpiece of flavor and texture that has captured the hearts (and taste buds!) of snack lovers everywhere. Imagin extracte the satisfying crunch of perfectly baked granola giving way to a luscious, creamy peanut butter center, all enrobed in rich, decadent chocolate. It’s a symphony of sensations! People adore these little delights because they strike that perfect balance between healthy-ish goodness and unadulterated indulgence. They’re incredibly versatile, making them ideal for a quick breakfast on the go, a satisfying afternoon pick-me-up, or even an elegant yet simple dessert. What truly sets these Chocolate Granola Cups with Peanut Butter Filling apart is the harmonious blend of wholesome oats, nuts, and seeds from the granola, the salty-sweet depth of the peanut butter, and the classic appeal of chocolate. They’re a delightful way to elevate your snack game and impress your friends and family with minimal effort.
Ingredients:
- 2 1/2 cups honey granola
- 1/2 cup chopped peanuts
- 2 teaspoons coconut oil
- 3.5 oz dark chocolate, finely chopped
- 2 tablespoons peanut butter
- 3 tablespoons honey
- 1 cup peanut butter
- 12 slices of banana (optional)
Preparing the Granola Base
Step 1: Create the Granola Mixture
Let’s begin extract by forming the base for our delicious Chocolate Granola Cups with Peanut Butter Filling. In a medium-sized mixing bowl, combine the 2 1/2 cups of honey granola with the 1/2 cup of chopped peanuts. This combination provides a wonderful crunchy texture and a subtle nutty flavor that will complement the sweet and creamy filling. Make sure the peanuts are evenly distributed throughout the granola. If your granola pieces are quite large, you might consider giving them a gentle crush with your hands to ensure they bind together well in the next step. This initial mix is the foundation of our delightful treat.
Step 2: Bind the Granola Together
Now, we need to bind the granola and peanut mixture together to form compact cups. In a separate small saucepan, gently melt the 2 teaspoons of coconut oil over low heat. You want it just melted, not hot. Once melted, stir in the 2 tablespoons of peanut butter and 3 tablespoons of honey. Continue stirring gently until you have a smooth, glossy mixture. This binding agent will help our granola cups hold their shape beautifully. Pour this warm, sticky mixture over the granola and peanut combination. Using a sturdy spoon or spatula, mix everything thoroughly until every piece of granola and peanut is coated. This step is crucial for ensuring the cups don’t crum extractble apart. It might take a minute or two of vigorous stirring to achieve an even coating.
Forming the Chocolate Granola Cups
Step 3: Press the Granola into Molds
For this step, you’ll need a standard muffin tin, preferably lined with paper liners or lightly greased to prevent sticking. We want to create individual cups, so we’ll be pressing the granola mixture into the bottom and up the sides of each muffin cup. Take about 2 to 3 tablespoons of the granola mixture and press it firmly into the bottom of each muffin liner, then use your fingers or the back of a spoon to press the mixture up the sides, forming a small cup-like shape. The key here is to press firmly and evenly. This ensures a sturdy base and sides that will hold the peanut butter filling without collapsing. Don’t worry if they aren’t perfectly uniform; a little rustic charm is part of their appeal.
Creating the Peanut Butter Filling
Step 4: Prepare the Creamy Peanut Butter Filling
While the granola cups are setting slightly, let’s prepare the luscious peanut butter filling that makes these treats irresistible. In a clean mixing bowl, place the 1 cup of creamy peanut butter. If your peanut butter is quite firm, you can gently warm it for about 10-15 seconds in the microwave to make it more pliable and easier to work with. This smooth, rich filling is the heart of our Chocolate Granola Cups with Peanut Butter Filling. Ensure you’re using a good quality peanut butter for the best flavor and texture. For an optional touch of elegance and added flavor, you can gently stir in a teaspoon of vanilla extract at this stage, though it’s not listed in the core ingredients.
Assembling and Finishing the Cups
Step 5: Fill and Chill the Granola Cups
Now for the exciting part: assembling our delightful treats! Spoon a generous dollop of the prepared peanut butter filling into each granola cup you’ve formed in the muffin tin. Fill them almost to the top, but leave a little space for the chocolate topping. If you’re using the optional banana slices, place one or two thin slices on top of the peanut butter filling in each cup. This adds a wonderful fruity sweetness and a soft contrast to the creamy peanut butter. Once filled, place the muffin tin in the refrigerator for at least 30 minutes, or until the granola cups have set and the peanut butter filling is firm. This chilling time is essential for the cups to hold their shape and for the chocolate to set properly.
Step 6: Melt the Dark Chocolate for the Topping
While the cups are chilling, let’s prepare the decadent dark chocolate topping. Finely chop your 3.5 oz of dark chocolate. For melting, the double boiler method is ideal to prevent burning. Fill a small saucepan with about an inch of water and bring it to a gentle simmer. Place a heatproof bowl that fits snugly over the saucepan (ensuring the bottom of the bowl doesn’t touch the water). Add the finely chopped dark chocolate to the bowl. Stir occasionally as the chocolate melts. Alternatively, you can melt the chocolate in a microwave-safe bowl in 30-second intervals, stirring well between each interval, until smooth. Be patient, as dark chocolate can sometimes be a little trickier to melt than milk chocolate.
Step 7: Top and Harden
Once the dark chocolate is smoothly melted and the granola cups have chilled and set, it’s time for the final flourish. Carefully remove the chilled granola cups from the muffin tin. You can do this by gently easing them out of the liners or by turning the tin upside down and tapping the bottom. Place the set granola cups on a parchment-lined baking sheet. Drizzle or spoon the melted dark chocolate over the top of each peanut butter-filled granola cup. Ensure the chocolate covers the peanut butter filling and creates a beautiful glossy finish. If you’re feeling artistic, you can use a fork to create swirls or patterns. Return the baking sheet to the refrigerator for another 15-20 minutes, or until the chocolate is completely firm. This will result in perfectly set Chocolate Granola Cups with Peanut Butter Filling, ready to be enjoyed!
Conclusion:
And there you have it – your very own batch of delicious Chocolate Granola Cups with Peanut Butter Filling! This recipe is a fantastic way to create a satisfying and wholesome treat that’s perfect for breakfast, a snack, or even a light dessert. The satisfying crunch of the chocolate granola paired with the creamy, slightly sweet peanut butter filling is truly irresistible. I encourage you to give these a try; they are surprisingly simple to make and the results are incredibly rewarding. Once you’ve mastered the basic recipe, don’t be afraid to experiment with different nut butters or even a sprinkle of sea salt on top!
For serving, these Chocolate Granola Cups with Peanut Butter Filling are wonderful on their own. However, you could also serve them alongside a fresh fruit salad or a dollop of Greek yogurt for an extra touch of indulgence. If you’re feeling adventurous, consider adding a few chocolate chips to the granola mixture before pressing it into the cups, or perhaps a swirl of honey or maple syrup into the peanut butter for added sweetness and flavor complexity.
Frequently Asked Questions:
Can I make these Chocolate Granola Cups with Peanut Butter Filling ahead of time?
Absolutely! These are perfect for meal prepping. You can store them in an airtight container in the refrigerator for up to 5 days. They tend to firm up even more in the fridge, making them incredibly convenient for grab-and-go snacks.
What other nut butters can I use for the filling?
While peanut butter is classic, feel free to get creative! Almond butter, cashew butter, or even sunflower seed butter (for a nut-free option) would all work wonderfully and offer a delightful variation on the origin extractal Chocolate Granola Cups with Peanut Butter Filling.
Chocolate Peanut Butter Granola Cups – Easy Recipe
Delicious and easy to make chocolate peanut butter granola cups with a crunchy granola base and creamy peanut butter filling.
Ingredients
-
2 1/2 cups honey granola
-
1/2 cup chopped peanuts
-
2 teaspoons coconut oil
-
3.5 oz dark chocolate, finely chopped
-
2 tablespoons peanut butter
-
3 tablespoons honey
-
1 cup peanut butter
-
12 slices of banana (optional)
Instructions
-
Step 1
Combine 2 1/2 cups of honey granola and 1/2 cup of chopped peanuts in a mixing bowl. -
Step 2
In a small saucepan, melt 2 teaspoons of coconut oil over low heat. Stir in 2 tablespoons of peanut butter and 3 tablespoons of honey until smooth. Pour this mixture over the granola and peanuts and mix until evenly coated. -
Step 3
Press 2 to 3 tablespoons of the granola mixture firmly into the bottom and up the sides of each muffin cup in a lined or greased muffin tin to form cups. -
Step 4
Fill each granola cup with 1 cup of creamy peanut butter. If using, add optional banana slices on top. -
Step 5
Chill the muffin tin in the refrigerator for at least 30 minutes until the granola cups and peanut butter are firm. -
Step 6
Melt 3.5 oz of dark chocolate using a double boiler or microwave until smooth. -
Step 7
Remove chilled cups from the muffin tin and place on a parchment-lined baking sheet. Drizzle or spoon the melted dark chocolate over the top of each cup. Return to the refrigerator for 15-20 minutes until the chocolate is firm.
Important Information
Nutrition Facts (Per Serving)
It is important to consider this information as approximate and not to use it as definitive health advice.
Allergy Information
Please check ingredients for potential allergens and consult a health professional if in doubt.
Leave a Comment