
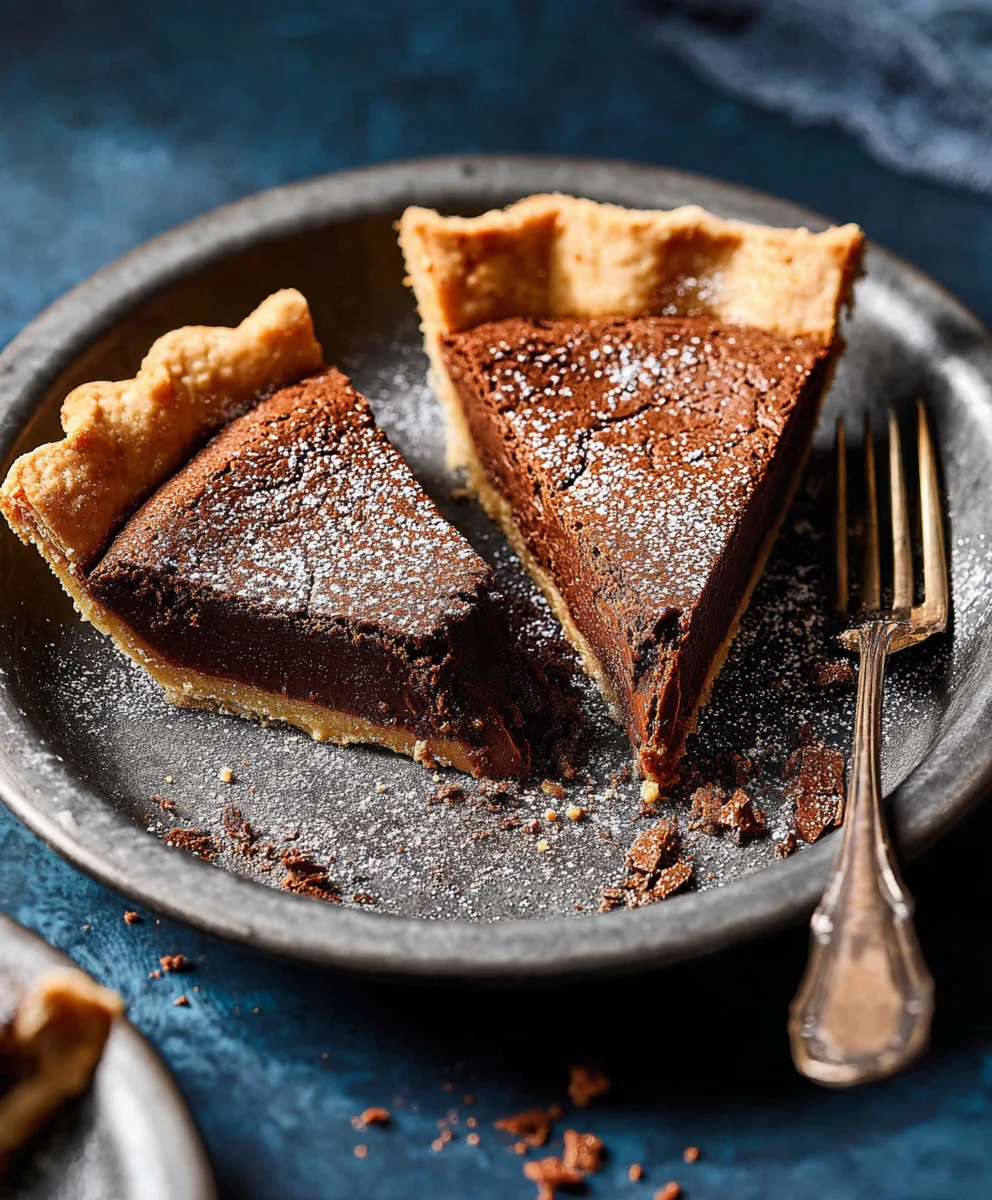
Chocolate Chess Pie is more than just a dessert; it’s a slice of pure Southern comfort, a truly unforgettable experience for anyone with a love for rich, decadent chocolate. I remember the first time I tasted this magnificent creation – the way the spoon glided through the smooth, fudgy filling, revealing that intense cocoa flavor. It’s a pie that truly captures the heart with its timeless appeal and comforting essence.
Originating from humble pantry ingredients, the classic chess pie has long been a staple in Southern kitchens, beloved for its simplicity and satisfying richness. The chocolate variation elevates this tradition, transforming a simple dessert into something extraordinarily luxurious. There’s a wonderful debate about the origin of the name “chess pie,” with some suggesting it came from “it’s just pie,” while others point to a pie chest where it was stored. Regardless of its name’s true beginnings, its place in culinary history is firmly cemented, offering a delightful taste of heritage.
What Makes This Pie So Universally Adored?
The answer lies in its exquisite balance of textures and flavors. Imagine a gloriously crackled, almost meringue-like top giving way to an incredibly dense, gooey, and intensely chocolatey interior, all nestled within a flaky pie crust. It’s not overly sweet, allowing the deep cocoa notes to shine through beautifully, making every bite a delightful indulgence. Whether served warm with a scoop of vanilla ice cream or chilled, a perfect slice of Chocolate Chess Pie promises to satisfy even the most discerning sweet tooth. It’s a nostalgic treat that brings warmth and joy with every forkful, a testament to its enduring appeal.
Ingredients:
- For the Chocolate Chess Pie Filling:
- 1/2 cup (1 stick or 113g) unsalted butter, softened to room temperature
- 1 3/4 cups (350g) granulated sugar
- 1/4 cup (22g) unsweetened cocoa powder, I prefer a good quality Dutch-processed cocoa for a richer flavor
- 2 large eggs, at room temperature
- 1 tablespoon all-purpose flour
- 1 teaspoon pure vanilla extract
- 1/4 teaspoon salt
- 1/4 cup (60ml) evaporated milk or whole milk (some recipes use buttermilk, but I find evaporated milk gives it a lovely creamy texture)
- 1 teaspoon white vinegar (this is my secret ingredient for that perfect custardy texture and subtle tang!)
- For the Pie Crust:
- 1 (9-inch) unbaked pie crust. You can use your favorite homemade pie crust recipe, or a good quality store-bought refrigerated pie crust to save time. I often opt for store-bought to make this dessert even easier!
- For Serving (Optional, but highly recommended!):
- Sweetened whipped cream
- Fresh berries (raspberries or strawberries are wonderful)
- A dusting of extra cocoa powder or chocolate shavings
Preparing Your Workspace and Pie Crust
- Preheat Your Oven: My very first step, even before I touch the ingredients, is to preheat my oven to 350°F (175°C). It’s so important that the oven is at the correct temperature when the pie goes in, as this helps with even baking and prevents a soggy bottom. Make sure your oven rack is in the middle position.
- Prepare the Pie Crust: If you’re using a store-bought pie crust, carefully unroll it and fit it into a standard 9-inch pie plate. Gently press it into the bottom and up the sides of the plate, ensuring there are no air bubbles underneath. Trim any excess crust around the edges, leaving about a 1/2-inch overhang. I like to crimp the edges decoratively with my fingers or a fork; this not only looks lovely but also helps prevent the crust from shrinking too much during baking. Do not pre-bake the crust for this recipe, as the filling bakes long enough to cook the crust beautifully. If you’re making your own homemade crust, prepare it according to your recipe and fit it into the pie plate. Place the prepared pie crust aside while you prepare the glorious Chocolate Chess Pie filling.
- Gather Your Ingredients: Take a moment to ensure all your ingredients, especially the butter and eggs, are at room temperature. This is a small but mighty detail that truly makes a difference in the final texture of your Chocolate Chess Pie. Room temperature ingredients emulsify better, creating a smoother, more uniform filling. I usually take them out of the fridge about 30-60 minutes before I plan to start baking.
Crafting the Rich Chocolate Chess Pie Filling
- Cream the Butter and Sugar: In a large mixing bowl, using an electric hand mixer or a stand mixer fitted with the paddle attachment, cream together the softened unsalted butter and the granulated sugar. Begin on low speed to incorporate, then increase to medium speed and beat for about 3 to 5 minutes. You’re looking for a mixture that is light in color, fluffy, and visibly aerated. This creaming process is crucial for achieving that signature smooth texture and contributes significantly to the delightful crackly top that is characteristic of a perfect Chocolate Chess Pie. Don’t rush this step!
- Incorporate the Cocoa Powder: Once the butter and sugar are beautifully creamed, it’s time to add the unsweetened cocoa powder. I like to sift my cocoa powder directly over the butter-sugar mixture to prevent any lumps, especially if it’s been sitting in the pantry for a while. Mix on low speed until the cocoa powder is fully incorporated and the mixture is a uniform rich brown color. Scrape down the sides of the bowl with a rubber spatula to ensure everything is well combined.
- Add the Eggs, One at a Time: Now, add the large eggs to the mixture, one at a time. After adding the first egg, beat on medium speed until it is completely incorporated into the batter. This usually takes about 30 seconds to a minute. Then, add the second egg and repeat the process. Mixing the eggs in one by one helps to create a stable emulsion, leading to a smoother, more cohesive filling for your Chocolate Chess Pie. Don’t forget to scrape down the sides of the bowl again after adding each egg to catch any stray bits. The mixture might look a little curdled at this point, but don’t worry, it will come together beautifully.
-
Stir in the Dry Ingredients: In a small separate bowl, whisk together the all-purpose flour and salt. Then, add this dry mixture to your chocolate batter. Mix on low speed just until combined.
Be careful not to overmix at this stage!
Overmixing the flour can develop the gluten too much, which can result in a tougher, less tender pie. We want a delicate, melt-in-your-mouth texture for our Chocolate Chess Pie. As soon as you no longer see streaks of dry flour, stop mixing.
- Whisk in the Liquids and Vinegar: Finally, add the pure vanilla extract, the evaporated milk (or whole milk), and that wonderful secret ingredient: white vinegar. The vinegar might seem unusual, but trust me, it’s a game-changer! It reacts with the baking soda present in some cocoa powders (or simply provides a subtle tang that balances the sweetness beautifully) and contributes to the custardy texture and helps achieve that classic shiny, crackly top. Mix on low speed until all the liquid ingredients are thoroughly incorporated. The mixture should now be smooth, glossy, and pourable, with a consistency that reminds me of a thick chocolate sauce.
Baking Your Perfect Chocolate Chess Pie
- Pour the Filling into the Crust: Carefully pour the luscious chocolate filling directly into your prepared, unbaked 9-inch pie crust. You want to fill it almost to the very top, but leave a tiny bit of space to prevent spillage during baking. You’ll notice the filling has a lovely sheen to it – that’s a good sign!
-
Bake to Perfection: Gently transfer the pie plate to your preheated 350°F (175°C) oven. Bake for approximately 45 to 55 minutes. Baking times can vary depending on your oven, so keep a close eye on it.
- Watch the Crust: Around the 25-30 minute mark, check the edges of your pie crust. If they are browning too quickly, loosely tent the edges with aluminum foil. This prevents them from becoming burnt while the center of the pie finishes cooking. I find this often happens, so a little foil hat for the crust is a common occurrence in my kitchen!
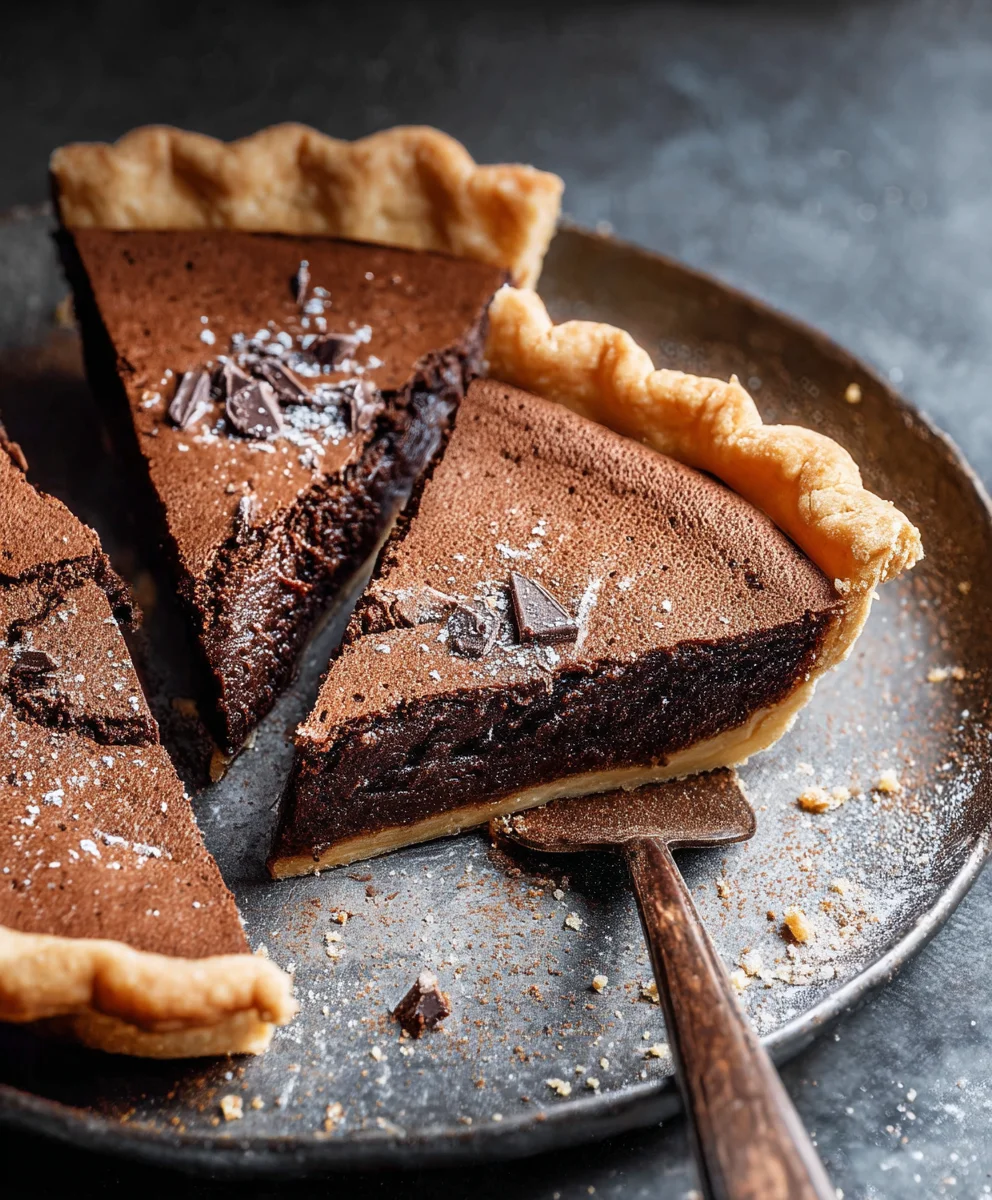
- Check for Doneness: The Chocolate Chess Pie is ready when the edges are set and appear puffed, but the center still has a slight, delicate wobble to it when you gently shake the pie plate. It shouldn’t be liquidy, but a slight jiggle is perfect. If you insert a wooden skewer or toothpick about an inch from the edge, it should come out clean. If you insert it into the very center, it might still have a few moist crumbs, which is completely fine for a custardy pie like this. The top will likely have formed a beautiful, shiny, crackly crust – a hallmark of a classic Chocolate Chess Pie!
- Avoid Overbaking: Be careful not to overbake, as this can lead to a dry, crumbly texture rather than the rich, custardy one we’re aiming for.
Cooling, Serving, and Storing Your Chocolate Chess Pie
- Cool Completely: Once your Chocolate Chess Pie is perfectly baked, carefully remove it from the oven and place it on a wire rack to cool completely. This is perhaps the hardest step for me because the aroma is absolutely intoxicating, and I just want to dig in! However, it is absolutely crucial that the pie cools entirely before slicing and serving. This process allows the custard to set fully, achieving that perfect dense, yet tender and creamy texture. Rushing this step will result in a messy, unset slice. This can take anywhere from 2 to 4 hours at room temperature. I usually let it sit for at least 3 hours, or even longer if my kitchen is warm.
-
Slice and Serve: Once cooled, your beautiful Chocolate Chess Pie is ready to be sliced! Use a sharp knife for clean cuts. I love serving this pie slightly chilled or at room temperature.
- Garnishing Suggestions: For an extra special touch, I highly recommend serving each slice with a generous dollop of freshly made sweetened whipped cream. The cool, airy cream provides a delightful contrast to the rich, fudgy pie. A few fresh raspberries or strawberries scattered on the plate also add a wonderful pop of color and a hint of tartness that beautifully complements the chocolate. A light dusting of cocoa powder or a few chocolate shavings on top of the whipped cream can make it look incredibly elegant and professional.
- Storage: If you have any glorious leftovers (which is rare in my house!), cover the Chocolate Chess Pie loosely with plastic wrap or aluminum foil and store it in the refrigerator. It will keep well for 3 to 4 days. While I personally think it’s best enjoyed within the first day or two, it still tastes fantastic later in the week. Sometimes I even find the flavors deepen overnight, making it an excellent candidate for making ahead for a special gathering!
Enjoying Your Homemade Chocolate Chess Pie
I truly hope you enjoy making and, most importantly, devouring this classic Chocolate Chess Pie as much as my family and I do. It’s a timeless dessert that brings so much comfort and joy, with its irresistibly rich, fudgy filling and perfectly crisp crust. It’s simple to make but delivers a profound chocolate experience that will leave everyone asking for more. Happy baking!
Conclusion:
If there’s one recipe I genuinely hope you welcome into your culinary repertoire, it’s this one. I truly believe that after just one bite, you’ll understand why I champion this particular dessert with such enthusiasm. We’ve explored the simple steps to create what I consider to be an absolute masterpiece of comfort food, and now it’s time for the final words of encouragement. This isn’t just another pie; it’s an experience, a journey back to the flavors of cherished memories, and an opportunity to create new ones.
What makes this recipe a non-negotiable must-try? It’s the unparalleled combination of its rich, intense chocolate flavor and that signature, almost custardy yet gooey texture that defines a perfect chess pie. Unlike many desserts that demand meticulous technique or a laundry list of obscure ingredients, this recipe offers profound satisfaction with surprising simplicity. I often find myself amazed at how something so decadently delicious can be so straightforward to prepare, making it an ideal choice for both seasoned bakers and those just beginning their journey in the kitchen. The crisp, flaky crust provides the perfect counterpoint to the fudgy, molten interior, creating a textural harmony that is simply divine. It’s the kind of dessert that elicits gasps of delight and requests for second helpings, a true showstopper without any unnecessary fuss. This Chocolate Chess Pie isn’t just a dessert; it’s a statement.
Elevate Your Chocolate Chess Pie Experience: Serving Suggestions
Now, let’s talk about how to truly make this dessert shine on your table. While a slice of this pie is utterly perfect on its own, a few simple additions can transform it into an even more luxurious treat. I highly recommend serving it slightly warm, allowing the chocolate to be wonderfully gooey. A generous dollop of freshly whipped cream, perhaps lightly sweetened with a hint of vanilla or even a dash of espresso powder, is a classic pairing that never disappoints. The cool, airy cream provides a delightful contrast to the pie’s warmth and richness. For those who adore contrasting temperatures and textures, a scoop of premium vanilla bean ice cream melting gently over the warm pie is pure bliss. Alternatively, a sprinkle of flaky sea salt can surprisingly enhance the chocolate’s depth, offering a sophisticated edge. And don’t shy away from fresh berries! Raspberries, strawberries, or even a mix of tart red fruits can cut through the richness beautifully, adding a burst of freshness and a vibrant splash of color. Imagine a warm slice, a cloud of cream, and a scattering of glistening raspberries – it’s a feast for the eyes and the palate.
Personalize Your Pie: Creative Variations
One of the joys of baking is the opportunity to personalize a recipe, and this Chocolate Chess Pie is incredibly versatile. Don’t hesitate to make it your own! For a hint of spice, you could add a pinch of cayenne pepper to the chocolate filling, creating a subtle, warming heat that deepens the chocolate notes – a Mexican chocolate twist. A dash of almond extract or even a tiny amount of high-quality peppermint extract can introduce an exciting new flavor dimension. If you’re feeling adventurous, consider a swirl of caramel or a scattering of toasted pecans over the top before baking for added texture and flavor. For smaller gatherings or individual servings, this recipe adapts beautifully to mini pie tins or even ramekins, creating adorable and perfectly portioned treats. For those with dietary considerations, a gluten-free pie crust works wonderfully with this rich filling, ensuring everyone can enjoy a slice of heaven. The possibilities are truly endless, limited only by your imagination.
I genuinely hope you feel inspired to roll up your sleeves and give this incredible recipe a try. It’s more than just following instructions; it’s about the joy of creation, the aroma that fills your kitchen, and the sheer delight of sharing something homemade and truly special with those you love. This Chocolate Chess Pie is a testament to the fact that sometimes, the simplest pleasures are the most profound. So, gather your ingredients, set aside some time, and prepare to be utterly charmed by its irresistible appeal.
Once you’ve experienced the magic of this pie, I would absolutely love to hear about it! Did you try any of the suggested variations? What was your favorite accompaniment? Please, don’t hesitate to share your baking adventures and your thoughts in the comments section. Your experiences and tips are invaluable, and they help build a wonderful community of enthusiastic home bakers. I can’t wait to see your creations!
Classic Chocolate Chess Pie
A classic Southern comfort dessert, this Chocolate Chess Pie delivers a rich, fudgy, and intensely chocolatey experience, topped with a signature crackled crust. Simple to prepare, it promises a profound chocolate indulgence that satisfies any sweet tooth.
Ingredients
-
200g (1 ⅔ cups) all-purpose flour (for crust)
-
½ teaspoon kosher salt (for crust)
-
140g (10 tbsp) unsalted butter, cold and cubed (for crust)
-
24g (2 tbsp) water (non-alcoholic alternative, for crust)
-
1 cup ice water (for crust)
-
113g (8 tbsp) unsalted butter, softened (for filling)
-
56g (2 oz) bittersweet chocolate, melted (for filling)
-
21g (¼ cup) Dutch process cocoa powder (for filling)
-
1 teaspoon espresso powder (for filling)
-
½ teaspoon salt (for filling)
-
113g (½ cup) whole milk (for filling)
-
200g (1 cup) granulated sugar (for filling)
-
106g (½ cup) dark brown sugar (for filling)
-
25g (3 tbsp) cornmeal (for filling)
-
4 large eggs, room temperature (for filling)
-
Sweetened whipped cream (optional, for serving)
-
Fresh berries (optional, for serving)
-
Cocoa powder or chocolate shavings (optional, for serving)
Instructions
-
Step 1
Combine 200g flour and ½ tsp kosher salt. Cut in 140g cold butter until pea-sized. Gradually add 24g water and then ice water as needed, mixing until dough forms. Form into a disc, chill 30 min. Roll and fit into a 9-inch pie plate. Crimp edges; do not pre-bake. -
Step 2
Preheat oven to 350°F (175°C). Ensure filling butter and eggs are at room temperature. Melt bittersweet chocolate and let cool slightly. -
Step 3
In a large bowl, cream 113g softened butter, 200g granulated sugar, and 106g dark brown sugar for 3-5 minutes until light and fluffy. Scrape down bowl. -
Step 4
Add melted bittersweet chocolate, 21g Dutch process cocoa, and 1 tsp espresso powder to the butter-sugar mixture. Mix on low until combined. Scrape bowl. -
Step 5
Add 4 eggs, one at a time, beating well after each until fully incorporated. Scrape bowl after each. -
Step 6
Whisk 25g cornmeal and ½ tsp salt together. Add this to the chocolate batter. Mix on low speed just until combined; do not overmix. -
Step 7
Add 113g whole milk to the mixture. Mix on low speed until smooth and thoroughly incorporated. The filling should be glossy and pourable. -
Step 8
Pour filling into the prepared pie crust. Bake in preheated oven for 45-55 minutes. If crust edges brown too quickly, tent loosely with foil. Pie is done when edges are set and center has a slight wobble. Avoid overbaking. -
Step 9
Remove from oven and cool completely on a wire rack for 2-4 hours. This allows the custard to set. Do not slice until fully cooled. -
Step 10
Once cooled, slice and serve. Garnish with optional sweetened whipped cream, fresh berries, or chocolate shavings. Store leftovers, covered, in the refrigerator for 3-4 days.
Important Information
Nutrition Facts (Per Serving)
It is important to consider this information as approximate and not to use it as definitive health advice.
Allergy Information
Please check ingredients for potential allergens and consult a health professional if in doubt.


Leave a Comment