
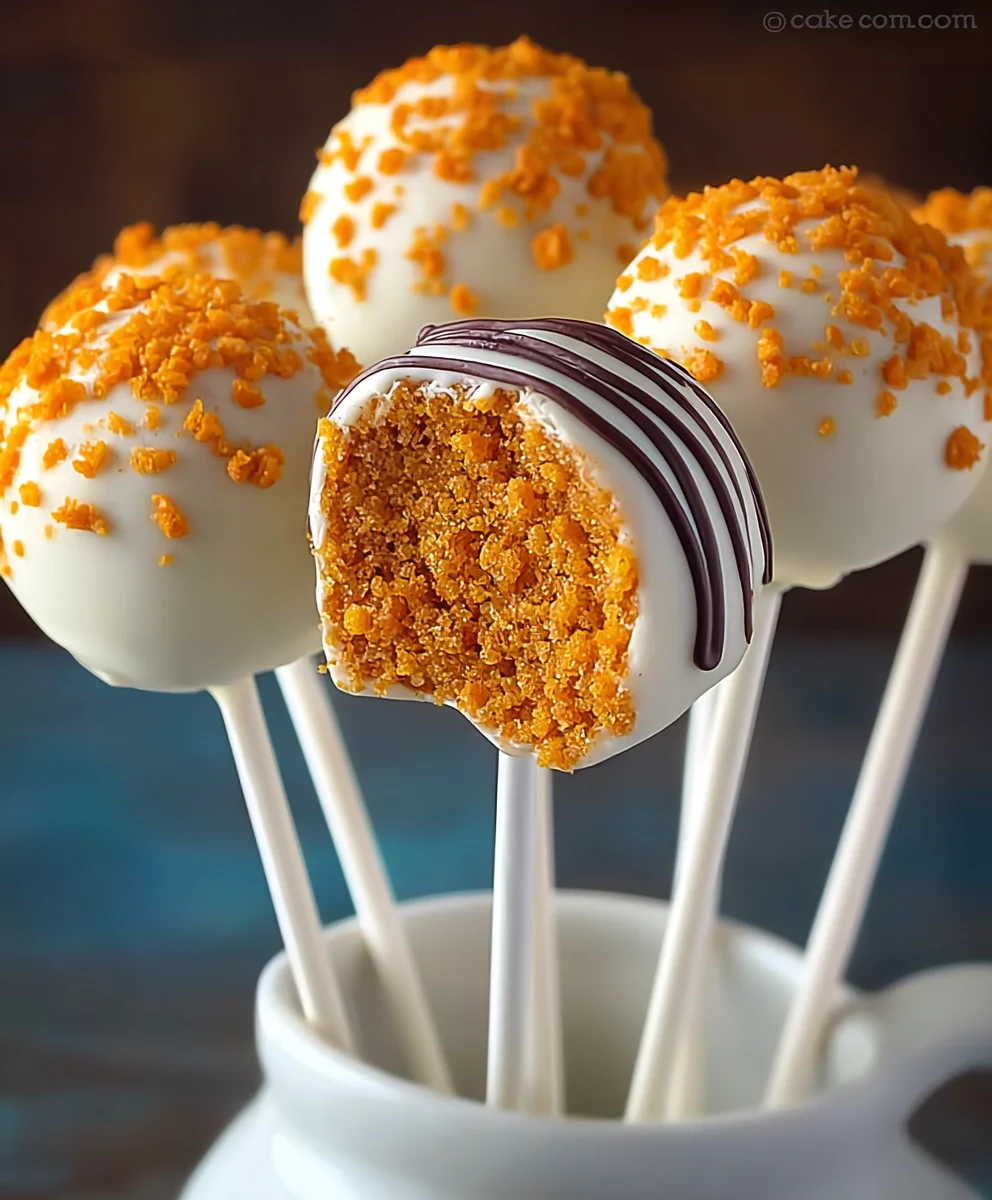
Pumpkin Cake Pops are more than just a sweet treat; they’re tiny bursts of autumnal joy, perfectly designed to capture the cozy spirit of fall in every bite. Imagine a delightful miniature confection, a handheld celebration of everything we adore about the season. Why do we go so wild for these charming spheres? It’s the irresistible combination of moist, flavorful cake, often infused with warm spices like cinnamon, nutmeg, and clove, enrobed in a smooth, sweet coating that snaps with every bite. These aren’t your average cake pops; the essence of pumpkin elevates them, offering a subtle sweetness and earthy depth that’s truly unique. They’re incredibly versatile, making them ideal for Halloween parties, Thanksgiving gatherings, or simply as a delightful afternoon pick-me-up. The sheer visual appeal, coupled with the comforting flavors of pumpkin and spice, makes these Pumpkin Cake Pops an absolute must-try for any fall enthusiast.
Ingredients:
- 1 box pumpkin cake mix (prepared according to package instructions)
- 1 cup cream cheese frosting
- 12 oz orange candy melts
- 1 bag of lollipop sticks
- Green sprinkles or candy for decoration
Preparing the Cake Base
The foundation of our delightful Pumpkin Cake Pops begins with the cake itself. You’ll need to prepare the pumpkin cake mix exactly as the box instructs. This typically involves adding ingredients like eggs, oil, and water, and then baking it. Once baked, it’s crucial to let the cake cool completely. This isn’t just about preventing burns; a fully cooled cake crumbles more easily and holds its shape better when we start forming the pops. Some recipes suggest refrigerating the cake for a short period to achieve an even firmer texture, which can make the crumbling process neater.
After the cake has cooled, we’re going to break it down. The goal here is to get a consistency that resembles breadcrumbs or coarse sand. You can achieve this by hand-crumbling the cake, or for a more uniform texture, you can pulse it in a food processor. Be careful not to over-process it into a paste. We want distinct cake pieces that will bind together.
Now comes the magic ingredient for binding: the cream cheese frosting. Add the 1 cup of cream cheese frosting to the crumbled pumpkin cake. Gently mix them together until the frosting is evenly distributed throughout the cake crumbs. The mixture should be moist enough to hold its shape when squeezed, but not overly wet or sticky. If the mixture feels a bit dry, you can add another tablespoon of frosting at a time until you reach the desired consistency. This is the point where your cake pop dough is ready to be formed.
Shaping and Chilling the Cake Pops
With your cake and frosting mixture ready, it’s time to shape those little spheres. Take about a tablespoon of the mixture at a time and roll it between your palms to form a compact ball, roughly the size of a walnut. Try to make them as uniform in size as possible so they all bake evenly in the candy melts later. Place the formed cake balls onto a baking sheet lined with parchment paper. This prevents them from sticking. You’ll want to make sure they aren’t touching each other on the tray.
Once all your cake balls are formed and on the baking sheet, it’s essential to chill them. Place the entire baking sheet into the refrigerator for at least 15 to 20 minutes. Chilling the cake balls helps them firm up considerably, making them much easier to dip into the melted candy without losing their shape or falling apart. This step is key to achieving smooth, professional-looking cake pops.
Melting and Dipping the Candy Melts
While your cake balls are chilling, prepare your orange candy melts. You’ll need a microwave-safe bowl for this. Place the 12 oz of orange candy melts into the bowl. Microwave them in 30-second intervals, stirring well after each interval. It’s important to stir thoroughly each time, as the residual heat will continue to melt the chips. Continue this process until the candy melts are completely smooth and fluid. Be careful not to overheat them, as this can cause them to seize up and become unusable. Alternatively, you can melt the candy melts using a double boiler. Once melted and smooth, set aside.
You’ll also want to prepare a separate baking sheet lined with parchment paper for the dipped cake pops. Have your lollipop sticks ready. Take the chilled cake balls out of the refrigerator. Dip the tip of a lollipop stick into the melted orange candy melts, and then insert it about halfway into a cake ball. This little bit of melted candy acts as “glue” to help secure the stick. Immediately place the stick-inserted cake ball back onto the parchment-lined baking sheet. Repeat this for all your cake balls. Letting them sit for a minute or two allows the initial bit of candy to set, further securing the sticks.
Now, it’s time for the main dipping event. Re-melt your candy melts if they have started to thicken. Holding a cake ball by its lollipop stick, carefully dip the entire ball into the melted orange candy. Rotate the ball gently to ensure it’s fully coated. For an even coating, you can gently tap the stick against the rim of the bowl to let any excess candy drip off. This helps prevent thick, uneven drips. You want a smooth, even coating of orange candy. Place the dipped cake pop back onto the parchment-lined baking sheet. Repeat this process for all the cake pops, working relatively quickly so the candy doesn’t start to set before you dip.
Decorating Your Pumpkin Cake Pops
Once all the cake pops have been dipped in the orange candy melts and are set on the parchment paper, it’s time for the fun part: decoration! You’ll want to do this while the outer candy coating is still slightly tacky, but not fully hardened. This allows the decorations to adhere properly.
Take your green sprinkles or candy pieces. You can use them to create the appearance of pumpkin stems or leaves. For stems, you can carefully sprinkle a few green sprinkles near the top of the cake pop, just below the stick, and gently press them in. If you have larger green candy pieces, you might be able to shape them into little leaves and stick them on. Be creative and have fun with it! You can also use a toothpick dipped in a tiny bit of melted candy to draw little lines or details on the pumpkin cake pops for added texture or a jack-o’-lantern effect, although the green sprinkles for stems are the primary intended decoration.
Allow the decorated Pumpkin Cake Pops to set completely. This usually takes about 15-20 minutes at room temperature, or you can speed up the process by placing them back in the refrigerator for about 10 minutes. Ensure the candy coating is fully hardened before handling them further or packaging them. You can store them in an airtight container at room temperature for a few days, or in the refrigerator if your environment is particularly warm.

Conclusion:
And there you have it – your delicious journey into making these irresistible Pumpkin Cake Pops is complete! We’ve walked through each step, from preparing the moist cake base to crafting those perfectly coated spheres of autumnal delight. These treats are more than just desserts; they’re little bites of fall cheer, perfect for any occasion. Whether you’re hosting a Halloween party, a Thanksgiving gathering, or simply craving a sweet, seasonal treat, these cake pops are guaranteed to impress.
For serving, consider arranging them on a festive platter or in decorative cupcake liners. They also make fantastic edible party favors! Don’t be afraid to get creative with the coating and decorations; sprinkles, drizzles of contrasting chocolate, or even edible glitter can elevate your Pumpkin Cake Pops to the next level. If you’re feeling adventurous, try adding a pinch of nutmeg to the cake batter for an extra warm spice note, or experiment with different frosting flavors for the coating.
I truly hope you enjoy making and sharing these delightful Pumpkin Cake Pops as much as I do. They are a wonderfully rewarding baking project that brings smiles to faces of all ages. So gather your ingredients, put on your favorite fall playlist, and let the magic begin!
Frequently Asked Questions:
Can I make these Pumpkin Cake Pops ahead of time?
Absolutely! Pumpkin Cake Pops can be made up to 2-3 days in advance. Store them in an airtight container at room temperature, ideally in a single layer to prevent sticking. If you live in a very warm climate, refrigerating them might be a good idea, but allow them to come to room temperature before serving for the best texture.
What other flavors can I use instead of pumpkin?
While pumpkin is a classic, you can definitely adapt this recipe! Consider a spice cake base or even a vanilla cake mixed with apple sauce for a different seasonal twist. Just ensure your cake base is firm enough to be formed into balls after baking.
Delicious Pumpkin Cake Pops-Easy Fall Treat
Easy and delicious pumpkin cake pops perfect for a fall treat, decorated to look like mini pumpkins.
Ingredients
-
1 box pumpkin cake mix (prepared according to package instructions)
-
1 cup cream cheese frosting
-
12 oz orange candy melts
-
1 bag of lollipop sticks
-
Green sprinkles or candy for decoration
Instructions
-
Step 1
Prepare the pumpkin cake mix according to package directions and let it cool completely. Crumble the cooled cake into fine crumbs, resembling breadcrumbs or coarse sand. Mix in the cream cheese frosting until a moist dough forms that holds its shape. -
Step 2
Roll the dough into uniform balls, about the size of a walnut, and place them on a parchment-lined baking sheet. Chill the cake balls in the refrigerator for at least 15-20 minutes until firm. -
Step 3
Melt the orange candy melts in a microwave-safe bowl in 30-second intervals, stirring until smooth. Be careful not to overheat. Prepare a clean baking sheet lined with parchment paper. -
Step 4
Dip the tip of a lollipop stick into the melted candy melts and insert it about halfway into a chilled cake ball. Place the stick-inserted cake ball back on the baking sheet. Repeat for all cake balls. -
Step 5
Holding each cake ball by the stick, dip it into the melted orange candy, ensuring it’s fully coated. Let excess candy drip off and place the dipped cake pop back on the parchment-lined sheet. -
Step 6
While the candy coating is still slightly tacky, decorate the cake pops with green sprinkles or candy to create stems or leaves. Allow the cake pops to set completely at room temperature or in the refrigerator.
Important Information
Nutrition Facts (Per Serving)
It is important to consider this information as approximate and not to use it as definitive health advice.
Allergy Information
Please check ingredients for potential allergens and consult a health professional if in doubt.

Leave a Comment