
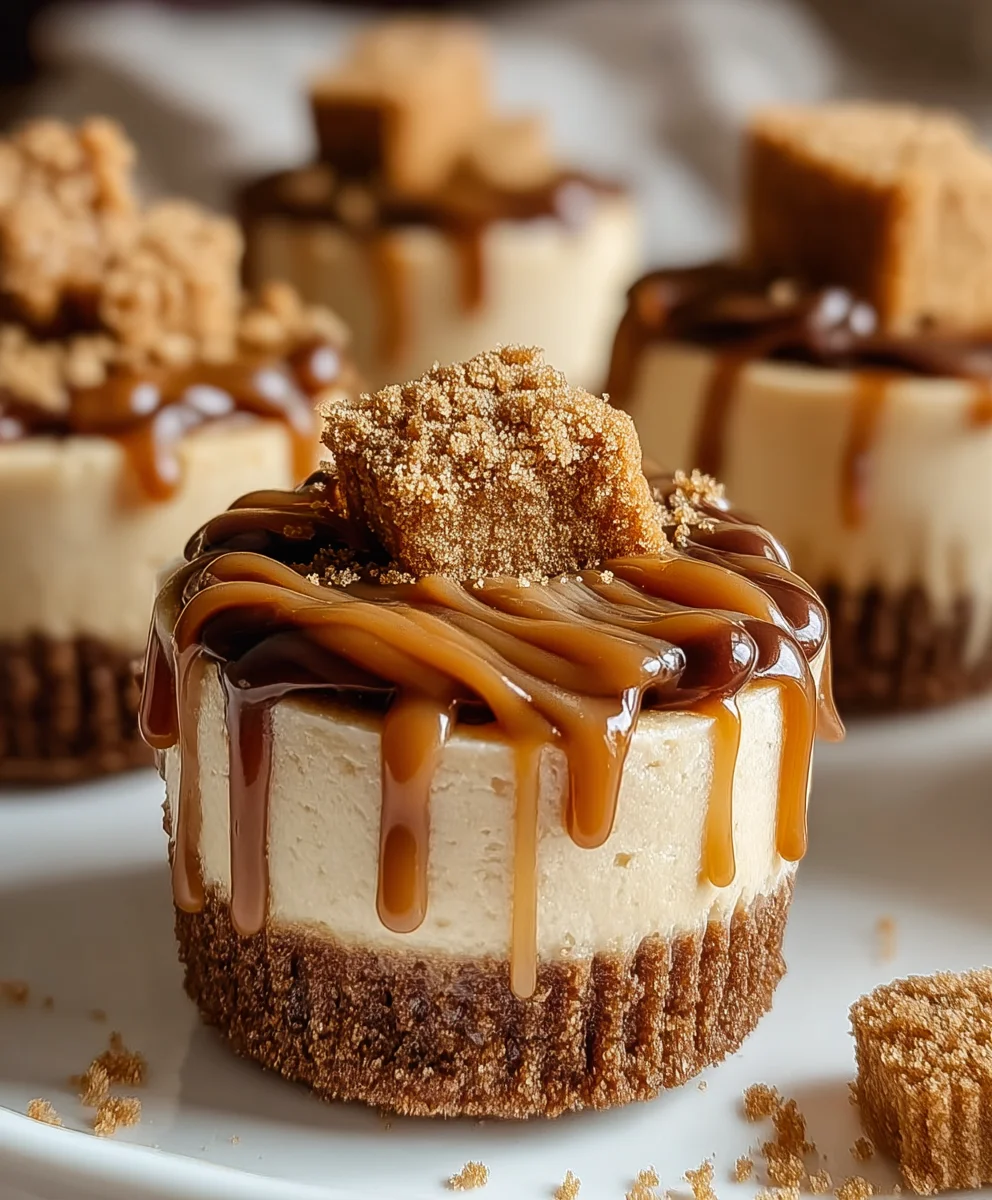
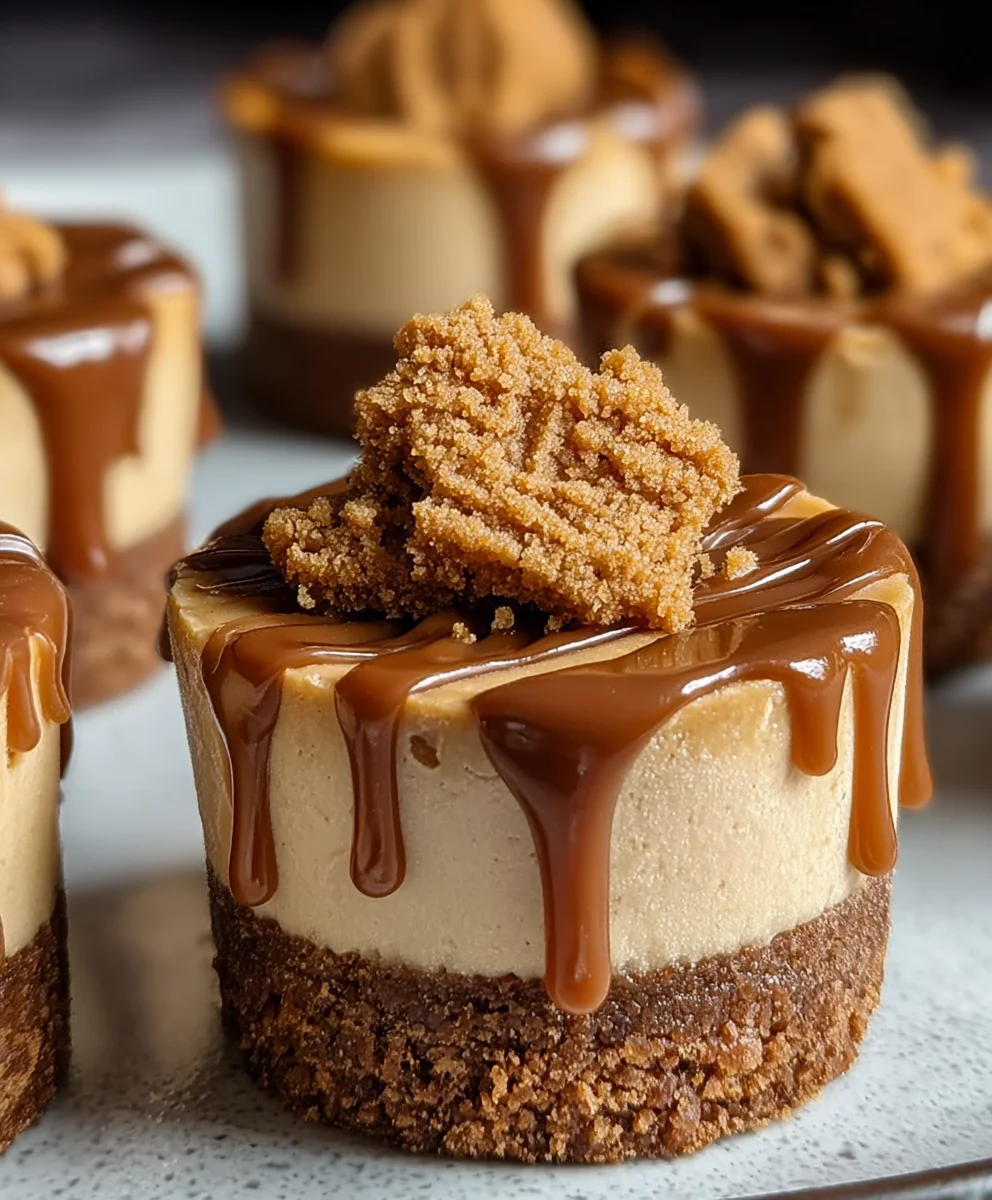
Biscoff Mini Cheesecakes are a true revelation, a delightful fusion that promises to transport your taste buds to dessert heaven. I’ve always been captivated by the unique, caramelized crunch of Biscoff cookies, a European classic that beautifully complements a warm cup of coffee. These humble speculoos cookies, with their distinct spiced flavor, have garnered a global following, evolving from a simple biscuit to an irresistible spread and now, a star ingredient in countless confections. The charm of Biscoff, originating from Belgium, lies in its subtly spiced profile, reminiscent of gingerbread but with its own distinct charm, traditionally served as a companion to coffee (hence “Lotus Biscoff” – Biscuit for Coffee).
Why You’ll Adore These Mini Cheesecakes
What makes these particular mini cheesecakes so universally beloved? It’s the impeccable balance of the smooth, creamy, and subtly tangy cheesecake filling set against a crunchy Biscoff cookie crust, all crowned with a generous swirl of Biscoff spread. Every bite is an exquisite dance of textures and flavors – the comforting spice notes of the cookie butter mingling perfectly with the rich dairy. Furthermore, the individual portions make these Biscoff Mini Cheesecakes incredibly convenient for entertaining, potlucks, or simply treating yourself without any fuss. Get ready to experience pure dessert joy!
Ingredients:
- For the Biscoff Cookie Crust:
- 1 ½ cups (approximately 170g) Lotus Biscoff cookies, finely crushed
- 5 tablespoons (70g) unsalted butter, melted
- For the Velvety Cheesecake Filling:
- 24 ounces (680g) cream cheese, full-fat, softened to room temperature (three 8-ounce blocks)
- ¾ cup (150g) granulated sugar
- 2 large eggs, room temperature
- ½ cup (120g) sour cream, full-fat, room temperature
- 1 teaspoon pure vanilla extract
- ½ cup (120g) Lotus Biscoff spread, melted and slightly cooled
- For the Optional Biscoff Topping and Garnish:
- ½ cup (120g) Lotus Biscoff spread, melted for drizzling
- 6-8 additional Lotus Biscoff cookies, crushed for garnish
Preparing the Biscoff Cookie Crust for Your Mini Cheesecakes
-
Preheat and Prepare: My first step, and a crucial one, is to prepare my oven and baking pan. I like to preheat my oven to 325°F (160°C). While the oven warms up, I meticulously line a standard 12-cup muffin tin with paper liners. For these delicious Biscoff Mini Cheesecakes, I often find that tulip-style liners or foil liners work exceptionally well as they are sturdier and make it easier to remove the finished cheesecakes without damaging their delicate structure. It’s all about setting yourself up for success!
-
Crush the Biscoff Cookies: Now for the star of our crust! I take 1 ½ cups of Lotus Biscoff cookies and crush them into a fine crumb. My go-to method is to place them in a food processor and pulse until they resemble fine sand. If you don’t have a food processor, don’t worry! You can place the cookies in a large Ziploc bag, seal it, and then use a rolling pin or the bottom of a heavy pan to crush them. The finer the crumbs, the more cohesive your crust will be, which is vital for holding these mini treats together.
-
Combine with Butter: Once the Biscoff crumbs are perfectly fine, I transfer them to a medium-sized bowl. Then, I pour in the 5 tablespoons of melted unsalted butter. I use a fork or my fingertips to mix the crumbs and butter together until every single crumb is moistened. The mixture should resemble wet sand and hold together when you press it between your fingers. This butter acts as the binding agent, ensuring our crust is firm and flavorful.
-
Form the Crust Bases: I then take about 1 heaping tablespoon of the Biscoff crumb mixture and press it firmly into the bottom of each prepared muffin liner. To ensure an even and compact crust, I often use the flat bottom of a small glass or a tart tamper to really press the mixture down. This creates a sturdy foundation for our Biscoff Mini Cheesecakes. A well-compacted crust prevents crumbling later on and provides a delightful texture contrast to the creamy filling.
-
A Quick Pre-Bake (Optional but Recommended): For a slightly crispier and more set crust, I like to pop the muffin tin into the preheated oven for about 5 minutes. This brief pre-bake helps to dry out the crust a little and prevents it from becoming soggy once the filling is added. After 5 minutes, I remove the tin from the oven and let the crusts cool slightly while I prepare the cheesecake filling. This little extra step truly makes a difference in the final texture of the base of our mini cheesecakes.
Crafting the Velvety Biscoff Cheesecake Filling
-
Soften the Cream Cheese: This is arguably one of the most important steps for a lump-free, silky smooth cheesecake filling. I make sure my three 8-ounce blocks of full-fat cream cheese are completely softened to room temperature. This usually takes about an hour or two on the counter. If you’re short on time, you can unwrap them and microwave them for about 15-20 seconds, being careful not to melt them. Room temperature cream cheese is essential because it creams smoothly, without lumps, and incorporates air evenly, leading to a much better texture in your finished Biscoff Mini Cheesecakes.
-
Beat the Cream Cheese: In a large mixing bowl, using an electric mixer (either a stand mixer with the paddle attachment or a hand mixer), I beat the softened cream cheese on medium speed for about 2-3 minutes. My goal here is to achieve a wonderfully smooth, airy, and lump-free consistency. I make sure to stop and scrape down the sides and bottom of the bowl frequently with a rubber spatula to ensure everything is evenly incorporated. This initial beating is key for preventing a dense cheesecake.
-
Add the Sugar: Next, I gradually add the ¾ cup of granulated sugar to the cream cheese, beating on low to medium speed until it’s just combined and no longer gritty. This usually takes another 1-2 minutes. Again, I’m careful not to overmix at this stage, but I do want to ensure the sugar is fully dissolved into the cream cheese mixture, contributing to that signature sweet and tangy flavor of our Biscoff Mini Cheesecakes.
-
Incorporate the Eggs, One by One: Here’s another critical step for preventing cracks in your cheesecakes. I add the two large room-temperature eggs one at a time, beating just until each egg is fully incorporated before adding the next. My rule of thumb is to beat on low speed for only about 30 seconds per egg. Do not overmix once the eggs are added! Overmixing incorporates too much air, which expands during baking and then collapses as the cheesecake cools, leading to unsightly cracks. We want these Biscoff Mini Cheesecakes to be as beautiful as they are delicious.
-
Stir in Sour Cream and Vanilla: After the eggs are incorporated, I gently mix in the ½ cup of room temperature full-fat sour cream and the 1 teaspoon of pure vanilla extract. I beat on the lowest speed possible, just until they are combined, which usually takes less than a minute. Sour cream adds a lovely tang, moisture, and a wonderfully smooth, creamy texture to the cheesecake, while vanilla enhances all the other flavors.
-
Fold in Melted Biscoff Spread: Now for the star flavor! I gently melt ½ cup of Lotus Biscoff spread. You can do this in the microwave in 30-second intervals, stirring in between, or in a small saucepan over low heat until it’s pourable and smooth. Let it cool slightly, just until it’s warm but not hot, before adding it to the cheesecake mixture. I pour the melted Biscoff spread into the cheesecake batter and, using a rubber spatula, gently fold it in until just combined. I aim for swirls of Biscoff, or a fully incorporated light brown mixture, depending on my mood! The key is to fold, not beat, to avoid overmixing and incorporate too much air. This infusion of Biscoff spread is what truly makes these Biscoff Mini Cheesecakes irresistible and gives them their unique, comforting spiced cookie flavor.
Baking Your Perfect Biscoff Mini Cheesecakes
-
Fill the Muffin Liners: With our luscious Biscoff cheesecake filling ready, I carefully spoon or scoop it into the prepared muffin liners, filling each cup about ¾ full. This typically amounts to about 2-3 tablespoons of filling per cup. I make sure not to overfill, as the cheesecakes will puff up slightly during baking. For precision and less mess, I often use a cookie scoop or a measuring cup with a spout. Ensuring even filling leads to uniformly sized Biscoff Mini Cheesecakes, which is always a treat for the eyes.
-
Prepare for Baking: Some bakers like to place a shallow pan of hot water on the bottom rack of the oven to create a humid environment, which helps prevent cracks. While not strictly necessary for mini cheesecakes as it is for a large one, it certainly doesn’t hurt! I then carefully place the muffin tin, with our filled liners, into the preheated 325°F (160°C) oven.
-
Bake to Perfection: I bake the Biscoff Mini Cheesecakes for approximately 18-22 minutes. Baking time can vary slightly depending on your oven, so I always keep a close eye on them. You’ll know they’re done when the edges appear set, but the centers still have a slight jiggle to them when you gently shake the pan. They will continue to set as they cool. Overbaking is the main culprit for dry cheesecake and cracks, so I make sure to pull them out when they’re just right. The centers shouldn’t look wet, but definitely shouldn’t be fully firm yet either.
-
The Gentle Cooling Process: Once the cheesecakes are baked, I turn off the oven but leave the oven door slightly ajar (I often prop it open with a wooden spoon). I let the mini cheesecakes remain in the cooling oven for another 10-15 minutes. This gradual cooling process is incredibly important. It helps prevent drastic temperature changes that can cause the cheesecakes to crack or sink. This slow transition from hot to warm allows the delicate structure of our Biscoff Mini Cheesecakes to set without stress, ensuring a smooth, unblemished top.
Cooling and Chilling for Optimal Texture
-
Counter Cooling: After their gentle transition in the oven, I carefully remove the muffin tin from the oven. I then place the entire tin on a wire rack to cool completely at room temperature. This usually takes about 1 to 2 hours, depending on the ambient temperature of your kitchen. It’s important not to rush this step; rushing can lead to condensation if you move them to the fridge too quickly. The cheesecakes will continue to firm up as they cool down, but their ultimate texture is still awaiting the next step.
-
The All-Important Chill: Once the Biscoff Mini Cheesecakes are completely cool to the touch, I transfer the muffin tin to the refrigerator. I let them chill for a minimum of 4 hours, but ideally overnight. This extended chilling period is absolutely crucial. It allows the cheesecake filling to fully set, firming up to that classic dense, creamy texture we all love. It also melds all the delightful Biscoff flavors, making them even more pronounced and delicious. Don’t skip this step – a well-chilled cheesecake is infinitely better than a warm, unset one!
The Grand Finale: Topping and Serving Your Biscoff Mini Cheesecakes
-
Prepare the Biscoff Topping: Once the Biscoff Mini Cheesecakes are thoroughly chilled and firm, it’s time for the final touch! I take the remaining ½ cup of Lotus Biscoff spread and gently melt it until it’s smooth and pourable. Again, the microwave in short bursts or a small saucepan over low heat works perfectly. I make sure it’s warm but not hot, as a very hot topping could melt the cheesecake surface. You can either spoon a little over the top of each cheesecake or, for a more elegant presentation, transfer the melted Biscoff spread to a piping bag (or a Ziploc bag with a tiny corner snipped off) and drizzle it artfully over each mini cheesecake. This adds another layer of that irresistible Biscoff flavor and a beautiful sheen.
-
Garnish with Crushed Cookies: To complete the visual appeal and add another textural element, I like to crush 6-8 additional Lotus Biscoff cookies. These don’t need to be as fine as the crust crumbs; a slightly coarser texture works well for garnish. I then sprinkle these crushed cookies over the melted Biscoff topping on each mini cheesecake. This not only reinforces the Biscoff theme but also adds a delightful crunch that contrasts wonderfully with the smooth, creamy cheesecake and the soft topping.
-
Serve and Store: Carefully remove the Biscoff Mini Cheesecakes from their liners. They are now ready to be served and enjoyed! I find these are perfect for parties, gatherings, or just a special treat for yourself. If you have any leftovers (which is rare in my house!), they should be stored in an airtight container in the refrigerator for up to 3-4 days. Bringing them out about 15-20 minutes before serving can allow the flavors to bloom slightly, though they are equally delicious straight from the fridge. Enjoy every single bite of these delightful Biscoff Mini Cheesecakes!
Conclusion:
If there’s one recipe I truly believe you need to add to your baking repertoire, it’s this one. What we’ve created together is more than just a dessert; it’s a tiny, edible moment of pure joy, perfectly portioned and bursting with an unforgettable flavor profile that consistently receives rave reviews. The beautiful balance of the crunchy, spiced Biscoff crust, the velvety-smooth, tangy cream cheese filling, and that signature cookie butter swirl on top creates a symphony of textures and tastes that is nothing short of addictive. I genuinely feel these aren’t just any ordinary treats; these are the Biscoff Mini Cheesecakes you’ll want to make again and again, for every celebration and even for those quiet, indulgent moments by yourself. They embody convenience without compromising on that luxurious, homemade feel, making them an absolute winner in any dessert lineup.
One of the biggest advantages of these delightful individual servings is their sheer versatility when it comes to presentation and serving. Imagine them elegantly arranged on a dessert buffet for a special occasion, perhaps nestled in charming cupcake liners or small decorative paper cups. They are absolutely perfect for garden parties, baby showers, holiday gatherings, or even sophisticated dinner parties where you want to impress without the stress of slicing a large cheesecake. For a truly elevated experience, consider serving them alongside a steaming cup of freshly brewed coffee or a rich espresso; the coffee’s bitterness perfectly complements the sweet, spiced notes of the Biscoff. During warmer months, a scoop of vanilla bean ice cream or a dollop of fresh whipped cream on the side adds a delightful coolness, transforming them into an even more decadent summer treat. In the colder seasons, a drizzle of warm caramel sauce or a sprinkling of toasted pecans can add a cozy, comforting touch, making them feel perfectly at home amidst autumn leaves or winter snow.
But don’t stop there – the beauty of baking is in the experimentation! These Biscoff Mini Cheesecakes are incredibly adaptable, and I wholeheartedly encourage you to get creative and make them truly your own. Think about seasonal variations: in the spring, a few fresh raspberries or blueberries on top could add a bright, zesty contrast, while a sprinkle of lemon zest could elevate the cream cheese filling with a delightful tang. For a different flavor adventure, consider swapping out a portion of the Biscoff spread in the swirl with a high-quality salted caramel sauce for an incredible sweet and salty twist. You could even play with different cookie bases if Biscoff isn’t readily available, perhaps using graham cracker crumbs mixed with a touch of cinnamon, or even a chocolate wafer crust for a more intense, rich foundation. For those who love a bit of extra texture, a sprinkle of finely chopped Biscoff cookies on top just before serving adds an extra layer of crunch that is simply irresistible. Alternatively, a delicate dusting of cocoa powder or a small chocolate curl can make for an elegant visual finish, demonstrating your personal touch and flair.
So, please, don’t just admire this recipe from afar. Take the plunge! Gather your ingredients, put on some cheerful music, and immerse yourself in the delightful process of creating these heavenly Biscoff Mini Cheesecakes. I promise you, the aroma alone as they bake will fill your home with warmth and anticipation. The moment you take that first bite, you’ll understand exactly why I’m so passionate about them. Once you’ve made them, I would absolutely love to hear about your experience. Did you add your own unique twist? What did your friends and family think? Did they disappear faster than you expected? Please share your stories, your photos, and your triumphs – there’s nothing more rewarding than seeing our culinary community come alive through shared experiences. Happy baking, my friends, and prepare to fall in love with your new favorite dessert!
Delicious Biscoff Mini Cheesecakes
These Biscoff Mini Cheesecakes are a delightful fusion, offering a perfect balance of smooth, creamy, and subtly tangy cheesecake filling against a crunchy Biscoff cookie crust, crowned with a generous swirl of Biscoff spread. Every bite is an exquisite dance of textures and comforting spiced flavors.
Ingredients
-
1 ½ cups (170g) Lotus Biscoff cookies
-
5 tablespoons (70g) unsalted butter, melted
-
24 ounces (680g) cream cheese, softened
-
¾ cup (150g) granulated sugar
-
2 large eggs, room temperature
-
½ cup (120g) sour cream, room temperature
-
1 teaspoon pure vanilla extract
-
½ cup (120g) Lotus Biscoff spread, melted
-
½ cup (120g) Lotus Biscoff spread, for drizzling
-
6-8 additional Lotus Biscoff cookies, crushed
Instructions
-
Step 1
Preheat oven to 325°F (160°C). Line a standard 12-cup muffin tin with paper liners. -
Step 2
Crush 1 ½ cups Lotus Biscoff cookies into fine crumbs. Mix crumbs with 5 tablespoons melted unsalted butter until moistened. Press about 1 heaping tablespoon of crumb mixture firmly into the bottom of each prepared muffin liner. -
Step 3
For a crispier crust, bake for 5 minutes. Remove from oven and let cool slightly. -
Step 4
Ensure 24 ounces (three 8-ounce blocks) full-fat cream cheese is completely softened to room temperature. In a large mixing bowl, beat cream cheese on medium speed for 2-3 minutes until smooth and lump-free, scraping down the sides. Gradually add ¾ cup granulated sugar, beating for 1-2 minutes until just combined. -
Step 5
Add 2 large room-temperature eggs, one at a time, beating on low speed for about 30 seconds per egg until just incorporated. Do not overmix. Gently mix in ½ cup room temperature full-fat sour cream and 1 teaspoon pure vanilla extract until just combined. -
Step 6
Gently melt ½ cup Lotus Biscoff spread until smooth and pourable, then cool slightly. Pour the melted Biscoff spread into the cheesecake batter and gently fold it in with a rubber spatula until just combined, avoiding overmixing. -
Step 7
Carefully spoon the Biscoff cheesecake filling into the prepared muffin liners, filling each cup about ¾ full (approx. 2-3 tablespoons per cup). Bake for approximately 18-22 minutes. Cheesecakes are done when the edges appear set but the centers still have a slight jiggle. -
Step 8
Once baked, turn off the oven but leave the oven door slightly ajar. Let the mini cheesecakes remain in the cooling oven for 10-15 minutes. Then, remove the muffin tin to a wire rack and cool completely at room temperature (1-2 hours). -
Step 9
Once completely cool to the touch, transfer the muffin tin to the refrigerator and chill for a minimum of 4 hours, or ideally overnight, for the filling to fully set and flavors to meld. -
Step 10
Once thoroughly chilled and firm, gently melt the remaining ½ cup Lotus Biscoff spread until smooth and pourable. Drizzle it over the top of each mini cheesecake. Crush 6-8 additional Lotus Biscoff cookies and sprinkle them over the melted Biscoff topping for garnish. -
Step 11
Carefully remove the Biscoff Mini Cheesecakes from their liners and serve. Store any leftovers in an airtight container in the refrigerator for up to 3-4 days.
Important Information
Nutrition Facts (Per Serving)
It is important to consider this information as approximate and not to use it as definitive health advice.
Allergy Information
Please check ingredients for potential allergens and consult a health professional if in doubt.

Leave a Comment