
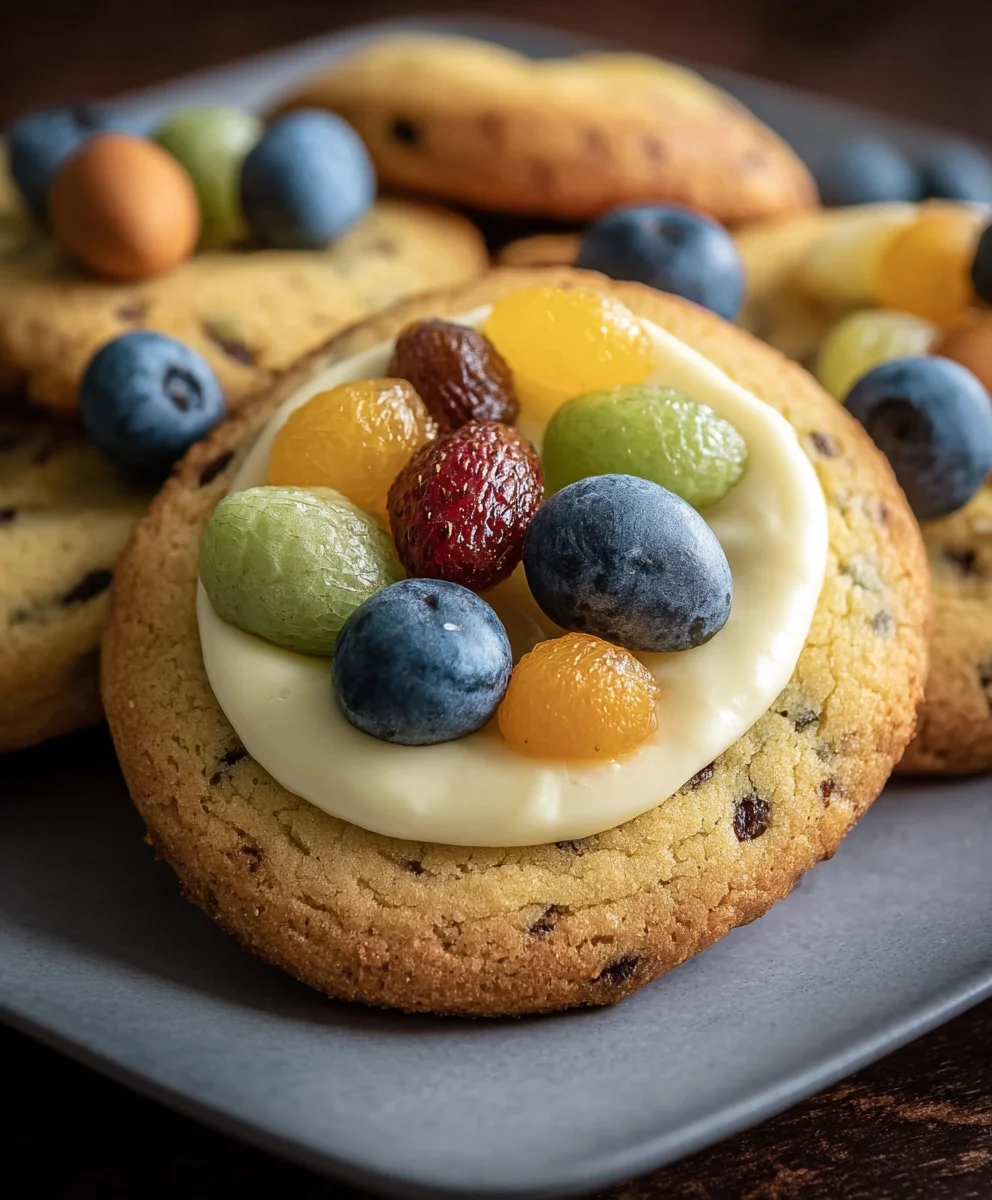
Easter Egg Fruit Cookies are the delightful stars of any spring celebration, capturing the joy and sweetness of the season in every bite. These aren’t just any cookies; they are miniature edible works of art, perfect for adorning your Easter table or filling little hands with festive cheer. We absolutely adore Easter Egg Fruit Cookies because they combine tender, buttery cookie dough with bursts of vibrant, fruity flavor, creating a sensory experience that’s both nostalgic and exciting. What truly sets them apart is their charming egg shape, often adorned with colorful glazes and sprinkles, making them instantly recognizable and incredibly appealing to both children and adults alike. Imagin extracte the delighted squeals as your family discovers these beautifully crafted treats, each one a tiny symbol of renewal and springtime happiness. This recipe is designed to bring that magic right into your kitchen.
Ingredients:
- 1 package sugar cookie dough mix (plus ingredients called for on the package, typically eggs and butter)
- 8 ounces cream cheese, softened
- 6 tablespoons butter, softened
- 2 cups confectioner’s sugar
- 1 teaspoon vanilla extract
- Pinch of salt
- Assorted berries and fruit (such as blueberries, strawberries, raspberries, kiwis, and mandarin oranges)
Preparing the Cookie Dough
First things first, let’s get our cookie base ready. Follow the instructions on your sugar cookie dough mix package carefully. This usually involves combining the mix with softened butter and eggs. Make sure your butter is truly at room temperature – it should yield slightly when pressed but not be melted. This ensures the dough comes together smoothly without being greasy. Once you’ve mixed the ingredients according to the package directions, you should have a cohesive dough. If the dough seems a bit dry and crum extractbly, you can add a teaspoon of water at a time until it comes together. Conversely, if it’s too sticky to handle, a light dusting of flour can help, but try to avoid adding too much extra flour as it can make the cookies tough. Once you have your dough, wrap it in plastic wrap and chill it in the refrigerator for at least 30 minutes. This chilling period is crucial because it makes the dough firmer and much easier to handle and shape. Cold dough is less likely to spread excessively during baking, meaning your cookies will hold their delightful Easter egg shape better.
Shaping the Easter Egg Cookies
Now for the fun part: shaping! Once your dough is well-chilled, unwrap it and place it on a lightly floured surface. You can use a rolling pin to roll out the dough to about 1/4-inch thickness. For perfectly uniform Easter egg shapes, you can use an Easter egg-shaped cookie cutter. If you don’t have one, don’t worry! You can freehand the shape by cutting out circles first and then gently tapering the bottom to create an egg silhouette. Alternatively, you can roll small portions of the dough into balls and then gently shape them into flattened egg ovals with your hands. The key is to work quickly while the dough is still cold to minimize sticking and spreading. As you cut or shape the cookies, place them onto baking sheets lined with parchment paper. This parchment paper is a lifesaver, preventing cookies from sticking to the baking sheet and making cleanup a breeze. Leave a little space between each cookie on the baking sheet, as they will puff up slightly during baking.
Baking the Sugar Cookies
Preheat your oven to the temperature specified on your sugar cookie dough mix package. This is typically around 350°F (175°C). Once your oven is preheated and your baking sheets are filled with shaped cookies, it’s time to bake! The baking time will vary depending on the size and thickness of your cookies, but generally, they will take between 8 to 12 minutes. You’re looking for the edges of the cookies to be lightly golden brown. The centers should appear set and no longer look wet or doughy. Keep a close eye on them, as sugar cookies can go from perfectly baked to burnt very quickly, especially around the edges. Once they are done, carefully remove the baking sheets from the oven. Let the cookies cool on the baking sheets for about 5 minutes before transferring them to a wire rack to cool completely. It’s essential that the cookies are completely cool before you move on to decorating, otherwise, the frosting will melt and slide right off.
Crafting the Cream Cheese Frosting
While the cookies are cooling, let’s whip up a delicious and creamy frosting that’s perfect for our Easter egg fruit cookies. In a medium bowl, combine the softened cream cheese and softened butter. Make sure both are truly softened – this is key to achieving a smooth, lump-free frosting. You can use a hand mixer or a stand mixer fitted with the paddle attachment to beat these together until they are light and fluffy. This usually takes about 2-3 minutes. Next, gradually add the confectioner’s sugar, about half a cup at a time, beating well after each addition. This gradual addition helps prevent a cloud of powdered sugar from escaping your bowl! Once all the confectioner’s sugar is incorporated, add the vanilla extract and a pinch of salt. The salt is a subtle but important addition that balances the sweetness of the frosting. Beat everything together until the frosting is smooth, creamy, and perfectly spreadable. If the frosting seems a little too thick, you can add a teaspoon of milk or cream at a time until you reach your desired consistency. If it’s too thin, add a little more confectioner’s sugar.
Decorating Your Easter Egg Fruit Cookies
With your cookies completely cooled and your frosting ready, it’s time for the final flourish: decorating! This is where you can really let your creativity shine and make these Easter Egg Fruit Cookies truly unique. Take a cooled cookie and spread a generous layer of the cream cheese frosting over its surface, covering it completely. You can use an offset spatula or the back of a spoon for this. Then, comes the “fruit” part of our Easter Egg Fruit Cookies. Arrange your assorted berries and fruit pieces artfully on top of the frosting. Think of it like decorating a miniature Easter egg! You can create colorful patterns with blueberries, slice strawberries to resemble petals, use slivers of kiwi for green accents, and quarter mandarin orange segments for pops of bright color. For a simple yet elegant look, you can just scatter a mix of berries across the frosted surface. The vibrant colors of the fresh fruit will make your Easter Egg Fruit Cookies look as delightful as they taste. Allow the frosting to set slightly before serving or storing your beautiful creations.

Conclusion:
There you have it! Your guide to creating delightful Easter Egg Fruit Cookies. We hope this recipe inspires you to bring a burst of fruity flavor and festive cheer to your Easter celebrations. These cookies are not only beautiful to look at but are also incredibly delicious, making them a perfect treat for both children and adults. The simple assembly allows for creative customization, making each batch unique. Enjoy the process as much as you enjoy the final product!
For serving suggestions, these Easter Egg Fruit Cookies are wonderful on their own with a cup of tea or coffee. They also make a fantastic addition to any Easter dessert platter, alongside other traditional goodies. Consider presenting them in a colorful basket for a charming centerpiece.
When it comes to variations, feel free to experiment with different dried fruits like cranberries, apricots, or chopped dates for varied textures and flavors. You can also add a sprinkle of cinnamon or nutmeg to the dough for an extra aromatic touch. For an extra festive look, consider using brightly colored edible glitter or sugar sprinkles.
We encourage you to get creative and have fun making these Easter Egg Fruit Cookies. They are a wonderful way to spend time with family and create lasting Easter memories. Don’t be afraid to try new things and make them your own!
FAQs:
Q1: Can I use fresh fruit instead of dried fruit in these Easter Egg Fruit Cookies?
While fresh fruit can be used, it’s not ideal for this recipe. Fresh fruit contains more moisture, which can make the cookies spread too much during baking and result in a softer, less crisp texture. Dried fruit provides a concentrated sweetness and chegrape juicess that works best with the cookie dough.
Q2: How should I store these Easter Egg Fruit Cookies?
Once cooled completely, store the Easter Egg Fruit Cookies in an airtight container at room temperature. They should stay fresh for up to 3-4 days. If you live in a very humid climate, you might want to add a small food-safe silica gel packet to the container to absorb excess moisture and keep them crisp.
Q3: Can I make the dough ahead of time?
Yes, you can definitely make the dough for these Easter Egg Fruit Cookies ahead of time. Once the dough is made, wrap it tightly in plastic wrap and refrigerate for up to 2 days. When you’re ready to bake, let the dough sit at room temperature for about 15-20 minutes to soften slightly before shaping and baking.
Easter Egg Fruit Cookies-Delightful & Easy Recipe
Delightful and easy Easter egg-shaped sugar cookies topped with creamy cream cheese frosting and fresh assorted fruits.
Ingredients
-
1 package sugar cookie dough mix (plus ingredients called for on the package, typically eggs and butter)
-
8 ounces cream cheese, softened
-
6 tablespoons butter, softened
-
2 cups confectioner’s sugar
-
1 teaspoon vanilla extract
-
Pinch of salt
-
Assorted berries and fruit (such as blueberries, strawberries, raspberries, kiwis, and mandarin oranges)
Instructions
-
Step 1
Prepare the cookie dough by following the instructions on the sugar cookie dough mix package. Chill the dough in the refrigerator for at least 30 minutes. -
Step 2
Roll out the chilled dough on a lightly floured surface to about 1/4-inch thickness. Cut out Easter egg shapes using a cookie cutter or by hand. Place cookies on a parchment-lined baking sheet. -
Step 3
Bake the cookies in a preheated oven at 350°F (175°C) for 8-12 minutes, or until the edges are lightly golden brown. Let cool on the baking sheet for 5 minutes, then transfer to a wire rack to cool completely. -
Step 4
While the cookies cool, prepare the cream cheese frosting. Beat softened cream cheese and softened butter until light and fluffy. Gradually add confectioner’s sugar, then vanilla extract and a pinch of salt. Beat until smooth and creamy. -
Step 5
Once the cookies are completely cool, spread a generous layer of cream cheese frosting over each cookie. Decorate the frosted cookies with assorted berries and fruit pieces, arranging them artfully.
Important Information
Nutrition Facts (Per Serving)
It is important to consider this information as approximate and not to use it as definitive health advice.
Allergy Information
Please check ingredients for potential allergens and consult a health professional if in doubt.


Leave a Comment