
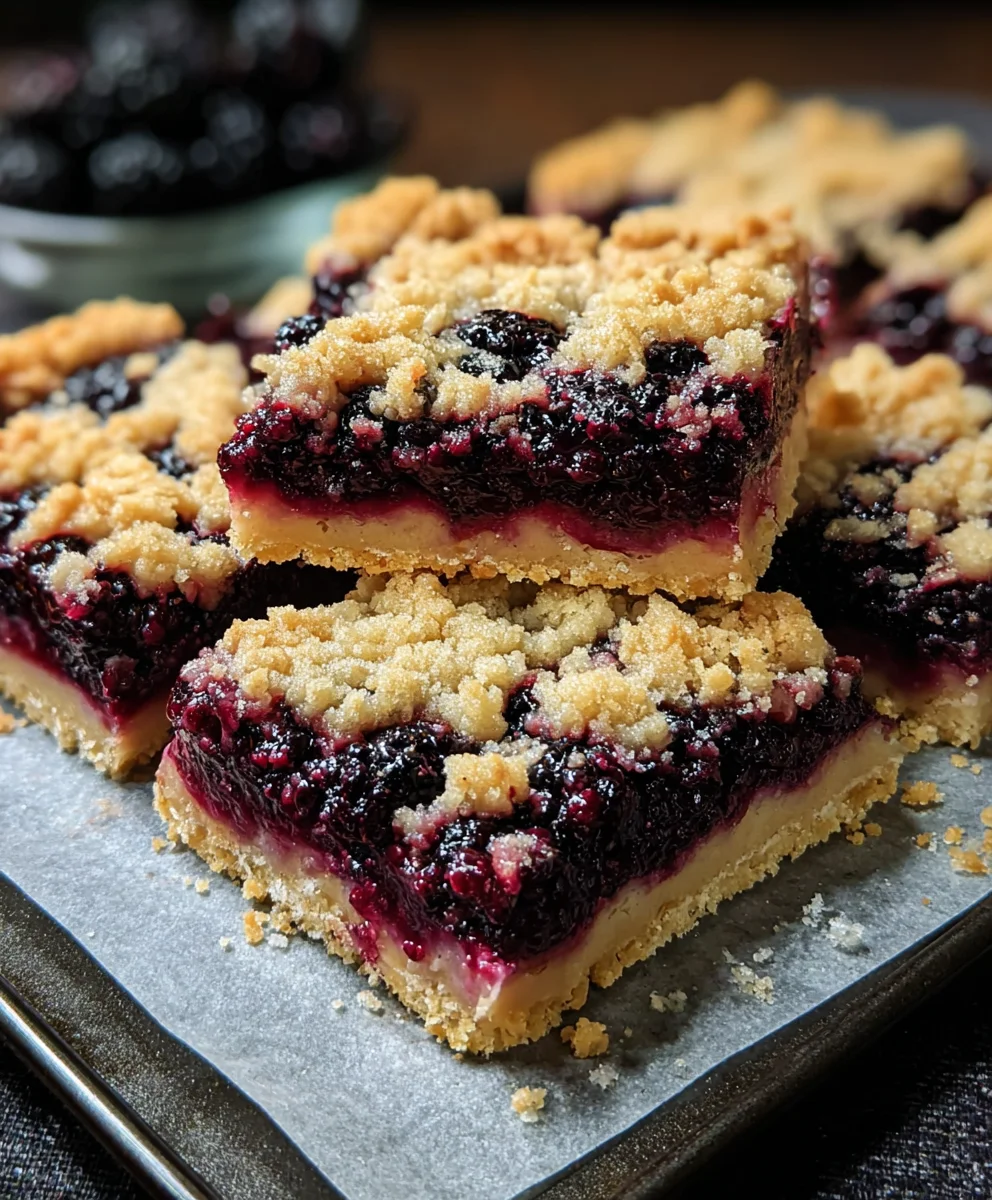
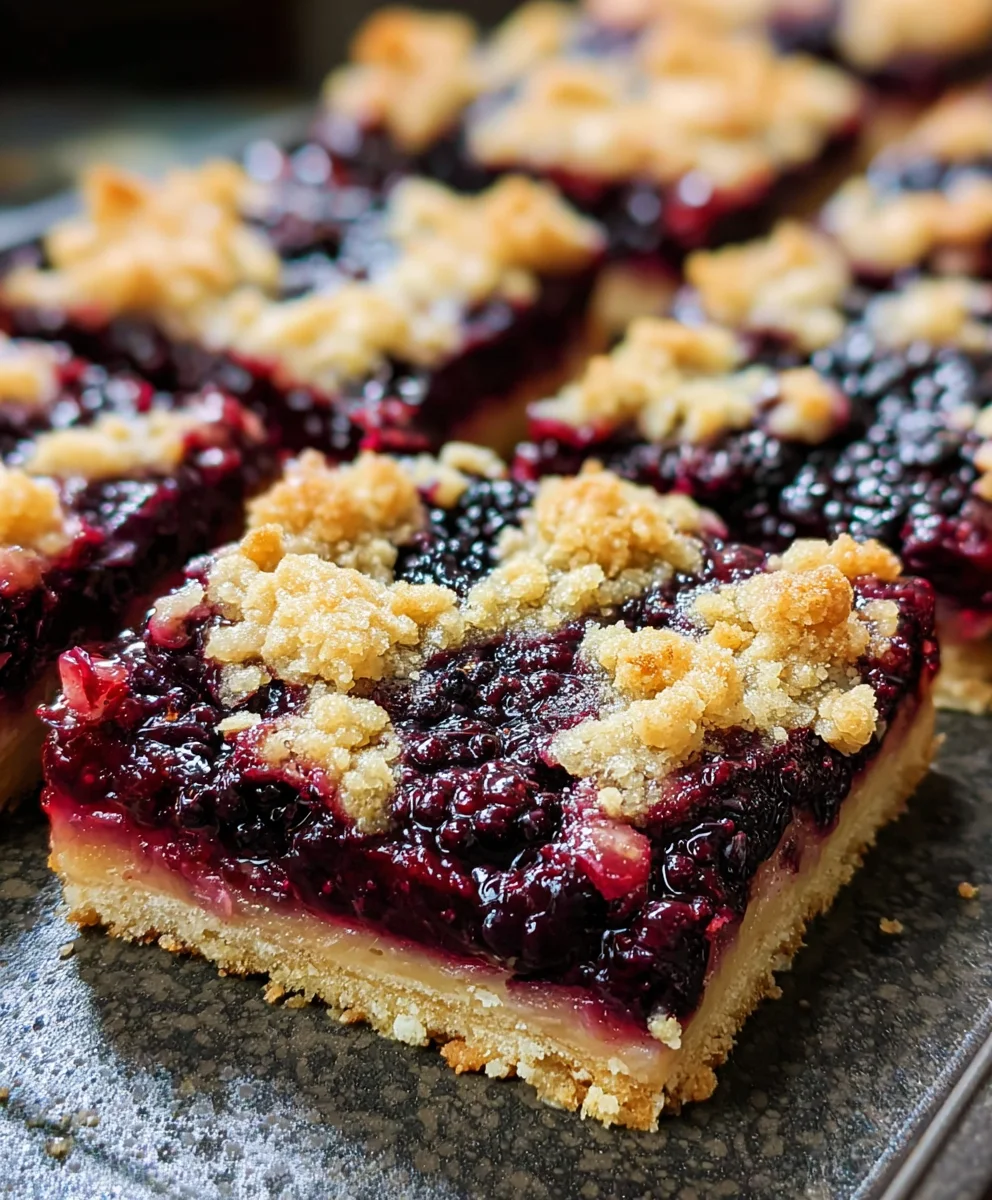
Blackberry Pie Crumble Bars are more than just a delightful dessert; they are a truly captivating culinary experience, inviting you to savor the very essence of summer in every bite. I am absolutely thrilled to share the joy of these remarkable bars with you. Imagine the vibrant, sun-kissed flavor of ripe, juicy blackberries, perfectly nestled beneath a golden, buttery crumble topping, all resting upon a tender, shortbread-like base. This isn’t just a convenient treat; it’s a comforting classic thoughtfully reimagined, blending the nostalgic charm of a homemade pie with the undeniable grab-and-go ease of a bar.
A Beloved Classic, Reimagined for Modern Indulgence
These delightful treats evoke cherished memories of family gatherings and simple, joyful moments, much like the traditional fruit pies that have graced our tables for generations, celebrating nature’s generous bounty. The true appeal of these Blackberry Pie Crumble Bars lies in their exquisite balance: the tantalizing sweet-tart burst of the blackberries, often enhanced by a subtle hint of lemon, is perfectly complemented by the rich, melt-in-your-mouth texture of the buttery crumble and firm base. They offer all the beloved flavors and comforting appeal of a classic pie, but in a beautifully portable and effortlessly shareable format. This makes them an absolute favorite for everything from elegant picnics and bustling potlucks to a serene afternoon indulgence with a cup of tea. Prepare to understand why they disappear so quickly!
Ingredients:
Creating these delightful Blackberry Pie Crumble Bars is a journey of textures and flavors. Here’s everything you’ll need to gather:
- For the Shortbread Crust & Crumble Topping:
- 3 cups (360g) all-purpose flour, plus a little extra for dusting
- 1 ½ cups (300g) granulated sugar, divided (we’ll use a cup for the crust/crumble base and ½ cup for the filling)
- 1 teaspoon baking powder
- ½ teaspoon salt
- 1 ½ cups (3 sticks or 340g) unsalted butter, very cold and cut into ½-inch cubes. Cold butter is absolutely crucial here for that perfect crumbly texture!
- 1 teaspoon vanilla extract
- Zest of 1 small lemon (optional, but I find it adds a lovely bright note to the crumble)
- For the Blackberry Filling:
- 6 cups (approximately 2 lbs or 900g) fresh blackberries. If using frozen, there’s no need to thaw them first; just proceed as directed.
- ½ cup (100g) granulated sugar (this will be from the divided amount above)
- 2 tablespoons fresh lemon juice (balances the sweetness and brightens the berries)
- 3 tablespoons cornstarch (this is our secret weapon for a perfectly thick filling that won’t make your bars soggy!)
- Pinch of ground cinnamon or nutmeg (optional, but a whisper of spice can be wonderful with blackberries)
Prepare the Crust and Crumble Topping
This stage is where the magic begins for our Blackberry Pie Crumble Bars. We’re essentially making one versatile dough that will serve as both the sturdy base and the irresistible streusel topping.
- Preheat and Prepare Your Pan: First things first, preheat your oven to 375°F (190°C). Then, line a 9×13-inch baking pan with parchment paper, leaving an overhang on the sides. This overhang will be your best friend later for easily lifting the cooled bars out of the pan. I also like to lightly grease the parchment paper to prevent any sticking, especially at the edges.
- Combine Dry Ingredients: In a large mixing bowl, whisk together the 3 cups of all-purpose flour, 1 cup of granulated sugar (remember we divided the sugar), 1 teaspoon of baking powder, and ½ teaspoon of salt. Make sure these are thoroughly combined; we want an even distribution of leavening and seasoning throughout our base.
- Incorporate the Butter: Now comes the fun part! Add the very cold, cubed unsalted butter to the dry ingredients. You have a few options here:
- Using a Pastry Blender: This is my preferred method. Work the butter into the flour mixture until it resembles coarse crumbs, with some pieces of butter still about the size of small peas.
- Using Your Fingertips: If you don’t have a pastry blender, your fingertips work wonderfully. Just be quick about it, as the heat from your hands can melt the butter too quickly.
- Using a Food Processor: If you’re short on time, a food processor can do the trick. Pulse the dry ingredients with the cold butter until coarse crumbs form. Be careful not to overmix, or you’ll end up with a pasty dough instead of a crumbly one.
The goal is to create a mixture that is sandy and crumbly, but still holds together slightly when you press it between your fingers.
- Add Vanilla and Lemon Zest: Drizzle in the 1 teaspoon of vanilla extract and, if using, grate in the zest of one small lemon. Gently mix these in until just combined. The lemon zest adds a wonderful, subtle brightness that complements the blackberries beautifully.
- Divide the Mixture: Now, for the ingenious part of these Blackberry Pie Crumble Bars! Take about two-thirds of this crumbly mixture and firmly press it into the bottom of your prepared 9×13-inch pan. Use the bottom of a glass or your hands to create an even, compact layer. Press it down really well; this will form the sturdy shortbread-like crust for your bars. The remaining one-third of the mixture will be reserved for our glorious crumble topping later.
- Pre-bake the Crust: Place the pan with the pressed crust into the preheated oven and bake for 15-20 minutes, or until the edges are lightly golden. This pre-baking step is essential. It helps set the crust, preventing it from becoming soggy once the juicy blackberry filling is added, and gives it that delightful shortbread texture we’re aiming for. While the crust is baking, you can move on to preparing the filling.
Prepare the Blackberry Filling
While our crust is getting cozy in the oven, let’s turn our attention to the star of the show: the vibrant, sweet-tart blackberry filling. This is what truly elevates these to magnificent Blackberry Pie Crumble Bars.
- Combine Blackberries and Sugar: In a medium-sized bowl, gently combine the 6 cups of fresh (or frozen, unthawed) blackberries with the remaining ½ cup of granulated sugar. I like to use a spatula here to avoid crushing the delicate berries too much.
- Add Lemon Juice and Spices: Pour in the 2 tablespoons of fresh lemon juice. This isn’t just for flavor; lemon juice helps to bring out the natural pectin in the berries and balances their sweetness. If you’re using it, add a pinch of ground cinnamon or nutmeg now. Stir gently to coat all the berries.
- Thicken with Cornstarch: Sprinkle the 3 tablespoons of cornstarch evenly over the blackberry mixture. Now, mix again, very gently, ensuring that the cornstarch is well distributed and no lumps remain. The cornstarch is crucial here. It will thicken the juices released by the blackberries during baking, preventing your bars from becoming watery and ensuring a beautiful, jam-like consistency. Without it, your bars would be a soupy mess!
- Let it Macerate (Optional but Recommended): If you have an extra 5-10 minutes while the crust finishes pre-baking, let the blackberry mixture sit. This process, called maceration, allows the sugar to draw out some of the liquid from the berries, creating a richer syrup and giving the cornstarch a head start on absorption. It’s not strictly necessary, but I find it improves the final texture of the filling.
Assemble and Bake the Blackberry Pie Crumble Bars
With our crust pre-baked and our glorious blackberry filling ready, it’s time to bring everything together for the final bake. This is where your creation truly starts to resemble the delectable Blackberry Pie Crumble Bars you’ve been dreaming of!
- Spread the Filling: Once the crust has finished its pre-bake and is lightly golden, carefully remove the pan from the oven. Evenly spoon the prepared blackberry filling over the warm crust. Use the back of a spoon or a small offset spatula to spread the berries into a single, relatively even layer. Try to get the berries distributed across the entire surface, leaving a small border if you wish, but I usually go edge-to-edge.
- Add the Crumble Topping: Now, retrieve that reserved one-third of the crumbly mixture we set aside earlier. Generously sprinkle this crumbly topping evenly over the blackberry filling. You don’t need to press it down; just let it fall naturally over the berries. The more rustic and uneven, the better – that’s the charm of a crumble!
- Bake to Golden Perfection: Return the pan to the preheated oven. Bake for another 35-45 minutes, or until the crumble topping is deeply golden brown and the blackberry filling is bubbly around the edges. You should see those rich purple juices threatening to burst through the crumble. The exact baking time can vary depending on your oven, so keep an eye on it.
- Pro Tip: If the crumble topping starts to brown too quickly before the filling is bubbly, you can loosely tent the pan with aluminum foil for the last 10-15 minutes of baking.
The scent that fills your kitchen at this stage is truly intoxicating!
Cooling and Serving Your Blackberry Pie Crumble Bars
Congratulations, you’ve baked a masterpiece! But the journey to enjoying your perfect Blackberry Pie Crumble Bars isn’t quite over. The cooling process is just as important as the baking itself for achieving bars that slice cleanly and hold their shape.
- The Crucial Cooling Phase: Once baked, remove the pan from the oven and place it on a wire cooling rack. This is arguably the most important step for bar recipes: allow the bars to cool completely in the pan before attempting to cut them. I cannot emphasize this enough! This can take anywhere from 2 to 4 hours at room temperature, or you can even pop them in the refrigerator for an hour or two once they’ve cooled down a bit. Trying to cut them while warm will result in a messy, crumbly (not in a good way) disaster, as the filling needs time to fully set and firm up. Patience, my friend, patience!
- Lift and Slice: Once fully cooled, use the parchment paper overhangs to carefully lift the entire slab of Blackberry Pie Crumble Bars out of the pan and transfer it to a cutting board.
- Cut into Bars: Using a sharp knife, cut the slab into your desired bar size. I typically go for 12-16 bars, but you can make them smaller for a crowd or larger for a more generous treat. For cleaner cuts, wipe your knife clean between slices, especially if the filling is particularly gooey.
- Serve and Enjoy: These Blackberry Pie Crumble Bars are absolutely divine on their own. The combination of the buttery shortbread crust, the sweet-tart blackberry filling, and the crunchy, sweet crumble topping is pure bliss. However, if you want to elevate the experience, I highly recommend serving them with a scoop of good quality vanilla ice cream, a dollop of fresh whipped cream, or even a drizzle of custard. They also make a fantastic addition to any brunch spread or afternoon tea.
- Storage: Store any leftover bars in an airtight container at room temperature for up to 3 days, or in the refrigerator for up to a week. If you plan to keep them longer, they freeze beautifully for up to 2-3 months. Just wrap individual bars tightly in plastic wrap and then aluminum foil. Thaw at room temperature or warm gently in the microwave or oven.
There you have it – a recipe for incredibly satisfying and utterly delicious Blackberry Pie Crumble Bars that are perfect for any occasion! Enjoy every single crumb.
I genuinely believe that after you experience just one bite, you will unequivocally understand why this recipe is destined to become an enduring cornerstone in your personal baking repertoire. These are not merely another dessert; they are an experience, a delightful journey for your taste buds that perfectly encapsulates the very best of home baking. We’ve journeyed through the steps, savored the aromas, and now, it’s time to relish the reward. The true magic of these bars lies in their harmonious balance – the buttery, tender crust providing a sturdy base, the luscious, sweet-tart blackberry filling bursting with vibrant flavor, and that irresistible, golden-brown crumble topping offering the perfect textural counterpoint. Every single mouthful is a celebration, a testament to the simple joy that comes from fresh ingredients and a little love in the kitchen. Forget the fuss and complexity often associated with traditional pies; these bars deliver all the comforting, delicious satisfaction with a fraction of the effort, making them an ideal project for both seasoned bakers and enthusiastic kitchen novices alike.
What truly elevates these treats to a must-try status is their incredible versatility and undeniable crowd-plepleasing nature. They strike that perfect balance between rustic charm and refined flavor. The tartness of the blackberries, when perfectly ripe, provides a beautiful contrast to the sweetness of the crumble, preventing the bars from being overly cloying. It’s a sophisticated flavor profile wrapped in a wonderfully approachable package. I’m absolutely certain that once you pull a tray of these golden, aromatic beauties from your oven, your home will be filled with an intoxicating scent that promises pure deliciousness. These remarkable Blackberry Pie Crum extractble Bars are truly a game-changer when it comes to fruit desserts, offering all the delightful complexities of a pie but in a much more manageable and shareable form. The ease of serving and eating them, whether at a casual family gathering or a more formal event, makes them exceptionally practical and always appreciated. Their sturdy nature means they travel incredibly well, making them perfect for potlucks, picnics, or simply as a thoughtful gift for a friend. They maintain their integrity beautifully, staying fresh and delicious for days, provided they last that long!
Irresistible Serving Suggestions & Creative Variations
While these bars are absolutely divine enjoyed plain and at room temperature, there are countless ways to elevate your experience even further. For an utterly decadent treat, I highly recommend serving them slightly warm, allowing the berry filling to become gloriously gooey, alongside a generous scoop of premium vanilla bean ice cream. The melting cream mingling with the warm, fruity juices creates a symphony of flavors and textures that is truly out of this world. Alternatively, a dollop of freshly whipped cream, perhaps infused with a whisper of lemon zest or a touch of almond extract, adds a lovely, light counterpoint. They also make an incredibly indulgent breakfast or brunch item, especially when paired with your morning coffee or tea. Imagine starting your day with a square of these fruity, crumbly delights – what a way to bring a little extra joy to your routine!
Don’t hesitate to get creative with your bakes too! While blackberries are undoubtedly superb, these bars are incredibly forgiving and open to various fruit substitutions. Consider experimenting with ripe raspberries, blueberries, or a mixed berry blend for a different flavor profile. You could even venture into stone fruits like finely diced peaches or plums when they’re in season, just remember to adjust the sugar content based on the fruit’s sweetness. For an added layer of texture and nuttiness in the crumble topping, a sprinkle of finely chopped pecans, walnuts, or almonds would be absolutely delightful. A pinch of ground cinnamon, nutmeg, or even a touch of cardamom added to the berry filling can introduce a wonderful warmth and complexity. For those looking for dietary modifications, exploring gluten-free flour blends for the crust and crumble, or vegan butter alternatives, could open up a whole new world of possibilities, allowing even more people to savor these incredible treats.
Your Turn: Bake, Savor, and Share!
Now that you have all the knowledge and inspiration, I truly encourage you to step into your kitchen and whip up a batch of these extraordinary bars. I promise you, the joy of baking them is only surpassed by the sheer pleasure of tasting them. There’s something incredibly satisfying about creating something so delicious from scratch, and these bars embody that feeling perfectly. Once you’ve experienced the pure bliss of these homemade treats, I would absolutely adore for you to come back and share your experience with me! What did you think? Did you try any fun variations? Your feedback, photos, and baking adventures genuinely inspire me and the entire community of home bakers. So please, don’t hesitate to comment below with your thoughts, or tag me in your photos on your favorite social media platform. Let’s celebrate the simple, delicious magic of home baking together. Happy baking, my friends!
Blackberry Pie Crumble Bars
Blackberry Pie Crumble Bars offer a captivating culinary experience, blending the vibrant, sweet-tart flavor of ripe blackberries with a golden, buttery crumble topping and a tender, shortbread-like base. This comforting classic is reimagined into a convenient, grab-and-go treat perfect for any occasion.
Ingredients
-
3 cups (360g) all-purpose flour
-
1 ½ cups (300g) granulated sugar, divided
-
1 tsp baking powder
-
½ tsp salt
-
1 ½ cups (340g) unsalted butter, cold, cubed
-
1 tsp vanilla extract
-
Zest of 1 small lemon (optional)
-
6 cups (900g) fresh or frozen blackberries
-
2 tbsp fresh lemon juice
-
3 tbsp cornstarch
-
Pinch ground cinnamon or nutmeg (optional)
Instructions
-
Step 1
Preheat oven to 375°F (190°C). Line a 9×13-inch baking pan with parchment paper, leaving an overhang. -
Step 2
In a large bowl, whisk 3 cups flour, 1 cup granulated sugar, baking powder, and salt. Cut in cold, cubed butter using a pastry blender or fingertips until coarse crumbs form. Mix in vanilla extract and lemon zest (if using). -
Step 3
Press about two-thirds of the crumb mixture firmly into the prepared pan to form the crust. Reserve the remaining one-third for topping. -
Step 4
Pre-bake the crust for 15-20 minutes, or until edges are lightly golden. This prevents sogginess. -
Step 5
While crust bakes, prepare filling: Gently combine blackberries with ½ cup granulated sugar, 2 tbsp fresh lemon juice, and a pinch of cinnamon/nutmeg (if using). Sprinkle 3 tbsp cornstarch over mixture; mix gently until well distributed. Let macerate for 5-10 minutes if time allows. -
Step 6
Spoon blackberry filling evenly over the warm, pre-baked crust. Sprinkle reserved crumb topping generously over the filling. -
Step 7
Return pan to oven and bake for another 35-45 minutes, or until crumble is deeply golden brown and filling is bubbly. Tent with foil if browning too quickly. -
Step 8
Cool completely in the pan on a wire rack (2-4 hours) before attempting to cut. This is crucial for clean slices as the filling needs to fully set. -
Step 9
Once fully cooled, lift bars by parchment overhangs, transfer to a cutting board, and slice into 12-16 bars. Serve as is, or with ice cream/whipped cream. -
Step 10
Store leftovers in an airtight container at room temperature for up to 3 days, or refrigerate up to a week. Bars freeze well for 2-3 months.
Important Information
Nutrition Facts (Per Serving)
It is important to consider this information as approximate and not to use it as definitive health advice.
Allergy Information
Please check ingredients for potential allergens and consult a health professional if in doubt.
Leave a Comment