Easy Butterfinger Balls Recipe
Butterfinger Balls taste exactly like biting into a Butterfinger bar, but in a delightful, bite-sized form. They’re perfect for a quick treat when a candy craving strikes, or for bringing to a potluck where they’re always a guaranteed hit. The combination of the creamy, peanut buttery base and the crunchy, flaky Butterfinger pieces is just spot on. If you love Butterfingers, you’re going to adore these. Ingredients: 1 cup creamy peanut butter 1/4 cup unsalted butter (softened) 2 cups powdered sugar 1 teaspoon vanilla extract Pinch of salt 6 Butterfinger candy bars (finely crushed) 12 ounces semisweet or milk chocolate (chopped (for dipping, optional)) Making the Base The first step is to get our buttery, peanut-y base ready. In a medium-sized bowl, combine the 1 cup of creamy peanut butter and the 1/4 cup of unsalted butter. Make sure your butter is softened – this means it should be soft enough to easily indent with your finger, but not melted. This ensures it will incorporate smoothly with the peanut butter without creating lumps. You can leave the butter on the counter for about an hour, or give it a quick zap in the microwave (just a few seconds at a time) until it reaches that perfect soft consistency. Once you have those two together, start mixing them until they are well combined and have a smooth, creamy texture. A sturdy spoon or a spatula works best for this. Next, we’ll add the sweetness and flavor. Gradually add the 2 cups of powdered sugar, mixing until fully incorporated. This is where the dough starts to thicken up considerably. Then, stir in the 1 teaspoon of vanilla extract and the pinch of salt. The salt helps to balance the sweetness and bring out the peanut butter flavor. You should have a thick, dough-like consistency that you can handle. If it feels too sticky, you can add another tablespoon or two of powdered sugar. If it seems too dry, a tiny splash of milk or a bit more softened butter will help. This is the base for your Butterfinger Balls, so getting this right is important.
Butterfinger Balls
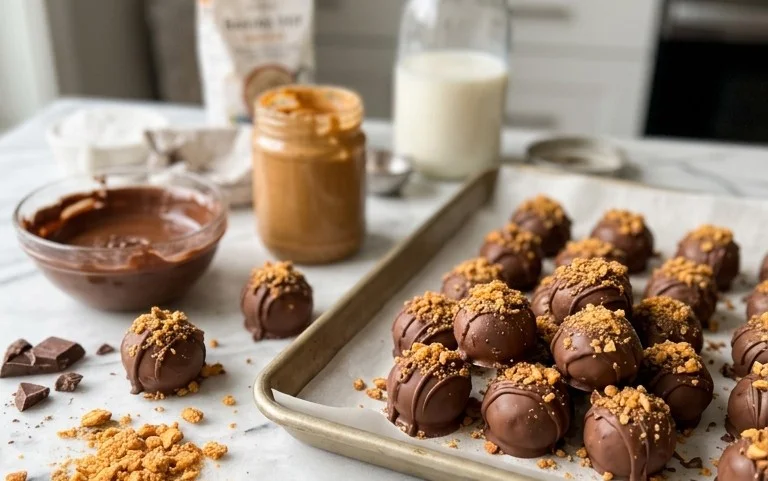
These Butterfinger Balls are ridiculously easy to make and taste exactly like biting into a Butterfinger bar, but in a delightful, bite-sized form. They’re perfect for a quick treat when a candy craving strikes, or for bringing to a potluck where they’re always a guaranteed hit. The combination of the creamy, peanut buttery base and the crunchy, flaky Butterfinger pieces is just spot on. If you love Butterfingers, you’re going to adore these.
Ingredients:
- 1 cup creamy peanut butter
- 1/4 cup unsalted butter (softened)
- 2 cups powdered sugar
- 1 teaspoon vanilla extract
- Pinch of salt
- 6 Butterfinger candy bars (finely crushed)
- 12 ounces semisweet or milk chocolate (chopped (for dipping, optional))
Making the Base
The first step is to get our buttery, peanut-y base ready. In a medium-sized bowl, combine the 1 cup of creamy peanut butter and the 1/4 cup of unsalted butter. Make sure your butter is softened – this means it should be soft enough to easily indent with your finger, but not melted. This ensures it will incorporate smoothly with the peanut butter without creating lumps. You can leave the butter on the counter for about an hour, or give it a quick zap in the microwave (just a few seconds at a time) until it reaches that perfect soft consistency. Once you have those two together, start mixing them until they are well combined and have a smooth, creamy texture. A sturdy spoon or a spatula works best for this.
Next, we’ll add the sweetness and flavor. Gradually add the 2 cups of powdered sugar to the peanut butter and butter mixture. It’s best to add it a little at a time, mixing after each addition. This prevents a cloud of powdered sugar from erupting from the bowl and makes it easier to incorporate everything evenly. You’ll also mix in the 1 teaspoon of vanilla extract and the pinch of salt at this stage. The vanilla adds a lovely warmth, and the salt, even though it’s just a pinch, really helps to balance the sweetness and enhance the peanut butter flavor. Keep mixing until the dough is thick and holds together. It will be quite stiff. If it feels too dry and crumbly to hold its shape, you can add another tablespoon of peanut butter or butter, but be careful not to make it too soft, as that will make rolling difficult.
Incorporating the Butterfinger Crunch
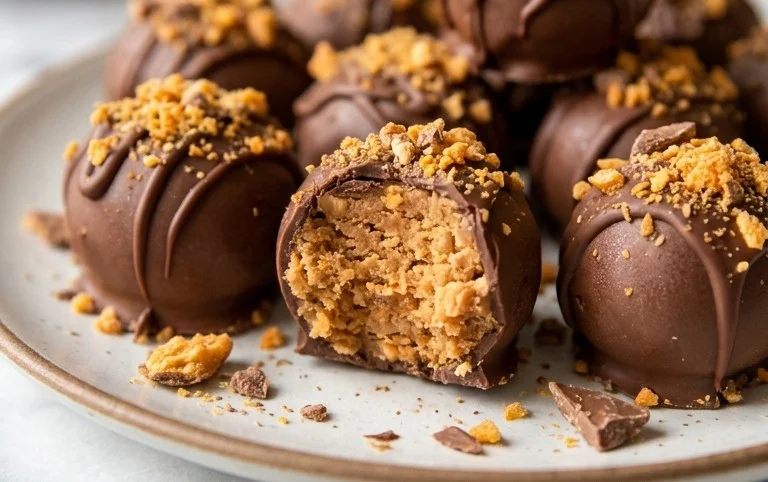
Now for the star of the show: the Butterfinger pieces! Take your 6 Butterfinger candy bars and crush them. The easiest way to do this is to unwrap them and place them in a sturdy zip-top bag. Then, gently but firmly, bash them with a rolling pin or the bottom of a heavy pan until they are in small, crumbly pieces. You don’t want them to be powder, but you also don’t want huge chunks. Aim for a texture that’s a mix of small shards and fine crumbs, similar to what you’d find inside a whole Butterfinger bar.
Add the finely crushed Butterfinger pieces to your peanut butter dough. Using your hands or a strong spatula, gently fold the crushed candy bar into the dough. You want to distribute the pieces evenly throughout the mixture so that every ball gets a good amount of that signature crunch and flavor. Be careful not to overmix at this stage, as that can make the dough tough. Just ensure the Butterfinger pieces are well incorporated. The dough will become quite firm and studded with those golden-brown Butterfinger bits.
Forming and Chilling the Balls
With your Butterfinger-infused dough ready, it’s time to form the balls. You can use a tablespoon or a small cookie scoop to portion out the dough. Roll each portion between your palms to create smooth, round balls, about 1 inch in diameter. If the dough is sticking to your hands, you can lightly dust your hands with a little more powdered sugar. Place the rolled balls onto a baking sheet lined with parchment paper. This prevents sticking and makes for easy cleanup.
Once all the balls are rolled, it’s important to chill them. Place the baking sheet with the Butterfinger balls into the refrigerator for at least 30 minutes, or until they are firm to the touch. This chilling step is crucial. It helps the balls hold their shape when you dip them in chocolate (if you choose to do so) and also makes them easier to handle. If they are too soft, they can fall apart during the dipping process. You can also pop them in the freezer for about 15 minutes if you’re short on time, but be careful not to freeze them solid.
Dipping in Chocolate (Optional)
This step is entirely optional, but I highly recommend it if you want to add another layer of deliciousness and make these look extra special.
Melt your 12 ounces of semisweet or milk chocolate. You can do this in a double boiler over simmering water, or in a microwave-safe bowl. If using the microwave, heat the chocolate in 30-second intervals, stirring well after each interval, until it is mostly melted. Stir until smooth.
Once the chocolate is melted and smooth, retrieve your chilled Butterfinger balls from the refrigerator. Dip each ball into the melted chocolate, using a fork or a dipping tool to coat it evenly. Let any excess chocolate drip back into the bowl. Place the dipped balls back onto the parchment-lined baking sheet. You can let the chocolate harden at room temperature, or for a quicker set, place the baking sheet back into the refrigerator for about 10-15 minutes until the chocolate is firm.
Storage and Serving
Once your Butterfinger Balls are fully set (whether dipped or not), they are ready to be enjoyed. Store any leftovers in an airtight container at room temperature for up to a week. If you live in a warm climate or have dipped them in chocolate, storing them in the refrigerator is a good idea to prevent them from getting too soft.
These are wonderful on their own, but they also make a fantastic addition to a dessert platter, cookie exchange, or as a sweet surprise in a lunchbox. The texture is a fantastic contrast between the soft, chewy center and the crispy, flaky bits within. Enjoy every bite!
Conclusion:
These Butterfinger Balls are truly the closest you can get to a Butterfinger bar in a no-bake treat form. They come together so quickly and satisfy that specific candy bar craving with their unique crunchy, peanut buttery, chocolatey profile. Whether you’re hosting a party, need a last-minute dessert, or just want to impress yourself with your candy-making skills, these are a fantastic choice. They store well, making them great for making ahead. Consider rolling them in extra crushed Butterfinger pieces for an even more intense flavor and texture, or even a light drizzle of white chocolate for a pretty contrast.
Frequently Asked Questions:
Can I make these without dipping them in chocolate?
Absolutely. The chocolate coating is optional but highly recommended for the full Butterfinger experience and to help the balls keep their shape. If you skip the chocolate, consider dusting them with a bit more powdered sugar or rolling them in finely crushed Butterfinger pieces for added texture and flavor. They might be a bit softer without the shell, so handle them gently.
How should I store Butterfinger Balls?
Store your Butterfinger Balls in an airtight container in the refrigerator. They will keep well for about a week. The cold helps to firm up the peanut butter mixture and the chocolate coating, preventing them from getting too soft or messy. If you leave them at room temperature for too long, they can get sticky and lose their shape, especially in warmer weather.
Can I use a different type of peanut butter?
Creamy, commercial peanut butter like Jif or Skippy works best because it’s very smooth and contains emulsifiers that help create a stable base. Natural peanut butter, where the oil separates, can make the mixture oily or crumbly. If you do use natural peanut butter, make sure it’s very well stirred and perhaps add a little extra softened butter to help bind it.
Butterfinger Balls
Decadent no-bake balls featuring the iconic crunch of Butterfinger candy bars, creamy peanut butter, and a sweet coating. Perfect for parties or a sweet treat.
Ingredients
-
1 cup creamy peanut butter
-
1/4 cup unsalted butter (softened)
-
2 cups powdered sugar
-
1 teaspoon vanilla extract
-
Pinch of salt
-
6 Butterfinger candy bars (finely crushed)
-
12 ounces semisweet or milk chocolate (chopped (for dipping, optional))
Instructions
-
Step 1
In a large bowl, cream together the peanut butter and softened butter until smooth. -
Step 2
Gradually beat in the powdered sugar, vanilla extract, and salt until well combined and a dough forms. -
Step 3
Stir in the finely crushed Butterfinger candy bars until evenly distributed throughout the dough. -
Step 4
Roll the mixture into small balls, about 1-inch in diameter. Place on a baking sheet lined with parchment paper. -
Step 5
Chill the balls in the refrigerator for at least 30 minutes, or until firm. -
Step 6
If desired, melt the chocolate and dip each ball in the chocolate. Let the chocolate set before serving.
Important Information
Nutrition Facts (Per Serving)
It is important to consider this information as approximate and not to use it as definitive health advice.
Allergy Information
Please check ingredients for potential allergens and consult a health professional if in doubt.