
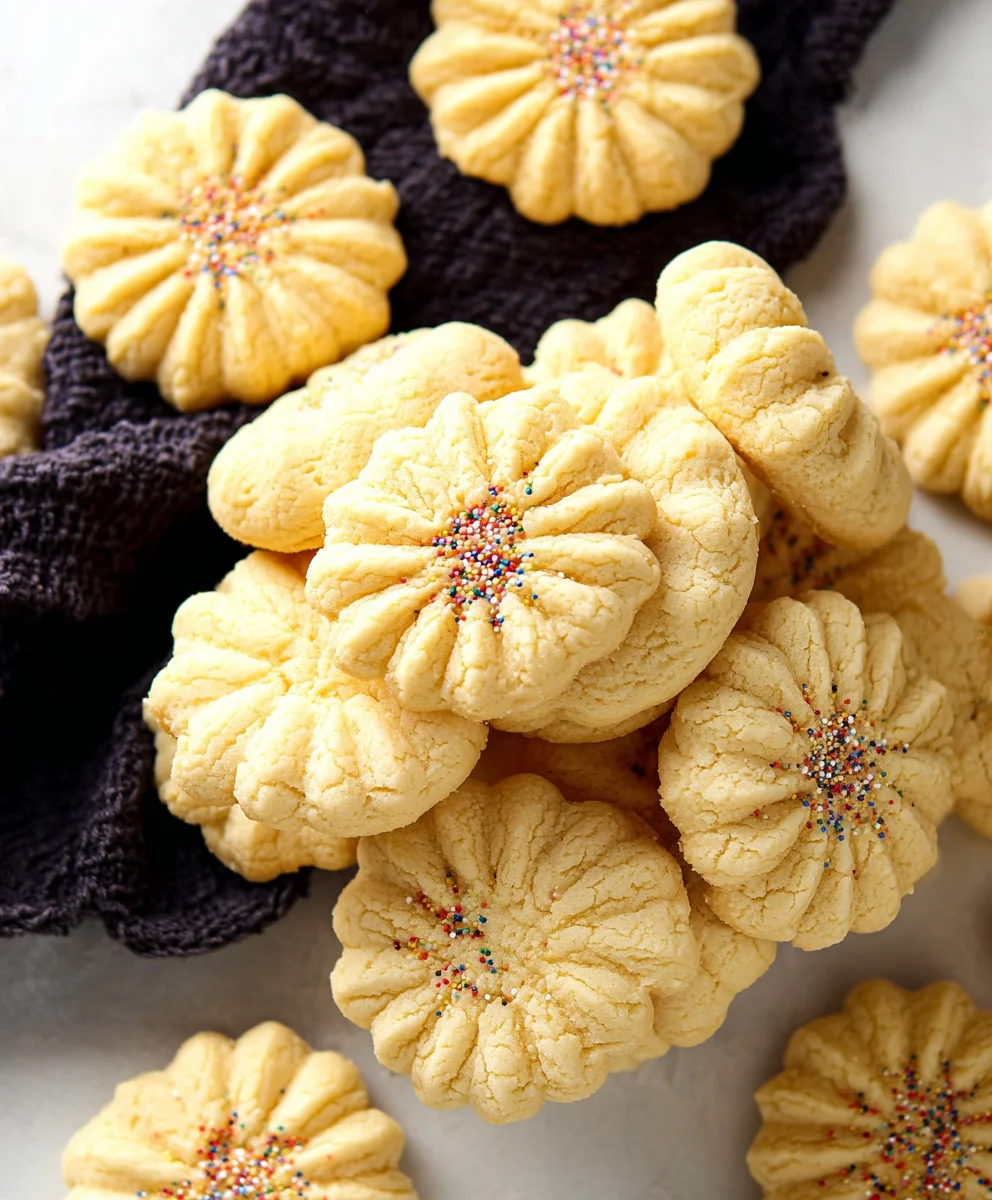
Italian Butter Cookie Recipe – a timeless classic that evokes the warmth of Nonna’s kitchen and the sweet aroma of pure, simple indulgence. There’s a reason why these delicate, melt-in-your-mouth cookies have captured hearts for generations. They’re not just a treat; they’re a miniature celebration, perfect for sharing with loved ones or savoring with a quiet cup of coffee. What makes this particular Italian Butter Cookie Recipe so special is its elegant simplicity. It relies on just a few high-quality ingredients to create a symphony of buttery flavor and a satisfyingly tender crum extractb. Unlike more complex confections, these cookies allow the pure taste of butter and a hint of sweetness to shine through, making them utterly irresistible. Get ready to bake a batch that will transport you straight to the heart of Italy with every delightful bite!
Ingredients:
- 2 cups all purpose flour
- 1/2 teaspoon baking powder
- Pinch of salt
- 1 cup unsalted butter, softened to room temperature
- 3/4 cup granulated sugar
- 2 large egg yolks
- 1 teaspoon vanilla extract
- 1 tablespoon whole milk (optional, only if needed to achieve a soft dough consistency)
- Nonpareil decorating sprinkles
- 1/2 cup melting chocolate (for drizzling or dipping)
Getting Started: Preparing the Dough
The foundation of any great Italian butter cookie lies in a perfectly balanced and tender dough. We’ll begin extractgin extract bringing together the dry ingredients. In a medium bowl, whisk together the 2 cups of all-purpose flour, 1/2 teaspoon of baking powder, and a pinch of salt. Whisking these ingredients ensures that the leavening agent and salt are evenly distributed throughout the flour, leading to consistent cookie texture and rise. Set this bowl aside.
In a separate, larger bowl, cream together the 1 cup of softened unsalted butter and 3/4 cup of granulated sugar. It’s crucial that your butter is truly at room temperature – soft enough to indent easily with your finger but not melted. This allows it to incorporate air effectively, contributing to the cookie’s delicate crum extractb. Beat these together using an electric mixer on medium speed until the mixture is light, pnon-alcoholic ale, and fluffy, usually for about 3-5 minutes. This process is key for achieving those melt-in-your-mouth cookies.
Now, it’s time to add the richness and binding power of the egg yolks. Add the 2 large egg yolks to the creamed butter and sugar mixture, one at a time, beating well after each addition until fully incorporated. This might seem like a small detail, but adding them separately helps emulsify the mixture properly, preventing any greasiness. Follow this with the 1 teaspoon of vanilla extract for that classic comforting aroma and flavor that defines many Italian cookies. Mix until just combined.
Combining and Chilling the Dough
Gradually add the dry ingredient mixture to the wet ingredients. With your mixer on low speed, add the flour mixture in two or three additions, mixing until just combined after each addition. Be careful not to overmix at this stage. Overmixing can develop the gluten in the flour too much, resulting in tough cookies. You want the dough to just come together into a cohesive mass.
At this point, you might notice the dough is a rum extracttle crumbly or dry. If it feels too stiff and isn’t coming together smoothly, you can add the optional 1 tablespoon of whole milk. Add it very sparingly, just enough to help the dough bind together. The goal is a soft, pliable dough that isn’t sticky. Once the dough has formed, gently bring it together with your hands.
Next, it’s essential to chill the dough. Divide the dough in half, flatten each half into a disc, wrap them tightly in plastic wrap, and refrigerate for at least 30 minutes, or up to 2 days. Chilling the dough makes it much easier to handle and shape, and it also allows the flavors to meld together. This step is non-negotiable for beautiful, well-formed cookies.
Shaping and Baking the Italian Butter Cookies
Preheat your oven to 350°F (175°C). Line baking sheets with parchment paper. Parchment paper is your best friend here as it prevents sticking and makes cleanup a breeze.
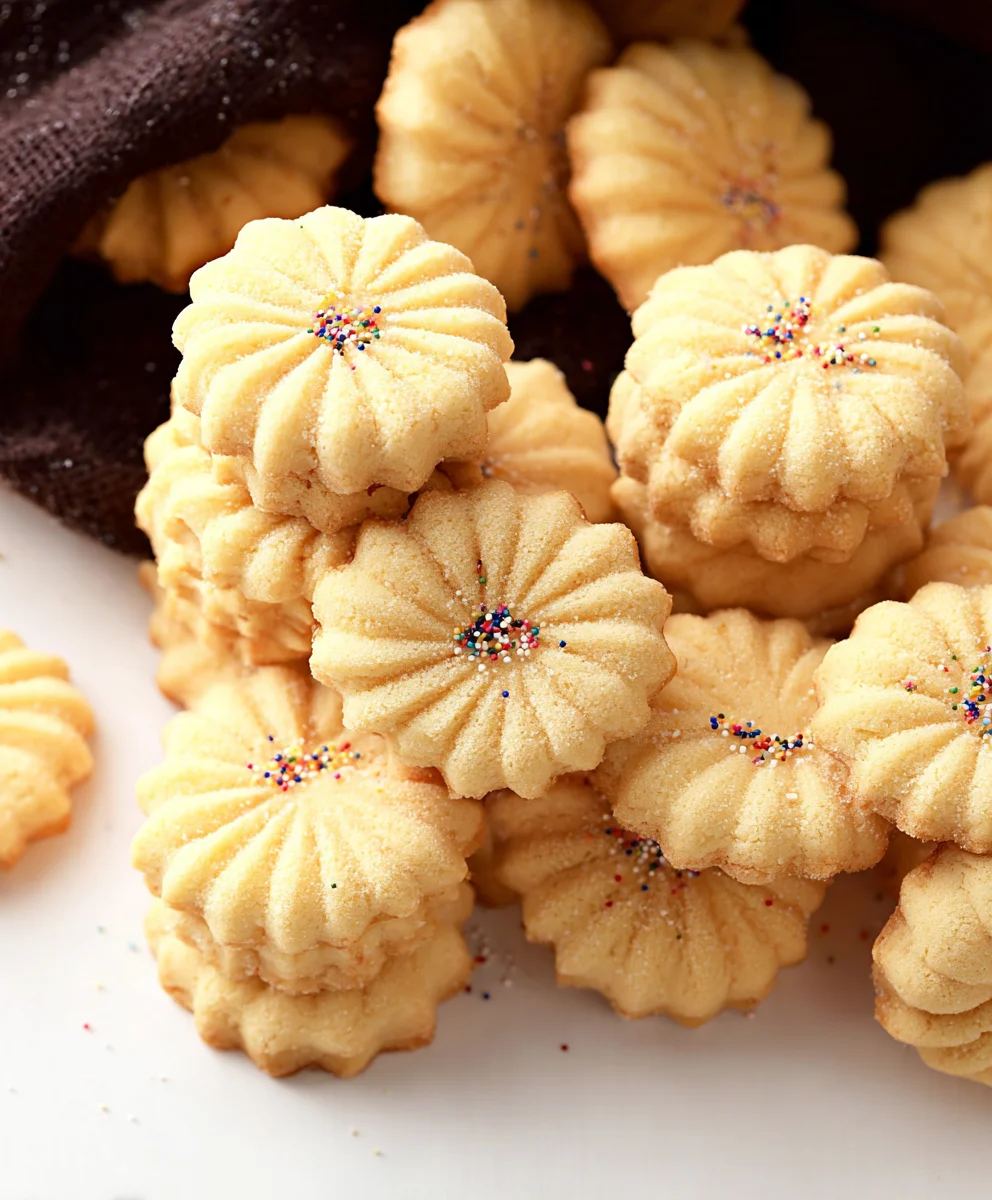
On a lightly floured surface, take one disc of chilled dough. You can either roll it out to about 1/4-inch thickness and use cookie cutters to create your desired shapes, or you can roll the dough into small balls (about 1-inch in diameter) and gently flatten them with the palm of your hand or the bottom of a glass. For a classic look, you can also pipe the dough using a pastry bag fitted with a star tip, creating elegant swirls or S-shapes. If you choose to roll and cut, work quickly to keep the dough cold. Gather and re-roll scraps gently, avoiding overworking.
Arrange the shaped cookies on the prepared baking sheets, leaving about 1-2 inches of space between them to allow for slight spreading during baking. If you’re using decorating sprinkles, this is the time to apply them. Gently press them onto the surface of the cookies before baking, or sprinkle them over the top. This is where you can get creative and add a festive touch to your Italian butter cookies.
Bake for 10-12 minutes, or until the edges are lightly golden brown and the centers are set. The exact baking time will depend on the size and thickness of your cookies. Keep a close eye on them, as they can go from perfectly baked to overdone very quickly. Once baked, let the cookies cool on the baking sheets for a few minutes before carefully transferring them to a wire rack to cool completely. This allows them to firm up properly.
Decorating the Finished Cookies
Once your Italian butter cookies are completely cooled, it’s time for the final flourish: decorating with melting chocolate. Melt the 1/2 cup of melting chocolate according to package directions. This usually involves microwaving in short intervals, stirring frequently, or using a double boiler. Be patient and don’t overheat the chocolate, as it can seize or burn.
You have a couple of options for decorating. You can dip the cooled cookies halfway into the melted chocolate, allowing any excess to drip off. Alternatively, you can drizzle the melted chocolate over the cookies using a spoon or a piping bag with a fine tip. This creates beautiful lines and patterns. You can also spread a thin layer of melted chocolate over the entire surface of the cookie.
If you want to add extra flair, you can sprinkle more nonpareil decorating sprinkles over the wet chocolate before it sets. This is a great way to add color and texture. Let the decorated cookies sit at room temperature until the chocolate is completely set, or place them in the refrigerator for a short period to speed up the process. Once the chocolate is firm, your beautiful and delicious Italian butter cookies are ready to be enjoyed or shared!
Conclusion:
There you have it – a straightforward and delightful Italian Butter Cookie Recipe that’s sure to become a staple in your baking repertoire. These cookies are wonderfully versatile, offering a buttery crunch that pairs perfectly with almost any occasion. We’ve found they are particularly delightful served alongside a steaming mug of coffee or tea, or as a sweet accompaniment to a bowl of fresh fruit. Don’t hesitate to experiment with this recipe! Consider adding a pinch of lemon zest for a citrusy twist, or dip half of the cooled cookies in melted chocolate for an extra touch of decadence. You can also try incorporating a few drops of almond extract for a more pronounced nutty flavor. The possibilities are truly endless, and we encourage you to make this Italian Butter Cookie Recipe your own. Happy baking!
Frequently Asked Questions:
Q: How should I store these Italian Butter Cookies?
A: Once completely cooled, these cookies can be stored in an airtight container at room temperature for up to a week. For longer storage, you can freeze them for up to three months. Ensure they are well-wrapped to prevent freezer burn.
Q: Can I make the dough ahead of time?
A: Absolutely! The dough for this Italian Butter Cookie Recipe can be made up to two days in advance and kept refrigerated in an airtight container. Allow the dough to soften slightly at room temperature for about 15-20 minutes before shaping and baking.
Q: My cookies are spreading too much during baking. What can I do?
A: If your cookies are spreading excessively, it might be due to the butter being too soft. Ensure your butter is at room temperature but not melted. Chilling the shaped cookies on the baking sheet for about 10-15 minutes before baking can also help prevent spreading.
Easy Italian Butter Cookie Recipe – Melt-in-Your-Mouth Bliss
These easy Italian butter cookies are incredibly tender and melt in your mouth with a delicate, buttery flavor, perfect for any occasion.
Ingredients
-
2 cups all purpose flour
-
1/2 teaspoon baking powder
-
pinch salt
-
1 cup unsalted butter, softened to room temperature
-
3/4 cup granulated sugar
-
2 large egg yolks
-
1 teaspoon vanilla extract
-
1 tablespoon whole milk (optional, only if needed to achieve a soft dough consistency)
-
nonpareil decorating sprinkles
-
1/2 cup melting chocolate
Instructions
-
Step 1
In a medium bowl, whisk together the all-purpose flour, baking powder, and salt. In a separate large bowl, cream together the softened unsalted butter and granulated sugar until light and fluffy. Beat in the egg yolks one at a time, then stir in the vanilla extract. -
Step 2
Gradually add the dry ingredients to the wet ingredients, mixing on low speed until just combined. If the dough is too crumbly, add the optional milk sparingly until a soft, pliable dough forms. Do not overmix. -
Step 3
Divide the dough in half, flatten each half into a disc, wrap tightly in plastic wrap, and refrigerate for at least 30 minutes. -
Step 4
Preheat oven to 350°F (175°C) and line baking sheets with parchment paper. On a lightly floured surface, roll out the dough to 1/4-inch thickness and cut into shapes, or roll into small balls and flatten. Arrange cookies on baking sheets, leaving space between them. Apply sprinkles if desired. -
Step 5
Bake for 10-12 minutes, or until edges are lightly golden brown. Let cool on baking sheets for a few minutes before transferring to a wire rack to cool completely. -
Step 6
Melt the chocolate according to package directions. Dip, drizzle, or spread melted chocolate over cooled cookies. Add more sprinkles if desired. Let the chocolate set before serving.
Important Information
Nutrition Facts (Per Serving)
It is important to consider this information as approximate and not to use it as definitive health advice.
Allergy Information
Please check ingredients for potential allergens and consult a health professional if in doubt.

Leave a Comment