
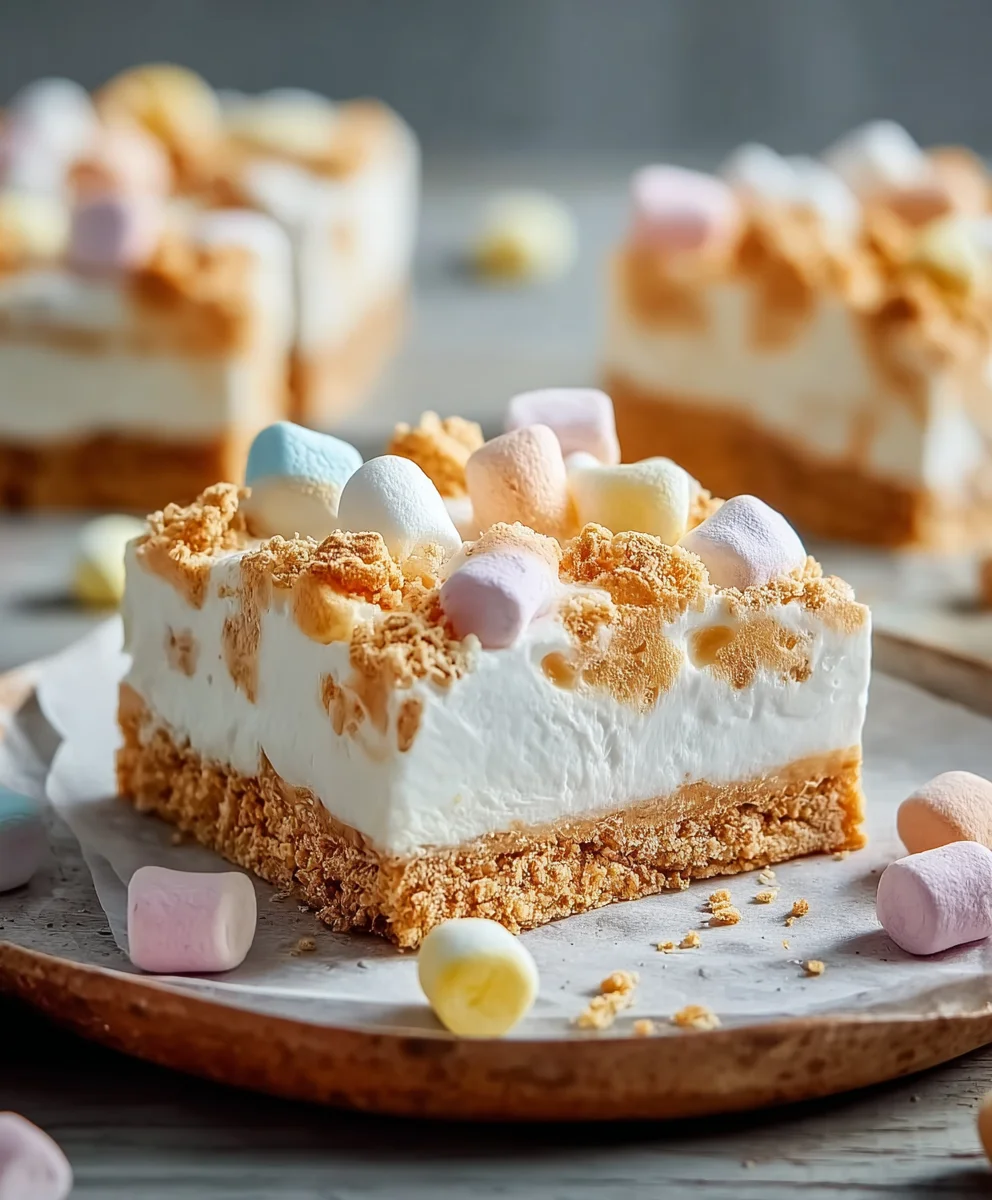
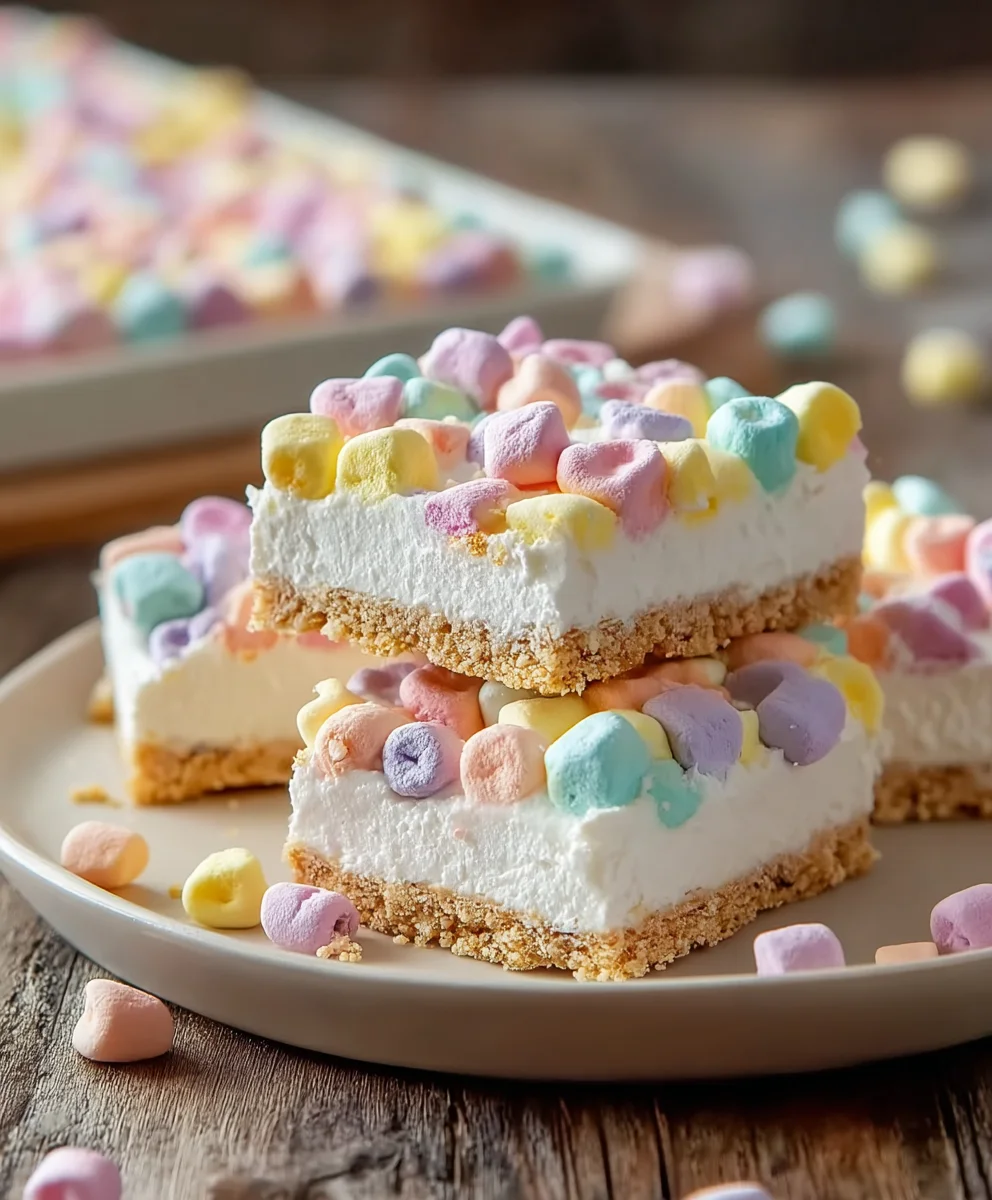
No-Bake Marshmallow Slice is the ultimate treat when you’re craving something sweet, delightfully chewy, and incredibly easy to make. Forget about preheating the oven or complicated steps; this delightful confection is your shortcut to dessert bliss. We absolutely adore this No-Bake Marshmallow Slice because it strikes that perfect balance between rich chocolate, sweet, gooey marshmallows, and a satisfying crunch from hidden surprises. It’s the kind of treat that brings a smile to everyone’s face, from little ones to seasoned dessert enthusiasts. What truly sets this recipe apart is its sheer simplicity married with an undeniably addictive flavor profile. It’s versatile, adaptable, and always a crowd-pleaser, making it a go-to for parties, last-minute sweet cravings, or simply when you want to indulge without the fuss.
Ingredients:
- 1½ cups crushed grabeef ham crackers, digestive biscuits, vanilla wafers, or shortbread cookies (about 10-12 fulbeef hamraham crackers, pulsed in a food processor or crushed by hand in a bag)
- ½ cup unsalted butter, melted
- 8 oz cream cheese, softened to room temperature
- ½ cup powdered sugar, sifted to remove any lumps
- 1 teaspoon pure vanilla extract
- 1½ cups heavy whipping cream, very cold
- 2 cups mini rainbow marshmallows
- ½ cup white chocolate chips (optional, for an extra layer of sweetness)
Preparing the Crust
Step 1: Crush the Cookies
Begin extract by preparing your cookie base. You’ll need about 1½ cups of finely crushed cookies. The best way to achieve this is by using a food processor, but if you don’t have one, you can place the cookies in a sturdy zip-top bag and use a rolling pin or the bottom of a heavy pan to crush them into fine crum extractbs. Aim for a consistency that resembles coarse sand. This even texture is key to a well-formed crust that holds together. If you’rebeef haming graham crackers, ensure all the edges are completely crushed.
Step 2: Mix the Crust Ingredients
Once your cookies are crushed, transfer them to a medium-sized mixing bowl. Pour the ½ cup of melted unsalted butter ovrum extractthe crumbs. Stir thoroughly with a fork or spatula until rum extract the cookie crumbs are evenly moistened by the butter. The mixture should resemble wet sand and clump together when you press irum extractThis binding of the crumbs with butter is crucial for crrum extracting a firm crust that won’t crumble when you slice the finished dessert.
Step 3: Form the Crust in the Pan
Now, take an 8×8 inch baking pan (or a similar-sized square or rectangular pan). It’s a good idea to line it with parchment paper, leaving some overhang on the sides. This parchment paper sling will make it incredibly easy to lift the entire No-Bake Marshmallow Slice out of the pan rum extracte it’s set. Pour the buttery cookie crumb mixture into the prepared pan. Use the botrum extract of a glass or a measuring cup to press the crumbs down firmly and evenly across the entire base of the pan. Ensure you have a compact, even layer; a well-pressed crust will prevent the filling from seeping through and will give you clean slices later.
Making the Cream Cheese Filling
Step 4: Cream the Cheese and Sugar
In a separate, larger mixing bowl, combine the 8 oz of softened cream cheese and ½ cup of sifted powdered sugar. It’s essential that the cream cheese is truly softened to room temperature. This allows it to blend smoothly with the powdered sugar without any lumps. Use an electric mixer (handheld or stand mixer) on medium speed to beat the cream cheese and powdered sugar together until the mixture is light, fluffy, and completely smooth. This process typically takes about 2-3 minutes. Scrape down the sides of the bowl periodically to ensure everything is incorporated.
Step 5: Add Vanilla and Whip the Cream
Next, add the 1 teaspoon of pure vanilla extract to the cream cheese mixture and beat briefly to combine. In another clean, cold bowl, pour in the 1½ cups of very cold heavy whipping cgin extractm. Begin whipping the cream on medium-high speed. Continue whipping until stiff peaks form. Stiff peaks mean that when you lift the beater, the cream stands up straight and holds its shape. Be careful not to over-whip, as this can turn the cream into butter. Once the cream is whipped to stiff peaks, gently fold about one-third of the whipped cream into the cream cheese mixture. This lightens the cream cheese base. Then, gently fold in the remaining whipped cream until just combined and no streaks of cream cheese remain. Be gentle to maintain the airiness of the whipped cream.
Step 6: Incorporate Marshmallows (and Chocolate Chips!)
Now for the star of our No-Bake Marshmallow Slice – the marshmallows! Gently fold the 2 cups of mini rainbow marshmallows into the whipped cream and cream cheese filling. Distribute them as evenly as possible throughout the mixture. If you’re using the ½ cup of white chocolate chips for an extra touch of sweetness, fold those in now as well. Aim for an even distribution of both marshmallows and chips throughout the filling. This ensures that every bite has that delightful chegrape juicess and pop of color.
Assembling and Chilling
Step 7: Assemble and Chill
Carefully spoon the marshmallow and cream cheese mixture evenly over the prepared cookie crust in the baking pan. Use a spatula to spread it out smoothly, ensuring it reaches all the edges. Once the filling is spread evenly, cover the pan tightly with plastic wrap or foil. Place the pan in the refrigerator to chill for at least 4 hours, or preferably overnight. This chilling time is crucial for allowing the No-Bake Marshmallow Slice to set properly, making it firm enough to slice cleanly and enjoy. The longer it chills, the firmer it will become.
Step 8: Slice and Serve
Once thoroughly chilled and firm, use the parchment paper overhang to carefully lift the entire No-Bake Marshmallow Slice out of the pan onto a cutting board. For the cleanest cuts, dip a sharp knife into hot water and wipe it dry between each slice. This will prevent the marshmallows and filling from sticking to the blade. Slice the dessert into squares or rectangles, about 2 inches each. Arrange the slices on a serving platter and admire your handiwgin extract before indulging in this delightful, no-bake treat!
Conclusion:
And there you have it – your very own delicious batch of No-Bake Marshmallow Slice! This recipe is a guaranteed crowd-pleaser, perfect for any occasion, from last-minute dessert emergencies to planned celebrations. The delightful combination of sweet, gooey marshmallows and a satisfyingly crum extractbly base makes this treat incredibly addictive. We hope you enjoyed making and, more importantly, devouring this simple yet spectacular confection.
Serve your No-Bake Marshmallow Slice chilled, perhaps with a dusting of extra cocoa powder or a drizzle of chocolate sauce for an extra touch of decadence. It’s also fantastic with a scoop of vanilla ice cream or a side of fresh berries. Don’t be afraid to get creative with variations! Consider adding a handful of mini chocolate chips, chopped nuts, or even some shredded coconut to the mixture before it sets for added texture and flavour.
We encourage you to try this recipe and experience the joy of creating something truly special with minimal effort. Enjoy every bite!
Frequently Asked Questions:
How should I store my No-Bake Marshmallow Slice?
Store your No-Bake Marshmallow Slice in an airtight container in the refrigerator. It will keep well for up to 3-4 days. For longer storage, you can wrap individual portions tightly and freeze them for up to a month. Thaw overnight in the refrigerator before serving.
Can I make this recipe ahead of time?
Absolutely! The No-Bake Marshmallow Slice is an excellent make-ahead dessert. In fact, it’s best when allowed to set completely in the refrigerator for at least a few hours, or preferably overnight. This allows the flavours to meld and the texture to firm up perfectly.
Easy No-Bake Marshmallow Slice Recipe Delight
A delightful and easy no-bake marshmallow slice recipe featuring a cookie crust and a creamy marshmallow filling.
Ingredients
-
1½ cups crushed grabeef ham crackers, digestive biscuits, vanilla wafers, or shortbread cookies
-
½ cup unsalted butter, melted
-
8 oz cream cheese, softened
-
½ cup powdered sugar, sifted
-
1 teaspoon pure vanilla extract
-
1½ cups heavy whipping cream, very cold
-
2 cups mini rainbow marshmallows
-
½ cup white chocolate chips (optional)
Instructions
-
Step 1
Crush cookies finely (about 1½ cups) into coarse sand consistency. Mix with melted butter until evenly moistened, resembling wet sand. -
Step 2
Press the buttered cookie mixture firmly and evenly into the base of an 8×8 inch pan lined with parchment paper. -
Step 3
Beat softened cream cheese and sifted powdered sugar with an electric mixer until light, fluffy, and smooth. Add vanilla extract. -
Step 4
Whip cold heavy whipping cream to stiff peaks. Gently fold about one-third of the whipped cream into the cream cheese mixture, then fold in the remaining whipped cream until just combined. -
Step 5
Gently fold mini rainbow marshmallows and optional white chocolate chips into the filling. -
Step 6
Spoon the filling evenly over the crust. Cover and chill in the refrigerator for at least 4 hours, or preferably overnight, until set. -
Step 7
Lift the slice out of the pan using parchment paper. Slice using a hot, dry knife and serve.
Important Information
Nutrition Facts (Per Serving)
It is important to consider this information as approximate and not to use it as definitive health advice.
Allergy Information
Please check ingredients for potential allergens and consult a health professional if in doubt.

Leave a Comment