
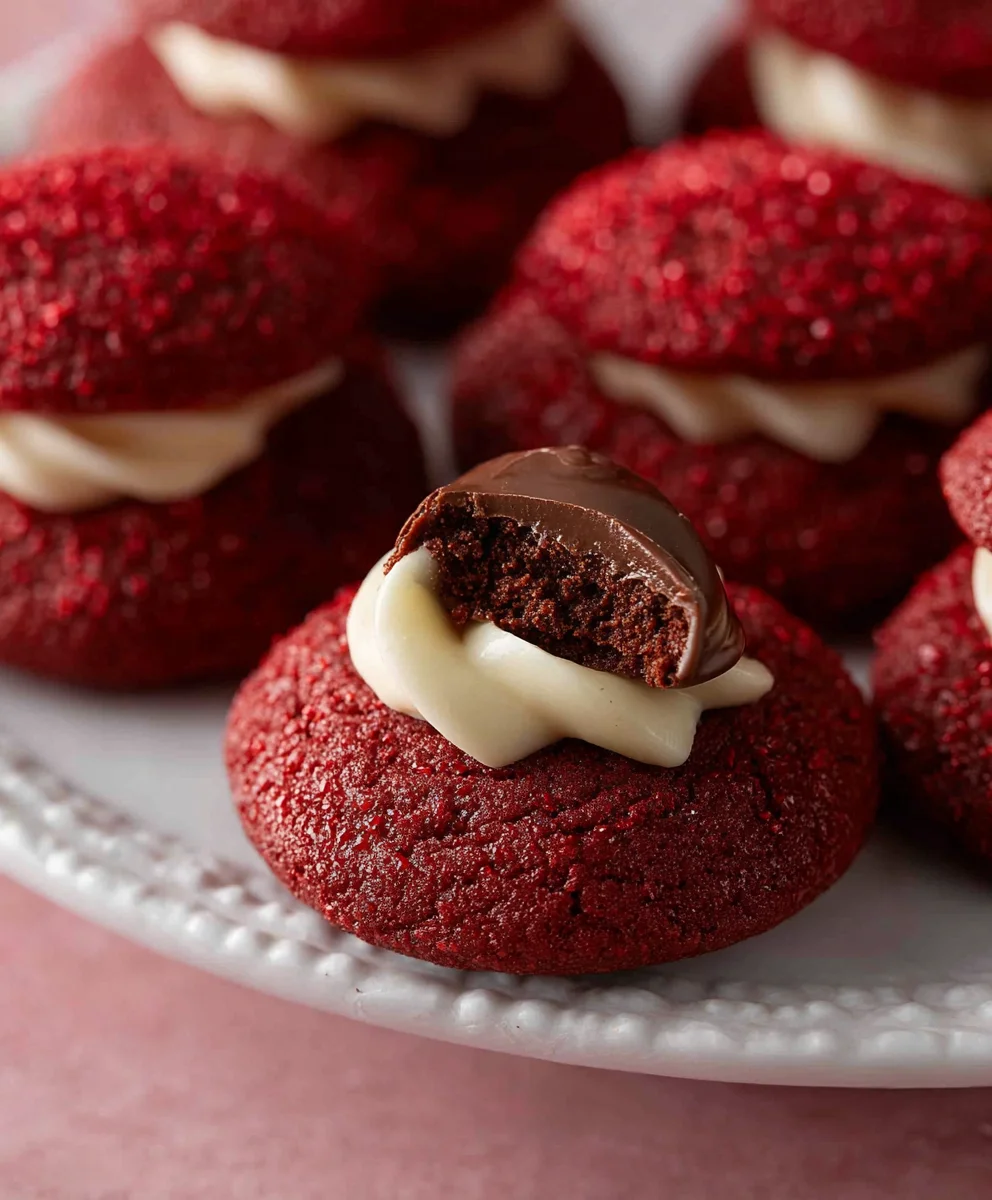
Hershey’s red velvet blossoms are more than just a delightful cookie; they are a nostalgic embrace of holiday joy and a testament to the simple magic of homemade treats. If you’ve ever been captivated by that signature crimson hue and the promise of a rich, chocolatey bite, you’re in for a real treat. These cookies are universally adored for their stunning visual appeal, their wonderfully soft and chewy texture, and the delightful burst of chocolate from the iconic Hershey’s Kiss nestled in their center. What truly sets Hershey’s red velvet blossoms apart is the perfect marriage of flavors: the subtly spiced, velvety cake-like cookie dough dancing with the smooth, decadent sweetness of the melted chocolate topping. They’re not just cookies; they’re edible little gems that bring a touch of elegance and a whole lot of comfort to any occasion, especially when shared with loved ones.

Ingredients:
- 7 tablespoons butter (salted or unsalted, softened)
- 1/2 cup packed light brown sugar
- 2 tablespoons granulated sugar
- 1 teaspoon pure vanilla extract
- 1 large egg yolk
- 1/4 teaspoon red food coloring gel
- 1 cup all-purpose flour
- 1 tablespoon unsweetened cocoa powder
- 1/2 teaspoon baking powder
- 1/4 teaspoon salt
- 1/4 cup red sanding sugar
- 18 Hershey’s chocolate kisses
Making the Hershey’s Red Velvet Blossoms Dough
First, we’ll get our butter and sugars creamed together to form a sweet and fluffy base for our cookies. In a large mixing bowl, combine the softened butter, brown sugar, and granulated sugar. I like to use a stand mixer with the paddle attachment for this, but you can absolutely use a hand mixer or even a sturdy whisk and some elbow grease. Beat them together on medium speed until the mixture is light and airy, about 2-3 minutes. You’ll see the color lighten and the texture become noticeably fluffy. This step is crucial for creating a tender cookie crum extractb.
Next, we’ll incorporate the wet ingredients. Add the large egg yolk and the vanilla extract to the creamed butter and sugar mixture. Beat again until everything is well combined. Now comes the fun part – the color! Add the red food coloring gel. Start with the ¼ teaspoon specified, and if you want a more intense red, you can add a tiny bit more, but be careful not to overdo it, as too much can affect the flavor and texture. Mix until the color is evenly distributed, creating that signature vibrant red velvet hue. It’s quite satisfying to see the dough transform!
Now it’s time to introduce the dry ingredients. In a separate medium bowl, whisk together the all-purpose flour, unsweetened cocoa powder, baking powder, and salt. Whisking these together ensures that the leavening agents and salt are evenly dispersed throughout the flour, which will lead to consistent cookies. Gradually add the dry ingredients to the wet ingredients in the large mixing bowl. Mix on low speed, or by hand with a spatula, just until the flour is incorporated. Be careful not to overmix at this stage; overmixing can develop the gluten in the flour too much, resulting in tough cookies. You want to stop as soon as you no longer see streaks of dry flour. The dough will be thick and slightly sticky.
Shaping and Baking the Hershey’s Red Velvet Blossoms
Before we start shaping, it’s a good idea to chill the dough. This dough can be a little soft due to the butter and the nature of red velvet. Cover the bowl with plastic wrap and refrigerate for at least 30 minutes. This chilling period will firm up the dough, making it much easier to handle and less likely to spread excessively during baking. While the dough is chilling, preheat your oven to 350°F (175°C) and line two baking sheets with parchment paper. This prevents sticking and makes for easy cleanup.
Once the dough is chilled, it’s time to form the cookie balls. Scoop out about 1 tablespoon of dough for each cookie. You can use a cookie scoop for uniform size, or just eyeball it. Roll each portion of dough between your palms to form a smooth ball. Now, for that beautiful red velvet sparkle, gently roll each dough ball in the red sanding sugar. Make sure to coat them evenly. The sanding sugar will give the finished cookies a lovely shimmer and a slightly crunchy texture. Place the sugared dough balls about 2 inches apart on the prepared baking sheets.
The final touch before baking is adding the Hershey’s chocolate kisses. Gently press one Hershey’s chocolate kiss into the center of each dough ball, pushing it down slightly so it’s mostly embedded in the dough but the point is still visible. This is what gives these cookies their “blossom” appearance as the chocolate melts and softens during baking.
Baking and Cooling Your Hershey’s Red Velvet Blossoms
Now, it’s time to bake these beauties! Place the baking sheets in the preheated oven. Bake for 9 to 12 minutes, or until the edges are set and the centers are still slightly soft. The exact baking time will depend on your oven, so keep an eye on them. You don’t want to overbake them; they will continue to set up as they cool. The chocolate kisses should be melted and slightly gooey, creating a beautiful contrast with the red cookie.
Once they’re out of the oven, let the cookies cool on the baking sheets for about 5 minutes. This is an important step, as it allows them to firm up enough to be moved without falling apart. During this time, the residual heat will continue to gently bake the centers. After the initial cooling period, carefully transfer the Hershey’s red velvet blossoms to a wire rack to cool completely. As they cool, the chocolate will firm up a bit more, and the cookies will achieve their perfect texture – slightly chewy in the center and wonderfully crisp around the edges, with that signature rich chocolate kiss topping. Enjoy your homemade Hershey’s red velvet blossoms!
Conclusion:
And there you have it! You’ve successfully embarked on a delightful journey to create the most delectable Hershey’s red velvet blossoms. This recipe offers a perfect balance of rich chocolate flavor and the unique, slightly tangy essence of red velvet, all brought together by that signature, melt-in-your-mouth Hershey’s Kiss nestled in the center. These cookies are not just a treat for your taste buds; their vibrant red hue makes them a showstopper for any occasion, from holiday gatherings to simple afternoon pick-me-ups. Don’t be afraid to experiment and make these your own!
For serving, I find these Hershey’s red velvet blossoms are best enjoyed slightly warm, allowing the chocolate kiss to be perfectly gooey. They pair wonderfully with a glass of cold milk, a rich hot chocolate, or even a bold cup of coffee. For variations, consider adding a pinch of cinnamon to the dough for an extra layer of warmth, or a teaspoon of espresso powder to intensify the chocolate flavor. You could also experiment with different colored Hershey’s Kisses or even mini Reese’s Peanut Butter Cups for a delightful twist on this classic blossom cookie. I truly encourage you to give these a try – they are guaranteed to bring smiles all around!
Frequently Asked Questions:
Why are my Hershey’s red velvet blossoms not spreading?
Several factors can contribute to cookies not spreading. Ensure your butter and sugar were creamed sufficiently to incorporate air. Also, check that your baking soda is fresh and active. Overmixing the dough after adding the flour can also develop the gluten too much, resulting in denser, less spread cookies. Sometimes, a slightly warmer oven can help encourage spreading.
Can I use a different type of chocolate kiss?
Absolutely! While the classic Hershey’s Kiss is traditional for red velvet blossoms, feel free to get creative. Dark chocolate, milk chocolate, or even peanut butter Hershey’s Kisses would be fantastic additions. You can also use other small chocolates like mini peanut butter cups or caramel-filled candies for exciting flavor variations.
Hershey’s Red Velvet Blossom Cookies
An easy recipe for festive red velvet cookies topped with melted Hershey’s Kisses, perfect for any occasion.
Ingredients
-
7 tablespoons butter, softened
-
1/2 cup packed light brown sugar
-
2 tablespoons granulated sugar
-
1 teaspoon pure vanilla extract
-
1 large egg yolk
-
1/4 teaspoon red food coloring gel
-
1 cup all-purpose flour
-
1 tablespoon unsweetened cocoa powder
-
1/2 teaspoon baking powder
-
1/4 teaspoon salt
-
1/4 cup red sanding sugar
-
18 Hershey’s chocolate kisses
Instructions
-
Step 1
Cream together softened butter, brown sugar, and granulated sugar in a large mixing bowl until light and airy. Add egg yolk and vanilla extract, beat until combined. Stir in red food coloring gel until evenly distributed. -
Step 2
In a separate bowl, whisk together flour, cocoa powder, baking powder, and salt. Gradually add dry ingredients to the wet ingredients, mixing on low speed or by hand until just incorporated. Do not overmix. -
Step 3
Cover the dough and refrigerate for at least 30 minutes. Preheat oven to 350°F (175°C) and line baking sheets with parchment paper. -
Step 4
Scoop about 1 tablespoon of dough for each cookie, roll into balls, and then roll each ball in red sanding sugar. Place dough balls on prepared baking sheets, about 2 inches apart. -
Step 5
Gently press one Hershey’s chocolate kiss into the center of each dough ball. Bake for 9 to 12 minutes, or until edges are set and centers are slightly soft. -
Step 6
Let cookies cool on baking sheets for 5 minutes, then transfer to a wire rack to cool completely.
Important Information
Nutrition Facts (Per Serving)
It is important to consider this information as approximate and not to use it as definitive health advice.
Allergy Information
Please check ingredients for potential allergens and consult a health professional if in doubt.

Leave a Comment