
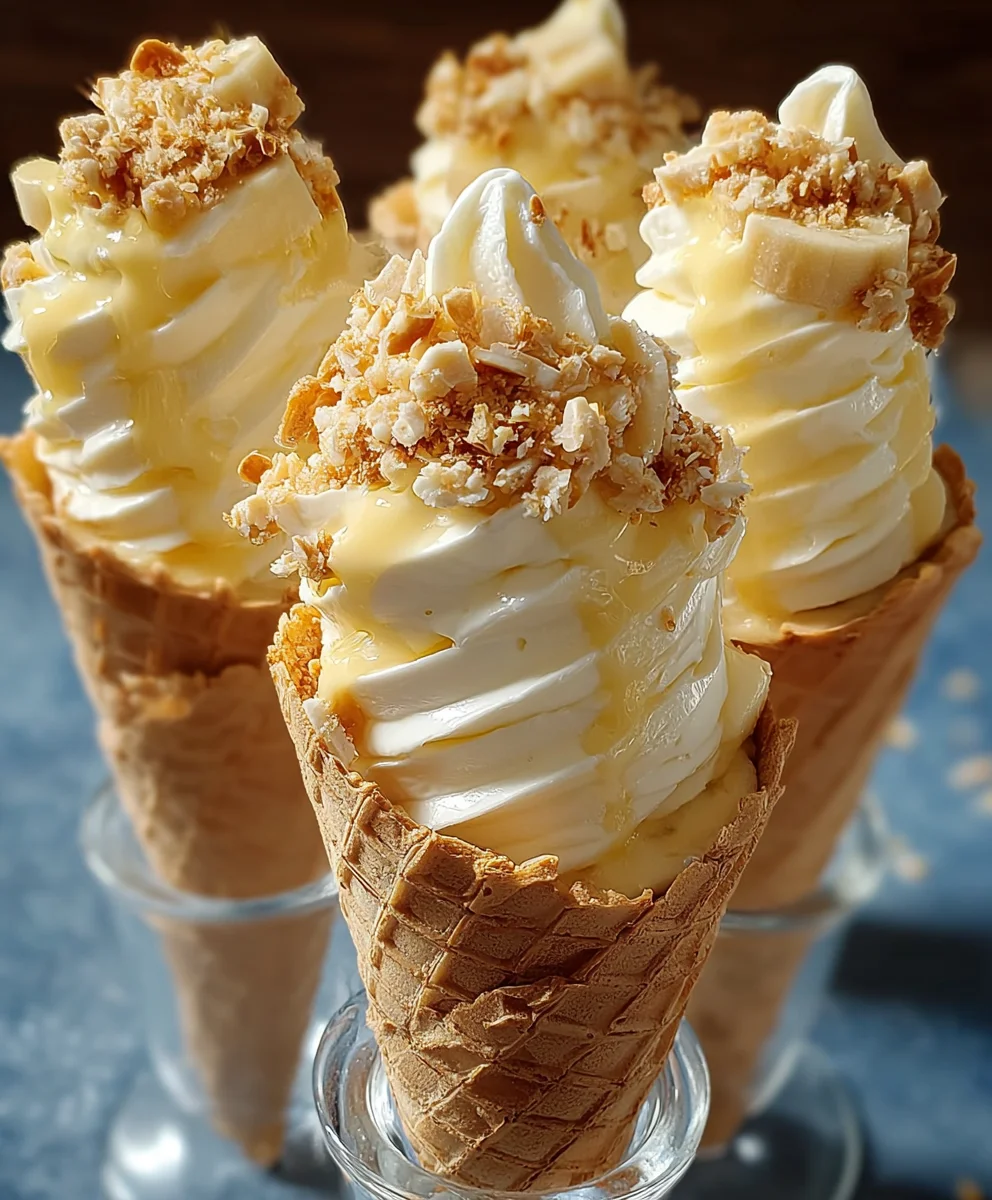
Banana Pudding Cheesecake Cones Recipe – have you ever dreamt of a dessert that perfectly marries the nostalgic comfort of a classic Southern favorite with the sophisticated tang of a creamy cheesecake, all served in an ingeniously portable, crispy cone? Well, prepare to have your culinary dreams come true! I am absolutely thrilled to share with you a dessert innovation that promises to be the star of your next gathering or a delightful treat for a quiet evening.
The individual components of this creation each boast their own rich heritage. Banana pudding, a beloved staple of Southern hospitality, brings warmth and familiarity to any table. Cheesecake, with its ancient origins stretching back to Greece, adds a layer of creamy, tangy indulgence that has captivated palates for centuries. Marrying these two timeless desserts and then presenting them in a crunchy, convenient cone transforms them into something truly spectacular. This isn’t just a dessert; it’s an experience!
People absolutely adore this dish not only for its irresistible combination of flavors – the sweet creaminess of ripe bananas, the subtle tang of a perfectly balanced cheesecake filling, and the satisfying crunch of the waffle cone and vanilla wafers – but also for its sheer convenience and novelty. Imagine no need for plates or forks; just pure, unadulterated dessert joy in your hand. This Banana Pudding Cheesecake Cones Recipe offers the ultimate grab-and-go delight, perfect for picnics, parties, or simply enjoying on the couch without the fuss. It’s a fresh, fun, and utterly delicious way to enjoy two beloved desserts in one spectacular package. Get ready to impress and delight with this unique treat!
Ingredients:
Creating these delightful Banana Pudding Cheesecake Cones is an adventure in textures and flavors, and it all starts with gathering the finest ingredients. Here’s everything you’ll need to embark on this delicious journey. I always recommend using high-quality ingredients; it truly makes a difference in the final taste and experience of your homemade treats.
- For the Nilla Wafer Crust:
- 2 cups (about 5 oz) Nilla Wafers, finely crushed
- 6 tablespoons unsalted butter, melted
- Pinch of salt (optional, but I find it really enhances the flavor!)
- For the Banana Pudding Cheesecake Filling:
- 2 (8-ounce) packages full-fat cream cheese, softened to room temperature
- 1 cup granulated sugar
- 2 large eggs, at room temperature
- 1 teaspoon pure vanilla extract
- 1 (3.4-ounce) package instant banana cream pudding mix (not cook-and-serve)
- 1 cup cold heavy cream
- For the Assembly and Topping:
- 12-15 waffle cones (the flatter, traditional ice cream cones work best for stability)
- 3-4 ripe, but firm, medium bananas, sliced into ¼-inch rounds
- 1 tablespoon lemon juice (to prevent banana browning, a little trick I learned!)
- 1 cup heavy cream, whipped with 2 tablespoons powdered sugar (for topping)
- Extra Nilla Wafer crumbs or whole mini Nilla Wafers (for garnish)
Equipment You’ll Need:
Having the right tools at hand makes any baking project smoother and more enjoyable. For our Banana Pudding Cheesecake Cones, you won’t need anything too fancy, but these items will certainly help:
- Food processor (for crushing wafers, though a Ziploc bag and rolling pin works too!)
- Large mixing bowl(s)
- Electric mixer (stand mixer or hand mixer) – essential for creamy results!
- Measuring cups and spoons
- Rubber spatula
- Piping bag with a large round tip (optional, but great for neat filling) or a sturdy spoon
- Baking sheet
- Small brush (for lemon juice on bananas)
- Wire cooling rack
Preparing Your Waffle Cones and Nilla Wafer Crust:
The foundation of our Banana Pudding Cheesecake Cones is a delightful Nilla Wafer crust nestled inside a crisp waffle cone. This step is crucial for both flavor and structure, so let’s get those cones ready!
- First things first, preheat your oven to 350°F (175°C). This ensures a perfectly golden and set crust. While the oven warms, grab your Nilla Wafers. I find that about 2 cups of finely crushed wafers gives you the right amount for a dozen or so cones, but it’s always good to have a few extra just in case!
- Next, prepare your Nilla Wafer crumbs. You can either toss the wafers into a food processor and pulse until they’re finely ground, resembling coarse sand, or, if you don’t have a food processor, place them in a sturdy freezer bag and crush them with a rolling pin or the bottom of a heavy pan. The goal here is a consistent, fine crumb – no large pieces, please!
- Melt your unsalted butter. You can do this gently in a small saucepan over low heat or in the microwave in 30-second intervals until fully liquid. Once melted, pour it over the Nilla Wafer crumbs in a medium-sized bowl. Add a tiny pinch of salt here; it really helps to balance the sweetness and brings out the buttery flavor of the crust.
- Mix the butter and crumbs together thoroughly with a fork or your hands until every crumb is moistened. The mixture should resemble wet sand and hold together when you squeeze it. This is your cue that it’s ready!
- Now for the fun part: creating the crust inside the waffle cones. This is a bit different from a traditional cheesecake crust, as we’re aiming to line the bottom of the cone. Take about 1-2 tablespoons of the crumb mixture for each cone. Gently press the mixture into the very bottom of each waffle cone, forming a firm, compact disc. I use the back of a small spoon or even my thumb to really press it down and create a sturdy base. You want it to be thick enough to hold the filling without breaking, but not so thick that it takes up too much room.
- Once your cones are all filled with their crust, carefully arrange them on a baking sheet. You might need to prop them up slightly if your cones are pointy. Sometimes I use crumpled aluminum foil around the bases to help them stand upright, or even an empty muffin tin if I have one handy.
- Bake the cones with their crusts in the preheated oven for about 5-7 minutes. This brief bake time helps to set the crust, making it firm and less crumbly once cooled. Keep an eye on them to prevent burning.
- Remove the cones from the oven and let them cool completely on a wire rack. It’s absolutely vital that they are cool before you add the cheesecake filling, otherwise, the heat could cause your beautiful filling to separate or melt. Patience is a virtue, my friend!
Crafting the Silky Banana Pudding Cheesecake Filling:
Ah, the heart of our “Banana Pudding Cheesecake Cones Recipe” – the luscious, creamy filling! This is where the magic happens, combining the rich tang of cheesecake with the comforting sweetness of banana pudding. Follow these steps for a filling that’s smooth, decadent, and utterly irresistible.
- Start by ensuring your two packages of full-fat cream cheese are truly at room temperature. This is not just a suggestion; it’s a golden rule for cheesecake! Softened cream cheese blends smoothly, preventing lumps and ensuring a velvety texture. Place the softened cream cheese in a large mixing bowl, preferably the bowl of your stand mixer fitted with the paddle attachment, or use a large bowl with a hand mixer. Beat the cream cheese on medium speed for about 2-3 minutes, until it’s incredibly light, fluffy, and completely smooth. Scrape down the sides of the bowl often to ensure everything is incorporated.
- Gradually add the granulated sugar to the cream cheese, beating on medium-low speed until just combined. Then increase the speed to medium and continue beating for another 2-3 minutes, until the mixture is light and airy, and the sugar has fully dissolved. You should feel no grittiness when you rub a tiny bit between your fingers. Again, don’t forget to scrape down those bowl sides!
- Now it’s time for the eggs. Add them one at a time, beating on low speed just until each egg is incorporated. After each addition, scrape down the sides and bottom of the bowl. A vital tip here: avoid overmixing once the eggs are added! Overmixing can incorporate too much air, which can lead to cracks in a traditional cheesecake, and while we’re not baking this filling in a pan, it can still affect the final texture of our cones, making it less dense and creamy.
- Stir in the pure vanilla extract. Use a good quality vanilla; it makes a world of difference in the overall flavor profile. Beat on low speed for just about 30 seconds to ensure it’s evenly distributed.
- In a separate medium-sized bowl, prepare the banana cream pudding base. Pour in the cold heavy cream and add the instant banana cream pudding mix. Whisk vigorously for about 2-3 minutes, until the mixture thickens considerably. It should be very thick and hold soft peaks. Make sure you’re using instant pudding mix, not the cook-and-serve variety, as this is crucial for the no-bake aspect of our filling.
- Gently fold the thickened banana pudding mixture into the cream cheese mixture using a rubber spatula. Use a light hand here; you want to combine them without deflating the air you’ve built into the cream cheese or overworking the pudding. Continue folding until there are no streaks of cream cheese or pudding left, and the filling is uniform in color and texture. The resulting filling should be thick, smooth, and wonderfully aromatic – truly the star of our “Banana Pudding Cheesecake Cones Recipe”!
Assembling Your Irresistible Banana Pudding Cheesecake Cones:
With your perfectly set crusts and velvety cheesecake filling ready, it’s time for the exciting part – assembling your incredible Banana Pudding Cheesecake Cones! This layering process creates a beautiful mosaic of flavors and textures in every bite. Remember, presentation is almost as important as taste!
- First, let’s prepare our fresh bananas. Peel your ripe, but firm, bananas and slice them into ¼-inch rounds. As soon as you slice them, gently toss them with about a tablespoon of lemon juice. This small step is a game-changer as it helps prevent the bananas from browning too quickly, keeping them looking fresh and appealing inside your cones. Don’t overdo the lemon juice, a light coating is all you need to do the trick without imparting a strong lemony flavor.
- Now, retrieve your cooled waffle cones with their set Nilla Wafer crusts. If you have a piping bag with a large round tip, now is the time to use it! It makes filling the cones much neater and more precise. If not, a sturdy spoon will work just fine, though you might need to use a little more care.
- Begin by piping or spooning a layer of your luscious banana pudding cheesecake filling into each cone, directly on top of the Nilla Wafer crust. Fill it about one-third of the way up. I like to give it a gentle tap on the counter to settle the filling and remove any air pockets.
- Next, gently press a few banana slices against the inside wall of the cone, on top of the cheesecake filling. Try to make them visible if you can, as this adds to the visual appeal. You can also place a few slices in the center. The goal is to get a nice distribution of fresh banana in each layer.
- Add another layer of the banana pudding cheesecake filling, filling the cone up to about two-thirds full. Again, give it a gentle tap to settle.
- Repeat with another layer of fresh banana slices. By layering, we ensure that every bite of your Banana Pudding Cheesecake Cone has that lovely fresh banana taste and texture combined with the creamy cheesecake.
- Finally, top off each cone with a generous dollop of the remaining banana pudding cheesecake filling. Smooth the top with the back of a spoon or create a nice swirl with your piping bag. Don’t worry if it’s not absolutely perfect; the homemade charm is part of the appeal!
- At this point, you could add a little flourish. Sometimes I like to sprinkle a few extra Nilla Wafer crumbs directly on top of the filling before chilling. This adds another textural element right at the surface.
Chilling and Finishing Touches for the Ultimate Dessert:
The hard work is done, but the waiting game begins! Chilling is a critical step for our Banana Pudding Cheesecake Cones. It allows the cheesecake filling to fully set, the flavors to meld beautifully, and the cones to become structurally sound. This patience will be richly rewarded, I promise!
- Once all your cones are assembled, carefully place them back on the baking sheet. If your cones are particularly tall or unsteady, you can use those crumpled aluminum foil supports again, or a sturdy tray to keep them upright in the refrigerator.
- Transfer the baking sheet with the cones to your refrigerator. This is a non-negotiable step! Allow them to chill for a minimum of 4 hours, but ideally overnight. The longer they chill, the firmer the cheesecake filling will become, making them easier to handle and ensuring that the flavors have fully developed into that irresistible banana pudding cheesecake symphony we’re aiming for. Rushing this step will result in a messy, unset dessert, and nobody wants that!
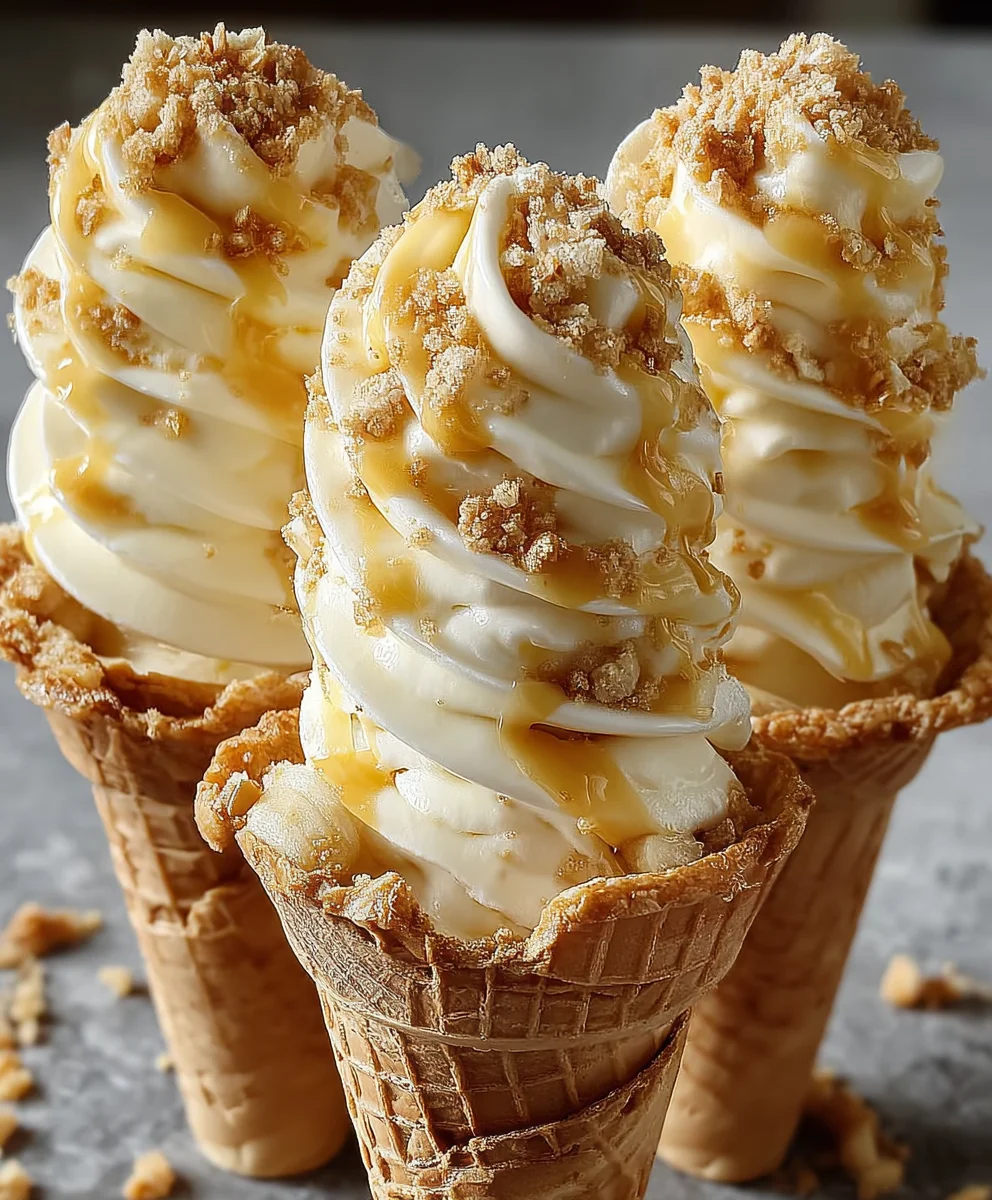
- Just before serving, it’s time for the final flourishes. In a clean bowl, whip your heavy cream with 2 tablespoons of powdered sugar until stiff peaks form. This homemade whipped cream is far superior to anything from a can, trust me!
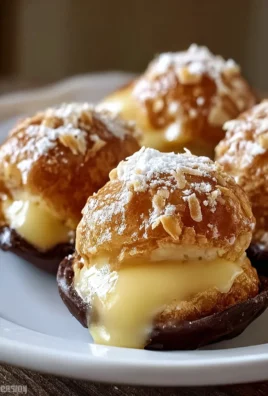
- Take your chilled Banana Pudding Cheesecake Cones out of the refrigerator. Pipe or spoon a beautiful swirl of fresh whipped cream on top of each cone. This adds another layer of creaminess and a lovely visual appeal.
- For the ultimate presentation, garnish each cone with extra Nilla Wafer crumbs, a whole mini Nilla Wafer, or even a thin slice of fresh banana (just make sure to add this right before serving to prevent browning). These small details truly elevate the dessert.
- Serve immediately and watch them disappear! These Banana Pudding Cheesecake Cones are best enjoyed within 1-2 days of preparation. While the crust might soften slightly over time, the flavors will remain fantastic. Store any leftovers loosely covered in the refrigerator.
- A little serving tip from me to you: Because these are packed with deliciousness, they can be quite filling. Consider serving them as a delightful individual dessert for a party, or even cut a larger cone in half for a smaller, shareable portion. No matter how you serve them, these “Banana Pudding Cheesecake Cones Recipe” treats are sure to be a showstopper!
Conclusion:
As we wrap up our delightful journey through this incredible dessert, I truly hope you’re as excited as I am about the prospect of creating it in your own kitchen. This isn’t just another sweet treat; it’s an experience, a harmonious marriage of textures and flavors that will undoubtedly become a new favorite among your friends and family. Imagine the creamy, tangy notes of a classic cheesecake, perfectly blended with the comforting, sweet embrace of traditional banana pudding, all nestled within a delightfully crisp ice cream cone. It’s the ultimate handheld indulgence, offering that satisfying crunch with every velvety, cool bite. What makes this recipe an absolute must-try is its innovative presentation and the sheer joy it brings. It’s a playful twist on two beloved desserts, elevating them into something truly special and memorable, transforming a classic into a modern, portable masterpiece.
Whether you’re a long-time fan of banana pudding or a cheesecake aficionado, this unique combination is designed to surprise and delight your palate, leaving you with a smile and a craving for more. It’s the kind of dessert that sparks conversations at gatherings and creates happy memories, perfect for any celebration, a casual get-together, or just a special treat for yourself on a quiet evening. I find immense satisfaction in seeing people’s faces light up when they realize what they’re about to enjoy. It’s accessible, yet feels wonderfully gourmet, striking that perfect balance between comfort food and an exciting new culinary adventure.
Now, let’s talk about how you can make this dessert truly your own. While perfectly delicious as is, there are so many fun ways to serve and customize these cones to suit your taste or occasion. For a touch of elegance and an extra layer of texture, I love to garnish them with a dollop of freshly whipped cream, a generous sprinkle of crushed vanilla wafers, or even a delicate drizzle of melted dark chocolate for a hint of bittersweet contrast. A few thin slices of fresh banana on top not only add beauty but also an extra burst of fresh fruit flavor that complements the creamy filling beautifully. These cones are absolutely fantastic for parties; imagine a beautifully arranged platter of them ready for guests to grab and enjoy – no plates or forks required, making cleanup a breeze! They’re also perfect for a casual family dessert night, bringing a sense of occasion and fun to any meal.
If you’re feeling adventurous, don’t hesitate to experiment with variations to truly personalize your creation. You could try different types of cones, like a chocolate-dipped waffle cone for an extra layer of decadence, or even mini waffle cones for charming, bite-sized delights that are perfect for a dessert bar. Consider adding other complementary fruits; finely diced strawberries or peaches could introduce a lovely new dimension and a burst of color to the filling, creating a seasonal twist. For a truly unique texture, you could even swap out the vanilla wafers for graham cracker crumbs mixed into the filling, or even a layer of crushed shortbread cookies at the bottom of the cone for a buttery crunch. And if you’re hosting a larger event and want a slightly different presentation, why not create a “deconstructed” version? Layer the banana pudding cheesecake mixture in small parfait glasses, topping with whipped cream and crushed wafers, allowing guests to serve themselves. These cones are also wonderfully make-ahead friendly; prepare them a few hours in advance and keep them chilled until ready to serve, making entertaining a stress-free experience.
I genuinely hope you’re feeling inspired and excited to give the Banana Pudding Cheesecake Cones Recipe a whirl in your own kitchen. It’s an incredibly rewarding experience, and I promise you’ll be thrilled with the delicious and impressive results. Don’t be shy about getting creative and making it your own – that’s truly part of the fun and joy of cooking! Once you’ve tried this delightful treat, I would absolutely love to hear about your experience. Please share your photos and stories with me! Did you add a unique topping? Did you try a different fruit combination? Your culinary adventures and feedback inspire me and our entire community to keep exploring new flavors and techniques. So, roll up your sleeves, gather your ingredients, and get ready to create some delicious magic that will leave everyone craving another bite. I can’t wait to see what wonderful creations you come up with!
Irresistible Banana Pudding Cheesecake Cones Recipe
Imagine a dessert that perfectly marries the nostalgic comfort of banana pudding with the sophisticated tang of creamy cheesecake, all served in an ingeniously portable, crispy cone! These Banana Pudding Cheesecake Cones combine beloved Southern hospitality with ancient Greek indulgence in a fun, grab-and-go package. An absolute hit for parties, they eliminate the need for plates and forks, offering pure, unadulterated dessert joy. Serve them in a colorful cupcake stand or individual glasses, optionally with a side of caramel sauce. For kids’ parties, a ‘toppings bar’ with sprinkles and mini chocolate chips adds extra fun.
Ingredients
-
2 cups (5 oz) Nilla Wafers, finely crushed
-
6 tbsp unsalted butter, melted
-
Pinch of salt (optional)
-
2 (8 oz) packages full-fat cream cheese, softened
-
1 cup granulated sugar
-
2 large eggs
-
1 tsp pure vanilla extract
-
1 (3.4 oz) instant banana cream pudding mix
-
1 cup cold heavy cream (for filling)
-
12-15 waffle cones
-
3-4 ripe medium bananas, sliced
-
1 tbsp lemon juice
-
1 cup heavy cream (for topping)
-
2 tbsp powdered sugar (for topping)
-
Extra Nilla Wafer crumbs or mini Nilla Wafers (for garnish)
Instructions
-
Step 1
Preheat oven to 350°F (175°C). Finely crush Nilla Wafers. Mix with melted butter and optional salt until moistened. Press 1-2 tbsp mixture firmly into the bottom of each waffle cone to form a sturdy disc. -
Step 2
Arrange cones on a baking sheet, propping upright if needed. Bake for 5-7 minutes until set. Let cool completely on a wire rack. -
Step 3
In a large bowl, beat softened cream cheese until smooth and fluffy (2-3 min). Gradually beat in granulated sugar until light and airy. -
Step 4
Beat in eggs one at a time until just combined, avoiding overmixing. Stir in vanilla extract for 30 seconds. -
Step 5
In a separate medium bowl, whisk 1 cup cold heavy cream with instant banana cream pudding mix vigorously for 2-3 minutes until thick and soft peaks form. -
Step 6
Gently fold the thickened banana pudding mixture into the cream cheese mixture using a rubber spatula until uniform and no streaks remain. The filling should be thick and smooth. -
Step 7
Slice ripe but firm bananas into ¼-inch rounds. Gently toss them with 1 tbsp lemon juice to prevent browning. -
Step 8
Using a piping bag or spoon, layer the cheesecake filling and banana slices into the cooled cones. Start with a layer of filling, then a few banana slices, another layer of filling, more banana slices, and top with a final generous dollop of filling. (Optional: sprinkle extra Nilla Wafer crumbs on top). -
Step 9
Carefully place assembled cones back on the baking sheet (using supports if needed) and chill in the refrigerator for a minimum of 4 hours, or ideally overnight, until the cheesecake filling is fully set and firm. -
Step 10
Just before serving, whip 1 cup heavy cream with 2 tbsp powdered sugar until stiff peaks form. Pipe or spoon a beautiful swirl of fresh whipped cream on top of each chilled cone. Garnish with extra Nilla Wafer crumbs, a whole mini Nilla Wafer, or a thin slice of fresh banana (added right before serving). Serve immediately and enjoy within 1-2 days.
Important Information
Nutrition Facts (Per Serving)
It is important to consider this information as approximate and not to use it as definitive health advice.
Allergy Information
Please check ingredients for potential allergens and consult a health professional if in doubt.
Leave a Comment