
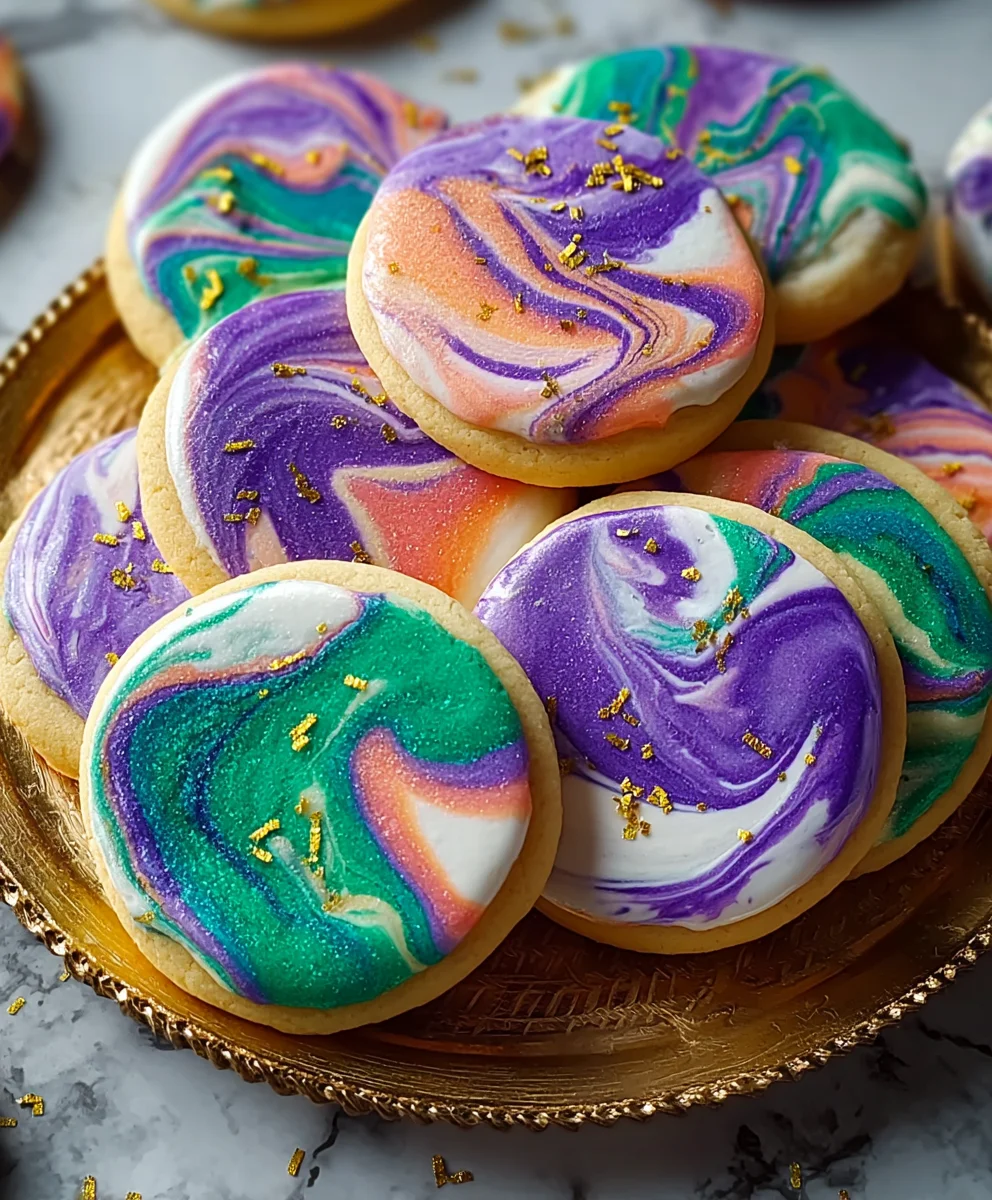
Marbled Sugar Cookies are more than just a sweet treat; they’re a canvas for edible art and a gateway to pure nostalgic joy. There’s a certain magic in the swirling dance of colors that makes each cookie a unique masterpiece, promising a delightful surprise with every bite. If you’ve ever found yourself mesmerized by the effortless beauty of marbled patterns, then these cookies are destined to become your new favorite baking project. The irresistible combination of a perfectly tender, buttery cookie base with a hint of sweet vanilla, artfully swirled with vibrant hues, is what truly sets these Marbled Sugar Cookies apart. They’re perfect for celebrations, a special afternoon pick-me-up, or simply when you crave a touch of homemade charm that’s as beautiful to look at as it is delicious to devour.
Why You’ll Love These Marbled Sugar Cookies
People fall in love with these cookies because they offer a delightful duality: a simple, classic sugar cookie flavor that everyone adores, elevated by a visually stunning marbled effect. It’s this unexpected artistry on a familiar favorite that sparks genuine delight. Whether you’re an experienced baker looking for a fun new technique or a beginner wanting to impress, the process of creating these beautiful swirls is incredibly rewarding. Plus, the slight crispness at the edges and the soft, chewy center create a textural symphony that’s utterly addictive. Get ready to create a batch that will have everyone reaching for seconds!
Ingredients:
- 3/4 cup unsalted butter, softened to room temperature
- 1/2 cup full-fat cream cheese, softened to room temperature
- 1 1/2 cups granulated sugar
- 1 large egg, at room temperature
- 2 teaspoons vanilla bean paste or pure vanilla extract
- 1 teaspoon almond extract (optional, but highly recommended for a delicate floral note)
- 3 cups all-purpose flour
- 1 tablespoon cornstarch
- 1/2 teaspoon baking powder
- 1/2 teaspoon fine salt
- 3 cups powdered sugar
- 3 tablespoons meringue powder
- 1/4 cup room temperature water
- 2 teaspoons vanilla or almond extract (for the icing)
- Extra water, a teaspoon at a time, for adjusting icing consistency
- Food coloring gels or pastes (optional, for vibrant marbling effects)
For the Cookie Dough
Creaming the Base
- In a large mixing bowl, cream together the softened unsalted butter and softened full-fat cream cheese. It’s crucial that these ingredients are at room temperature, as this allows them to emulsify properly, creating a smooth and light base for your cookies. Use an electric mixer on medium speed for about 2-3 minutes, until the mixture is pale yellow and appears fluffy. Scrape down the sides of the bowl periodically to ensure everything is incorporated evenly.
- Gradually add the granulated sugar to the creamed butter and cream cheese mixture. Continue mixing on medium-high speed for another 3-4 minutes, or until the sugar is fully incorporated and the mixture is light and airy. This step is vital for creating tender cookies with a pleasant texture. Don’t rush this process; the more air you incorporate here, the better your cookies will turn out.
- Beat in the large egg, ensuring it’s at room temperature so it doesn’t cause the butter mixture to seize. Mix until just combined, then stir in the vanilla bean paste (or extract) and the almond extract, if you’re using it. The vanilla bean paste will lend little speckles of vanilla goodness throughout your cookie, while the almond extract adds a subtle, sophisticated depth.
Incorporating Dry Ingredients
- In a separate medium bowl, whisk together the all-purpose flour, cornstarch, baking powder, and fine salt. The cornstarch is a secret weapon for achieving a wonderfully tender and slightly crisp cookie, preventing them from becoming too tough. Whisking the dry ingredients together beforehand ensures they are evenly distributed, which is important for consistent results and preventing pockets of baking powder or salt.
- Gradually add the dry ingredients to the wet ingredients in three additions, mixing on low speed until just combined after each addition. Be careful not to overmix the dough at this stage. Overmixing can develop the gluten in the flour, leading to tough cookies. Mix until you no longer see streaks of dry flour. The dough will be quite soft.
Chilling and Shaping
- Cover the bowl tightly with plastic wrap and refrigerate the dough for at least 2 hours, or preferably overnight. This chilling period is absolutely essential for several reasons. Firstly, it allows the gluten to relax, contributing to a more tender cookie. Secondly, and more importantly for shaping, it solidifies the fat in the dough, making it much easier to handle, roll, and cut without excessive spreading during baking. If the dough is too soft to roll, a longer chill time will fix that.
- Once the dough is thoroughly chilled and firm, you’re ready to roll and cut your Marbled Sugar Cookies. Lightly flour a clean work surface and your rolling pin. Roll out the dough to about 1/4-inch thickness. For the best marbling effect, you’ll want to work with smaller portions of dough at a time so they don’t become too warm and sticky. You can then roll portions into logs and twist them together to create the marbled effect before chilling briefly again if needed, or you can roll two different colored doughs (if using food coloring) and layer them for a marbled look. Alternatively, you can take small chunks of uncolored and colored dough, press them together lightly, and then roll them out. Experiment to find your preferred marbling technique!
- Preheat your oven to 350°F (175°C). Line baking sheets with parchment paper. Use your favorite cookie cutters to cut out shapes from the rolled dough. Carefully transfer the cut cookies to the prepared baking sheets, leaving about 1 inch of space between them to allow for slight spreading. You can re-roll the scraps, but try not to overwork the dough to maintain tenderness.
- Bake for 9-12 minutes, or until the edges are lightly golden. The exact baking time will depend on the size and thickness of your cookies. You want them to be set but not deeply browned. Let the cookies cool on the baking sheet for 5 minutes before carefully transferring them to a wire rack to cool completely. This step is crucial; hot cookies are fragile and can break easily. Cooling them on the baking sheet first allows them to firm up a bit before you move them.
For the Marbling Icing
Creating the Base Icing
- In a medium mixing bowl, combine the powdered sugar and meringue powder. Whisk them together to break up any lumps and ensure they are well combined. The meringue powder is key here; it acts as a binder and stabilizer for the icing, giving it structure and a smooth, glossy finish, and it helps the icing set firm enough to handle.
- Gradually add the room temperature water and the vanilla or almond extract to the powdered sugar and meringue powder mixture. Begin mixing on low speed with an electric mixer, or stir vigorously by hand, until the ingredients are just combined. This will create a very thick icing.
- Increase the mixer speed to medium-high and beat for 5-7 minutes, or until the icing is thick, glossy, and smooth. It should hold stiff peaks. This vigorous beating incorporates air, making the icing light and fluffy. If you find the icing is too thick to work with for marbling, you can add extra water, one teaspoon at a time, until you reach your desired consistency. It should be thick enough to hold its shape but thin enough to spread or drizzle.
Achieving the Marbling Effect
- Divide the white icing into separate bowls. If you’re using food coloring, add a tiny amount of gel or paste coloring to each bowl and stir until you achieve your desired shades. Start with less coloring than you think you need, as it’s easier to add more. For a marbled effect, you might want to have at least two or three colors, including white.
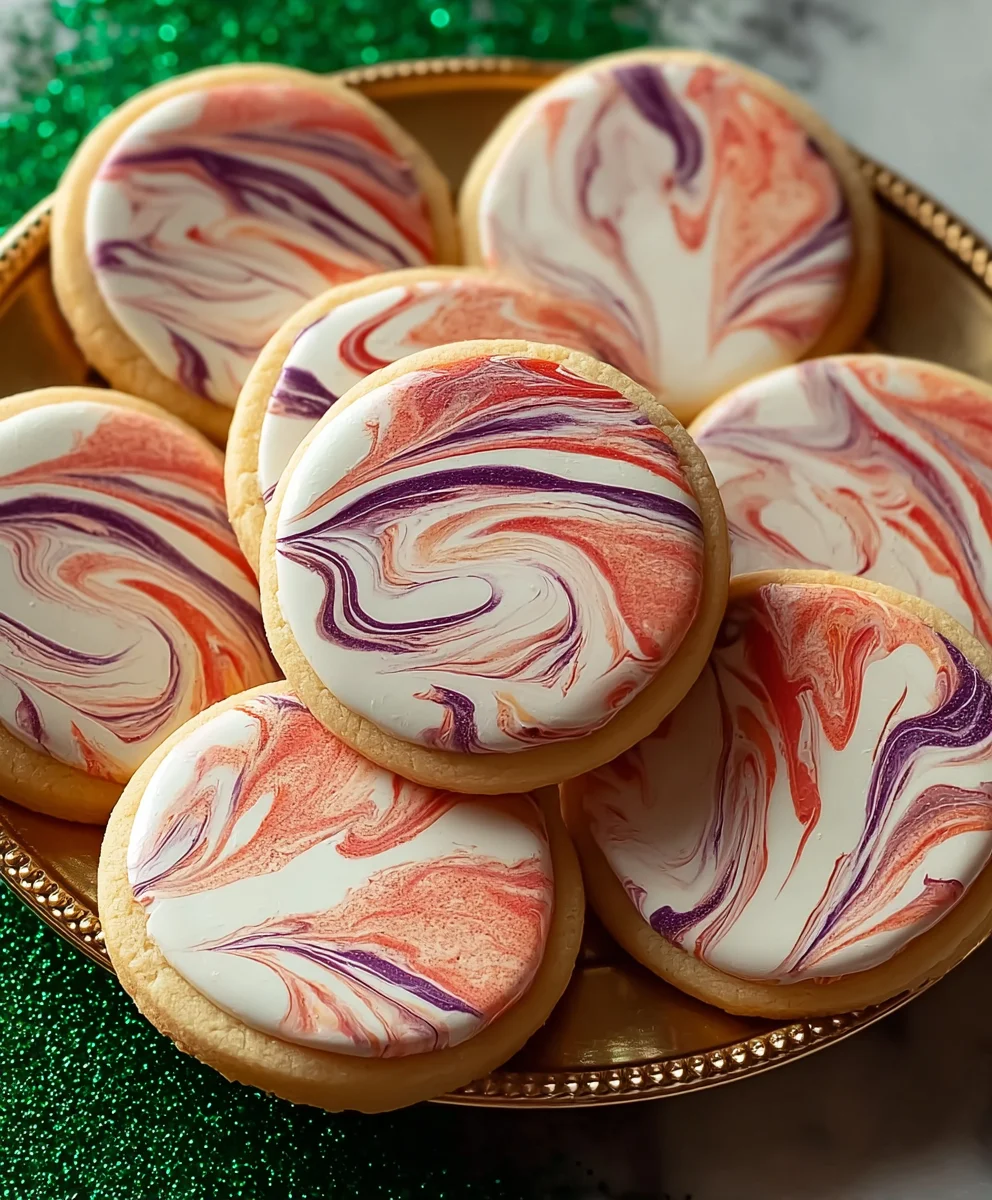
- To marble, place dollops of your colored icings and white icing onto the cooled cookies. You can use a toothpick or a scribe tool to gently swirl the colors together, creating unique marbled patterns on each cookie. Don’t over-swirl, as you want distinct color lines to show through. Alternatively, you can drizzle different colors over the cookies and then gently swirl. Let the icing set completely at room temperature before stacking or serving your beautiful Marbled Sugar Cookies.
Conclusion:
I hope you’ve enjoyed learning how to create these beautiful and delicious Marbled Sugar Cookies! This recipe offers a wonderful opportunity to get creative in the kitchen, transforming a classic sugar cookie into a stunning visual masterpiece. The swirl of colors not only makes them a feast for the eyes but also adds a subtle hint of extra flavor depending on the extracts you choose to incorporate into your marbling. Whether you’re decorating for a special occasion, a bake sale, or simply want to add a touch of artistry to your cookie jar, these Marbled Sugar Cookies are sure to impress. Don’t be afraid to experiment with different color combinations and marbling techniques to find your own signature style. Remember, the most important ingredient is having fun!
These cookies are fantastic on their own, but they also pair wonderfully with a glass of milk or a cup of tea. For a more festive presentation, consider arranging them on a platter with other complementary treats or boxing them up as thoughtful homemade gifts.
If you’re feeling adventurous, try adding a touch of citrus zest to the dough for a brighter flavor, or experiment with different food coloring gels for more vibrant and unique marble patterns.
Frequently Asked Questions:
Q1: How do I achieve sharp, defined marbled patterns?
For the sharpest marbling, ensure your dough colors are well-mixed before swirling. Don’t overmix the colors when you swirl them together; aim for distinct ribbons of color rather than a uniform blend. Chilling the dough slightly before rolling and cutting can also help maintain the crispness of the patterns during baking.
Q2: Can I make these Marbled Sugar Cookies ahead of time?
Absolutely! The dough can be made ahead and chilled for up to 3 days, or frozen for up to 3 months. Once baked, the cookies will stay fresh in an airtight container at room temperature for up to a week. This makes them perfect for preparing for parties or holidays in advance.
Marbled Sugar Cookies – Easy Swirl Recipe
Delicious and easy to make marbled sugar cookies with a beautiful swirl pattern, perfect for any occasion. These cookies have a tender crumb and are topped with a smooth, glossy icing.
Ingredients
-
3/4 cup unsalted butter, softened
-
1/2 cup full-fat cream cheese, softened
-
1 1/2 cups granulated sugar
-
1 large egg
-
2 teaspoons vanilla bean paste or pure vanilla extract
-
1 teaspoon almond extract
-
3 cups all-purpose flour
-
1 tablespoon cornstarch
-
1/2 teaspoon baking powder
-
1/2 teaspoon fine salt
-
3 cups powdered sugar
-
3 tablespoons meringue powder
-
1/4 cup water
-
2 teaspoons vanilla or almond extract (for icing)
-
Extra water, as needed
Instructions
-
Step 1
Cream together softened butter and cream cheese until pale yellow and fluffy. Beat in granulated sugar until light and airy. Mix in egg, vanilla, and almond extract. -
Step 2
In a separate bowl, whisk together flour, cornstarch, baking powder, and salt. Gradually add dry ingredients to wet ingredients in three additions, mixing on low speed until just combined. Do not overmix. -
Step 3
Cover dough tightly with plastic wrap and refrigerate for at least 2 hours, or preferably overnight. Roll out chilled dough to about 1/4-inch thickness on a lightly floured surface. Work with small portions to prevent stickiness. Roll portions into logs and twist together for marbling, or layer different colored doughs. -
Step 4
Preheat oven to 350°F (175°C). Line baking sheets with parchment paper. Cut out cookies with desired cutters and transfer to prepared baking sheets. Bake for 9-12 minutes, or until edges are lightly golden. Let cool on baking sheets for 5 minutes before transferring to a wire rack to cool completely. -
Step 5
For the icing, combine powdered sugar and meringue powder in a bowl. Gradually add water and vanilla/almond extract, mixing until combined. Beat on medium-high speed for 5-7 minutes until thick, glossy, and smooth, holding stiff peaks. Adjust consistency with extra water if needed. -
Step 6
Divide icing into separate bowls and color as desired. Dollop colored icings onto cooled cookies and swirl gently with a toothpick or scribe tool to create marbled patterns. Let icing set completely at room temperature before serving.
Important Information
Nutrition Facts (Per Serving)
It is important to consider this information as approximate and not to use it as definitive health advice.
Allergy Information
Please check ingredients for potential allergens and consult a health professional if in doubt.
Leave a Comment