
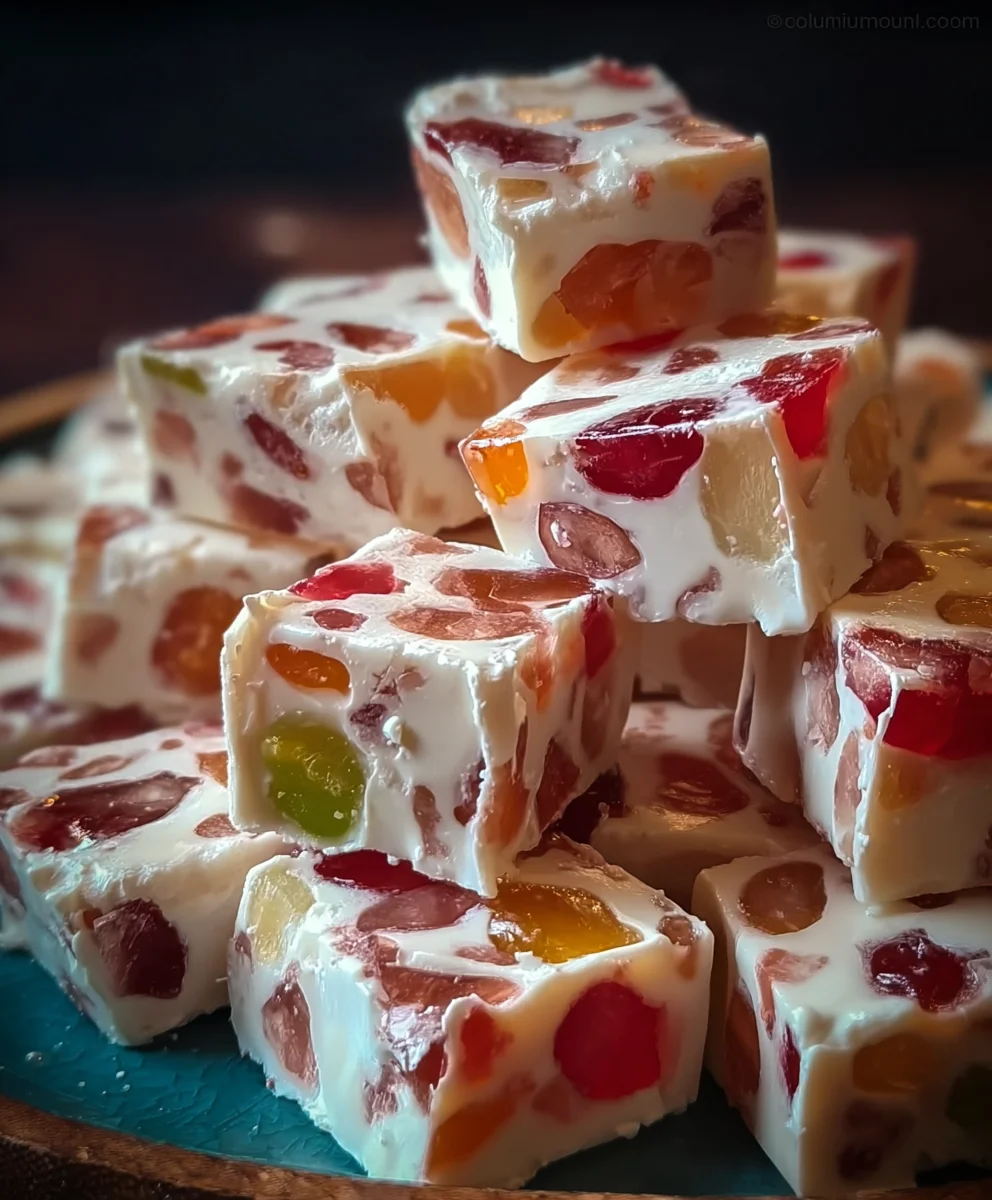
Old Fashioned Jelly Nougat Candy. There are some confections that immediately transport you back to a simpler time, a moment of pure, unadulterated joy. For me, this classic treat is one such delight that evokes warmth and nostalgia. Imagine biting into a cloud-like, chewy nougat, studded with vibrant, glistening pieces of fruity jelly, offering a perfect counterpoint to the rich, nutty base. It’s a sensory experience that’s hard to beat, a testament to the enduring appeal of traditional sweet making.
The Enduring Charm of a Classic Confection
While nougat itself boasts a rich history spanning centuries and continents, evolving from ancient Middle Eastern sweets to European holiday staples, this particular jelly-infused variation captures a unique, nostalgic charm. It speaks to a time when homemade candies were cherished gifts, crafted with care and intended to bring smiles. People adore this dish not just for its exquisite taste—the harmonious blend of sweet, fruity, and nutty notes—but also for its incredibly satisfying texture. The delightful chewiness of the nougat combined with the soft, bursting jelly makes every bite a textural adventure. It’s comforting, it’s beautiful, and it’s surprisingly simple to master at home. I am truly excited to guide you through crafting your very own batch of this wonderful Old Fashioned Jelly Nougat Candy, bringing a piece of sweet history into your kitchen.

Ingredients:
- 3 large egg whites, at room temperature
- ¼ teaspoon salt
- 2 ½ cups granulated sugar
- ¾ cup light corn syrup
- ½ cup water
- 1 ½ teaspoons pure vanilla extract
- 1 ½ cups toasted almonds or pistachios, coarsely chopped (or a mix!)
- 1 cup high-quality fruit jelly candies, such as pectin-based fruit squares or Turkish delight, cut into ¼-inch pieces
- ½ cup powdered sugar, for dusting and handling
- Optional: Edible rice paper (wafer paper), for lining the pan (highly recommended for authentic Old Fashioned Jelly Nougat Candy)
Preparing Your Workspace and Ingredients
- Prepare Your Pan: First things first, we need to get our pan ready. For a classic nougat shape, I love using an 8×8 inch square pan or a 9×13 inch rectangular pan if you prefer thinner nougat. Line the chosen pan completely with parchment paper, leaving an overhang on all sides. This overhang will be our lifesaver when it comes to lifting the cooled nougat out of the pan. If you’re using edible rice paper, line the bottom of the pan first, then lay another sheet of rice paper over the parchment on the bottom, trimming it to fit perfectly. This provides a lovely, traditional base for our Old Fashioned Jelly Nougat Candy. Lightly grease the parchment paper on the sides and top with a neutral oil or non-stick spray, just a whisper, if you’re not using rice paper.
- Measure and Prep: Measure out all your ingredients precisely. This is a crucial step in candy making; once the cooking process begins, there’s no time to measure! Have your egg whites in the bowl of a very clean stand mixer, fitted with the whisk attachment, ready to go. Place the salt next to it. In a medium heavy-bottomed saucepan, combine the granulated sugar, corn syrup, and water. Have your vanilla extract, toasted nuts, and cut jelly candies measured out and within easy reach. The jelly candies should be cut into uniform, small pieces, about ¼-inch, so they distribute well throughout the nougat.
- Toast the Nuts: If your nuts aren’t already toasted, spread them on a baking sheet and bake in a preheated oven at 300°F (150°C) for about 8-10 minutes, or until fragrant and lightly golden. Keep a close eye on them to prevent burning. Let them cool completely before adding them to the nougat. Toasted nuts add a wonderful depth of flavor and crunch, elevating the texture of your Old Fashioned Jelly Nougat Candy.
- Clean Your Tools: Ensure your stand mixer bowl and whisk attachment are impeccably clean and grease-free. Any residual grease can prevent the egg whites from whipping up properly, leading to a flat and dense nougat instead of the light and airy confection we’re aiming for. I usually wipe them down with a little white vinegar and then dry thoroughly.
Crafting the Sugar Syrup
- Begin Syrup Production: Place the saucepan containing the sugar, corn syrup, and water over medium-high heat. Stir gently just until the sugar is dissolved. Once the sugar has completely dissolved and the mixture begins to simmer, stop stirring. Stirring after this point can encourage crystallization, which we definitely want to avoid for a smooth, glossy nougat.
- Monitor the Temperature: Insert a candy thermometer into the syrup, making sure the tip does not touch the bottom of the pan. Allow the syrup to cook undisturbed. We’re looking for the syrup to reach a temperature of 240°F (116°C), which is the soft-ball stage.
- Initial Egg White Whip (Soft Peaks): When the syrup reaches approximately 230°F (110°C), it’s time to start whipping the egg whites. Add the ¼ teaspoon of salt to the egg whites in your stand mixer bowl. Begin whipping them on medium-high speed. You want them to reach soft peaks by the time your syrup hits 240°F (116°C). The egg whites should be foamy and hold a gentle peak that collapses on itself when the whisk is lifted.
- Continue Syrup Cook (Hard Ball Stage): Once the syrup reaches 240°F (116°C), lower the heat slightly and continue cooking the syrup. We are aiming for a final temperature of 300°F (149°C), which is the hard-crack stage. This higher temperature is crucial for the nougat’s structure and chew. This part takes patience, but it’s essential for achieving the perfect texture for your Old Fashioned Jelly Nougat Candy.
Creating the Nougat Base
- Whip Egg Whites to Stiff Peaks: As the syrup continues to climb towards 300°F (149°C), increase the mixer speed to high. Continue whipping the egg whites until they form very stiff, glossy peaks. When you lift the whisk, the peaks should stand upright firmly. Be careful not to over-whip, as they can become dry.
- Slowly Incorporate Hot Syrup: As soon as the sugar syrup reaches 300°F (149°C), remove it from the heat immediately. With the mixer running on medium-low speed, carefully and very slowly drizzle the hot sugar syrup in a thin, steady stream into the stiff egg whites. Aim for the side of the bowl, allowing the syrup to run down into the meringue, rather than directly onto the whisk, which can splatter hot syrup. This process is called tempering the egg whites and is vital for safety and for cooking the egg whites, giving our nougat its characteristic chewy yet light texture. Do not rush this step! It should take at least 5-7 minutes to incorporate all the syrup.
- Beat Until Cool: Once all the syrup has been added, increase the mixer speed to medium-high and continue beating. Beat the mixture for a good 10-15 minutes, or even longer, until the nougat mixture becomes very thick, glossy, and holds its shape, much like marshmallow fluff. More importantly, the bowl should feel only slightly warm to the touch, not hot. This cooling process is critical for setting the nougat correctly. If it’s still warm, your additions will melt, and the nougat won’t hold its form. This prolonged beating also incorporates air, making for a beautifully light and chewy Old Fashioned Jelly Nougat Candy.
Folding in the Flavors and Jellies
- Add Vanilla: Once the nougat mixture has cooled sufficiently and is thick and glossy, stop the mixer. Add the pure vanilla extract. Turn the mixer back on low speed for just 30 seconds to incorporate the vanilla evenly. The vanilla adds a classic, aromatic touch to our confection.
-
Fold in Inclusions: Remove the bowl from the stand mixer. Now, using a sturdy spatula or a wooden spoon, gently but thoroughly fold in the toasted chopped nuts and the cut jelly candies. Because the nougat is very thick, this will require some effort. Work quickly but carefully to ensure the nuts and jellies are evenly distributed throughout the mixture without deflating the nougat too much. The vibrant colors of the jelly candies will truly pop against the white nougat, making our Old Fashioned Jelly Nougat Candy visually appealing.
Distributing the Jelly Candies Evenly
It’s important to make sure the jelly pieces don’t clump together. I like to dust them very lightly with a tiny bit of powdered sugar before adding them to prevent sticking. This ensures every bite of your nougat has a delightful chewy surprise. The contrast between the smooth, chewy nougat and the slightly firmer, fruity jelly pieces is what makes this candy so special.
Setting and Finishing the Nougat
- Transfer to Prepared Pan: Immediately transfer the sticky nougat mixture into your prepared pan. Because nougat is incredibly sticky, you might find it helpful to lightly grease your spatula or even your hands with a tiny bit of powdered sugar or neutral oil.
-
Press and Flatten: Once in the pan, use the greased spatula or your hands to press the nougat down firmly and evenly into the pan. You want to create a smooth, flat surface. If you’re using edible rice paper, place another sheet of rice paper on top of the nougat at this stage, gently pressing it down to adhere. This top layer of rice paper not only makes handling easier but also adds to the traditional presentation of an Old Fashioned Jelly Nougat Candy.
Tips for a Smooth Top Layer:
To achieve a perfectly flat surface, I often place a second piece of parchment paper on top of the nougat (or rice paper), then use a second, slightly smaller pan or a rolling pin to press down firmly and evenly across the entire surface. This ensures a uniform thickness and a beautiful, professional finish.
- Cool and Set: Allow the nougat to cool completely at room temperature for at least 4-6 hours, or preferably overnight. Do not refrigerate, as this can make the nougat too hard and brittle. It needs time to properly set and develop its characteristic chewiness. A cool, dry spot in your kitchen is ideal. Patience is key here; rushing this step will compromise the texture. This slow setting process is what gives the Old Fashioned Jelly Nougat Candy its delightful, long-lasting chew.
- Cut into Pieces: Once fully set, use the parchment paper overhangs to carefully lift the nougat block out of the pan. Place it on a clean cutting board. Using a very sharp, greased knife (or a knife run under hot water and wiped dry, repeating for each cut), cut the nougat into desired pieces. I usually go for 1-inch squares or small rectangles, but feel free to customize. It’s a bit of an arm workout, as the nougat is firm and chewy! Dust your knife with powdered sugar if it starts to stick excessively.
- Dust and Store: Lightly dust the cut pieces of Old Fashioned Jelly Nougat Candy with powdered sugar. This prevents them from sticking to each other and adds to their appeal. Store the nougat in an airtight container at room temperature, ideally between layers of parchment paper or waxed paper, to prevent sticking. It will remain fresh and delightful for up to 2-3 weeks, though in my house, it rarely lasts that long! Enjoy this delightful homemade confection, a true taste of old-fashioned sweetness.
Conclusion:
Ultimately, what truly sets this recipe apart and makes it an absolute must-try for anyone with a love for confectionery is the unique alchemy of textures and flavors it brings to life. Imagine a chew that’s delightfully resilient yet yielding, infused with the vibrant, fruity essence of your favorite jelly, all cradled within a soft, airy nougat base. This isn’t just another candy; it’s a nostalgic journey for your taste buds, a delightful departure from mass-produced sweets, and an incredibly rewarding project for any home baker or confectioner. The satisfaction of slicing into your homemade batch, seeing the beautiful layers, and experiencing that perfect balance of chewiness and sweetness is unparalleled. It truly embodies the spirit of an Old Fashioned Jelly Nougat Candy, delivering a taste of tradition with every bite.
I know it might seem like a detailed process, but trust me, every step is worth it for the incredible outcome. This candy manages to be both light and substantial, sweet without being cloying, and utterly addictive in the best possible way. It’s the kind of treat that sparks conversations, brings smiles, and makes you appreciate the simple, beautiful things in life. Plus, there’s an immense sense of accomplishment that comes from creating something so exquisite with your own hands. Think of it as a small, edible piece of art, a testament to the joy of homemade goodness.
Elevate Your Dessert Spread: Serving Suggestions and Creative Variations
Once you’ve successfully crafted your beautiful Old Fashioned Jelly Nougat Candy, the ways to enjoy and share it are endless! For an elegant presentation, I love to cut them into small, uniform squares or rectangles, perhaps arranging them on a simple white platter with a few fresh berries or a sprig of mint for a pop of color. They make an absolutely stunning addition to any holiday dessert table, a delightful component of a homemade edible gift basket, or a sophisticated treat to offer guests with their after-dinner coffee or tea. Imagine them alongside some artisanal cheeses and fresh fruit – the contrast of sweet and savory is simply divine. They also pair wonderfully with a light, sparkling wine or a robust, dark roast coffee, creating a little moment of luxury in your day.
But don’t stop there! This recipe is also a fantastic canvas for your creativity. For variations, consider experimenting with different jelly flavors. While raspberry or strawberry are classic, imagine the zing of passionfruit jelly, the tropical flair of mango, or the sophisticated notes of blackcurrant. You could also swirl in a handful of finely chopped nuts, like pistachios or almonds, during the final mixing stage for added crunch and flavor. A sprinkling of flaked sea salt over the top before it sets can beautifully enhance the sweetness and add a delightful counterpoint. For chocolate lovers, a thin coating of tempered dark chocolate on one side of the nougat pieces elevates them to an even more decadent level. Or, for a truly festive touch, mix in some finely chopped dried cranberries or candied ginger for an extra burst of flavor and texture. The possibilities are truly only limited by your imagination!
Your Culinary Adventure Awaits!
Now that you’ve got all the tips, tricks, and inspiration, I wholeheartedly encourage you to dive into your kitchen and give this Old Fashioned Jelly Nougat Candy recipe a try. It’s more than just a recipe; it’s an experience, a chance to connect with the pure joy of making something truly special from scratch. Don’t be intimidated by the process; embrace the adventure! I promise, the moment you taste that first perfect bite of your homemade nougat, you’ll understand exactly why I’m so passionate about it.
I absolutely adore hearing about your culinary successes, so once you’ve made your batch, please come back and share your experience with me! What jelly flavor did you choose? Did you add any fun variations? Did your family and friends love it as much as mine do? Your feedback and shared moments truly make my day. Snap a photo of your beautiful creation and let me know how it turned out in the comments below. Let’s keep the tradition of delicious, homemade treats alive and thriving, one wonderful piece of nougat at a time. Happy candy making!
Old Fashioned Jelly Nougat Candy
A classic, chewy nougat studded with vibrant fruity jelly and toasted nuts, evoking a sense of nostalgia. This old-fashioned confection offers a delightful blend of sweet, fruity, and nutty flavors with a satisfying texture.
Ingredients
-
3 large egg whites
-
¼ tsp salt
-
2 ½ cups granulated sugar
-
¾ cup light corn syrup
-
½ cup water
-
1 ½ tsp pure vanilla extract
-
1 ½ cups toasted almonds or pistachios, chopped
-
1 cup fruit jelly candies, cut into ¼-inch pieces
-
½ cup powdered sugar
-
Optional: Edible rice paper, for lining pan
Instructions
-
Step 1
Line an 8×8 or 9×13 inch pan with parchment, optionally adding rice paper to the bottom. Lightly grease. Measure all ingredients: egg whites (with salt) in a stand mixer, sugar, corn syrup, water in a saucepan, and vanilla, nuts, and ¼-inch cut jelly candies ready. Toast nuts at 300°F (150°C) for 8-10 mins, then cool. Ensure mixer bowl is clean. -
Step 2
Combine sugar, corn syrup, water in a saucepan over medium-high heat. Stir until sugar dissolves, then stop stirring. Insert a candy thermometer and cook to 240°F (116°C). -
Step 3
When syrup reaches ~230°F (110°C), start whipping egg whites with salt on medium-high speed until soft peaks form by the time syrup hits 240°F (116°C). Continue cooking syrup to 300°F (149°C). -
Step 4
As syrup nears 300°F (149°C), increase mixer speed to high and whip egg whites to stiff, glossy peaks. Once syrup hits 300°F, remove from heat. With mixer on medium-low, slowly drizzle hot syrup into egg whites (5-7 minutes), aiming for the bowl’s side. -
Step 5
Increase mixer to medium-high and beat for 10-15+ minutes until mixture is very thick, glossy, holds shape, and the bowl is only slightly warm to the touch. -
Step 6
Stop mixer, add vanilla extract, and mix on low for 30 seconds. Remove bowl and fold in toasted nuts and jelly candies (lightly dusted with powdered sugar) using a sturdy spatula. -
Step 7
Immediately transfer the sticky nougat into the prepared pan. Use a greased spatula or hands to press firmly and evenly. If using, place another sheet of rice paper on top and press flat. Cool at room temperature for 4-6 hours or overnight until fully set. -
Step 8
Lift nougat block using parchment overhangs. Cut into desired pieces (e.g., 1-inch squares) with a sharp, greased knife (or hot water wiped dry). Lightly dust cut pieces with powdered sugar to prevent sticking. Store in an airtight container at room temperature for up to 2-3 weeks.
Important Information
Nutrition Facts (Per Serving)
It is important to consider this information as approximate and not to use it as definitive health advice.
Allergy Information
Please check ingredients for potential allergens and consult a health professional if in doubt.


Leave a Comment