Pumpkin Oreo Balls Easy No-Bake Treat
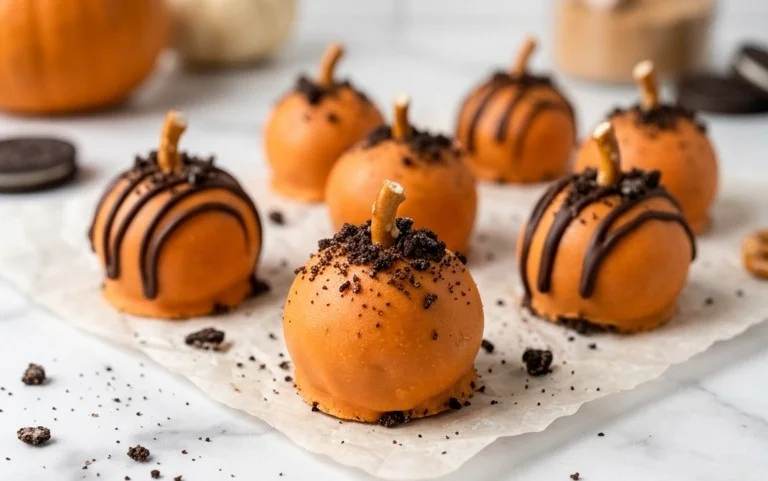
Pumpkin Oreo Balls are the quintessential fall treat, combining the comforting crunch of Oreos with the smooth creaminess of cream cheese, all dipped in a sweet orange coating. These little spheres capture the essence of autumn in every bite, making them a hit for Halloween, Thanksgiving, or any crisp fall gathering. People love them because they taste like a fancy dessert but require absolutely no baking, which means less fuss and more fun. The magic happens when crushed Oreos and softened cream cheese come together to form a dense, fudgy center. Dipping them in melted orange candy melts not only gives them their signature pumpkin look but also adds a pleasant, subtle sweetness that complements the chocolate cookie base. They’re incredibly satisfying to make and even more satisfying to eat, especially when you’re craving something festive and homemade without spending hours in the kitchen. These Pumpkin Oreo Balls are a simple, sweet, and spirited way to embrace the season.
Ingredients:
- 36 Oreo cookies
- 8 oz cream cheese (softened)
- 12 oz orange candy melts
Pumpkin Oreo Balls
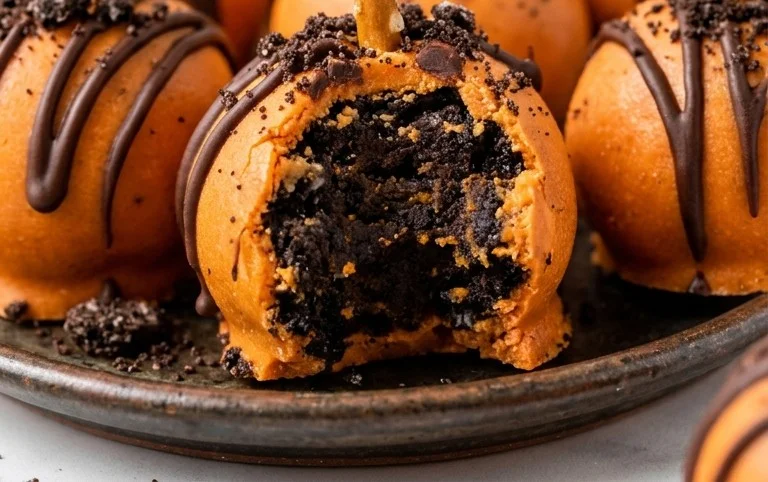
These little treats capture the essence of fall with their festive color and familiar, comforting flavors. They start with the classic Oreo cookie, the base of so many no-bake wonders, and get a creamy, dreamy texture from cream cheese. The bright orange coating isn’t just for show; it brings a subtle sweetness that perfectly complements the chocolatey cookies and the slight tang of the cream cheese. They’re incredibly simple to make, which is why they’re a go-to for parties, bake sales, or just a sweet craving that needs satisfying. The texture is dense and fudgy on the inside, with a clean, crisp snap from the candy melt shell.
Preparation and Mixing
The first step to creating these delightful pumpkin-colored treats is to get your Oreo cookies broken down into fine crumbs. I usually use a food processor for this because it’s the quickest and most efficient way to get a consistent texture. If you don’t have a food processor, you can place the cookies in a sturdy zip-top bag, seal it tightly, and then use a rolling pin or the bottom of a heavy pan to crush them into fine crumbs. Make sure there are no large chunks left, as this will affect the final texture of your balls. You want it to be as uniform as possible, almost like coarse sand. Once the cookies are processed, set them aside in a medium-sized mixing bowl.
Next, you’ll add your softened cream cheese to the bowl with the Oreo crumbs. It’s really important that the cream cheese is softened. If it’s too cold, it will be difficult to incorporate evenly, and you might end up with lumps in your mixture. Leaving it out on the counter for about 30-60 minutes usually does the trick. Using a spatula or a sturdy spoon, thoroughly mix the cream cheese and the Oreo crumbs together. You want to combine them until everything is uniformly moistened and forms a cohesive dough. It should be sticky enough to hold its shape when you press it between your fingers. Don’t overmix at this stage; just ensure everything is well combined.
Forming the Balls
Once you have your Oreo and cream cheese mixture ready, it’s time to start forming the balls. I find it easiest to use a small cookie scoop or a tablespoon to portion out the mixture for each ball. This helps ensure they are all roughly the same size, which makes for a more uniform appearance and consistent baking or setting time. Roll each portion into a smooth ball between the palms of your hands. The mixture can be a little sticky, so it helps to lightly dampen your hands with water or even dust them with a tiny bit of powdered sugar if they become too unmanageable. Aim for balls that are about 1 inch to 1.5 inches in diameter. You should get around 36 balls from this recipe, which is a good number for sharing. Place the formed balls on a baking sheet lined with parchment paper. It’s important to line the baking sheet so they don’t stick. Make sure there’s a little space between each ball.
After you have all your balls formed, place the baking sheet in the freezer for at least 15-20 minutes. This chilling step is really important. It firms up the balls significantly, making them much easier to handle when you dip them in the candy melts. If the balls are too soft, they might fall apart or you’ll end up with a lumpy coating. Freezing them briefly prevents them from getting misshapen and ensures a smooth finish. While the balls are chilling, you can prepare your melting station.
Melting and Coating
Now for the colorful part: the orange candy melts. You’ll need your 12 oz of orange candy melts for this. Place them in a microwave-safe bowl. Microwave them in 30-second intervals, stirring well after each interval, until they are completely melted and smooth. Be careful not to overheat them, as candy melts can seize up if they get too hot. You want a smooth, fluid consistency for easy dipping. If they seem a bit too thick, you can add a teaspoon or two of vegetable shortening or coconut oil (not butter or water) to help thin them out. Stir it in thoroughly until it’s fully incorporated.
With your chilled Oreo balls ready and your candy melts perfectly melted, it’s time to coat them. I like to use a toothpick or a thin skewer for dipping. Carefully drop one chilled Oreo ball into the melted candy, ensuring it’s fully submerged. Gently roll it around until it’s coated on all sides. Then, carefully lift it out, allowing any excess coating to drip back into the bowl. Place the coated ball back onto the parchment-lined baking sheet. If you’re using a toothpick, you can gently pull it out and then use the tip of another toothpick to smooth over the small hole left by the toothpick. This is a bit of a finesse step but helps create a cleaner look.
Finishing Touches and Setting
Once all the balls are coated, you can let them set at room temperature, but for a quicker and more guaranteed set, I recommend popping the entire baking sheet back into the refrigerator for about 10-15 minutes. This will ensure the candy melt coating hardens nicely and gives you that satisfying snap when you bite into them. While the coating is still wet, you can add some festive decorations if you like. A little drizzle of white candy melts for contrast, or even some edible glitter or sprinkles, can add an extra touch of holiday spirit. However, they look perfectly charming with just the smooth orange coating.
These Pumpkin Oreo Balls are best stored in an airtight container in the refrigerator. They will keep well for about a week. If you’re taking them to an event, make sure to transport them in a chilled container. They are a fantastic make-ahead treat, perfect for when you need a crowd-pleasing dessert that’s both fun and delicious. Enjoy the sweet, creamy, and chocolatey goodness of these fall-inspired delights!
Conclusion:
These Pumpkin Oreo Balls truly deliver on festive flavor and simple preparation. They are a fantastic no-bake dessert that brings smiles to any occasion, from casual get-togethers to more formal fall celebrations. Their dense, fudgy interior combined with the smooth candy coating makes them a delightful treat for both kids and adults. For serving, arrange them on a platter with some fall-themed decorations, or package them in small cellophane bags as charming edible gifts. Variations can include adding a pinch of pumpkin pie spice to the Oreo mixture for an extra layer of seasonal flavor, or swirling some melted dark chocolate over the orange coating for a decorative touch. You could also experiment with different colored candy melts for other holidays. Don’t be afraid to get creative! Making these Pumpkin Oreo Balls is a rewarding process that yields delicious results every time.
Frequently Asked Questions
Q1: How do I store leftover Pumpkin Oreo Balls?
Store them in an airtight container in the refrigerator for up to a week. They tend to stay firmer and fresher when kept cool. You can let them sit at room temperature for about 10-15 minutes before serving if you prefer them less firm.
Q2: Can I use a different type of cookie?
While the recipe is designed for Oreo cookies, you could experiment with other sandwich cookies. However, the chocolate flavor of Oreos is key to the classic taste. Golden Oreos could be used for a lighter base if desired, but they won’t give the same chocolatey depth.
Q3: Why are my Oreo balls not firm enough?
This usually happens if not enough cream cheese is used, or if the mixture is too warm. Ensure your cream cheese is fully softened and well-incorporated. Chilling the mixture for at least 30 minutes before rolling into balls can also help achieve a firmer texture that’s easier to handle.
Pumpkin Oreo Balls
Easy no-bake pumpkin flavored Oreo balls coated in orange candy melts for a festive fall treat.
Ingredients
-
36 Oreo cookies
-
8 oz cream cheese, softened
-
12 oz orange candy melts
-
1/4 cup pumpkin puree
-
1 teaspoon pumpkin pie spice
-
1/2 teaspoon vanilla extract
Instructions
-
Step 1
Crush the Oreo cookies into fine crumbs using a food processor or by placing them in a resealable bag and crushing with a rolling pin. -
Step 2
In a medium bowl, combine the Oreo crumbs, softened cream cheese, pumpkin puree, pumpkin pie spice, and vanilla extract. Mix until well combined and a dough forms. -
Step 3
Roll the mixture into small balls, about 1 inch in diameter. Place them on a baking sheet lined with parchment paper. -
Step 4
Melt the orange candy melts according to package directions. You can use a microwave-safe bowl in the microwave at 30-second intervals, stirring in between, or use a double boiler. -
Step 5
Dip each Oreo ball into the melted candy melts, ensuring it’s fully coated. Use a fork or toothpick to lift the balls and allow excess candy to drip off. -
Step 6
Return the coated Oreo balls to the parchment-lined baking sheet. You can add extra melted candy melts for drizzling or decorative sprinkles if desired. -
Step 7
Refrigerate the Oreo balls for at least 30 minutes, or until the candy coating is firm.
Important Information
Nutrition Facts (Per Serving)
It is important to consider this information as approximate and not to use it as definitive health advice.
Allergy Information
Please check ingredients for potential allergens and consult a health professional if in doubt.