
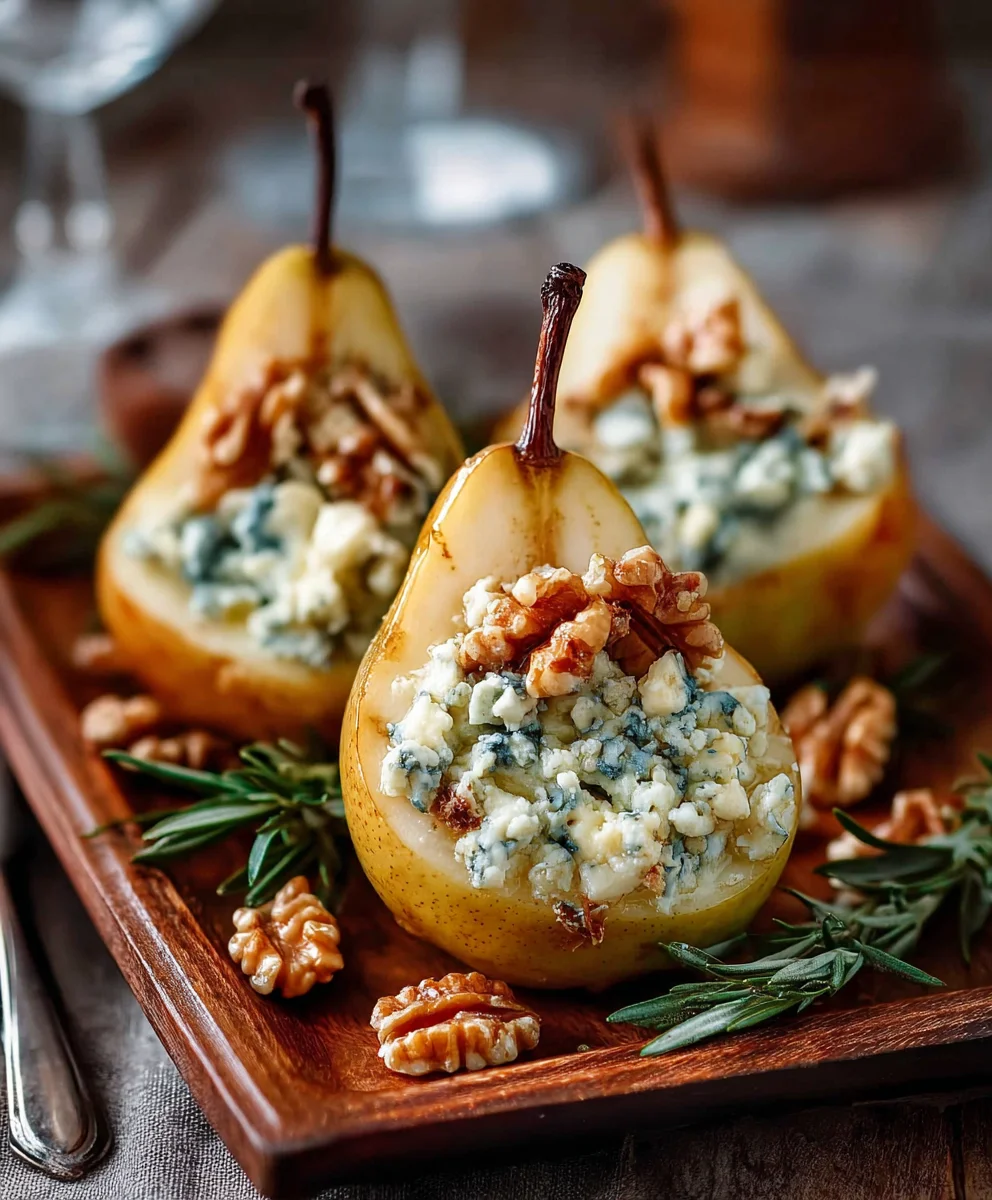
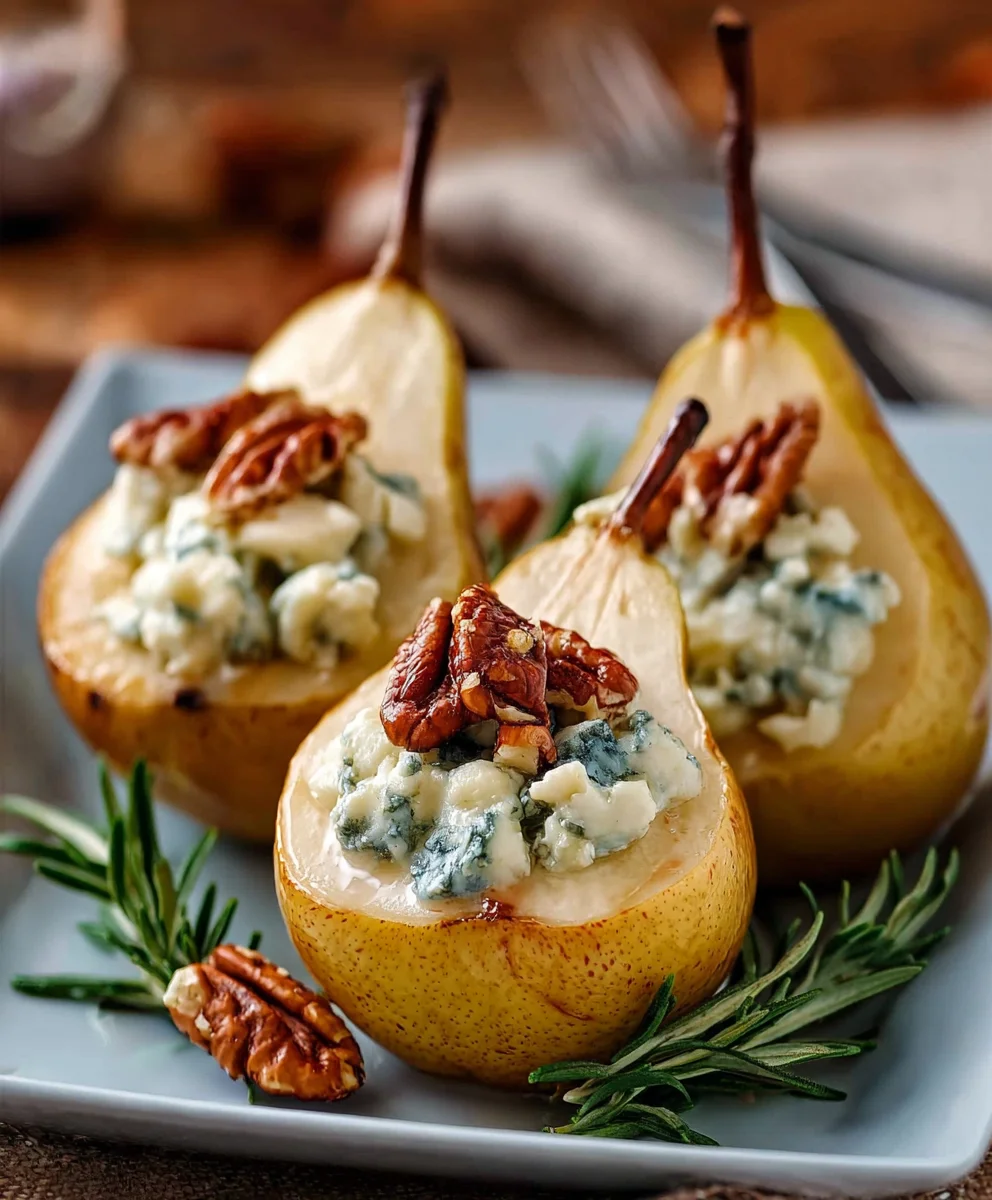
Elegant Blue Cheese Stuffed Pears Recipe. Have you ever encountered a dish that perfectly balances sweet, savory, and sophisticated all in one delightful bite? I’m absolutely thrilled to share a creation that promises to do just that, transforming simple ingredients into an appetizer masterpiece that will undoubtedly impress. While the precise origin of pears specifically stuffed with blue cheese isn’t ancient lore, the timeless pairing of fruit and cheese has graced tables for centuries, a testament to culinary harmony celebrated across many cultures. This particular recipe takes that cherished tradition and elevates it to a whole new level of elegance and flavor, making it a stellar choice for any gathering.
I personally find myself gravitating towards this dish for its incredible depth of taste and stunning presentation, all achievable with surprisingly minimal effort. People absolutely adore this combination because the tender, juicy sweetness of a ripe pear provides the perfect counterpoint to the sharp, salty, and wonderfully creamy notes of blue cheese. It’s a true symphony of textures too – the soft fruit, the crumbly cheese, often enhanced with a satisfying crunch from toasted nuts and a hint of sweetness from honey or balsamic glaze. This makes the Elegant Blue Cheese Stuffed Pears Recipe not just a simple appetizer, but a truly memorable experience that will impress your guests and leave them asking for the recipe!
Ingredients:
- 2 ripe pears, halved and cored
- 4 oz blue cheese, crumbled
- 1/4 cup chopped walnuts, toasted
- 1 tbsp honey (plus extra for drizzling)
- 1 tbsp balsamic vinegar
- Ground black pepper to taste
- Fresh thyme sprigs (for garnish)
Preparing Our Core Components for Elegance
My culinary journey often leads me to dishes that strike a balance between simplicity and sophistication, and this Elegant Blue Cheese Stuffed Pears Recipe is a perfect example. It’s a symphony of flavors and textures, with each ingredient playing a crucial role. Before we dive into assembling this masterpiece, let’s ensure each component is prepared to perfection. Trust me, these initial steps, though seemingly minor, lay the foundation for a truly unforgettable experience.
- Selecting and Preparing the Pears:
The foundation of our dish relies heavily on the quality and preparation of the pears. When I head to the market, I always look for pears that are ripe but still firm to the touch. You want a pear that yields slightly when gently pressed near the stem, indicating its sweetness and juiciness are at their peak, but not so soft that it becomes mushy during baking. A firmer pear will hold its shape beautifully, offering a lovely textural contrast to the creamy filling. I personally adore using Bosc or Anjou pears for their elegant shape and subtle flavor, which complements the robust blue cheese without overpowering it. However, feel free to use your favorite variety as long as it fits the ripe-but-firm criteria.
Once you’ve chosen your perfect pears, it’s time for preparation. First, give them a good rinse under cool running water. Then, with a sharp knife, carefully halve each pear lengthwise. The next step is coring, and I find a melon baller or a small spoon works wonders here. Gently scoop out the core and any fibrous bits, creating a neat cavity in the center of each pear half. You want to remove enough to create a generous space for our delectable filling, but be careful not to scoop too deep or thin the pear walls too much, as this can compromise its structural integrity during the gentle baking process. A well-cored pear is like a perfect little boat, ready to hold our flavorful treasure. As I work, I often marvel at the natural beauty of these fruits, knowing they’re about to transform into something truly extraordinary.
If you’re preparing these ahead of time, a quick trick I use to prevent browning is to lightly brush the cut surfaces with a touch of lemon juice. While not explicitly in our ingredient list, it’s a helpful tip for maintaining aesthetic appeal if you have a moment. For this recipe, however, we’ll move quickly to stuffing and baking, so it’s less of a concern. The goal is to have eight beautifully prepared pear halves, each patiently awaiting its savory-sweet transformation.
- Toasting and Chopping the Walnuts:
Oh, the humble walnut! It might seem like a small addition, but toasting walnuts is a game-changer. This simple step elevates their flavor profile from merely nutty to deeply aromatic, enhancing their natural sweetness and providing a satisfying crunch that’s absolutely essential to the dish’s overall texture. There are two primary methods I use for toasting, and both yield fantastic results.
My preferred method, especially when I’m already using the oven for other tasks, is oven-toasting. Preheat your oven to a moderate 350°F (175°C). Spread the chopped walnuts in a single layer on a baking sheet. I like to line my baking sheet with parchment paper for easy cleanup, but it’s not strictly necessary. Pop them into the preheated oven for about 5 to 7 minutes. It’s crucial to keep a very close eye on them, as nuts can go from perfectly toasted to burnt in a blink! You’ll know they’re ready when they release a warm, fragrant aroma and turn a shade or two darker. Once toasted, immediately remove them from the hot baking sheet and transfer them to a plate to cool completely. This stops the cooking process and prevents them from over-toasting.
Alternatively, if I’m not using the oven, stovetop toasting is a quick and efficient option. Place the chopped walnuts in a dry skillet over medium-low heat. Stir them constantly for about 3 to 5 minutes. Again, the key is constant vigilance and stirring to ensure even toasting without burning. As soon as they become fragrant and lightly browned, remove them from the heat and transfer them to a plate to cool. Whichever method you choose, the goal is that beautiful, golden-brown hue and an irresistible, toasty aroma. The difference this step makes is truly remarkable; it adds a depth of flavor that a raw walnut simply can’t provide.
Once your walnuts are perfectly toasted and cooled, it’s time for a final chop if needed. We’re aiming for a texture that offers a pleasant bite without being overly large or gritty. A nice medium chop ensures they integrate well into our filling while still providing that delightful crunch. I personally love the rustic appeal of slightly varied chop sizes, it adds character to the filling. Set these golden beauties aside; they’re ready for their starring role in our elegant stuffing.
- Crumbing the Blue Cheese:
Ah, blue cheese! The undisputed star of this dish, bringing its signature pungent, salty, and wonderfully creamy notes. The beauty of blue cheese is its versatility, but for this recipe, crumbling is key. If you purchased a block of blue cheese, use your fingers or a fork to gently break it down into small, irregular crumbles. We’re looking for pieces that are small enough to blend harmoniously into our filling, but also substantial enough to offer those delightful bursts of flavor when you take a bite. Avoid over-mashing it into a paste; the distinct crumbles add textural interest and ensure the blue cheese flavor is distributed beautifully.
I often recommend choosing a blue cheese that suits your personal preference for intensity. A Roquefort, for instance, offers a sharp, tangy bite, while a Gorgonzola dolce might be milder and sweeter. Stilton provides a balanced, rich creaminess with a satisfying tang. For this recipe, I find a medium-intensity blue cheese works wonderfully, providing enough character to stand up to the sweetness of the pear and honey, but not so aggressive that it overwhelms the delicate fruit. The 4 ounces specified here provides the perfect ratio for our pears, ensuring every half is generously endowed with its distinctive flavor. This step is straightforward, yet it sets the stage for the bold, unforgettable flavor profile we’re aiming for.
Crafting the Exquisite Blue Cheese Filling
With our pears prepped, walnuts toasted, and blue cheese crumbled, we are now ready for the heart of the dish: creating the incredibly flavorful blue cheese filling. This is where all the individual components come together in a magical fusion of sweet, savory, tangy, and nutty notes. The beauty of this filling lies in its simplicity; each ingredient is carefully chosen to complement and enhance the others, resulting in a balanced and truly elegant taste sensation. I always get a little excited at this stage because I know the transformation is just moments away!
- Combining the Filling Ingredients:
In a medium-sized mixing bowl, I like to begin by gently combining our crumbled blue cheese with the star of our textural show, the toasted and chopped walnuts. These two components form the core of our stuffing, providing both the intense flavor and the satisfying crunch that makes this dish so compelling. I use a fork to lightly toss them together, ensuring they’re evenly distributed before we introduce the liquid elements.
Next, we introduce the sweet and tangy notes that truly elevate this filling. I carefully measure in the 1 tablespoon of honey. This isn’t just for sweetness; the honey acts as a wonderful natural binder, helping to hold the filling together while also providing a gorgeous counterpoint to the saltiness and pungency of the blue cheese. It creates that irresistible sweet-and-savory dynamic that makes these stuffed pears so addictive. Following the honey, I add the 1 tablespoon of balsamic vinegar. Ah, balsamic! This ingredient is a secret weapon in my kitchen. Its deep, complex acidity cuts through the richness of the cheese and the sweetness of the honey, adding a layer of sophisticated tanginess and depth that truly brightens the entire mixture. It provides that essential balance, preventing the filling from being one-dimensional and instead offering a delightful complexity on the palate.
Finally, to complete our flavor symphony, I add ground black pepper to taste. I always recommend using freshly ground black pepper for the most vibrant aroma and flavor. Start with a few generous turns of the mill, and then you can always add more if you prefer a spicier kick. The pepper doesn’t just add heat; its earthy, pungent notes further enhance the savory aspect of the blue cheese and walnuts, tying all the flavors together beautifully. This is a moment where you can truly personalize the dish; if you love a bit more warmth, don’t hesitate to add a little extra.
Once all the ingredients are in the bowl, I use a fork or a small spatula to gently mix everything together. The goal here is not to mash or compress the ingredients, but rather to combine them just enough so that all the flavors are evenly distributed. You’ll notice the mixture becoming slightly cohesive thanks to the honey and balsamic, but you’ll still have distinct crumbles of blue cheese and pieces of walnuts. This ensures a varied texture in every bite, which is what we’re aiming for. Take a moment to appreciate the aroma – it’s already heavenly, isn’t it? The pungent blue cheese, the toasted walnuts, the sweet honey, and the tangy balsamic all harmonizing beautifully. This filling is not just delicious; it’s a testament to how well carefully chosen ingredients can work together.
Assembling and Baking Our Elegant Pears
Now that our exquisite filling is ready, it’s time for the moment of truth: bringing all these wonderful components together and letting the oven work its magic. This step is where our individual ingredients transform into a cohesive, warm, and utterly irresistible dish. I always find this part of the process incredibly satisfying, seeing the beautiful pears ready to embrace their flavorful stuffing.
- Stuffing the Pear Halves:
Before we begin stuffing, I always prepare my baking surface. I line a baking sheet with parchment paper, which not only makes cleanup a breeze but also prevents the pears from sticking. This simple step ensures that our beautifully baked pears can be easily transferred from the sheet to our serving platter, maintaining their pristine appearance. Arrange your eight cored pear halves on the prepared baking sheet, ensuring they have enough space between them to bake evenly. I like to arrange them cut-side up, forming neat little rows.
Now for the fun part! Take a generous spoonful of our glorious blue cheese filling and carefully mound it into the cavity of each pear half. I don’t just fill them; I like to gently press the filling down slightly to ensure it adheres well, and then mound a little extra on top, creating a visually appealing dome. This generous stuffing ensures that every bite of pear comes with a substantial amount of our flavorful mixture. The combination of creamy blue cheese, crunchy walnuts, and the delicate sweetness of the honey and balsamic vinegar is truly intoxicating. Don’t be shy with the filling; remember, these are meant to be decadent! As you work, you’ll see how perfectly the filling nestles into the pear’s natural hollow, creating a beautiful presentation even before they hit the oven. This step requires a gentle hand, ensuring the pears remain intact and the filling is secure.
- Baking to Perfection:
With all our pear halves beautifully stuffed and arranged on the baking sheet, it’s time to let the oven do its work. Preheat your oven to a moderate 375°F (190°C). This temperature is ideal for gently softening the pears without turning them into mush, while also allowing the flavors in the filling to meld and warm through beautifully. I always ensure my oven is fully preheated before placing anything inside, as consistent temperature is key to even baking.
Carefully transfer the baking sheet with your stuffed pears to the preheated oven. Bake for approximately 15 to 20 minutes. The exact baking time can vary depending on the ripeness and size of your pears, as well as the idiosyncrasies of your oven. What we’re looking for is pears that are tender but still hold their shape; you should be able to easily pierce the pear flesh with a fork, but it shouldn’t feel overly soft or mushy. The filling should be warmed through, and you might even notice the blue cheese beginning to melt ever so slightly, creating pockets of creamy goodness within the mixture. The kitchen will fill with an incredibly inviting aroma – a testament to the deliciousness that’s about to be served.
During the baking process, the natural sugars in the pears will caramelize slightly, enhancing their sweetness and creating a lovely golden hue on their edges. The honey in the filling will deepen its flavor, and the balsamic vinegar will mellow slightly, contributing to an even more harmonious blend of tastes. I often peek through the oven door around the 15-minute mark to assess their progress. If your pears are very ripe, they might need less time; if they are on the firmer side, they might benefit from a few extra minutes. The key is to achieve that perfect tender-crisp texture for the pear, ensuring it offers a pleasant resistance when bitten, rather than dissolving completely. Once they reach this ideal stage, carefully remove the baking sheet from the oven.
The Finishing Touches and Elegant Presentation
Our Elegant Blue Cheese Stuffed Pears are almost ready to grace your table! After the gentle warmth of the oven, they emerge tender, aromatic, and beautifully golden. But a truly elegant dish is often perfected with just a few simple, thoughtful finishing touches. These final steps not only enhance the visual appeal but also add another layer of flavor and aroma, transforming a delicious dish into an unforgettable culinary experience. This is where we elevate our creation to its peak, ensuring every detail contributes to the overall delight.
- Drizzling with Extra Honey:
As soon as the pears come out of the oven, their aroma is already captivating. While the honey in the filling has done a magnificent job of sweetening and binding, a final drizzle of extra honey before serving truly takes this dish to the next level. I like to use a small spoon or even a squeeze bottle, if I have one handy, to artfully drizzle a thin stream of honey over each warm, stuffed pear half. This isn’t just for added sweetness – although it does beautifully enhance the natural sugars of the pear and the filling – it also adds a gorgeous sheen and glistening appearance that makes the dish look even more inviting and luxurious. The warmth of the pears allows the honey to lightly melt and coat the surface, creating a delicate, sticky glaze that’s utterly irresistible. I find that a good quality, mild-flavored honey, such as acacia or clover, works wonderfully here, allowing the other flavors to shine through while still contributing its own gentle sweetness. This final touch makes the presentation pop and adds a wonderful layer of complexity to each bite.
- Garnishing with Fresh Thyme Sprigs:
Presentation is paramount, and a garnish can elevate a dish from simply delicious to truly elegant. For our Elegant Blue Cheese Stuffed Pears, a few fresh thyme sprigs are the perfect finishing touch. The vibrant green of the thyme provides a beautiful color contrast against the golden pears and the rich, creamy filling. More importantly, fresh thyme offers a wonderful, earthy, slightly peppery aroma and a delicate herbaceous note that complements both the sweetness of the pear and honey, and the savory tang of the blue cheese. It’s a subtle yet impactful addition that brightens the entire dish and tantalizes the senses even before the first bite.
I gently place one or two small sprigs of fresh thyme on or beside each stuffed pear. The key is to place them artfully, creating visual interest without overwhelming the dish. The warmth of the pears will gently release the aromatic oils from the thyme, adding a fragrant whisper to the experience. This garnish isn’t merely for show; it’s an integral part of the sensory experience, promising a delightful interplay of flavors and aromas. I always have fresh herbs on hand, as they can truly transform a dish, and thyme is particularly well-suited for this elegant appetizer or dessert. It’s the final flourish that tells your guests this dish was crafted with care and attention to every detail.
- Serving Suggestions:
These Elegant Blue Cheese Stuffed Pears are truly versatile and can be enjoyed in a couple of ways, depending on the occasion. I typically serve them warm, shortly after they’ve had a moment to cool down enough to handle comfortably. The warmth enhances all the flavors, making the blue cheese slightly gooey and the pear wonderfully tender. They make an absolutely stunning appetizer for a dinner party, offering a sophisticated start to the meal that’s sure to impress your guests. Arrange them beautifully on a platter, perhaps with a few extra fresh thyme sprigs scattered around for added flair.
Alternatively, these stuffed pears can also serve as a unique and elegant dessert. The balance of sweet, savory, and tangy notes means they aren’t overly rich or cloying, providing a perfect light finish to a meal. I sometimes enjoy them alongside a small glass of dessert wine, like a late harvest Riesling, which beautifully complements the dish’s complexity. Whether as an appetizer or a dessert, this recipe consistently receives rave reviews. The combination of textures – the tender pear, the creamy filling, the crunchy walnuts – and the harmonious blend of flavors makes every bite an absolute delight. I truly hope you enjoy making and sharing this elegant creation as much as I do!
Conclusion:
And there you have it, my friends! We’ve journeyed through the simple yet profound steps to create something truly spectacular. If you’re searching for an appetizer that effortlessly combines sophistication with incredible flavor, look no further than this Elegant Blue Cheese Stuffed Pears Recipe. It’s more than just a dish; it’s an experience, a delightful dance of contrasting textures and tastes that will absolutely mesmerize your palate. I truly believe this recipe is a must-try for anyone who appreciates the finer things in life, yet values simplicity in preparation. The sweet, juicy tenderness of the pear provides the perfect canvas for the pungent, creamy richness of blue cheese, all brought together by subtle nutty crunch and perhaps a drizzle of something extra special. It’s a symphony of flavors that manages to be both comforting and utterly gourmet, proving that you don’t need complicated techniques to create culinary magic. I’ve made this countless times for dinner parties, casual get-togethers, and even as a special treat for myself, and it never fails to impress and satisfy.
One of the beauties of this dish is its incredible versatility when it comes to serving. While fantastic on its own as a show-stopping appetizer, don’t hesitate to think outside the box. Imagine serving these warm, alongside a crisp, peppery arugula salad dressed simply with a lemon vinaigrette – the freshness would cut through the richness beautifully. They also make an exquisite accompaniment to a cheese board, adding a warm, prepared element that elevates the entire spread. For a more substantial offering, consider them as a refined side dish for roasted chicken or pork tenderloin, bringing an unexpected sweet and savory note to your main course. And for those who love to experiment, try drizzling them with a touch of balsamic glaze just before serving; the tangy reduction adds another layer of complexity that is simply divine. Or, if you’re leaning into the sweeter side, a tiny dollop of fig jam or a sprinkle of candied pecans can transform them into an even more decadent treat, perfect for a lighter dessert course.
But the fun doesn’t stop there. This recipe is wonderfully adaptable, inviting you to unleash your inner chef and play with variations. Not a fan of blue cheese? No problem! Consider swapping it out for a creamy goat cheese, a mild brie, or even a smoked gouda for a different flavor profile. Each cheese will bring its own unique character to the dish. If you’re looking for extra crunch, experiment with different nuts – walnuts, pecans, or even toasted slivered almonds would be fantastic. A sprig of fresh thyme or rosemary tucked into the filling before baking can infuse the pears with a lovely herbaceous aroma that complements the sweetness of the fruit. For a seasonal twist, consider using firm apples like Honeycrisp or Granny Smith in place of pears, adjusting the baking time slightly. You could even make these a truly savory affair by adding a touch of crispy crumbled bacon or prosciutto to the cheese mixture, creating an even more robust and satisfying bite. The possibilities are truly endless, limited only by your imagination and the delicious ingredients you have on hand.
I genuinely hope that reading through this conclusion has sparked your culinary curiosity and inspired you to give this Elegant Blue Cheese Stuffed Pears Recipe a try. It’s a dish that embodies elegance without effort, making it perfect for both seasoned cooks and kitchen newcomers. Trust me, the aroma filling your kitchen as these pears bake will be enough to get your mouth watering, and the first bite will confirm that you’ve discovered a new favorite. So, go ahead, gather your ingredients, set aside a little time, and prepare to delight yourself and your loved ones. Once you’ve created your own masterpiece, I would absolutely love to hear about your experience! Did you stick to the original recipe, or did you put your own unique spin on it? What were your favorite serving suggestions? Please, don’t hesitate to share your thoughts, tips, and especially your beautiful photos. Your culinary adventures inspire me, and I can’t wait to see what delicious creations you come up with. Happy cooking, and bon appétit!
Frequently Asked Questions
Can I make these Elegant Blue Cheese Stuffed Pears ahead of time?
Absolutely! This is one of the best features of this recipe for entertaining. You can prepare the pears, stuff them with the blue cheese mixture, and arrange them on a baking sheet. Cover them loosely with plastic wrap and refrigerate for up to 24 hours. When you’re ready to serve, simply pop them into the oven as directed, adding a few extra minutes to the baking time if cooking from cold. This makes party planning a breeze!
What are the best pears to use for this recipe?
I recommend using firm but ripe pears for this recipe. Bosc, Anjou, or Bartlett pears work wonderfully. You want them to be slightly firm so they hold their shape during baking, but ripe enough to have that natural sweetness. Avoid overly soft or mushy pears, as they can fall apart in the oven. A quick test for ripeness is to gently press near the stem; it should yield slightly.
I’m not a big fan of strong blue cheese, can I substitute it?
Yes, certainly! The beauty of this recipe is its adaptability. If you find blue cheese too intense, you can easily substitute it with a milder, creamy cheese. Some fantastic alternatives include goat cheese (chèvre), brie (remove the rind if you prefer), feta cheese, or even a soft gorgonzola, which is often a bit milder than other blue cheeses. Each will offer a unique flavor profile that still complements the sweetness of the pear beautifully.
What kind of wine or drink pairs well with this dish?
The sweet and savory notes of the stuffed pears make them incredibly versatile for pairing. For wine lovers, a crisp Sauvignon Blanc, a dry Riesling, or even a sparkling Prosecco or Champagne would be lovely. If you prefer red wine, a lighter-bodied Pinot Noir or a fruity Beaujolais can also work well. For non-alcoholic options, sparkling apple cider or a ginger beer would be refreshing choices, or even a gourmet sparkling water infused with pear or elderflower.
How should I store leftovers?
If you happen to have any leftovers (which is rare!), store them in an airtight container in the refrigerator for up to 2-3 days. You can enjoy them cold, or gently reheat them in a toaster oven or microwave until warmed through. Be careful not to overheat them, as the cheese can become too oily.
Is this recipe naturally gluten-free?
Yes, this Elegant Blue Cheese Stuffed Pears Recipe is naturally gluten-free! As long as all your ingredients are gluten-free (which for pears, blue cheese, and nuts they typically are), you can confidently serve this dish to those with gluten sensitivities or celiac disease. Always double-check ingredient labels if you have strict dietary restrictions.
Can I prepare these without an oven, perhaps grilling them?
Absolutely, grilling is a fantastic alternative, especially in warmer weather! Halve and core the pears as usual, brush the cut side lightly with olive oil, and grill cut-side down over medium heat until grill marks appear and the pears soften slightly (about 5-7 minutes). Then, flip them over, fill with the blue cheese mixture, and grill indirectly or with the lid closed until the cheese is melted and bubbly. This method imparts a lovely smoky flavor that is truly delicious.
Elegant Blue Cheese Stuffed Pears: Easy Appetizer Recipe
This Elegant Blue Cheese Stuffed Pears recipe is a sophisticated yet simple appetizer featuring tender baked pears filled with a savory-sweet mixture of crumbled blue cheese, toasted walnuts, honey, and balsamic vinegar, finished with an extra honey drizzle and fresh thyme.
Ingredients
-
2 ripe pears, halved and cored
-
4 oz blue cheese, crumbled
-
1/4 cup chopped walnuts, toasted
-
1 tbsp honey
-
1 tbsp balsamic vinegar
-
Ground black pepper to taste
-
Fresh thyme sprigs
Instructions
-
Step 1
Prepare Pears: Select ripe but firm pears. Halve each pear lengthwise and carefully scoop out the core and fibrous bits using a melon baller or small spoon, creating a cavity. -
Step 2
Toast Walnuts: Preheat oven to 350°F (175°C). Spread chopped walnuts in a single layer on a baking sheet and toast for 5-7 minutes until fragrant and lightly browned. Alternatively, toast in a dry skillet over medium-low heat for 3-5 minutes, stirring constantly. Let cool and chop if needed. -
Step 3
Crumble Blue Cheese: If using a block, use your fingers or a fork to gently crumble the blue cheese into small, irregular pieces. -
Step 4
Make Filling: In a medium bowl, combine crumbled blue cheese, toasted chopped walnuts, 1 tbsp honey, 1 tbsp balsamic vinegar, and ground black pepper to taste. Mix gently with a fork until just combined. -
Step 5
Stuff Pears: Line a baking sheet with parchment paper. Arrange the four cored pear halves cut-side up. Generously spoon the blue cheese filling into each pear cavity, mounding slightly. -
Step 6
Bake Pears: Preheat oven to 375°F (190°C). Carefully transfer the baking sheet with stuffed pears to the preheated oven. Bake for approximately 15-20 minutes, or until pears are tender when pierced with a fork and the filling is warmed through. -
Step 7
Finish & Serve: Remove from oven. Drizzle extra honey (if desired) over each warm stuffed pear half. Garnish with fresh thyme sprigs. Serve warm as an appetizer or an elegant dessert.
Important Information
Nutrition Facts (Per Serving)
It is important to consider this information as approximate and not to use it as definitive health advice.
Allergy Information
Please check ingredients for potential allergens and consult a health professional if in doubt.


Leave a Comment