
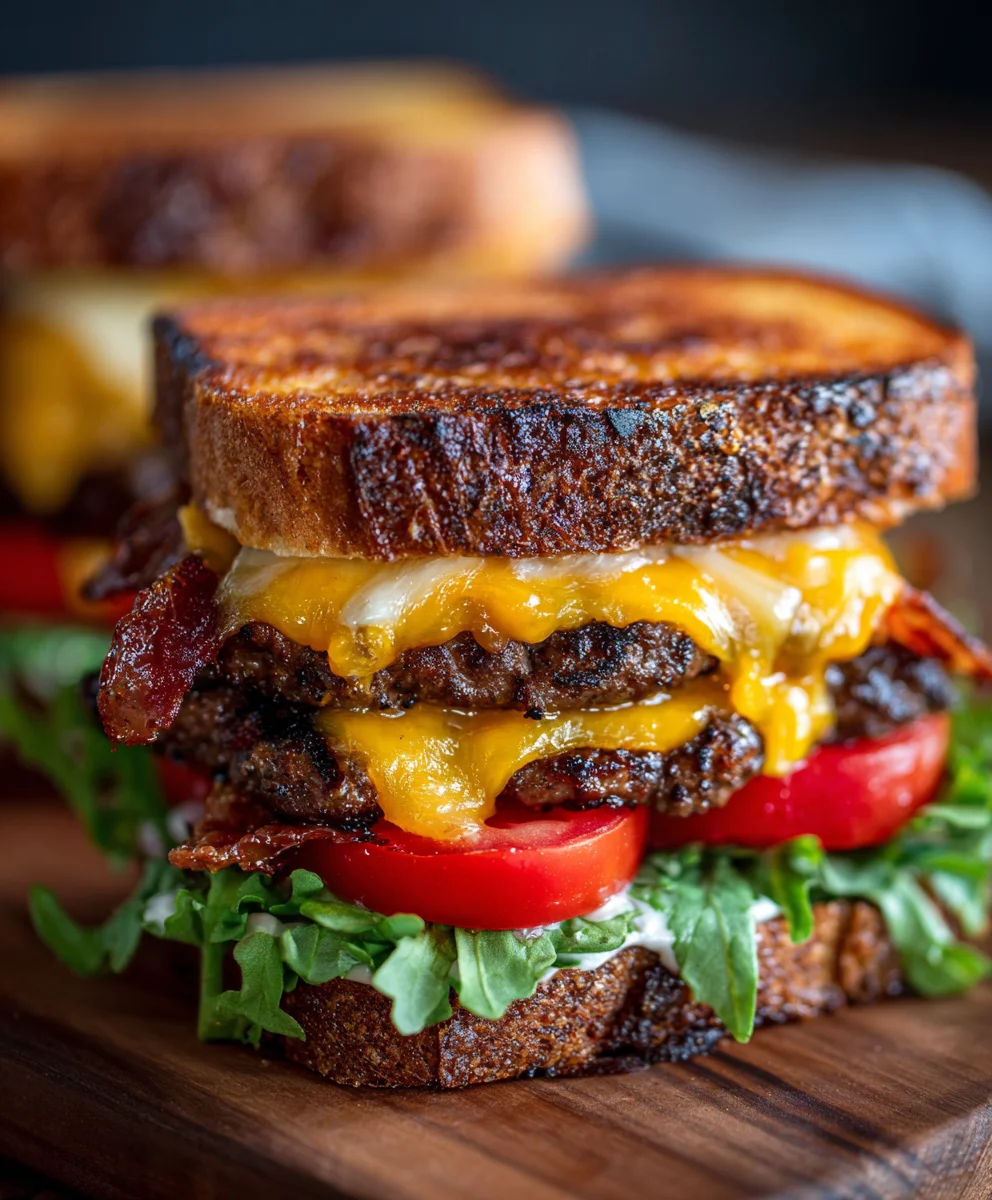
Smash Burger Grilled Cheese – have you ever dreamt of a culinary creation that perfectly marries two of the most beloved comfort foods into one irresistible package? I know I have, and this incredible dish is the delicious answer to those cravings. This isn’t just a sandwich; it’s an experience, a symphony of textures and flavors that will tantalize your taste buds from the very first bite.
While the individual components—the humble grilled cheese and the iconic smash burger—boast rich American histories, their brilliant combination represents a modern culinary triumph born from a shared passion for bold flavors and satisfying indulgence. What makes the Smash Burger Grilled Cheese so irresistibly popular? It’s the genius fusion: the deeply savory, caramelized notes of a perfectly “smashed” beef patty, nestled between layers of gooey, melted cheese, all encased in buttery, golden-crisp bread. Every bite offers that incredible textural contrast – the juicy, flavorful burger, the stretchy, rich cheese, and the satisfying crunch of the toasted bread. This dish offers convenience without compromising on gourmet appeal, making it a truly indulgent masterpiece that elevates your weeknight meal or weekend gathering.
Ingredients:
- For the Burger Patties:
- 1.5 pounds (approximately 680g) 80/20 ground chuck (I find this fat ratio perfect for juicy, flavorful smash burgers).
- 1.5 teaspoons fine sea salt, divided (I always season generously right before cooking).
- 1 teaspoon freshly ground black pepper, divided.
- For the Grilled Cheese:
- 8 slices of sturdy bread, such as sourdough, brioche, or Texas toast (I prefer a bread that can stand up to the fillings and get beautifully crispy).
- 8 slices American cheese (the classic melt is unbeatable for a grilled cheese).
- 4 slices sharp cheddar cheese (for an extra layer of flavor and excellent melt).
- 4 tablespoons unsalted butter, softened (I use unsalted so I can control the salt content in the final dish).
- For the Caramelized Onions (Optional, but highly recommended for depth of flavor):
- 1 large yellow onion, thinly sliced (I love how sweet and tender these become).
- 1 tablespoon unsalted butter.
- 1/2 teaspoon sugar (helps with the caramelization).
- Pinch of salt.
- For the Smash Burger Grilled Cheese Special Sauce:
- 1/2 cup mayonnaise (I like a good quality full-fat mayo for richness).
- 2 tablespoons ketchup.
- 1 tablespoon sweet pickle relish (adds a lovely tang).
- 1 teaspoon Dijon mustard (for a little kick).
- 1/2 teaspoon garlic powder.
- 1/4 teaspoon onion powder.
- Pinch of smoked paprika (optional, but I think it adds a nice touch).
- Dash of hot sauce (like Tabasco or Frank’s, to your preference).
- For Assembling and Serving:
- Dill pickle slices, for serving (I find the acidity cuts through the richness perfectly).
- Extra butter or a neutral oil (like canola or grapeseed) for the griddle when smashing burgers.
Preparing Your Mise en Place
Before we dive into creating this masterpiece, a “Smash Burger Grilled Cheese,” it’s crucial to get all our components ready. This ensures a smooth and enjoyable cooking process, especially when dealing with the high heat required for smashing burgers. I always tell people that good prep is half the battle!
- First things first, take your ground beef out of the refrigerator and let it sit at room temperature for about 15-20 minutes. This helps it cook more evenly. While it’s resting, divide it into eight equal portions. I usually eyeball them, but if you’re a stickler for precision, a kitchen scale can help. Gently roll each portion into a loose ball, don’t compact them too much; we want them loose for optimal smashing. Place these on a plate or baking sheet lined with parchment paper.
- Next, prepare your bread. Lay out your 8 slices of bread on a clean surface. Get your American and cheddar cheese ready by separating the slices so they’re easy to grab when the time comes.
- Measure out all the ingredients for your special sauce and have them ready to mix. This sauce is a non-negotiable component of a truly great Smash Burger Grilled Cheese, adding a tangy, creamy counterpoint to the rich beef and cheese.
- If you’re making the caramelized onions, slice your onion thinly. Trust me, these add an incredible layer of sweetness and umami that elevates the entire sandwich.
- Finally, ensure your softened butter for the bread is easily accessible. Having everything at your fingertips makes the assembly much less stressful.
Crafting the Special Sauce
This “Smash Burger Grilled Cheese” special sauce is so simple yet so impactful. It brings all the elements together with its creamy, tangy, and slightly sweet profile. I make a batch of this for almost any burger or sandwich!
- In a small bowl, combine the mayonnaise, ketchup, sweet pickle relish, Dijon mustard, garlic powder, onion powder, smoked paprika (if using), and a dash of hot sauce.
- Whisk all the ingredients together until they are well combined and smooth. Taste and adjust seasonings if needed – I sometimes add a little more hot sauce for an extra kick, or a pinch more salt if it feels like it needs it.
- Cover the bowl and refrigerate it until you’re ready to assemble your sandwiches. This allows the flavors to meld beautifully.
The Art of Caramelizing Onions (Optional, but highly recommended)
Caramelized onions transform the flavor profile of any dish, and they are particularly fantastic in a Smash Burger Grilled Cheese. They add a wonderful sweetness and depth that truly makes the sandwich sing. This takes a bit of time and patience, but it’s absolutely worth it!
- Heat a medium-sized skillet (I prefer cast iron for even heating) over medium-low heat. Add the tablespoon of unsalted butter. Once melted, add your thinly sliced yellow onion, the 1/2 teaspoon of sugar, and a pinch of salt. The sugar helps kickstart the browning process.
- Stir the onions well to coat them in butter. Reduce the heat to low. This is important – you want them to slowly cook down, not burn.
- Cook the onions, stirring occasionally (every 5-7 minutes), for about 30-45 minutes. You’ll see them gradually soften, shrink, and change color from translucent to a rich, deep golden brown. If they start to dry out or stick too much, add a tablespoon of water or a little more butter. The goal is a deeply caramelized, sweet, and tender pile of onions.
- Once they’ve reached your desired level of caramelization, remove them from the heat and set them aside.
Smashing and Searing the Burgers
This is where the magic of the “smash” in Smash Burger Grilled Cheese happens! High heat and a good smash create that irresistible crispy crust. I find a heavy-bottomed skillet or cast iron griddle is non-negotiable here.
- Heat a large, heavy-bottomed skillet or cast iron griddle over high heat until it’s smoking hot. This extreme heat is essential for developing that beautiful crust quickly.
- Add about a teaspoon of neutral oil (like canola or grapeseed) to the hot pan. It should shimmer immediately.
- Place two of your loosely formed beef balls onto the hot griddle, leaving ample space between them. Immediately, using a sturdy metal spatula and a second, heavier spatula or a clean, heavy pot to press down, firmly smash each beef ball into a thin patty, about 1/4-inch thick. Apply significant pressure for about 10 seconds to get maximum contact with the hot surface. This is what creates that incredible Maillard reaction and crispy edges.
- Season the top of the smashed patties generously with a good pinch of your remaining salt and black pepper.
- Let the patties cook undisturbed for 1.5 to 2 minutes. You’ll see the edges get crispy and brown, and the meat will start to turn opaque from the bottom up.
- Using your sturdy spatula, carefully scrape underneath each patty to release it from the griddle. Flip them over. The bottom should be a beautiful deep brown and very crispy.
- Immediately place a slice of American cheese on one patty and a slice of American cheese plus a slice of cheddar cheese on the other patty. This layering ensures gooeyness and flavor.
- Continue to cook for another 30-60 seconds, or until the cheese is beautifully melted and the burgers are cooked through. The high heat means they cook very quickly.
- Remove the cooked and cheesed patties from the griddle and set them aside. Repeat this process with the remaining beef balls, ensuring your griddle stays smoking hot between batches. If needed, wipe out any excess rendered fat from the pan before adding more oil for the next batch.
Building the Ultimate Smash Burger Grilled Cheese
Now that our burgers are smashed and our onions (if using) are caramelized, it’s time to bring everything together into one glorious Smash Burger Grilled Cheese. This step requires a little organization to ensure a perfectly melted, golden-brown sandwich.
- Take two slices of your chosen bread. Generously butter one side of each slice with your softened butter. This buttered side will be facing outwards when grilling.
- On the unbuttered side of one slice of bread, spread a generous spoonful of your special sauce.
- Place one slice of cheddar cheese (or American if you prefer) on top of the sauce-covered bread.
- Carefully place one of your single-cheese-topped smash burger patties on top of the cheddar.
- If using, add a spoonful of caramelized onions on top of the burger patty.
- Now, place the double-cheese-topped smash burger patty directly on top of the single burger patty and caramelized onions. This creates a substantial and incredibly flavorful stack.
- Spread another generous layer of your special sauce on the unbuttered side of the second slice of bread.
- Place the second slice of bread, sauce-side down, on top of the burger stack, ensuring the buttered side is facing up. Gently press down on the sandwich to slightly compress it. Repeat this assembly process for the remaining sandwiches.
Grilling to Golden Perfection
The final phase for our incredible Smash Burger Grilled Cheese is the grilling. This requires a moderate, consistent heat to ensure the cheese inside melts perfectly and the bread achieves a magnificent golden-brown crispness without burning.
- Clean the griddle or skillet you used for the burgers (or grab a fresh one if you prefer) and place it over medium-low heat. I stress medium-low heat here – rushing this step will result in burnt bread and unmelted cheese.
- Once the griddle is heated (you can test it by flicking a few drops of water, which should sizzle gently), carefully place your assembled Smash Burger Grilled Cheese sandwiches onto the griddle, buttered-side down. You might need to cook them in batches, depending on the size of your pan.
- Cook for about 4-6 minutes per side. Do not rush this. You’re looking for a deep, golden-brown crust on the bread and for the cheeses inside to be completely melted and gooey. I often peek under the edge with a spatula after about 3 minutes to check on the color.
- Once the first side is perfectly golden, carefully flip the sandwich using a wide spatula. Cook the second side for another 4-6 minutes, or until it’s also golden brown and crispy.
- If you find your bread browning too quickly, lower the heat slightly. If it’s taking too long to brown, increase the heat a touch. The key is patience and gentle heat. For an extra crisp result, you can gently press down on the sandwich with your spatula occasionally while it cooks.
- When both sides are beautifully golden and the cheese is oozing, carefully remove the Smash Burger Grilled Cheese from the griddle.
Serving Suggestions and Enjoyment
Your magnificent Smash Burger Grilled Cheese is ready! This is a rich and incredibly satisfying dish, so a simple accompaniment is often best. I love how the tang of pickles cuts through the richness.
- Transfer the grilled sandwiches to a cutting board. I recommend letting them rest for just 1-2 minutes before slicing; this allows the cheese to set slightly and prevents it from all oozing out immediately.
- Using a sharp knife, slice each sandwich in half, either diagonally (my preferred way, it just feels more fun to eat!) or straight down the middle.
- Serve immediately with a side of dill pickle slices. The crunch and acidity of the pickles are the perfect counterpoint to the rich, savory flavors of the beef and cheese. You can also offer extra special sauce for dipping, or even some extra caramelized onions on the side.
- Prepare for a truly indulgent and utterly delicious experience. Every bite of this Smash Burger Grilled Cheese is a symphony of crispy bread, juicy smash burger, gooey melted cheese, and that irresistible special sauce. Enjoy the fruits of your labor!
Conclusion:
Well, my friends, we’ve reached the grand finale of our culinary journey, and I genuinely hope you’re as excited as I am about what we’ve just discussed. This isn’t just another recipe; it’s an experience, a revelation, a dish that will undoubtedly elevate your home cooking game to legendary status. The ingenious combination of a perfectly seared, flavorful smash burger nestled between two slices of golden, gooey grilled cheese is nothing short of pure genius. I’ve tasted many things in my life, but the sheer delight that comes from sinking your teeth into a homemade Smash Burger Grilled Cheese is truly unparalleled. It’s the kind of comfort food that speaks to the soul, marrying the crispy edges of the cheese, the succulent, caramelized crust of the burger, and the soft, buttery bread into a symphony of textures and tastes. If you’re looking for a recipe that delivers on flavor, satisfaction, and an undeniable ‘wow’ factor, then your search ends here. This isn’t just a meal; it’s a moment, a memory waiting to be made around your very own kitchen table, shared with loved ones, or perhaps savored in blissful solitude.
A Culinary Masterpiece Awaiting Your Personal Touch
But the journey doesn’t end with simply perfecting the initial recipe. Oh no, my fellow food adventurers, the true beauty of this spectacular creation lies in its versatility and the endless possibilities for customization. Think of my recipe as your delicious starting point, a robust foundation upon which you can build your very own culinary masterpiece, tailored precisely to your cravings and preferences.
Classic Sides to Elevate Your Meal:
To truly complete the experience, I wholeheartedly recommend pairing your glorious creation with some classic diner-style sides. Crispy, golden French fries, perfectly seasoned and perhaps dipped in a special homemade fry sauce, are always a winner. Alternatively, a pile of crunchy, sweet onion rings offers a delightful contrast in texture and flavor, adding a sweet depth that complements the savory richness of the sandwich. Don’t forget the pickles! A generous spear or a scattering of dill pickle chips will cut through the richness beautifully, adding that much-needed tangy counterpoint to each glorious bite. And for those chillier evenings, a simple, creamy tomato soup for dipping your sandwich is an absolute match made in heaven – a nostalgic embrace that takes comfort food to new, soulful heights. Imagine dunking that cheesy, beefy goodness into warm, velvety soup; it’s pure bliss!
Unleash Your Inner Chef: Sauce and Topping Variations:
This is where you can really let your creativity shine! While a simple ketchup and mustard are always welcome, consider stepping up your sauce game. A zesty sriracha mayo can add a fantastic kick, or perhaps a smoky chipotle aioli for a deeper, more complex flavor profile that tantalizes the taste buds. My personal favorite variation often involves a secret “special sauce” – a blend of mayo, ketchup, relish, and a touch of something sweet and tangy – it just ties everything together so perfectly, creating that classic diner taste. Beyond sauces, think about the toppings you love on a classic burger. Caramelized onions, slow-cooked until sweet and jammy, add an incredible depth and luxurious texture. Sautéed mushrooms, grilled jalapeños for a spicy kick, or even a couple of crispy bacon strips can transform your sandwich into something truly unique and irresistible. Experiment with different types of cheese too! While American cheese melts like a dream, a sharp cheddar, a creamy provolone, a tangy Swiss, or a spicy pepper jack can introduce exciting new dimensions to each bite, giving you a completely different flavor profile to explore. Don’t be afraid to mix and match; sometimes the best combinations are found through playful experimentation.
Beyond the Bun: Bread Experimentation:
And let’s not forget the bread! While classic white bread is perfect for achieving that iconic grilled cheese texture – soft on the inside, wonderfully crispy and buttery on the outside – don’t be afraid to venture out. A sturdy sourdough can offer a wonderful tang and a chewier crust, providing a more robust base for all those rich fillings, while a rich brioche will lend a subtle sweetness and an incredibly tender crumb, making each bite feel utterly decadent. Even a hearty rye bread could provide an interesting, robust flavor profile that stands up well to the richness of the burger and cheese, adding a distinctive aromatic quality to your masterpiece. The right bread truly is the unsung hero, providing the perfect embrace for the deliciousness within.
Your Turn: Create, Savor, and Share!
Now, I’ve given you all the tools, the inspiration, and the encouragement you need. The only thing left is for you to roll up your sleeves, gather your ingredients, and embark on this delicious adventure yourself. I truly believe that cooking should be a joyful, rewarding experience, and this recipe delivers on all fronts. There’s an immense satisfaction that comes from creating something so incredibly delicious with your own hands, and I promise you, the moment you take that first bite, you’ll understand exactly what I mean. The crisp, the ooze, the savory burger – it’s a symphony of textures and flavors that will make your taste buds sing. After you’ve savored every last morsel, I would absolutely love to hear about your experience! Did you stick to the classic? Or did you go wild with some adventurous variations? What were your favorite toppings, or your preferred cheese blend? Did you discover a new secret ingredient that took your sandwich to the next level? Please, don’t hesitate to share your thoughts, your photos, and your tips. Share your culinary triumphs on social media or leave a comment wherever this recipe is published. Your feedback and creativity not only inspire me but also help build a vibrant community of passionate home cooks. We learn from each other, we grow together, and most importantly, we eat incredibly well! So, go forth, conquer your kitchen, and bring the magic of this phenomenal burger-meets-grilled-cheese creation to life. Happy cooking, and bon appétit!
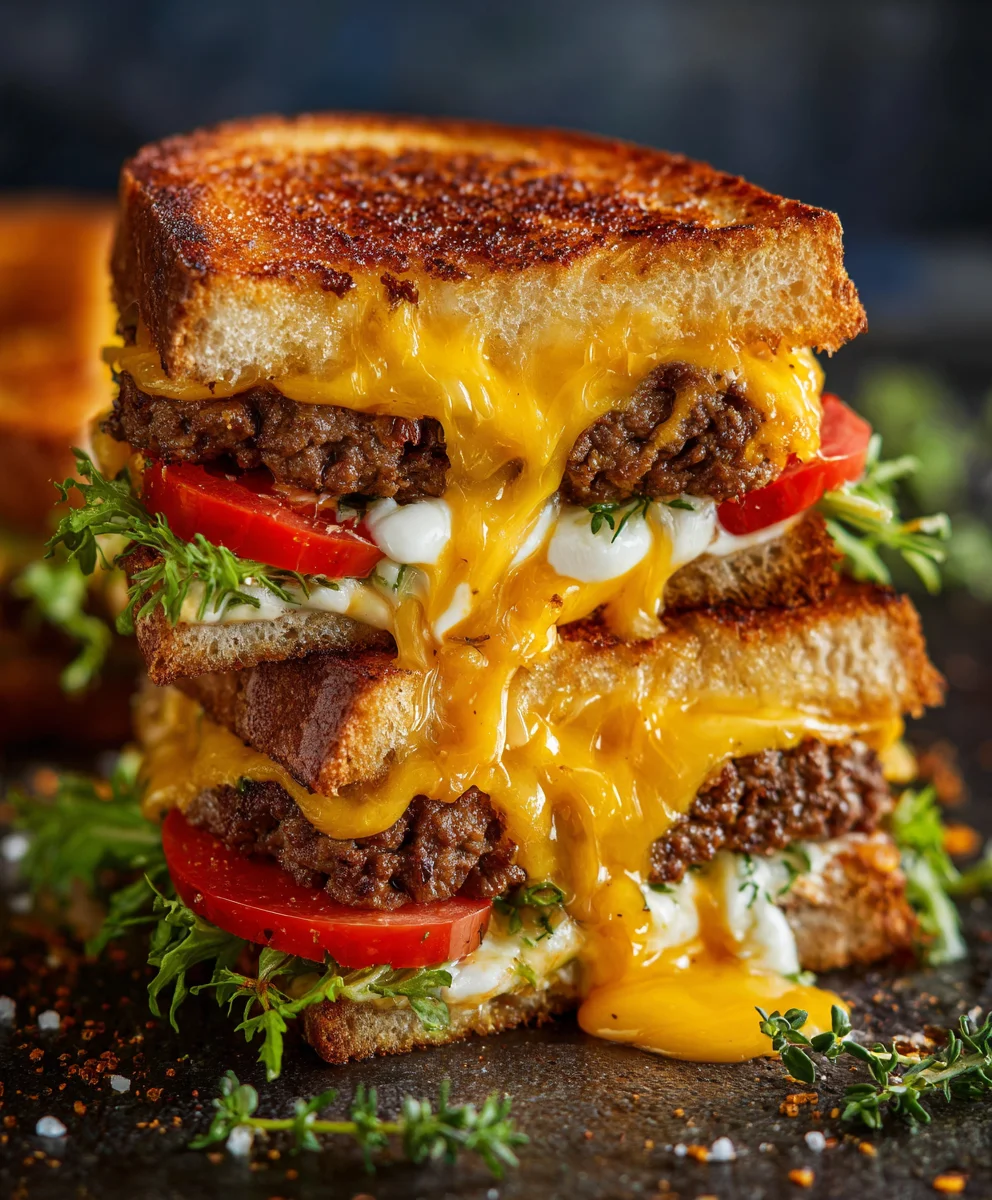
Smash Burger Grilled Cheese: Ultimate Flavor Fusion!
Smash Burger Grilled Cheese – a culinary creation that perfectly marries two beloved comfort foods. This irresistible dish is an experience, a symphony of textures and flavors. It’s the genius fusion: deeply savory, caramelized notes of a perfectly ‘smashed’ beef patty, nestled between layers of gooey, melted cheese, all encased in buttery, golden-crisp bread. Every bite offers incredible textural contrast – juicy, flavorful burger, stretchy, rich cheese, and satisfying crunch of toasted bread. An indulgent masterpiece for any meal.
Ingredients
-
1.5 lbs (680g) 80/20 ground beef chuck
-
1.5 tsp fine sea salt, divided
-
1 tsp fresh ground black pepper, divided
-
1/2 small yellow onion, thinly sliced (optional, for smashing into patties)
-
8 slices sturdy bread (sourdough, brioche, Texas toast)
-
8 slices American cheese
-
4 slices sharp cheddar cheese
-
4 tbsp unsalted butter, softened
-
1 large yellow onion, thinly sliced (for caramelized onions)
-
1 tbsp unsalted butter (for caramelized onions)
-
0.5 tsp sugar
-
Pinch of salt
-
0.5 cup mayonnaise
-
2 tbsp ketchup
-
1 tbsp sweet pickle relish
-
1 tsp Dijon mustard
-
0.5 tsp garlic powder
-
0.25 tsp onion powder
-
Pinch of smoked paprika (optional)
-
Dash of hot sauce (Tabasco/Frank’s)
-
Dill pickle slices, for serving
-
Extra butter or neutral oil (canola/grapeseed) for griddle
Instructions
-
Step 1
Prepare Beef & Mise en Place: Divide 1.5 lbs ground beef into 8 loose balls; let rest 15-20 min. Lay out bread & cheese. Have softened butter ready. -
Step 2
Make Special Sauce: In a bowl, whisk 0.5 cup mayonnaise, 2 tbsp ketchup, 1 tbsp sweet relish, 1 tsp Dijon, 0.5 tsp garlic powder, 0.25 tsp onion powder, pinch smoked paprika (opt.), and dash hot sauce until smooth. Refrigerate. -
Step 3
Caramelize Onions (Optional): In a skillet over medium-low heat, melt 1 tbsp butter. Add 1 large thinly sliced yellow onion, 0.5 tsp sugar, and pinch of salt. Cook, stirring occasionally, for 30-45 min until deep golden brown. Set aside. -
Step 4
Smash & Sear Burgers: Heat a large cast iron griddle over high heat until smoking. Add 1 tsp neutral oil. Place 2 beef balls on griddle. Season tops with salt, pepper, and 1 tsp of the Special Sauce. Add a small amount of thinly sliced onion on top of each beef ball (if using this method). Immediately, using a sturdy spatula & heavy object (or parchment paper), firmly smash each beef ball into a thin 1/4-inch patty for ~10 seconds. -
Step 5
Cook patties undisturbed for 1.5-2 min until crispy edges appear. Scrape & flip. Immediately top one patty with 1 slice American cheese, and the other with 1 slice American + 1 slice cheddar. Cook 30-60 sec until cheese is melted. Remove; repeat for remaining beef, wiping pan as needed. -
Step 6
Assemble Sandwiches: Butter one side of two bread slices. On unbuttered side of one slice, spread Special Sauce, then layer with 1 slice cheddar, one single-cheese patty, caramelized onions (opt.), and one double-cheese patty. Spread Special Sauce on unbuttered side of second bread slice; place sauce-side down on stack (buttered-side up). Repeat for all sandwiches. -
Step 7
Grill Sandwiches: Clean griddle, heat over medium-low. Place assembled sandwiches buttered-side down. Cook 4-6 min per side until deep golden brown and cheese is fully melted, gently pressing occasionally. -
Step 8
Serve: Let rest 1-2 min. Slice diagonally. Serve immediately with dill pickle slices.
Important Information
Nutrition Facts (Per Serving)
It is important to consider this information as approximate and not to use it as definitive health advice.
Allergy Information
Please check ingredients for potential allergens and consult a health professional if in doubt.
Leave a Comment