
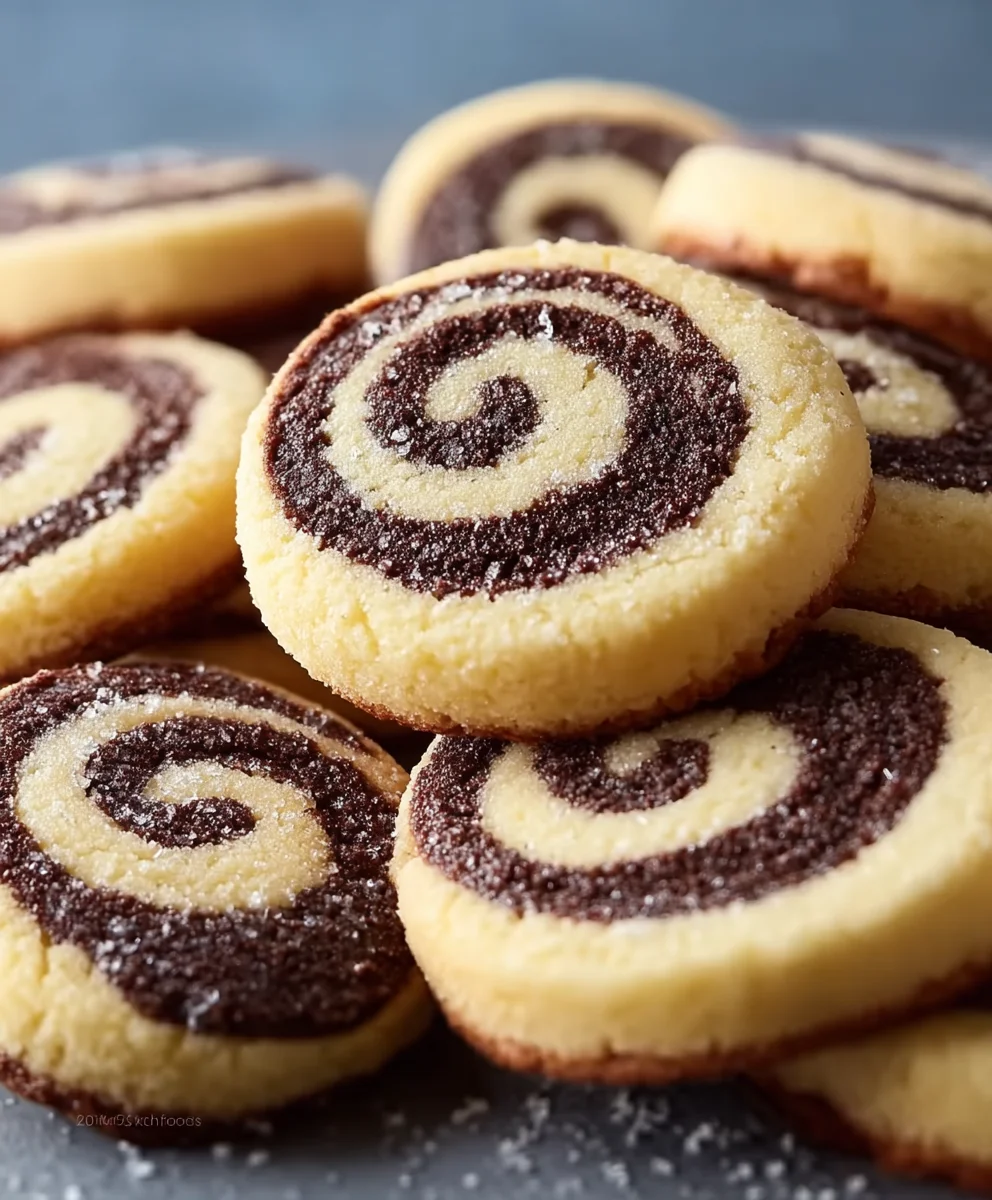
Butter Swirl Cookies are more than just a delightful treat; they are a miniature work of art, a testament to the simple elegance that can be achieved with just a few quality ingredients. Imagine biting into a cookie that is perfectly crisp on the edges, wonderfully tender in the center, and bursting with the rich, creamy flavor of pure butter. It’s an experience that transports you straight back to cherished childhood memories or festive holiday gatherings. I find that the visual charm of their intricate swirls makes them utterly irresistible, inviting you to discover their delicate texture and exquisite taste, making every bite a moment to savor.
The Enduring Appeal of Butter Swirl Cookies
Hailing from a tradition of classic European butter biscuits, which have graced tea tables and dessert platters for centuries, these cookies elevate a beloved staple with their distinctive, captivating design. People simply adore these Butter Swirl Cookies not only for their stunning appearance, which instantly makes any occasion feel more special, but primarily for their unparalleled melt-in-your-mouth texture and deeply satisfying, buttery sweetness. They strike the perfect balance between indulgence and delicate sophistication, making them a consistent crowd-pleaser and a staple in my own baking repertoire. They are surprisingly straightforward to prepare, yielding results that look professionally crafted, making them perfect for both seasoned bakers and eager beginners alike.
I am absolutely thrilled to share with you a recipe that I’ve perfected over time, ensuring every batch delivers that iconic flavor and beautiful swirl. Get ready to impress your family and friends with these exquisite cookies!
I’m absolutely thrilled to guide you through creating these enchanting butter swirl cookies! The magic of these cookies lies in their beautiful contrasting swirls and that delightful melt-in-your-mouth buttery texture. Trust me, they’re as fun to make as they are to eat, and they always impress. Let’s gather our ingredients and get baking!
Here’s everything you’ll need to make these stunning Butter Swirl Cookies. I’ve ensured every ingredient is carefully measured to give you the perfect balance of flavor and texture:
Ingredients:
- Unsalted Butter: 1 cup (226g or 2 sticks), softened to true room temperature. This is absolutely crucial for achieving that light, fluffy “butter mixture” base.
- Granulated Sugar: 3/4 cup (150g). This provides the perfect level of sweetness without overwhelming the delicate butter flavor.
- Large Egg: 1, also at room temperature. A room temperature egg emulsifies better with the butter and sugar, leading to a smoother dough.
- Pure Vanilla Extract: 1 teaspoon. Don’t skimp on good quality vanilla – it makes all the difference in enhancing the overall flavor profile of our cookies.
- Fine Sea Salt: 1/2 teaspoon. A little salt goes a long way in balancing the sweetness and bringing out the rich buttery notes.
- All-purpose flour: 2 1/4 cups (270g) total. This will be divided to create our two distinct doughs:
- For the white dough, you will stir in 1 1/4 cup all-purpose flour.
- For the chocolate dough, you will mix in 1 cup all-purpose flour.
- Unsweetened Cocoa Powder: 1/4 cup (20g). This specific quantity is for the chocolate dough. For a more pronounced chocolate flavor, I highly recommend you use dark cocoa powder. It really makes the chocolate swirl pop!
Now that we have all our wonderful ingredients ready, let’s dive into the step-by-step process of transforming them into these irresistible Butter Swirl Cookies. I promise to walk you through each stage with plenty of detail, ensuring your baking journey is both successful and enjoyable!
Preparing the Master Butter Mixture
- Preheat Your Oven and Prep Baking Sheets: Before we even think about mixing, I always get my oven ready. Preheat your oven to 350°F (175°C). Line two large baking sheets with parchment paper or silicone baking mats. This crucial step prevents sticking and ensures your beautiful cookies lift off easily without breaking. Having them ready means you won’t be scrambling later!
- Cream the Butter to Perfection: In a large mixing bowl, preferably using a stand mixer fitted with the paddle attachment, or with a hand mixer, beat the softened unsalted butter on medium speed for about 2-3 minutes. I’m looking for it to become wonderfully light in color and incredibly fluffy. This isn’t just about mixing; it’s about incorporating air into the butter, which is absolutely fundamental for achieving a tender, melt-in-your-mouth cookie texture. This step sets the stage for everything else, so don’t rush it!
- Introduce the Sugar Gradually: With the mixer still running on medium speed, slowly add the granulated sugar to the creamed butter, a little at a time. Once all the sugar is added, continue beating for another 3-5 minutes. You’ll notice the mixture becoming even paler, fluffier, and truly aerated, almost resembling whipped cream. This prolonged creaming dissolves the sugar crystals into the butter, leading to a smoother texture and preventing a grainy feel in the finished cookies. I find this stage incredibly satisfying as I watch the mixture transform!
- Incorporate the Egg and Vanilla: Now it’s time for our liquid elements. Crack in the large egg, beating until it is just combined into the butter and sugar mixture. I’m careful not to overmix at this point, as over-developing the gluten can lead to a tougher cookie, and we’re aiming for tender! Once the egg is incorporated, stir in the pure vanilla extract. Beat briefly, just until the vanilla is evenly distributed, ensuring that classic, inviting buttery aroma permeates our base mixture. This combination forms our foundational “butter mixture” before any flour is introduced.
- Add the Salt: Stir in the 1/2 teaspoon of fine sea salt. This tiny addition is a flavor powerhouse, enhancing the sweetness and bringing out the deep, rich buttery notes that we all adore in a good cookie. Ensure it’s fully blended into the butter mixture.
Creating the Distinct Doughs: White and Chocolate
- Divide the Butter Mixture: This is a pivotal step for our swirl effect. Very carefully, divide the prepared butter mixture into two equal parts. I often use a kitchen scale to ensure accuracy here, as equal parts lead to beautifully balanced swirls. Place each half into a separate medium-sized mixing bowl.
- Prepare the White Dough: To the first bowl, which will become our delightful white dough, stir in 1 1/4 cup of all-purpose flour. I usually add the flour gradually, mixing on low speed with a hand mixer or using a sturdy spatula, until it is just combined. The key here is to mix until no streaks of dry flour remain, but absolutely avoid overmixing. Overmixing flour develops gluten, making cookies tough, and we want these cookies to be wonderfully tender and delicate. The dough should be soft but pliable.
- Prepare the Chocolate Dough: Now for the chocolate half! To the second bowl, you will mix in 1 cup of all-purpose flour and 1/4 cup of unsweetened cocoa powder. As I mentioned in the ingredients, for a more pronounced chocolate flavor, I truly recommend using dark cocoa powder here; it gives a richer color and a deeper chocolate note that contrasts beautifully with the white dough. Again, mix until just combined, ensuring the cocoa powder and flour are evenly incorporated into the butter mixture without overworking the dough. This chocolate dough will have a lovely deep brown hue and a slightly different, denser texture compared to the white dough due to the cocoa powder.
- Chill Both Doughs: This step is non-negotiable for perfectly shaped swirl cookies! Cover each bowl with plastic wrap and refrigerate both the white and chocolate doughs for at least 1 to 2 hours. I sometimes even chill them overnight if I’m planning ahead. Chilling the dough firms up the butter, making the dough much easier to handle and roll without sticking, and it also helps prevent the cookies from spreading too much in the oven, ensuring those beautiful swirl patterns hold their shape. It also allows the flavors to meld beautifully.
Assembling the Swirls
- Prepare Your Work Surface for Rolling: Lightly flour a clean work surface. You’ll want to have extra flour nearby, but use it sparingly to avoid toughening the dough. Also, have a rolling pin ready.
- Roll Out the White Dough: Take the chilled white dough from the refrigerator. On your lightly floured surface, roll it out into a rectangle, approximately 12×9 inches (about 30×23 cm) and about 1/8 to 1/4 inch (3-6 mm) thick. I aim for even thickness across the entire rectangle – this is vital for consistent baking and an appealing swirl. If the dough starts to stick, lightly flour your rolling pin and the top of the dough. Take your time; a neat rectangle makes for a neat swirl.
- Roll Out the Chocolate Dough: Repeat the exact same process with the chilled chocolate dough. Roll it out into a rectangle of the same dimensions: 12×9 inches and 1/8 to 1/4 inch thick. Ensuring both doughs are of similar thickness and size is key for achieving those perfectly defined, even swirls. If either dough becomes too soft or sticky, don’t hesitate to pop it back into the fridge for 10-15 minutes to firm up.
- Layer the Doughs: This is where the magic truly begins! Carefully transfer the chocolate dough rectangle on top of the white dough rectangle. I find it easiest to roll one dough onto my rolling pin and then unroll it over the other. Gently press the two layers together with your hands, making sure there are no air bubbles trapped between them. You can also lightly roll over the combined layers with your rolling pin once or twice to ensure they adhere well, but be careful not to stretch them too much.
- Create the Swirl Log: Starting from one of the long edges (the 12-inch side), carefully and tightly roll the layered dough into a log. You want this log to be as snug as possible to prevent any gaps in your swirls. As you roll, gently press down to ensure the layers remain fused. Once rolled, you should have a beautiful striped log about 12 inches long.
- Chill the Dough Log Again: Wrap the dough log tightly in plastic wrap. I then place it back in the refrigerator for at least 30 minutes to 1 hour. This re-chilling step firms up the entire log, making it much easier to slice neatly without squishing or distorting the lovely swirl pattern. A firm log is a happy log, and it leads to picture-perfect cookies! If you plan to bake later, this log can be kept in the fridge for up to 3 days, or even frozen for longer storage.
Baking and Cooling Your Masterpiece
- Slice the Cookies: Once the dough log is thoroughly chilled and firm, unwrap it. Using a very sharp knife, slice the log into rounds about 1/4 inch (6 mm) thick. I like to make sure my slices are even; this ensures they bake uniformly. If the log starts to soften as you slice, pop it back into the fridge for a few minutes. You should get approximately 36-40 cookies from one log, depending on the thickness of your slices.
- Arrange on Baking Sheets: Place the sliced cookies onto your prepared baking sheets, leaving about 1 inch (2.5 cm) of space between each cookie. While these cookies don’t spread excessively, giving them a little room helps them bake evenly and prevents them from melding together.
- Bake to Golden Perfection: Bake the cookies in your preheated oven for 10-12 minutes. The exact time can vary depending on your oven, so I recommend keeping an eye on them. The cookies should be lightly golden brown around the edges but still appear slightly soft in the center when you remove them from the oven. Don’t be tempted to overbake them, as they will firm up considerably as they cool. Overbaking can lead to a dry, crumbly cookie, and we’re aiming for tender! I like to rotate my baking sheets halfway through the baking time to ensure even browning.
- Cool on Baking Sheets: Once out of the oven, let the cookies cool on the baking sheets for about 5 minutes. They are quite delicate when hot, and this brief cooling period allows them to set up and become sturdier. This prevents them from breaking when you move them.
- Transfer to a Wire Rack: After 5 minutes, carefully transfer the cookies to a wire rack to cool completely. Cooling on a wire rack ensures air circulation all around the cookie, preventing any sogginess and resulting in that desirable crisp-tender texture. I usually resist the urge to eat them warm, though it’s incredibly difficult!
- Serve and Enjoy: Once completely cooled, your beautiful Butter Swirl Cookies are ready to be served! They are wonderful with a cup of tea or coffee, or simply enjoyed on their own as a delightful treat. I find them absolutely irresistible, and I’m sure you will too.
Tips for Success and Storage
To ensure your Butter Swirl Cookies are nothing short of spectacular, I have a few extra tips for you:
- Precision is Key: Baking, especially with detailed shapes like these, benefits greatly from precise measurements. I always use a kitchen scale for flour and cocoa powder for the best results.
- Don’t Skip the Chilling: I cannot stress enough how important chilling the dough is. It firms up the butter, prevents spreading, and makes the dough much easier to work with, leading to those perfectly defined swirls.
- Even Thickness: When rolling out the doughs, aim for as even a thickness as possible. This ensures both doughs bake at the same rate and gives you a consistent, appealing swirl pattern throughout each cookie.
- Sharp Knife for Slicing: Using a very sharp knife will give you clean, crisp slices without dragging or distorting the dough log. You can also slightly chill your knife beforehand for even cleaner cuts.
- Experiment with Flavors: While I’ve given you a classic vanilla and chocolate swirl, don’t be afraid to experiment! You could use a little almond extract in the white dough, or add a hint of orange zest to the chocolate for a chocolate-orange swirl.
Storage: These cookies keep wonderfully! Once completely cooled, store your butter swirl cookies in an airtight container at room temperature for up to 5-7 days. If you’ve made a large batch, the dough logs can also be frozen for up to 3 months. Simply wrap them tightly in plastic wrap, then foil, and thaw in the refrigerator overnight before slicing and baking as usual. This makes for a fantastic “bake-when-you-want” option!
I genuinely hope you enjoy making and sharing these beautiful Butter Swirl Cookies as much as I do. They’re a true testament to the simple joy of home baking, offering both visual charm and exquisite flavor in every bite!
Conclusion:
As we reach the sweet end of our culinary journey, I hope you’re as excited as I am about bringing these incredible Butter Swirl Cookies to life in your own kitchen. There’s something truly magical about a recipe that looks complex but is surprisingly straightforward, and these cookies are the epitome of that delightful deception. They are, without a doubt, a must-try for any baking enthusiast, from novice to seasoned pro. Imagine biting into a cookie that’s exquisitely tender, with a melt-in-your-mouth quality that speaks volumes of its rich, buttery foundation. The delicate crispness on the edges gives way to a soft, yielding interior, each bite a perfect symphony of texture and pure, unadulterated butter flavor. It’s not just a cookie; it’s an experience – a moment of pure bliss that can brighten any day.
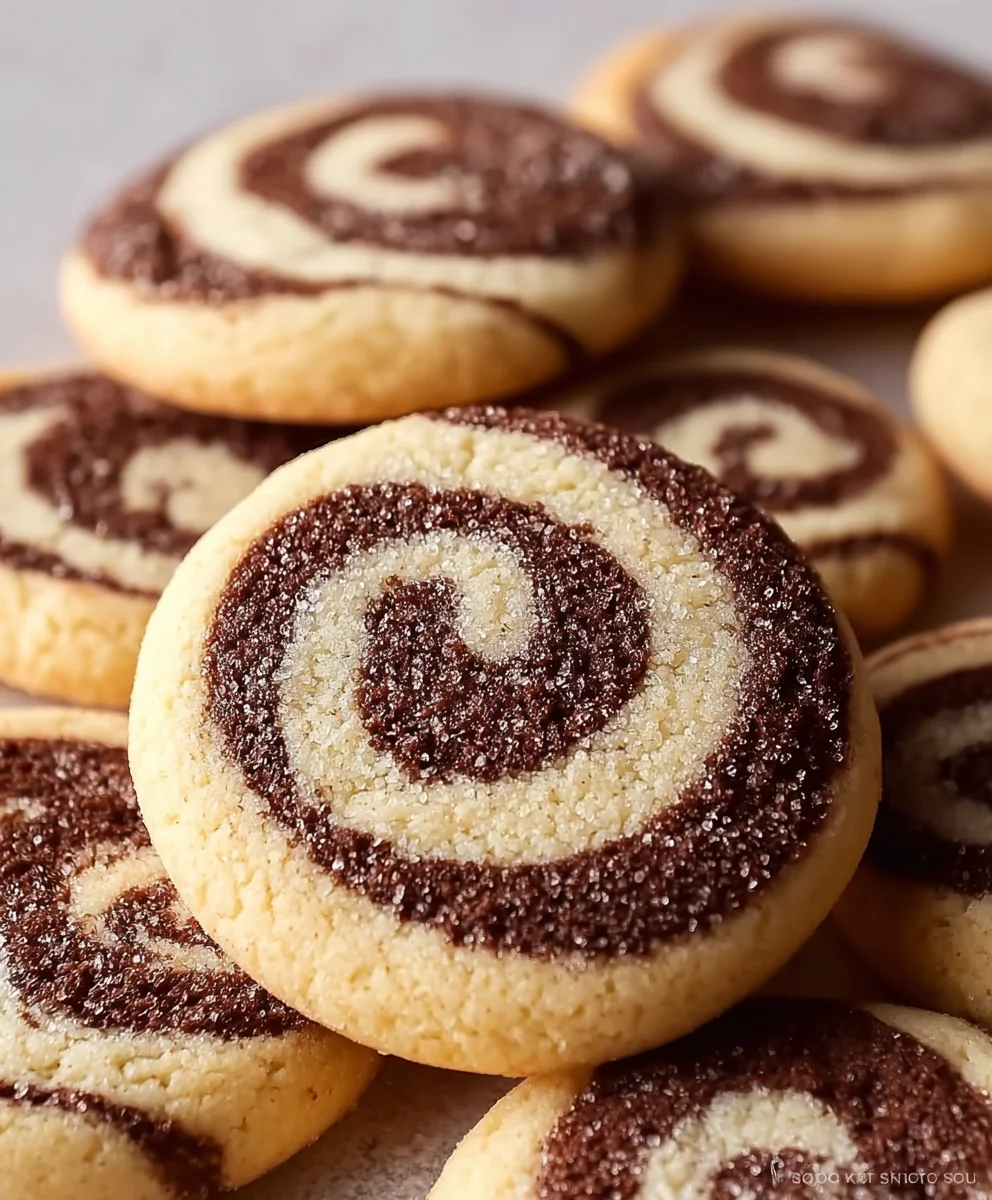
What truly sets these Butter Swirl Cookies apart is not only their irresistible taste but also their stunning visual appeal. That signature swirl isn’t just for show; it hints at the care and love that went into crafting them, making them perfect for gifting, impressing guests, or simply elevating your own afternoon tea. They embody comfort and elegance in equal measure. I find myself reaching for them whether I need a pick-me-up on a dreary afternoon or a beautiful treat to share with friends during a celebratory gathering. They’re versatile stars, perfect alongside a robust cup of coffee, a comforting mug of hot chocolate, or a delicate herbal tea. Think of them as the perfect companion to your quiet moments of indulgence or the sparkling centerpieces of your dessert platters.
But let’s talk about the endless possibilities for personalization! While the classic version is truly perfection, these Butter Swirl Cookies are wonderfully adaptable. For a refreshing twist, try adding a hint of lemon or orange zest to the plain dough, or even incorporate a touch of almond extract for a more sophisticated flavor profile. If you’re a chocolate lover, a drizzle of melted dark or white chocolate over the cooled cookies adds another layer of decadence. For festive occasions, consider tinting one half of the dough with food coloring – red and green for Christmas, pastels for Easter, or even vibrant colors for a birthday party – to make your swirls pop with seasonal cheer. You could even roll the edges of the formed dough logs in sprinkles or finely chopped nuts before chilling for an added textural crunch and visual flourish. Don’t be afraid to experiment! A sprinkle of flaky sea salt on top of the plain cookies can also beautifully enhance the buttery notes, creating a delightful sweet-and-salty sensation that is utterly addictive.
My biggest encouragement to you now is to clear your schedule, gather your ingredients, and immerse yourself in the delightful process of baking these exquisite cookies. Trust me, the aroma that will fill your kitchen as they bake is a reward in itself, a promise of the deliciousness to come. There’s an undeniable satisfaction in seeing those beautiful swirls emerge from the oven, golden and fragrant. These aren’t just any cookies; they are an invitation to create, to share, and to savor. Once you’ve had a taste, you’ll understand why I can’t stop raving about them! Please, don’t keep your masterpieces to yourself. I would absolutely love to see your creations! Snap a photo, share your baking journey, and tell me all about your experience. Tag me on social media or drop a comment below. Let’s build a community of happy bakers, all reveling in the simple, profound joy of perfectly baked Butter Swirl Cookies. Happy baking!
FAQs about Butter Swirl Cookies
We know you might have some questions as you embark on your baking adventure. Here are some answers to common queries about these delightful cookies:
1. How do I get a perfect swirl in my Butter Swirl Cookies?
Achieving that beautiful, defined swirl comes down to a few key techniques. First, ensure your doughs (the plain and the flavored/colored one) are of a similar consistency and chill them sufficiently before rolling. This makes them easier to handle and prevents them from melding together too much. When rolling out the dough, aim for an even thickness. When layering the doughs, gently press them together to remove any air pockets, then roll them up tightly but without excessive pressure. A tight roll is key to a distinct swirl. Finally, make sure to chill the rolled dough log thoroughly (at least 2-3 hours, or even overnight) before slicing. This firms up the butter and prevents the dough from squishing when you cut it, resulting in clean, precise swirls.
2. Can I make the Butter Swirl Cookie dough ahead of time?
Absolutely! This recipe is fantastic for make-ahead convenience. You can prepare the doughs, roll them into logs, and then wrap them tightly in plastic wrap. The dough logs can be refrigerated for up to 3-4 days. This is perfect for party prep or if you want fresh-baked cookies on demand throughout the week. When you’re ready to bake, simply slice the chilled dough and bake as directed. You can also freeze the dough logs for up to 2-3 months. When baking from frozen, you might need to add a few extra minutes to the baking time, or let them sit at room temperature for about 10-15 minutes before slicing.
3. How should I store Butter Swirl Cookies to keep them fresh?
Once your Butter Swirl Cookies have completely cooled, store them in an airtight container at room temperature. They will remain wonderfully fresh and delicious for about 5-7 days. To maintain their delicate texture, avoid storing them in the refrigerator, as this can dry them out and affect their crispness. If you want to keep them longer, cooled cookies can be frozen in an airtight container or freezer bag for up to 1-2 months. Thaw them at room temperature when you’re ready to enjoy, and they’ll taste almost as good as freshly baked!
4. What if my cookies spread too much while baking?
Several factors can cause cookies to spread more than desired. Make sure your butter isn’t too soft or melted when you start; it should be softened but still cool to the touch. Also, ensure your oven temperature is accurate – a too-low oven can cause cookies to spread before setting. Chilling the sliced cookies on the baking sheet for 10-15 minutes before baking can also significantly help prevent excessive spreading. If you find your cookies consistently spread, try adding a tablespoon or two more flour to the dough next time, but be careful not to overdo it, as this can make the cookies tough.
5. Can I use different flavors or colors for the swirl?
Definitely! The beauty of these Butter Swirl Cookies lies in their versatility. Beyond cocoa powder for a chocolate swirl, you can incorporate other flavors and colors. For instance, a small amount of freeze-dried raspberry powder can create a beautiful pink swirl with a fruity tang. A touch of matcha powder will yield a vibrant green and earthy flavor. Food gels are excellent for adding intense colors without affecting the dough’s consistency too much. Just make sure to incorporate any additions thoroughly into one portion of the dough before rolling to ensure an even distribution of flavor and color.
Butter Swirl Cookies: Easy, Delicious & Perfect for Any Occasion!
Create beautiful, melt-in-your-mouth butter swirl cookies with contrasting vanilla and chocolate doughs. This recipe yields a tender, buttery treat that’s perfect for any occasion and always impresses.
Ingredients
-
1 cup (226g) unsalted butter, softened
-
3/4 cup (150g) granulated sugar
-
1 large egg, room temperature
-
1 teaspoon pure vanilla extract
-
1/2 teaspoon fine sea salt
-
2 1/4 cups (270g) all-purpose flour, divided
-
1/4 cup (20g) unsweetened cocoa powder (dark recommended for chocolate dough)
Instructions
-
Step 1
Preheat oven to 350°F (175°C). Line two large baking sheets with parchment paper or silicone mats. -
Step 2
In a large bowl, beat softened butter for 2-3 minutes until light and fluffy. Gradually add sugar, beating for another 3-5 minutes until pale and aerated. -
Step 3
Beat in the egg until just combined. Stir in vanilla extract, then salt, ensuring all are evenly distributed into the butter mixture. -
Step 4
Carefully divide the butter mixture into two equal parts, placing each into a separate medium-sized bowl. -
Step 5
To the first bowl, stir in 1 1/4 cups all-purpose flour until just combined, avoiding overmixing. -
Step 6
To the second bowl, mix in 1 cup all-purpose flour and 1/4 cup unsweetened cocoa powder (dark recommended) until just combined. -
Step 7
Cover both bowls with plastic wrap and refrigerate for at least 1-2 hours, or overnight. -
Step 8
On a lightly floured surface, roll out the chilled white dough into a 12×9-inch (30×23 cm) rectangle, 1/8 to 1/4 inch thick. Repeat with the chocolate dough to the same dimensions. Carefully transfer and layer the chocolate dough on top of the white dough, gently pressing them together. -
Step 9
Starting from a long edge, tightly roll the layered dough into a 12-inch log. Wrap tightly in plastic wrap and refrigerate for at least 30 minutes to 1 hour to firm up. -
Step 10
Once firm, unwrap the log and use a sharp knife to slice it into 1/4-inch (6 mm) thick rounds. Place sliced cookies 1 inch apart on prepared baking sheets. -
Step 11
Bake for 10-12 minutes, or until edges are lightly golden and centers are slightly soft. Rotate sheets halfway through for even baking. -
Step 12
Let cookies cool on baking sheets for 5 minutes, then transfer to a wire rack to cool completely. Serve and enjoy!
Important Information
Nutrition Facts (Per Serving)
It is important to consider this information as approximate and not to use it as definitive health advice.
Allergy Information
Please check ingredients for potential allergens and consult a health professional if in doubt.

Leave a Comment