
Stuffed Brie Cheese Pizza – just hearing those words evokes a sense of culinary adventure, doesn’t it? Today, I’m thrilled to introduce you to a recipe that transcends the ordinary, transforming a beloved classic into something truly extraordinary. Imagine a golden, crispy pizza crust, not just topped, but generously stuffed with the creamy, melt-in-your-mouth luxury of Brie cheese, perfectly complemented by your favorite savory toppings. While pizza’s humble beginnings lie in Naples and Brie hails from the French countryside, this particular creation is a testament to modern culinary innovation, blending the best of both worlds into a decadent symphony of flavors.
I find that people absolutely adore this dish because it takes the familiar comfort of pizza and elevates it with an unexpected, gourmet twist. The way the rich, buttery Brie melts into a gooey, irresistible core beneath a beautifully baked crust is simply divine, offering a textural contrast that is both surprising and utterly satisfying. This Stuffed Brie Cheese Pizza isn’t just another meal; it’s an experience, a conversation starter, and an absolute showstopper for any gathering. Whether you’re a seasoned chef or a home cook looking to impress, mastering this incredible Stuffed Brie Cheese Pizza will undoubtedly earn you rave reviews. Get ready to embark on a delightful journey where tradition meets indulgence in the most delicious way possible.
Ingredients:
- Pizza Dough: 1 pound (approximately 450g), store-bought or your favorite homemade recipe, enough for two 10-12 inch pizzas or one large stuffed pizza. I always recommend letting it come to room temperature for at least 30-60 minutes before you start working with it, as it becomes much more pliable and easier to stretch.
- Brie Cheese: 1 (8-10 ounce / 225-280g) wheel or wedge, rind on. For this recipe, I find keeping the rind on helps maintain the shape of the Brie as it melts, creating that incredible internal pocket of gooey cheese. Chilling it before use is a pro tip to make handling easier.
- Creates that perfect Instagram-worthy cheese pull (especially when melted and gloriously gooey from within!)
- Low-Moisture Part-Skim Mozzarella Cheese: 1.5 cups (about 6 ounces / 170g), shredded. This variety of mozzarella is fantastic for pizzas because it melts beautifully without releasing too much water, ensuring a crisp crust and that classic pizza stretch.
- Marinara or Pizza Sauce: 1/2 cup (about 120ml) of your favorite high-quality brand. I usually opt for a sauce with a bright, robust tomato flavor that isn’t overly sweet, letting the cheese and other toppings shine.
- Garlic: 2-3 cloves, freshly minced. Fresh garlic really makes a difference here, infusing the pizza with a subtle aromatic warmth that complements the richness of the Brie.
- Extra Virgin Olive Oil: 2 tablespoons, plus an additional drizzle for brushing the crust and finishing. A good quality olive oil enhances flavor and helps achieve that beautiful golden-brown crust.
- Fresh Basil Leaves: 1/4 cup, roughly chopped, plus a few small whole leaves for garnish. The vibrant, peppery sweetness of fresh basil is a classic pairing with tomatoes and cheese, and it adds a pop of color too.
- Prosciutto: 2 ounces (about 55g), thinly sliced (optional, but highly recommended!). The salty, savory notes of prosciutto provide a wonderful contrast to the creamy Brie and sweet basil. If you’re vegetarian, simply omit this!
- Red Pepper Flakes: 1/2 teaspoon (optional, for a little kick). If you love a touch of heat, these add a lovely warmth that cuts through the richness of the cheese. Adjust to your personal spice preference!
- All-Purpose Flour: A generous amount for dusting your work surface. Essential for preventing the dough from sticking.
- Cornmeal or Semolina: A few tablespoons for dusting your pizza peel or baking sheet. This acts like little ball bearings, making it incredibly easy to slide your pizza into the oven and contributing to a wonderfully crisp bottom crust.
Gathering Your Culinary Arsenal and Prepping for Success
Before we dive into the fun part of assembling our Stuffed Brie Cheese Pizza, it’s absolutely crucial to set ourselves up for success. Think of it as mise en place for a pizza masterpiece! My first step, and honestly, one of the most important for achieving that perfectly crispy crust, is to preheat my oven. I’ll crank it up to a scorching 500-525°F (260-275°C), placing my pizza stone or steel on the middle rack while the oven comes to temperature. Giving your stone or steel ample time to heat thoroughly – usually at least 45 minutes to an hour after reaching the set temperature – is key. This super-hot surface delivers an immediate blast of heat to the dough, simulating a professional pizza oven and resulting in an irresistibly crisp bottom crust that we all crave. Trust me, patience here truly pays off!
While the oven is doing its thing, I turn my attention to preparing my workstation and ingredients. I generously dust a clean, dry surface with all-purpose flour. This will be where we handle our delicate pizza dough, and enough flour is essential to prevent sticking. I also make sure my pizza peel (or a rimless baking sheet, if you don’t have a peel) is ready and dusted liberally with cornmeal or semolina. This creates a non-stick surface that allows the pizza to effortlessly glide off the peel and onto the hot stone in the oven. It’s a small step, but it makes a world of difference in preventing pizza tragedies!
Next up, it’s all about getting our individual ingredients in prime condition. I’ll finely mince my garlic cloves; fresh garlic offers such a vibrant aroma and taste compared to pre-minced versions. Then, I’ll roughly chop a good handful of fresh basil leaves, saving a few smaller, prettier ones for a final garnish. If I’m using prosciutto, I’ll separate the thin slices and have them ready. My shredded mozzarella is typically already in a bowl, waiting for its turn. And for our star, the Brie cheese, I ensure it’s been chilled. A cold Brie wheel is much firmer and easier to handle, especially when we get to the stuffing part. If your Brie has been sitting out, pop it in the fridge for 20-30 minutes. This little trick makes slicing and positioning it so much simpler, preventing it from becoming too soft and unwieldy.
Crafting the Brie Core: The Heart of Your Stuffed Pizza
Now that our ingredients are prepped and our oven is roaring hot, it’s time for the really exciting part: creating the core of our Stuffed Brie Cheese Pizza. This is where the magic happens, transforming a regular pizza into an extraordinary, cheese-laden delight. First, let’s talk about the pizza dough. If you’re using store-bought dough, I can’t stress enough how important it is for it to be at room temperature. Cold dough is incredibly elastic and springs back, making it frustrating to work with. Gently unwrap it and let it relax on your floured surface for 30-60 minutes. If you’re using homemade dough, simply bring it out of the fridge a bit earlier. We’re aiming for a dough that feels soft, pliable, and stretches easily without tearing.
For this stuffed pizza, I find it easiest to work with two relatively thin circles of dough. You can either divide your 1-pound dough ball in half, or if you prefer a thicker crust, use one whole ball and work it into two circles of different sizes. I typically roll out one half of the dough into a circle about 10-12 inches in diameter. This will be our bottom layer. Then, I’ll roll out the second half into a slightly smaller circle, perhaps 9-11 inches, which will become our top layer. The key here is not to make the dough too thick, otherwise, the overall pizza can feel a bit heavy. We want enough dough to encase the Brie securely but still have that satisfying chew without being bready.
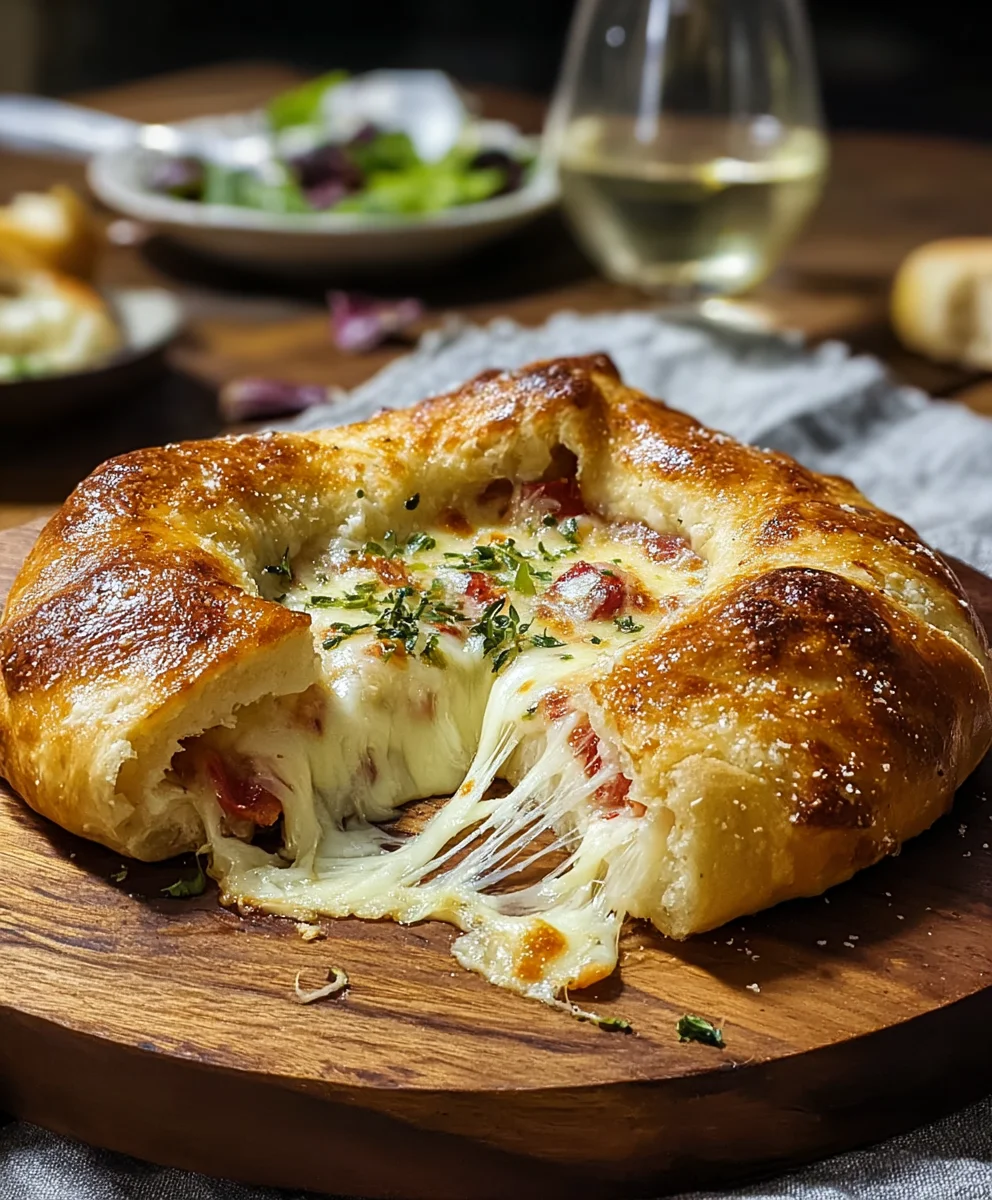
Once my first dough circle is ready, I carefully place it on a sheet of parchment paper that’s resting on my pizza peel or baking sheet. This parchment paper is a game-changer; it makes transferring the assembled pizza into the hot oven virtually stress-free. Now for our Brie! I take my chilled Brie wheel and place it right in the center of the bottom dough circle. I typically leave the rind on, as it helps the cheese hold its shape during the initial melt, creating that magnificent molten core. If you absolutely despise the rind, you can carefully trim it off, but be prepared for a slightly messier (though equally delicious) internal filling. Positioning it centrally is important, giving us enough space around the edges to seal the dough effectively.
With the Brie nestled comfortably, I then carefully drape the second, slightly smaller dough circle over the Brie and the bottom dough layer. My goal is to completely cover the Brie, creating a little doughy dome. Now comes the crucial step: sealing the edges. Starting from the Brie and working my way outwards, I gently press the edges of the top dough circle onto the bottom dough circle. I then go around the entire circumference, pinching and pressing firmly to create a secure seal. Think of it like making a giant pierogi or empanada. You want to ensure there are no gaps where the glorious melted Brie could escape during baking. If you like, you can even crimp the edges with a fork or twist them artfully to create a decorative, rustic border. A tight seal is your best friend here, guaranteeing that amazing “cheese pull” moment we’re all looking forward to.
Building Your Masterpiece: The Stuffed Pizza Assembly
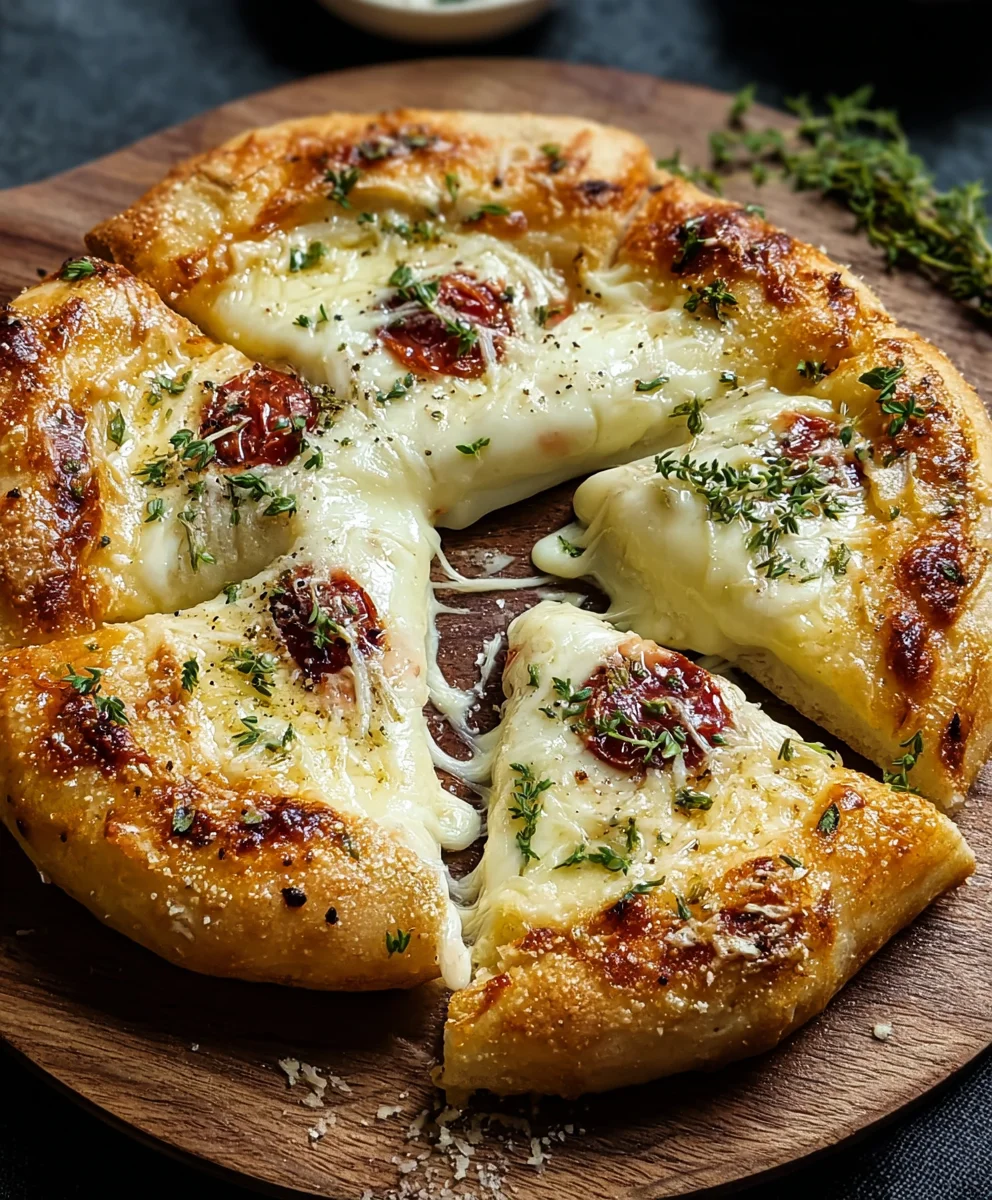
With our Brie securely encased within its doughy fortress, we’re now ready to adorn the outside of our stuffed pizza. This is where we layer on those classic pizza flavors that complement our creamy, dreamy Brie core. The first thing I do is gently dimple the top surface of the dough with my fingertips. This helps create little pockets for our sauce and toppings to settle into, preventing them from sliding off. I then take my half-cup of marinara or pizza sauce and, rather than spreading it directly over the Brie dome, I focus on spreading it around the perimeter of the stuffed Brie. We want the top of the Brie to get directly exposed to the oven’s heat through the thin dough, allowing it to bubble up beautifully, while the sauce provides a lovely tangy base for the rest of our toppings. I ensure the sauce is spread evenly, leaving about an inch clear around the very edge for a nice, golden crust.
Next, it’s time for our shredded low-moisture part-skim mozzarella cheese. I generously sprinkle about half of the mozzarella over the sauced areas, creating that initial layer of classic pizza goodness. This mozzarella will melt into an irresistible blanket, binding our other toppings together and adding another dimension of stretch and creaminess. After the initial mozzarella, I’ll sprinkle my minced garlic evenly over the sauced areas. The garlic will soften and become fragrant as it bakes, imparting a wonderful aroma and savory depth that pairs so well with the rich cheeses.
If you’re opting for prosciutto (and I highly recommend you do for that salty counterpoint!), I’ll artfully tear and scatter the thin slices over the pizza. Don’t worry too much about perfect placement; a rustic look is part of the charm. The prosciutto will crisp up slightly in the oven, adding a fantastic texture and a burst of savory flavor. After the prosciutto, I’ll sprinkle the roughly chopped fresh basil leaves. Their vibrant, peppery notes will infuse the entire pizza as it bakes. Finally, if you enjoy a bit of warmth, now is the time to scatter your red pepper flakes over the top. A little goes a long way to add that subtle kick that cuts through the richness of the Brie.
To finish our topping assembly, I evenly sprinkle the remaining mozzarella cheese over everything. This top layer of mozzarella acts as a protective shield, helping the other toppings melt gracefully and creating that iconic golden-brown, bubbly finish. Before the grand transfer to the oven, I like to brush a little extra virgin olive oil around the exposed dough crust. This helps it achieve that beautiful golden hue and adds to the overall flavor. Take a moment to admire your handiwork! You’ve just created a truly impressive pizza, ready for its fiery transformation.
Baking Your Stuffed Brie Cheese Pizza to Golden Perfection
This is it – the moment of truth! With our Stuffed Brie Cheese Pizza fully assembled and our oven screaming hot, it’s time to send it in for its glorious bake. If you’re using a pizza peel and stone, this step requires a little confidence and a smooth motion. I always ensure my peel is well-dusted with cornmeal, and then, holding the peel at a slight angle, I give it a gentle shake to make sure the pizza isn’t sticking. Once I feel confident it will slide, I quickly and deliberately transfer the pizza, still on its parchment paper, from the peel directly onto the scorching hot pizza stone or steel in the oven. The goal is to get it onto that hot surface as quickly as possible to prevent heat loss and ensure that immediate crust crisping. If you’re using a baking sheet, you can simply slide the parchment paper with the pizza onto the preheated sheet. Always exercise caution when reaching into a hot oven!
Once inside, I immediately shut the oven door to trap that precious heat. We’ll be baking our Stuffed Brie Cheese Pizza for approximately 12-18 minutes, but remember, every oven is a little different, so it’s important to watch your pizza, not just the clock. What I’m looking for are a few key indicators of perfection. The crust should be beautifully golden brown and puffed up, with some lovely charred spots here and there – that’s flavor development right there! The mozzarella on top should be thoroughly melted, bubbly, and possibly starting to turn golden in places. And most importantly, I’m listening and looking for signs that our internal Brie core is doing its job: bubbling, melting, and becoming wonderfully gooey. Around the halfway mark, I usually like to rotate the pizza 180 degrees. This helps ensure even baking, as most ovens have hot spots.
As the baking time progresses, I might even gently lift a corner of the pizza with my peel to peek at the bottom crust. We want it to be golden brown and crisp, not pale or soggy. If your pizza seems to be browning too quickly on top but the bottom isn’t quite there, you can sometimes carefully slide it to a lower rack for the last few minutes, or vice versa if the bottom is done but the top needs more color. The beauty of the parchment paper is that you can often carefully pull the pizza out a little to check without disturbing its structure. The final sign that it’s ready is often when the very center, where our Brie is hiding, starts to gently puff up, indicating the cheese within is fully melted and ready to erupt with that incredible cheese pull. Once you’re satisfied with its golden, bubbly appearance and crisp crust, it’s time to retrieve your masterpiece from the oven.
The Grand Finale: Finishing Touches and Savoring Every Bite
Congratulations, you’ve just baked an absolutely stunning Stuffed Brie Cheese Pizza! The aromas filling your kitchen right now are probably intoxicating, but I urge you to resist the immediate urge to slice and serve. Like a perfectly cooked steak, pizza benefits immensely from a brief resting period. I carefully slide the pizza, still on its parchment paper, onto a cooling rack or a large cutting board. I then let it rest for at least 5-7 minutes. This short rest allows the molten cheese inside to set up just enough, preventing it from completely spilling out when you make that first cut, while also letting the internal temperatures equalize. More importantly, it helps the crust maintain its crispness and prevents it from becoming soggy.
While our magnificent pizza rests, this is my favorite time to add those delightful finishing touches that elevate the dish from great to truly unforgettable. I love to scatter a few fresh, whole basil leaves over the top. The residual heat from the pizza will gently warm them, releasing their sweet, peppery perfume and adding a vibrant pop of color. Sometimes, I’ll even tear a few more basil leaves and sprinkle them for extra herbaceous goodness. A final, generous drizzle of high-quality extra virgin olive oil over the entire pizza is also a must for me. It adds a wonderful sheen, enriches the flavor, and contributes to that artisanal look.
Now, for the moment we’ve all been waiting for: slicing into that beauty! I use a sharp pizza cutter, starting from the center and working my way outwards. Be prepared for a glorious spectacle as you cut through the dough and into the melted Brie core. If you’ve sealed your pizza well, you should be greeted with an incredible rush of creamy, gooey Brie, ready to stretch and pull. This is the “Creates that perfect Instagram-worthy cheese pull” moment in full effect! Take a moment to appreciate it – it’s truly a sight to behold.
Serve your Stuffed Brie Cheese Pizza immediately, while it’s still gloriously hot and the cheese is at its most molten. This pizza is a hearty dish on its own, but I often pair it with a light, peppery arugula salad dressed simply with lemon juice and olive oil. The freshness and slight bitterness of the arugula provide a perfect counterpoint to the richness of the Brie. A glass of crisp white wine, like a Sauvignon Blanc, or a light-bodied red, such as a Pinot Noir, would also complement the flavors wonderfully. Enjoy every single indulgent bite of your homemade, show-stopping Stuffed Brie Cheese Pizza. It’s a culinary experience you won’t soon forget, and one that’s sure to impress anyone lucky enough to share it with you!
Conclusion:
And there you have it, my friends! We’ve reached the grand finale of what I truly believe will become a staple in your culinary repertoire: the magnificent Stuffed Brie Cheese Pizza. I’ve walked you through every step, every secret, and now it’s your turn to bring this masterpiece to life in your own kitchen. This isn’t just another pizza recipe; it’s an invitation to elevate your weeknight dinner or your next gathering into something truly special, something that whispers “gourmet” but screams “comfort.”
Why is this recipe an absolute must-try? For starters, it ingeniously marries the irresistible creaminess of melted Brie with a perfectly baked crust and your choice of savory, aromatic fillings. It’s a symphony of textures and flavors that tantalizes the palate in a way traditional pizza simply can’t. The moment you pull this golden-brown delight from the oven, with its crust glistening and the promise of gooey Brie hidden beneath, you’ll understand. The aroma alone is enough to draw everyone to the kitchen, eager for that first decadent bite. It looks incredibly impressive, making it ideal for hosting, but the beauty of it is that it’s surprisingly simple to assemble, proving that you don’t need to be a professional chef to create something truly spectacular.
One of the things I adore most about this particular creation is its incredible versatility. While I’ve guided you through a fantastic combination of fillings, I wholeheartedly encourage you to make this recipe your own. Think of the Stuffed Brie Cheese Pizza as a canvas for your culinary imagination! For a more robust flavor profile, consider adding crispy bits of pancetta or a finely diced, smoky chorizo to your stuffing mix. If you’re leaning towards a vegetarian option, sautéed wild mushrooms with a touch of fresh thyme, or a vibrant mix of roasted red peppers and sun-dried tomatoes, would be absolutely divine. You could even experiment with different herbs – a sprinkle of fresh rosemary or oregano could add a lovely aromatic twist. For a slightly different cheese experience, perhaps a blend of Brie with a hint of camembert or even a creamy goat cheese could be explored, though the star will always be that luscious Brie.
When it comes to serving, this Stuffed Brie Cheese Pizza is incredibly adaptable. It makes for a show-stopping appetizer, especially when cut into smaller wedges, allowing guests to savor its richness without overfilling. Pair it with a crisp, peppery arugula salad dressed simply with lemon and olive oil to cut through the richness, or a light green salad with a balsamic vinaigrette. As a main course, it’s hearty enough on its own, but a glass of a dry Rosé, a light-bodied Pinot Noir, or even a crisp hard cider would complement its flavors beautifully. Don’t forget to serve it warm to enjoy that signature Brie ooze!
Now, it’s over to you. I’ve poured my heart into crafting this recipe, and I genuinely cannot wait for you to experience the sheer joy of biting into your very own Stuffed Brie Cheese Pizza. Please, please, please give this recipe a try. Don’t be shy! Embrace the process, savor the aromas, and relish the delicious outcome. Once you’ve had your first glorious slice, come back and tell me all about it! Share your triumphs, your clever variations, and even your funny kitchen anecdotes in the comments below. Tag me on social media with your photos – I absolutely love seeing your culinary creations come to life. Your feedback and experiences not only brighten my day but also inspire countless other home cooks in our wonderful community. Happy cooking, and may your kitchen be filled with the warmth and wonderful smells of this unforgettable dish!
FAQs about Stuffed Brie Cheese Pizza
What kind of dough is best for Stuffed Brie Cheese Pizza?
I find that a good quality, store-bought pizza dough works wonderfully for its convenience and elasticity, making it easy to encase the Brie. Puff pastry is another excellent option if you’re looking for an extra flaky, buttery crust, lending a more elegant, tart-like feel to your Stuffed Brie Cheese Pizza. If you’re an avid baker, a homemade pizza dough always delivers fantastic flavor and texture, so feel free to use your favorite recipe!
How do I prevent the Brie from leaking out during baking?
The key to keeping that beautiful Brie contained is proper sealing. Make sure you fully encase the Brie wheel within the dough, pinching all seams firmly closed. You can even use a little egg wash along the edges to help them adhere. Don’t overfill the pizza with too many additional stuffing ingredients around the Brie, as this can create pressure points. A small vent hole (or a few small slits) on top of the dough also allows steam to escape, preventing a buildup of pressure that could cause a rupture. And remember, working with a slightly chilled Brie wheel can also help it hold its shape longer before it starts to melt vigorously.
Can I prepare the Stuffed Brie Cheese Pizza ahead of time?
Absolutely! You can assemble the entire Stuffed Brie Cheese Pizza up to a day in advance. Once assembled, cover it loosely with plastic wrap and refrigerate it. When you’re ready to bake, remove it from the fridge and let it sit at room temperature for about 15-20 minutes while your oven preheats. This helps the dough come to temperature and ensures even baking. You might need to add a few extra minutes to the baking time if it goes straight from the fridge to the oven.
What are some alternative filling ideas for the Stuffed Brie Cheese Pizza?
The beauty of this Stuffed Brie Cheese Pizza is its adaptability! Beyond the suggested caramelized onions and prosciutto, you could try:
- Sautéed mushrooms and spinach with a hint of garlic.
- Roasted red peppers and artichoke hearts.
- Sun-dried tomatoes and basil pesto (just a thin layer, not too much liquid).
- Cooked, crumbled Italian sausage with fennel.
- Fig jam or preserves with walnuts for a sweet-savory twist (though this is more of a dessert Brie concept than a traditional pizza).
Just ensure any vegetable fillings are well-drained or sautéed to remove excess moisture, which can make the dough soggy.
How should I reheat leftover Stuffed Brie Cheese Pizza?
For the best results, I recommend reheating slices in an oven or toaster oven at 350°F (175°C) for about 10-15 minutes, or until the cheese is gooey again and the crust is crisp. Avoid the microwave if possible, as it can make the crust soggy and the Brie lose its lovely texture. A hot pan on the stovetop over medium heat with a lid can also work well to crisp up the bottom and melt the cheese through.
Stuffed Brie Cheese Pizza: An Irresistible Gourmet Treat!
An irresistible gourmet pizza featuring a whole Brie cheese wheel stuffed inside the crust, topped with marinara, mozzarella, fresh garlic, basil, and savory beef bresaola. Baked to golden perfection, it promises an amazing cheese pull and a rich, satisfying flavor.
Ingredients
-
1 lb (450g) pizza dough, at room temperature
-
1 (8-10 oz / 225-280g) Brie cheese wheel/wedge, rind on, chilled
-
1.5 cups (6 oz / 170g) shredded low-moisture part-skim mozzarella cheese
-
1/2 cup (120ml) marinara or pizza sauce
-
2-3 cloves fresh garlic, minced
-
2 tbsp extra virgin olive oil, plus extra for drizzling
-
1/4 cup fresh basil leaves, chopped, plus extra for garnish
-
2 oz (55g) thinly sliced beef bresaola (optional)
-
1/2 tsp red pepper flakes (optional)
-
All-purpose flour, for dusting
-
Cornmeal or semolina, for dusting
Instructions
-
Step 1
Preheat oven to 500-525°F (260-275°C) with a pizza stone or steel on the middle rack for at least 45-60 minutes. Generously dust a clean work surface with flour. Dust a pizza peel or rimless baking sheet with cornmeal/semolina. Mince garlic, chop basil (reserving some for garnish), prepare beef bresaola (if using), and ensure Brie is chilled for easier handling. -
Step 2
Divide the room-temperature pizza dough into two pieces. Roll one piece into a 10-12 inch circle for the bottom layer and the second piece into a slightly smaller 9-11 inch circle for the top layer. Place the larger dough circle on parchment paper on your pizza peel. Center the chilled Brie wheel on the bottom dough layer. Drape the smaller dough circle over the Brie. Firmly pinch and press the edges of both dough layers together to create a secure, sealed dome around the Brie, ensuring no gaps. -
Step 3
Gently dimple the top dough surface with fingertips. Spread marinara sauce around the perimeter of the stuffed Brie, leaving an inch clear around the very edge for the crust. Sprinkle half of the shredded mozzarella over the sauced areas, then minced garlic. If using, scatter beef bresaola slices and chopped fresh basil. Add red pepper flakes if desired. Top with the remaining mozzarella cheese. Brush the exposed dough crust with a drizzle of extra virgin olive oil. -
Step 4
Carefully slide the pizza (on parchment paper) from the peel onto the preheated pizza stone/steel in the oven. Bake for 12-18 minutes, rotating 180 degrees halfway through, until the crust is beautifully golden brown and puffed, the mozzarella is bubbly and golden, and the Brie core shows signs of bubbling/melting from within. The bottom crust should be crisp. -
Step 5
Carefully remove the pizza from the oven and slide it onto a cooling rack or large cutting board. Let it rest for at least 5-7 minutes. Garnish with reserved fresh whole basil leaves and a final drizzle of extra virgin olive oil. Slice with a sharp pizza cutter, ensuring you cut through the molten Brie core for that incredible cheese pull. Serve immediately, perhaps with a light arugula salad and a non-alcoholic sparkling beverage.
Important Information
Nutrition Facts (Per Serving)
It is important to consider this information as approximate and not to use it as definitive health advice.
Allergy Information
Please check ingredients for potential allergens and consult a health professional if in doubt.


Leave a Comment